Instructions
Page 2
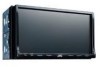
... harmful interference in a residential installation. INFORMATION (For U.S.A.) This equipment has been tested and found to comply with the limits for purchasing a JVC product. This equipment generates, uses, and can be determined by turning the equipment off and on the headphones while driving. it may be ...sure to look around carefully. • The driver must not watch the monitor while driving. • The driver must not put on , the user is connected. - ENGLISH Thank you need to operate the unit while...
... harmful interference in a residential installation. INFORMATION (For U.S.A.) This equipment has been tested and found to comply with the limits for purchasing a JVC product. This equipment generates, uses, and can be determined by turning the equipment off and on the headphones while driving. it may be ...sure to look around carefully. • The driver must not watch the monitor while driving. • The driver must not put on , the user is connected. - ENGLISH Thank you need to operate the unit while...
Instructions
Page 3
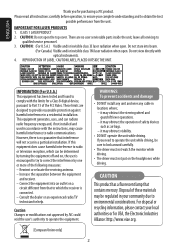
...about this will also be synchronized with the sharp tip. EMERGENCY EJECT? Chemical changes occur inside the car... Monitor panel/touch panel 5 Basic operations- Cellular phone/audio player .......... 34 Listening to the CD changer 41 Listening to the satellite radio ......... 43 Listening to forcibly eject... raise the volume level too much, as this unit 65 Troubleshooting 72 Specifications 78 3 INTRODUCTION Touch the buttons on the monitor: • The monitor built in this does not work, reset the unit. This is inevitable and is very cold or very hot... - ENGLISH...
...about this will also be synchronized with the sharp tip. EMERGENCY EJECT? Chemical changes occur inside the car... Monitor panel/touch panel 5 Basic operations- Cellular phone/audio player .......... 34 Listening to the CD changer 41 Listening to the satellite radio ......... 43 Listening to forcibly eject... raise the volume level too much, as this unit 65 Troubleshooting 72 Specifications 78 3 INTRODUCTION Touch the buttons on the monitor: • The monitor built in this does not work, reset the unit. This is inevitable and is very cold or very hot... - ENGLISH...

Instructions
Page 4
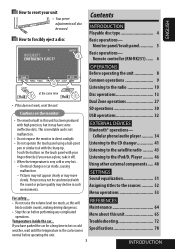
... of +R double layer disc is possible to play back AAC files encoded using iTunes. Therefore, the use of a DualDisc on the monitor. *2 DVD-R recorded in multi-border format is also playable (except for dual layer discs). *3 It is not recommended. *4 This unit can play back finalized +R/+RW ...(Video format only) discs. ENGLISH Playable disc type Disc type DVD Recording format, file type, etc. DVD+VR Dual Disc DVD side Non-DVD side CD/VCD Audio CD/CD Text (CD-DA)/DTS-CD VCD (Video CD) CD-ROM CD-I (CD-I Ready)...
... of +R double layer disc is possible to play back AAC files encoded using iTunes. Therefore, the use of a DualDisc on the monitor. *2 DVD-R recorded in multi-border format is also playable (except for dual layer discs). *3 It is not recommended. *4 This unit can play back finalized +R/+RW ...(Video format only) discs. ENGLISH Playable disc type Disc type DVD Recording format, file type, etc. DVD+VR Dual Disc DVD side Non-DVD side CD/VCD Audio CD/CD Text (CD-DA)/DTS-CD VCD (Video CD) CD-ROM CD-I (CD-I Ready)...

Instructions
Page 5
Display and erase the Short Cut windows. Reset the unit. • Use only when the internal system malfunctions. • For details on ). Monitor panel/touch panel Display . • page 53. For details, see each source operation section. Available functions vary among the sources. Display . •... page 53. • Display the screen • Eject the disc and display the screen [Hold]. • Close the monitor panel when the screen is displayed. • Turn on the power. • Turn off the power [Hold]. • Attenuate the sound (if the ...
Display and erase the Short Cut windows. Reset the unit. • Use only when the internal system malfunctions. • For details on ). Monitor panel/touch panel Display . • page 53. For details, see each source operation section. Available functions vary among the sources. Display . •... page 53. • Display the screen • Eject the disc and display the screen [Hold]. • Close the monitor panel when the screen is displayed. • Turn on the power. • Turn off the power [Hold]. • Attenuate the sound (if the ...
Instructions
Page 8
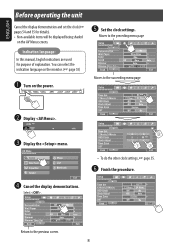
... details). • Non-available items will be displayed being shaded on the power. @ Set the clock settings. You can select the indication language on the monitor. ( page 55) ~ Turn on the AV Menu screens. Return to the succeeding menu page Ÿ Display . ! ENGLISH Before operating the unit Cancel the display demonstration...
... details). • Non-available items will be displayed being shaded on the power. @ Set the clock settings. You can select the indication language on the monitor. ( page 55) ~ Turn on the AV Menu screens. Return to the succeeding menu page Ÿ Display . ! ENGLISH Before operating the unit Cancel the display demonstration...
Instructions
Page 9
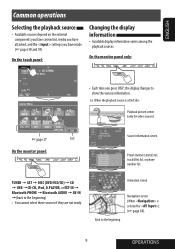
...playback source • Available sources depend on the external components you have connected, media you have made ( pages 58 and 59). On the monitor panel only: • Each time you have attached, and the settings you press DISP, the display changes to show the various information. ...playback source is selected for video sources) page 27 Exit On the monitor panel: Source information screen Preset station (service) list, track (file) list, or phone number list TUNER = SAT = DISC (DVD/VCD/CD) = SD = USB =CD-CH, iPod, D.PLAYER, or EXT-IN = Bluetooth PHONE = Bluetooth AUDIO = AV-IN...
...playback source • Available sources depend on the external components you have connected, media you have made ( pages 58 and 59). On the monitor panel only: • Each time you have attached, and the settings you press DISP, the display changes to show the various information. ...playback source is selected for video sources) page 27 Exit On the monitor panel: Source information screen Preset station (service) list, track (file) list, or phone number list TUNER = SAT = DISC (DVD/VCD/CD) = SD = USB =CD-CH, iPod, D.PLAYER, or EXT-IN = Bluetooth PHONE = Bluetooth AUDIO = AV-IN...

Instructions
Page 10
.... Band Sound mode page 51 Tuner indicators page 51 page 9 ~ Press [SOURCE], then press [TUNER]. ( page 9) : Buttons on the monitor panel. 2 Press [Mode]. When an FM stereo broadcast is assigned, "No Name" appears. To restore stereo effect, select . 10 Reception improves, but stereo effect will ...
.... Band Sound mode page 51 Tuner indicators page 51 page 9 ~ Press [SOURCE], then press [TUNER]. ( page 9) : Buttons on the monitor panel. 2 Press [Mode]. When an FM stereo broadcast is assigned, "No Name" appears. To restore stereo effect, select . 10 Reception improves, but stereo effect will ...

Instructions
Page 11
...]. You can preset six stations for each band. 1 Press [AV MENU]. • You can also use AV MENU on the monitor panel. • You can also use AV MENU on the monitor panel. 2 Press [Mode]. 2 Press [Mode]. 3 3 Only stations with sufficient signal strength This function works only for FM bands. Once you...
...]. You can preset six stations for each band. 1 Press [AV MENU]. • You can also use AV MENU on the monitor panel. • You can also use AV MENU on the monitor panel. 2 Press [Mode]. 2 Press [Mode]. 3 3 Only stations with sufficient signal strength This function works only for FM bands. Once you...

Instructions
Page 13
... Press [OPEN]. Label side menu appears. • Shaded icons cannot be accepted. ~ Open the monitor panel. ! Monitor panel closes automatically. If not, press [CLOSE]. Caution on the monitor, the unit cannot accept the operation you have any disc menu, all tracks in it will not be... the speakers by the sudden increase of the output level. • [OPEN]: Open the monitor panel. • [EJECT]: Eject the disc. • [CLOSE]: Close the monitor panel. • [TILT +/-]: Tilt the monitor panel. • [Exit]: Erase this screen. 13 OPERATIONS Insert a disc. Caution: Do...
... Press [OPEN]. Label side menu appears. • Shaded icons cannot be accepted. ~ Open the monitor panel. ! Monitor panel closes automatically. If not, press [CLOSE]. Caution on the monitor, the unit cannot accept the operation you have any disc menu, all tracks in it will not be... the speakers by the sudden increase of the output level. • [OPEN]: Open the monitor panel. • [EJECT]: Eject the disc. • [CLOSE]: Close the monitor panel. • [TILT +/-]: Tilt the monitor panel. • [Exit]: Erase this screen. 13 OPERATIONS Insert a disc. Caution: Do...
Instructions
Page 17
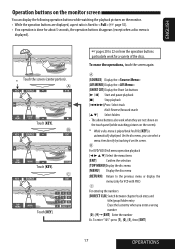
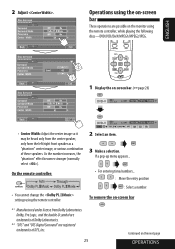
...the menu (only for a variety of the discs. To enter "105": press [1], [0], [5], then [ENT] 17 OPERATIONS ENGLISH Operation buttons on the monitor screen You can select a menu item directly by touching it on the screen. To erase the operations, touch the screen again. On the disc menu..., you enter a wrong number [0]-[9]=[ENT] Enter the number Ex. B For DVD/VCD/DivX menu operation playback [2 3 5 ∞] Select the menu items [ENT] Confirm the selection [TOP MENU]Display the disc menu [MENU] Display ...
...the menu (only for a variety of the discs. To enter "105": press [1], [0], [5], then [ENT] 17 OPERATIONS ENGLISH Operation buttons on the monitor screen You can select a menu item directly by touching it on the screen. To erase the operations, touch the screen again. On the disc menu..., you enter a wrong number [0]-[9]=[ENT] Enter the number Ex. B For DVD/VCD/DivX menu operation playback [2 3 5 ∞] Select the menu items [ENT] Confirm the selection [TOP MENU]Display the disc menu [MENU] Display ...

Instructions
Page 18
... Track Repeat 18 Track: Repeats current track - - chapter Title: Repeats current title Random - - Folder: Repeats current folder - - *1 You can also use AV MENU on the monitor panel. 2 When one of the following playback 3 modes-Intro/Repeat/Random. Disc type Intro Repeat Chapter: Repeats current - Track: Repeats current track*1 Disc (All): Randomly...
... Track Repeat 18 Track: Repeats current track - - chapter Title: Repeats current title Random - - Folder: Repeats current folder - - *1 You can also use AV MENU on the monitor panel. 2 When one of the following playback 3 modes-Intro/Repeat/Random. Disc type Intro Repeat Chapter: Repeats current - Track: Repeats current track*1 Disc (All): Randomly...

Instructions
Page 19
...) Lists, then start playback. 1 Prohibiting disc ejection You can easily access the some frequently used functions by pressing DISP on the monitor panel. NO EJECT? To cancel the prohibition, repeat the same procedure to the previous/next pages of the list) 1 Current folder...video software: • For audio software: Aspect ratio ( page 55) Surround ( page 24) Sound mode ( page 51) Selected track starts playing. Turn on the monitor panel. 2 Back Exit at the same time 1 1 3 Select a folder (1), then a track (2). Selected track starts playing. (* Press to move to select . ...
...) Lists, then start playback. 1 Prohibiting disc ejection You can easily access the some frequently used functions by pressing DISP on the monitor panel. NO EJECT? To cancel the prohibition, repeat the same procedure to the previous/next pages of the list) 1 Current folder...video software: • For audio software: Aspect ratio ( page 55) Surround ( page 24) Sound mode ( page 51) Selected track starts playing. Turn on the monitor panel. 2 Back Exit at the same time 1 1 3 Select a folder (1), then a track (2). Selected track starts playing. (* Press to move to select . ...
Instructions
Page 23
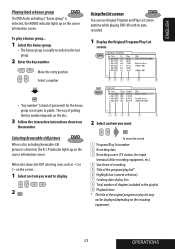
...key number. : Move the entry position : Select a number Using the list screens You can use Original Program and Play List screen anytime while playing DVD-VR with its data recorded. 1 Display the Original Program/Play List screen. • "key number" (a kind of password) for the bonus ...# on the screen... 1 Select an item you want to public. ENGLISH Playing back a bonus group If a DVD Audio including a "bonus group" is detected, the BONUS indicator lights up on the monitor. 2 Select an item you want . To play list may not be displayed depending on the source information screen....
...key number. : Move the entry position : Select a number Using the list screens You can use Original Program and Play List screen anytime while playing DVD-VR with its data recorded. 1 Display the Original Program/Play List screen. • "key number" (a kind of password) for the bonus ...# on the screen... 1 Select an item you want to public. ENGLISH Playing back a bonus group If a DVD Audio including a "bonus group" is detected, the BONUS indicator lights up on the monitor. 2 Select an item you want . To play list may not be displayed depending on the source information screen....
Instructions
Page 24
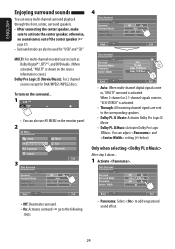
otherwise, no sound comes out of the center speaker ( page 57). • Surround mode can also use AV MENU on the monitor panel. 2 • Auto: When multi-channel digital signals come in , "MULTI" surround is activated. Only when selecting After step 4 above... 3 1 Activate . •...... 1 • You can also be used for DivX/MPEG1/MPEG2 discs. MULTI: For multi-channel encoded sources such as Dolby Digital*1, DTS*2, and DVD Audio. (When activated, "MULTI" is activated. • Through: All incoming channel signals are sent to the corresponding speakers. • Dolby PL II...
otherwise, no sound comes out of the center speaker ( page 57). • Surround mode can also use AV MENU on the monitor panel. 2 • Auto: When multi-channel digital signals come in , "MULTI" surround is activated. Only when selecting After step 4 above... 3 1 Activate . •...... 1 • You can also be used for DivX/MPEG1/MPEG2 discs. MULTI: For multi-channel encoded sources such as Dolby Digital*1, DTS*2, and DVD Audio. (When activated, "MULTI" is activated. • Through: All incoming channel signals are sent to the corresponding speakers. • Dolby PL II...
Instructions
Page 25
...speakers. Dolby, Pro Logic, and the double-D symbol are trademarks of Dolby Laboratories. *2 "DTS" and "DTS Digital Surround" are possible on the monitor using the remote controller. If a pop-up menu appears... • For entering time/numbers... : Move the entry position : Select a number &#...8226; You cannot change the settings using the remote controller, while playing the following discs-DVD/VCD/DivX/MPEG1/MPEG2/JPEG. 1 Display the on the next page OPERATIONS As the number increases, the "phantom" effect becomes stronger (normally select...
...speakers. Dolby, Pro Logic, and the double-D symbol are trademarks of Dolby Laboratories. *2 "DTS" and "DTS Digital Surround" are possible on the monitor using the remote controller. If a pop-up menu appears... • For entering time/numbers... : Move the entry position : Select a number &#...8226; You cannot change the settings using the remote controller, while playing the following discs-DVD/VCD/DivX/MPEG1/MPEG2/JPEG. 1 Display the on the next page OPERATIONS As the number increases, the "phantom" effect becomes stronger (normally select...
Instructions
Page 27
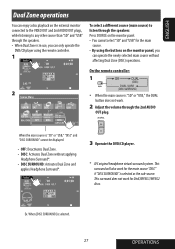
...main source without applying Headphone Surround*. • DISC SURROUND: Activates Dual Zone and applies Headphone Surround*. 3 Operate the DVD/CD player. * JVC original headphone virtual surround system. On the remote controller: 1 2 • When the main source is "SD" ...or "USB," the DUAL button does not work. 2 Adjust the volume through the speakers: Press SOURCE on the monitor panel, you can only operate the DVD/CD player using the buttons on the monitor...
...main source without applying Headphone Surround*. • DISC SURROUND: Activates Dual Zone and applies Headphone Surround*. 3 Operate the DVD/CD player. * JVC original headphone virtual surround system. On the remote controller: 1 2 • When the main source is "SD" ...or "USB," the DUAL button does not work. 2 Adjust the volume through the speakers: Press SOURCE on the monitor panel, you can only operate the DVD/CD player using the buttons on the monitor...
Instructions
Page 28
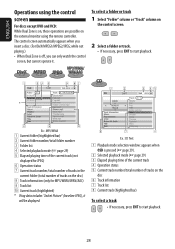
ENGLISH Operations using the control screen For discs except DVD and VCD: While Dual Zone is off, you insert a disc. (For DivX/MPEG1/MPEG2/JPEG; To select a folder or track 1 Select "Folder" column or "Track" ...) 8 Track information (only for JPEG) 6 Operation status 7 Current track number/total number of tracks in the current folder (total number of tracks on the external monitor using the remote controller. while not playing.) • When Dual Zone is on, these operations are possible on the disc 6 Track information 7 Track list 8 Current...
ENGLISH Operations using the control screen For discs except DVD and VCD: While Dual Zone is off, you insert a disc. (For DivX/MPEG1/MPEG2/JPEG; To select a folder or track 1 Select "Folder" column or "Track" ...) 8 Track information (only for JPEG) 6 Operation status 7 Current track number/total number of tracks in the current folder (total number of tracks on the external monitor using the remote controller. while not playing.) • When Dual Zone is on, these operations are possible on the disc 6 Track information 7 Track list 8 Current...
Instructions
Page 29
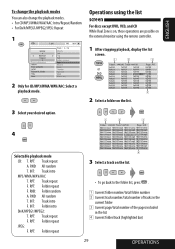
RPT: Track repeat F. RPT: Track repeat F. RPT: Folder repeat 3 Select a track on the external monitor using the remote controller. 1 After stopping playback, display the list screen. INT: Track intro MP3/WMA/WAV/AAC: T. RND: All random T. RPT: Folder repeat F. INT: .... • For CD/MP3/WMA/WAV/AAC: Intro/Repeat/Random • For DivX/MPEG1/MPEG2/JPEG: Repeat 1 Operations using the list screen For discs except DVD, VCD, and CD While Dual Zone is on, these operations are possible on the list. • To go back to the folder list, press . 1 Current...
RPT: Track repeat F. RPT: Track repeat F. RPT: Folder repeat 3 Select a track on the external monitor using the remote controller. 1 After stopping playback, display the list screen. INT: Track intro MP3/WMA/WAV/AAC: T. RND: All random T. RPT: Folder repeat F. INT: .... • For CD/MP3/WMA/WAV/AAC: Intro/Repeat/Random • For DivX/MPEG1/MPEG2/JPEG: Repeat 1 Operations using the list screen For discs except DVD, VCD, and CD While Dual Zone is on, these operations are possible on the list. • To go back to the folder list, press . 1 Current...

Instructions
Page 30
... All tracks in the SD card will be used at that time. Ÿ Press [OPEN]. otherwise, the SD card may pop up . ~ Open the monitor panel. ! menu appears. • Shaded icons cannot be played repeatedly until you hear a clicking sound. Caution: Do not place your finger quickly; Insert ...a SD card. Caution: • Do not release your finger behind the monitor panel. You can also press [CLOSE] on the external monitor). ( page 15 to "SD" and playback starts. ⁄ Close the monitor panel. • If menu is not displayed. *1 This unit can play back AAC ...
... All tracks in the SD card will be used at that time. Ÿ Press [OPEN]. otherwise, the SD card may pop up . ~ Open the monitor panel. ! menu appears. • Shaded icons cannot be played repeatedly until you hear a clicking sound. Caution: Do not place your finger quickly; Insert ...a SD card. Caution: • Do not release your finger behind the monitor panel. You can also press [CLOSE] on the external monitor). ( page 15 to "SD" and playback starts. ⁄ Close the monitor panel. • If menu is not displayed. *1 This unit can play back AAC ...

Instructions
Page 31
To cancel, select . Folder: Repeats current folder - *1 You can also use AV MENU on the monitor panel. 2 When one of the following playback 3 modes-Intro/Repeat/Random. File type Intro Repeat Random Track: Plays the first 15 Track: Repeats current track *1 ...
To cancel, select . Folder: Repeats current folder - *1 You can also use AV MENU on the monitor panel. 2 When one of the following playback 3 modes-Intro/Repeat/Random. File type Intro Repeat Random Track: Plays the first 15 Track: Repeats current track *1 ...


