Instructions
Page 2
... temperature is very cold or very hot... - Cautions on the monitor: • The monitor built in accordance with the limits for purchasing a JVC product. This equipment generates, uses, and can be regulated in such environments. 2 If this unit has been produced with the sharp tip. Connect... it may have some ineffective dots. IMPORTANT FOR LASER PRODUCTS 1. There are designed to Part 15 of these materials may be determined by JVC could void the user's authority to correct the interference by one or more of the following measures: - INFORMATION (For U.S.A.) This equipment ...
... temperature is very cold or very hot... - Cautions on the monitor: • The monitor built in accordance with the limits for purchasing a JVC product. This equipment generates, uses, and can be regulated in such environments. 2 If this unit has been produced with the sharp tip. Connect... it may have some ineffective dots. IMPORTANT FOR LASER PRODUCTS 1. There are designed to Part 15 of these materials may be determined by JVC could void the user's authority to correct the interference by one or more of the following measures: - INFORMATION (For U.S.A.) This equipment ...
Instructions
Page 3
...attach the monitor panel with the ignition switch turned on, the screen below is not engaged, "Parking Brake" flashes on the SD slot for System updating. Pay sufficient attention when operating the unit and make sure of safety devices such as this does not work, reset the unit. 3... hot or cold weather, wait until the temperature in the car becomes normal before performing any cable in any case other than updating the System. To update the System, ☞ page 18. • Do not remove the cover in a location where; - it may obstruct the steering wheel and gearshift lever ...
...attach the monitor panel with the ignition switch turned on, the screen below is not engaged, "Parking Brake" flashes on the SD slot for System updating. Pay sufficient attention when operating the unit and make sure of safety devices such as this does not work, reset the unit. 3... hot or cold weather, wait until the temperature in the car becomes normal before performing any cable in any case other than updating the System. To update the System, ☞ page 18. • Do not remove the cover in a location where; - it may obstruct the steering wheel and gearshift lever ...
Instructions
Page 4
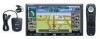
Monitor panel/ touch panel 10 Basic operations - Cellular phone/audio player 82 Listening to the CD changer 89 Listening to the satellite radio ........ 91 Listening to the HD Radio™ broadcast .... 94 Listening to the ... radio 60 Disc operations 63 SD operations 78 USB operations 80 Bluetooth® operations - Remote controller (RM-RK250) ..... 11 Menu operations 15 NAVIGATION SYSTEM Safety instructions for the Navigation System 18 Basic operations 19 Registering your home/favorite points 22 Starting guidance 25 Searching for a place 28 How you are guided 39 Arranging...
Monitor panel/ touch panel 10 Basic operations - Cellular phone/audio player 82 Listening to the CD changer 89 Listening to the satellite radio ........ 91 Listening to the HD Radio™ broadcast .... 94 Listening to the ... radio 60 Disc operations 63 SD operations 78 USB operations 80 Bluetooth® operations - Remote controller (RM-RK250) ..... 11 Menu operations 15 NAVIGATION SYSTEM Safety instructions for the Navigation System 18 Basic operations 19 Registering your home/favorite points 22 Starting guidance 25 Searching for a place 28 How you are guided 39 Arranging...
Instructions
Page 5
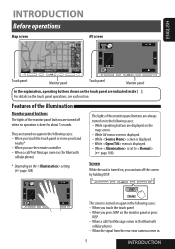
Features of the illumination Monitor panel buttons The lights of the monitor panel buttons are displayed on in the following cases: - When is set to . (☞ page 108) Screen While the unit is turned on, you can turn off when no operation is displayed. - When you use the remote controller - For details on again in the following cases: - When you touch the touch panel - While operating buttons are always turned on the map screen. - When a call /Text Message comes in 5 INTRODUCTION When the signal from the rear view camera comes in (for about 5 seconds. While ...
Features of the illumination Monitor panel buttons The lights of the monitor panel buttons are displayed on in the following cases: - When is set to . (☞ page 108) Screen While the unit is turned on, you can turn off when no operation is displayed. - When you use the remote controller - For details on again in the following cases: - When you touch the touch panel - While operating buttons are always turned on the map screen. - When a call /Text Message comes in 5 INTRODUCTION When the signal from the rear view camera comes in (for about 5 seconds. While ...

Instructions
Page 6
Attaching plate • The attaching plate closes automatically about a minute. ENGLISH Detaching/attaching the monitor panel Detaching 1 While the unit is released. Close Detach Exit The monitor panel is firmly locked. 6 Remove the monitor panel before this happens. 3 Soft case (supplied) Attaching Caution: • Hold the monitor panel securely so as not to drop it accidentally. • Fit the monitor panel onto the attaching plate until it is released. Yes Detach? No The monitor panel opens by about 50°. • It closes automatically when no operation is...
Attaching plate • The attaching plate closes automatically about a minute. ENGLISH Detaching/attaching the monitor panel Detaching 1 While the unit is released. Close Detach Exit The monitor panel is firmly locked. 6 Remove the monitor panel before this happens. 3 Soft case (supplied) Attaching Caution: • Hold the monitor panel securely so as not to drop it accidentally. • Fit the monitor panel onto the attaching plate until it is released. Yes Detach? No The monitor panel opens by about 50°. • It closes automatically when no operation is...
Instructions
Page 7
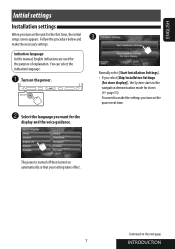
... you want for the purpose of explanation. Normally select [Start Installation Settings]. • If you select [Skip Installation Settings (for store display)], the System starts in the navigation demonstration mode for the first time, the initial setup screen appears. The power is turned off then turned on automatically so that your setting...
... you want for the purpose of explanation. Normally select [Start Installation Settings]. • If you select [Skip Installation Settings (for store display)], the System starts in the navigation demonstration mode for the first time, the initial setup screen appears. The power is turned off then turned on automatically so that your setting...
Instructions
Page 8
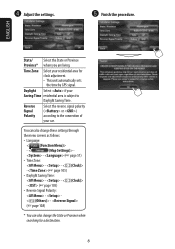
Reverse Signal Polarity Select the reverse signal polarity ( or ) according to Daylight Saving Time. You can also change these settings through the menu screens as follows: • Language: < (Function Menu)> - < (Map Settings)> - - (☞ page 51) • Time Zone: - - < (Clock)> - (☞ page 105) • Daylight Saving Time: - - < (Clock)> - (☞ page 105) • Reverse Signal Polarity: - - < (Others)> - (☞ page 108) * You can also change the State or Province when searching for clock adjustment. • This unit automatically sets the ...
Reverse Signal Polarity Select the reverse signal polarity ( or ) according to Daylight Saving Time. You can also change these settings through the menu screens as follows: • Language: < (Function Menu)> - < (Map Settings)> - - (☞ page 51) • Time Zone: - - < (Clock)> - (☞ page 105) • Daylight Saving Time: - - < (Clock)> - (☞ page 105) • Reverse Signal Polarity: - - < (Others)> - (☞ page 108) * You can also change the State or Province when searching for clock adjustment. • This unit automatically sets the ...

Instructions
Page 9
If the map is displayed, switch the screen to the AV screen by pressing DISP. 2 3 4 Cancel the demonstration. Setup Demonstration Wall Paper Color Scroll Dimmer Dimmer Time Set Back Metal Blue Once Auto 6 Auto 7 Exit 5 Finish the procedure. Select . Setup Demonstration Wall Paper Color Scroll Dimmer Dimmer Time Set Back Metal Blue Once Auto 6 Auto 7 Exit Exit 9 INTRODUCTION ENGLISH Canceling demonstration You can cancel the demonstration on the screen. 1 Turn on the power.
If the map is displayed, switch the screen to the AV screen by pressing DISP. 2 3 4 Cancel the demonstration. Setup Demonstration Wall Paper Color Scroll Dimmer Dimmer Time Set Back Metal Blue Once Auto 6 Auto 7 Exit 5 Finish the procedure. Select . Setup Demonstration Wall Paper Color Scroll Dimmer Dimmer Time Set Back Metal Blue Once Auto 6 Auto 7 Exit Exit 9 INTRODUCTION ENGLISH Canceling demonstration You can cancel the demonstration on the screen. 1 Turn on the power.

Instructions
Page 10
... tracks/chapters. To detach the monitor panel. Tilts the monitor panel. Map screen 10 Resets the unit. ☞ page 3 • Use only when the internal system malfunctions. *1 Also adjustable on the VOL touch panel (on the AV screen only): Move your 15 finger on the source. AV screen 2 menu Open/Tilt...
... tracks/chapters. To detach the monitor panel. Tilts the monitor panel. Map screen 10 Resets the unit. ☞ page 3 • Use only when the internal system malfunctions. *1 Also adjustable on the VOL touch panel (on the AV screen only): Move your 15 finger on the source. AV screen 2 menu Open/Tilt...
Instructions
Page 11
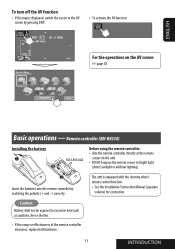
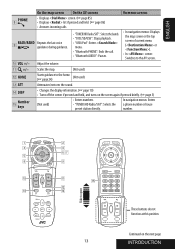
Insert the batteries into the remote controller by pressing DISP. • To activate the AV function: ABC Radio For the operations on the unit. • DO NOT expose the remote sensor to excessive heat such as sunshine, fire or the like. • If the range or effectiveness of the remote controller decreases, replace both batteries. 11 INTRODUCTION ENGLISH To turn off the AV function • If the map is equipped with the steering wheel remote control function. • See the Installation/Connection Manual (separate volume) for connection. The unit is displayed, switch the ...
Insert the batteries into the remote controller by pressing DISP. • To activate the AV function: ABC Radio For the operations on the unit. • DO NOT expose the remote sensor to excessive heat such as sunshine, fire or the like. • If the range or effectiveness of the remote controller decreases, replace both batteries. 11 INTRODUCTION ENGLISH To turn off the AV function • If the map is equipped with the steering wheel remote control function. • See the Installation/Connection Manual (separate volume) for connection. The unit is displayed, switch the ...
Instructions
Page 12
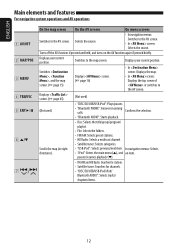
ENGLISH Main elements and features For navigation system operations and AV operations 1 AV/OFF 2 MAP/POS 3 MENU 4 TRAFFIC 5 ENT 6 6 5/∞ 7 / On the map screen On the AV screens On menu screens • In navigation menus: Switches to the AV screen. • In screen: Selects the source. Switches to the AV screen. Switches to the...; HD Radio: Selects a multicast channel. Turns off the AV function if pressed and held, and turns on the AV function again if pressed briefly. In navigation menus: Selects • "iPod": Enters the main menu (5), and an item.
ENGLISH Main elements and features For navigation system operations and AV operations 1 AV/OFF 2 MAP/POS 3 MENU 4 TRAFFIC 5 ENT 6 6 5/∞ 7 / On the map screen On the AV screens On menu screens • In navigation menus: Switches to the AV screen. • In screen: Selects the source. Switches to the AV screen. Switches to the...; HD Radio: Selects a multicast channel. Turns off the AV function if pressed and held, and turns on the AV function again if pressed briefly. In navigation menus: Selects • "iPod": Enters the main menu (5), and an item.
Instructions
Page 13
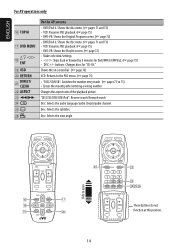
In navigation menus: Enters a phone number or house number. 1 2 3 4 67 5 8 9 p q t w e r Slide to the AV screen. Scales the map. (Not used) w HOME Starts guidance to the home. (☞ ... the bands. • "DISC/SD/USB": Stops playback. • "USB iPod": Enters menu. • "Bluetooth PHONE": Ends the call. • "Bluetooth AUDIO": Pauses. • In navigation menus: Displays the map screen or the top screen of current menu ( or ). • In screen: Switches to open These buttons do not function at...
In navigation menus: Enters a phone number or house number. 1 2 3 4 67 5 8 9 p q t w e r Slide to the AV screen. Scales the map. (Not used) w HOME Starts guidance to the home. (☞ ... the bands. • "DISC/SD/USB": Stops playback. • "USB iPod": Enters menu. • "Bluetooth PHONE": Ends the call. • "Bluetooth AUDIO": Pauses. • In navigation menus: Displays the map screen or the top screen of current menu ( or ). • In screen: Switches to open These buttons do not function at...
Instructions
Page 14
.../USB/USB iPod": Reverse search/forward search. Disc: Selects the subtitles. ENGLISH For AV operations only y TOP M u DVD MENU i ENT o OSD ; RETURN a DIRECT/ CLEAR s ASPECT d 1/¡ f g h On the AV screens • DVD/DivX 6: Shows the disc menu. (☞ pages 71 and 73) • VCD: Resumes PBC playback. (☞ page... 6: Shows the disc menu. (☞ pages 71 and 73) • VCD: Resumes PBC playback. (☞ page 75) • DVD-VR: Shows the Playlist screen. (☞ page 72) • Makes selection/settings Skips back or forward by 5 minutes for "CD-CH." a s d fgh...
.../USB/USB iPod": Reverse search/forward search. Disc: Selects the subtitles. ENGLISH For AV operations only y TOP M u DVD MENU i ENT o OSD ; RETURN a DIRECT/ CLEAR s ASPECT d 1/¡ f g h On the AV screens • DVD/DivX 6: Shows the disc menu. (☞ pages 71 and 73) • VCD: Resumes PBC playback. (☞ page... 6: Shows the disc menu. (☞ pages 71 and 73) • VCD: Resumes PBC playback. (☞ page 75) • DVD-VR: Shows the Playlist screen. (☞ page 72) • Makes selection/settings Skips back or forward by 5 minutes for "CD-CH." a s d fgh...
Instructions
Page 15
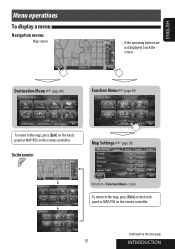
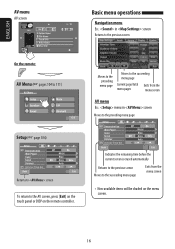
ENGLISH Menu operations To display a menu Navigation menus Map screen • If the operating buttons are not displayed, touch the screen. Destination Menu (☞ page 48) Function Menu (☞ page 49) To return to the map, press [Exit] on the touch panel or MAP/POS on the remote controller. On the remote: Map Settings (☞ page 50) Returns to screen To return to the map, press [Exit] on the touch panel or MAP/POS on the next page 15 INTRODUCTION Continued on the remote controller.
ENGLISH Menu operations To display a menu Navigation menus Map screen • If the operating buttons are not displayed, touch the screen. Destination Menu (☞ page 48) Function Menu (☞ page 49) To return to the map, press [Exit] on the touch panel or MAP/POS on the remote controller. On the remote: Map Settings (☞ page 50) Returns to screen To return to the map, press [Exit] on the touch panel or MAP/POS on the next page 15 INTRODUCTION Continued on the remote controller.
Instructions
Page 16
... page Exits from the menu screen • Non-available items will be shaded on the remote controller. ENGLISH AV menu AV screen Basic menu operations Navigation menu Ex.: in screen Moves to the preceding menu page Setup Demonstration Wall Paper Color Scroll Dimmer Dimmer Time Set Back Metal Blue Once Auto...
... page Exits from the menu screen • Non-available items will be shaded on the remote controller. ENGLISH AV menu AV screen Basic menu operations Navigation menu Ex.: in screen Moves to the preceding menu page Setup Demonstration Wall Paper Color Scroll Dimmer Dimmer Time Set Back Metal Blue Once Auto...

Instructions
Page 17
ENGLISH The following steps are one of the specifications. Ex.: Changing the setting in screen ~ ! Setup Demonstration Wall Paper Color Scroll Dimmer Dimmer Time Set Back Setup AV Input Camera Input External Input Metal Blue Once Auto 6 Auto 7 Exit Audio&Video Off iPod External • You can also use MENU on the remote controller. Ÿ Exit Back Exit Setup AV Input Camera Input External Input Off iPod (Off) Audio&Video Audio Back Exit • When operating on , press [Back] to close the selection list or to change other settings. ⁄ Setup AV Input Camera ...
ENGLISH The following steps are one of the specifications. Ex.: Changing the setting in screen ~ ! Setup Demonstration Wall Paper Color Scroll Dimmer Dimmer Time Set Back Setup AV Input Camera Input External Input Metal Blue Once Auto 6 Auto 7 Exit Audio&Video Off iPod External • You can also use MENU on the remote controller. Ÿ Exit Back Exit Setup AV Input Camera Input External Input Off iPod (Off) Audio&Video Audio Back Exit • When operating on , press [Back] to close the selection list or to change other settings. ⁄ Setup AV Input Camera ...
Instructions
Page 18
... more than one -way traffic, or other road users. The Navigation System serves solely as an aid to orientation when visibility is poor. JVC does not accept liability for erroneous data provided by the Navigation System. © 2008 NAVTEQ All rights reserved. In this specific JVC system. commercial vehicles) are absolutely sure that external noise is still...
... more than one -way traffic, or other road users. The Navigation System serves solely as an aid to orientation when visibility is poor. JVC does not accept liability for erroneous data provided by the Navigation System. © 2008 NAVTEQ All rights reserved. In this specific JVC system. commercial vehicles) are absolutely sure that external noise is still...
Instructions
Page 19
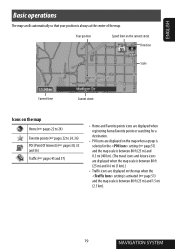
... (25 m) and 0.3 mi (400 m). (The travel icons and leisure icons are displayed when the map scale is between 80 ft (25 m) and 1.5 mi (2.5 km). 19 NAVIGATION SYSTEM
... (25 m) and 0.3 mi (400 m). (The travel icons and leisure icons are displayed when the map scale is between 80 ft (25 m) and 1.5 mi (2.5 km). 19 NAVIGATION SYSTEM

Instructions
Page 20
Direction and distance from your current position Displays current position To display your hand close to the screen. • The buttons disappear if no operation is centered on the position you are touching and holding . • Touch and hold the map to display the operating buttons. Outer area: fast • You can also display the buttons by pressing one of the scale buttons. ENGLISH To change the map scale 1 Touch the screen to keep scrolling the map. • The scrolling speed varies depending on the map. • You can also select a scale directly by moving your...
Direction and distance from your current position Displays current position To display your hand close to the screen. • The buttons disappear if no operation is centered on the position you are touching and holding . • Touch and hold the map to display the operating buttons. Outer area: fast • You can also display the buttons by pressing one of the scale buttons. ENGLISH To change the map scale 1 Touch the screen to keep scrolling the map. • The scrolling speed varies depending on the map. • You can also select a scale directly by moving your...
Instructions
Page 21
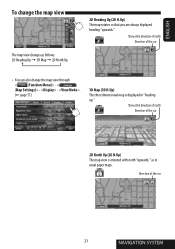
... car 2D North Up (2D N.Up) The map view is displayed in usual paper maps. Shows the direction of north Direction of the car 21 NAVIGATION SYSTEM
... car 2D North Up (2D N.Up) The map view is displayed in usual paper maps. Shows the direction of north Direction of the car 21 NAVIGATION SYSTEM
