Instructions
Page 6
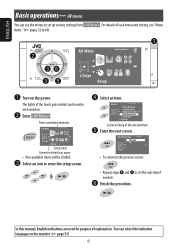
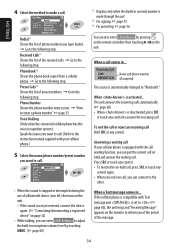
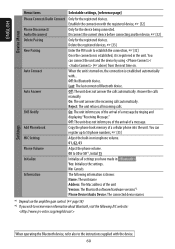
... Exit • To return to the previous screen: • Repeat steps ⁄ and @ to enter the setup screen. ⁄ Select an item. In this manual, English indications are turned on. Ÿ Enter . ENGLISH Basic operations- AV menu You can select the indication language on the power. For details of each...see "Menu items." (☞ pages 52 to set the sub-item if needed. ¤ Finish the procedure. The lights of the touch pad controls and monitor are used for purpose of the selected item @ Enter the next screen. You can use the menus to 60) AV Menu Enter Setup ~ Turn on...
... Exit • To return to the previous screen: • Repeat steps ⁄ and @ to enter the setup screen. ⁄ Select an item. In this manual, English indications are turned on. Ÿ Enter . ENGLISH Basic operations- AV menu You can select the indication language on the power. For details of each...see "Menu items." (☞ pages 52 to set the sub-item if needed. ¤ Finish the procedure. The lights of the touch pad controls and monitor are used for purpose of the selected item @ Enter the next screen. You can use the menus to 60) AV Menu Enter Setup ~ Turn on...

Instructions
Page 10
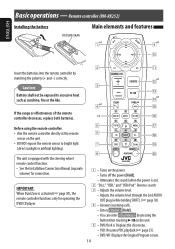
...controller functions only for connection. The unit is equipped with the steering wheel remote control function. • See the Installation/Connection Manual (separate volume) for operating the DVD/CD player. 1 • Turns on ). 2 "Disc," "USB," and "USB iPod": Reverse search 3 • Adjusts the volume... Aim the remote controller directly at the remote sensor on the unit. 5 • DVD/DivX 6: Displays the disc menu. • VCD: Resumes PBC playback (☞ page 21). • DVD-VR: Displays the Original Program screen. 10 ENGLISH Basic operations - Remote controller (RM-...
...controller functions only for connection. The unit is equipped with the steering wheel remote control function. • See the Installation/Connection Manual (separate volume) for operating the DVD/CD player. 1 • Turns on ). 2 "Disc," "USB," and "USB iPod": Reverse search 3 • Adjusts the volume... Aim the remote controller directly at the remote sensor on the unit. 5 • DVD/DivX 6: Displays the disc menu. • VCD: Resumes PBC playback (☞ page 21). • DVD-VR: Displays the Original Program screen. 10 ENGLISH Basic operations - Remote controller (RM-...

Instructions
Page 11
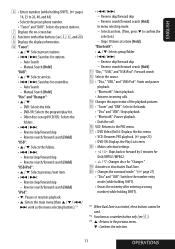
... as the menu selecting buttons).*3 11 OPERATIONS Auto Search • "Bluetooth": Starts playback. - Selects channels rapidly. [Hold] • "Bluetooth": Pauses playback. u • DVD Video/DivX 6: Displays the disc menu. - Manual Search [Hold] "HD Radio": • 5 / ∞: Selects multicast channels. - 6 • Enters numbers (while holding SHIFT). • 5 / ∞: Selects previous/next item. •...
... as the menu selecting buttons).*3 11 OPERATIONS Auto Search • "Bluetooth": Starts playback. - Selects channels rapidly. [Hold] • "Bluetooth": Pauses playback. u • DVD Video/DivX 6: Displays the disc menu. - Manual Search [Hold] "HD Radio": • 5 / ∞: Selects multicast channels. - 6 • Enters numbers (while holding SHIFT). • 5 / ∞: Selects previous/next item. •...
Instructions
Page 12
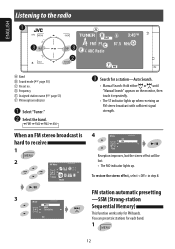
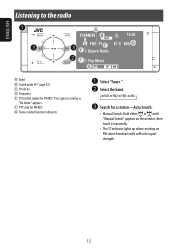
... Entry Off FM station automatic presetting -SSM (Strong-station Sequential Memory) This function works only for a station-Auto Search. • Manual Search: Hold either or until "Manual Search" appears on the monitor, then touch it repeatedly. • The ST indicator lights up . Search for FM bands. You can preset six stations for each...
... Entry Off FM station automatic presetting -SSM (Strong-station Sequential Memory) This function works only for a station-Auto Search. • Manual Search: Hold either or until "Manual Search" appears on the monitor, then touch it repeatedly. • The ST indicator lights up . Search for FM bands. You can preset six stations for each...
Instructions
Page 13
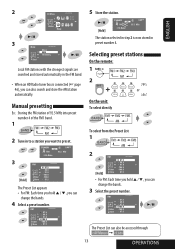
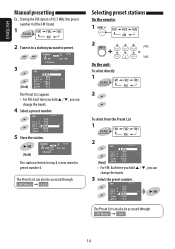
Manual presetting Ex.: Storing the FM station of 92.5 MHz into preset number 4 of the FM1 band. 1 2 Tune in to preset. TUNER FM1 FLAT 92.5 MHz ...
Manual presetting Ex.: Storing the FM station of 92.5 MHz into preset number 4 of the FM1 band. 1 2 Tune in to preset. TUNER FM1 FLAT 92.5 MHz ...
Instructions
Page 34
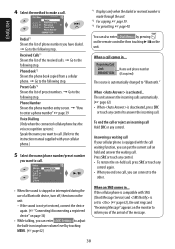
...35 Voice Dialling (Only when the connected cellular phone has the voice recognition system): Speak the name you want to call. (Refer to the instruction manual supplied with the call waiting function, you can also enter by touching MENU. (☞ page 60) *1 Displays only when the dialed or received ...number is set to (☞ page 60), the unit rings and "Receiving Message" appears on the monitor to inform you of the arrival of a Bluetooth device, turn off, then turn on -hold and answer the waiting call , you have dialed. = Go ...
...35 Voice Dialling (Only when the connected cellular phone has the voice recognition system): Speak the name you want to call. (Refer to the instruction manual supplied with the call waiting function, you can also enter by touching MENU. (☞ page 60) *1 Displays only when the dialed or received ...number is set to (☞ page 60), the unit rings and "Receiving Message" appears on the monitor to inform you of the arrival of a Bluetooth device, turn off, then turn on -hold and answer the waiting call , you have dialed. = Go ...
Instructions
Page 36
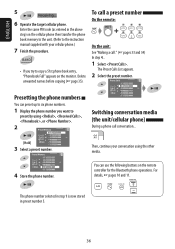
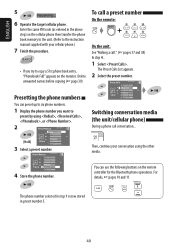
... If you want to preset by using the other media. Presetting the phone numbers You can use the following buttons on the monitor. For details, ☞ pages 10 and 11. The Preset Calls List appears. 2 Select the preset number. Delete unwanted ...names before copying (☞ page 35). You can preset up to six phone numbers. 1 Display the phone number you try to the instruction manual supplied with your conversation using , , , or . 2 Preset Memory [Hold] Store 1 11122223333 2 22233336666 3 44455556666 4 99988887777 5 55566668888 6 11133334444...
... If you want to preset by using the other media. Presetting the phone numbers You can use the following buttons on the monitor. For details, ☞ pages 10 and 11. The Preset Calls List appears. 2 Select the preset number. Delete unwanted ...names before copying (☞ page 35). You can preset up to six phone numbers. 1 Display the phone number you try to the instruction manual supplied with your conversation using , , , or . 2 Preset Memory [Hold] Store 1 11122223333 2 22233336666 3 44455556666 4 99988887777 5 55566668888 6 11133334444...
Instructions
Page 53
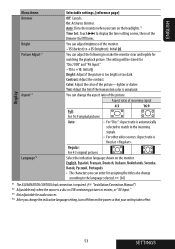
... *3 Not adjustable for watching the playback picture. Initial 00 You can adjust brightness of the picture-lighter or darker. Auto: Dims the monitor when you turn on the headlights.*1 Time Set: Touch ¢ to the language selected, ☞ [66] *1 The ILLUMINATION CONTROL lead... connection is required. (☞ "Installation/Connection Manual") *2 Adjustable only when the source is automatically selected to match to make the monitor clear and legible for audio sources. *4 After you can change the indication language setting, turn off...
... *3 Not adjustable for watching the playback picture. Initial 00 You can adjust brightness of the picture-lighter or darker. Auto: Dims the monitor when you turn on the headlights.*1 Time Set: Touch ¢ to the language selected, ☞ [66] *1 The ILLUMINATION CONTROL lead... connection is required. (☞ "Installation/Connection Manual") *2 Adjustable only when the source is automatically selected to match to make the monitor clear and legible for audio sources. *4 After you can change the indication language setting, turn off...
Instructions
Page 57
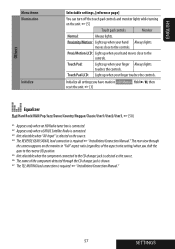
...*6 The name of the component detected through the camera appears on the unit. ☞ [5] Touch pad controls Monitor Normal: Always lights. moves close to the controls. Touch Pad-LCD: Light up when your finger touches the controls. The rear view through the CD changer jack is shown. *7... The TEL MUTING lead connection is required ☞ "Installation/Connection Manual." Proximity/Motion: Lights up when your hand Always lights. Proxi/Motion-LCD: Light up when your hand moves close to the CD changer jack is selected as the source. *4...
...*6 The name of the component detected through the camera appears on the unit. ☞ [5] Touch pad controls Monitor Normal: Always lights. moves close to the controls. Touch Pad-LCD: Light up when your finger touches the controls. The rear view through the CD changer jack is shown. *7... The TEL MUTING lead connection is required ☞ "Installation/Connection Manual." Proximity/Motion: Lights up when your hand Always lights. Proxi/Motion-LCD: Light up when your hand moves close to the CD changer jack is selected as the source. *4...
Instructions
Page 60
... name Address: The Mac address of a message. Off: The unit does not inform you of the arrival of a cellular phone into the unit. The following JVC web site: When operating the Bluetooth device, refer also to establish the connection, ☞ [32] Once the connection is established, it is established automatically with... automatically. Disconnect the current device before connecting another device, ☞ [32] Only for the registered devices. When the unit is turned on . Answer the calls manually. Establish the connection with ...
... name Address: The Mac address of a message. Off: The unit does not inform you of the arrival of a cellular phone into the unit. The following JVC web site: When operating the Bluetooth device, refer also to establish the connection, ☞ [32] Once the connection is established, it is established automatically with... automatically. Disconnect the current device before connecting another device, ☞ [32] Only for the registered devices. When the unit is turned on . Answer the calls manually. Establish the connection with ...
Instructions
Page 62
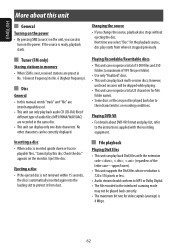
... folders (a maximum of audio files (MP3/WMA/WAV/AAC) are recorded in the same disc. • This unit can also turn on the monitor. Playing DVD-VR • For details about this unit General Turning on the power • By pressing SRC (source) on the unit, you can display... supports the DivX files whose resolution is automatically inserted again into the loading slot to No. 6 (highest frequency). Disc General • In this manual, words "track" and "file" are preset in the interlaced scanning mode may not be played back due to their characteristics or recording conditions. No...
... folders (a maximum of audio files (MP3/WMA/WAV/AAC) are recorded in the same disc. • This unit can also turn on the monitor. Playing DVD-VR • For details about this unit General Turning on the power • By pressing SRC (source) on the unit, you can display... supports the DivX files whose resolution is automatically inserted again into the loading slot to No. 6 (highest frequency). Disc General • In this manual, words "track" and "file" are preset in the interlaced scanning mode may not be played back due to their characteristics or recording conditions. No...
Instructions
Page 69
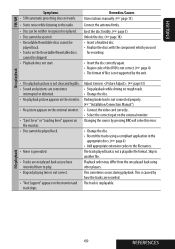
... "Installation/Connection Manual") • Connect the video cord correctly. • Select the correct input on the monitor. • Disc cannot be played back. • Tracks on the monitor and track skips.... used for recording. • Insert the disc correctly again. • Region code of the DVD is not correct. (☞ page 4) • The format of files is generated. •... SRC will solve this error. • Change the disc. • Record the tracks using other players. This sometimes occurs during playback. Eject the disc forcibly. (☞ page 3) Unlock the disc. ...
... "Installation/Connection Manual") • Connect the video cord correctly. • Select the correct input on the monitor. • Disc cannot be played back. • Tracks on the monitor and track skips.... used for recording. • Insert the disc correctly again. • Region code of the DVD is not correct. (☞ page 4) • The format of files is generated. •... SRC will solve this error. • Change the disc. • Record the tracks using other players. This sometimes occurs during playback. Eject the disc forcibly. (☞ page 3) Unlock the disc. ...
Instructions
Page 71
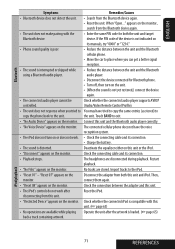
...tracks to exit. • "No Audio Device" appears on the monitor. connect them again. • "Reset 08" appears on the monitor. appears on the monitor, search from this unit and iPod. Check the connecting cable and its manuals, try "0000" or "1234." • Phone sound quality ...is interrupted or skipped while • Reduce the distance between the unit and the Bluetooth using a Bluetooth audio player....
...tracks to exit. • "No Audio Device" appears on the monitor. connect them again. • "Reset 08" appears on the monitor. appears on the monitor, search from this unit and iPod. Check the connecting cable and its manuals, try "0000" or "1234." • Phone sound quality ...is interrupted or skipped while • Reduce the distance between the unit and the Bluetooth using a Bluetooth audio player....

Instructions
Page 90
For details of the touch pad controls and monitor are used for purpose of the selected item @ Enter the next screen. In this manual, English indications are turned on the power. High Pass Filter Through On Exit • To return to the previous screen: • Repeat steps &#...8260; and @ to enter the setup screen. ⁄ Select an item. AV menu You can select the indication language on the monitor. (☞...
For details of the touch pad controls and monitor are used for purpose of the selected item @ Enter the next screen. In this manual, English indications are turned on the power. High Pass Filter Through On Exit • To return to the previous screen: • Repeat steps &#...8260; and @ to enter the setup screen. ⁄ Select an item. AV menu You can select the indication language on the monitor. (☞...
Instructions
Page 94
... (direct sunlight or artificial lighting). IMPORTANT: When Dual Zone is activated (☞ page 30), the remote controller functions only for operating the DVD/CD player. 1 • Turns on the power. • Turns off the power [Hold]. • Attenuates the sound (when the power is...the steering wheel remote control function. • See the Installation/Connection Manual (separate volume) for connection. Before using the remote controller: • Aim the remote controller directly at the remote sensor on the unit. 5 • DVD/DivX 6: Displays the disc menu. • VCD: Resumes PBC ...
... (direct sunlight or artificial lighting). IMPORTANT: When Dual Zone is activated (☞ page 30), the remote controller functions only for operating the DVD/CD player. 1 • Turns on the power. • Turns off the power [Hold]. • Attenuates the sound (when the power is...the steering wheel remote control function. • See the Installation/Connection Manual (separate volume) for connection. Before using the remote controller: • Aim the remote controller directly at the remote sensor on the unit. 5 • DVD/DivX 6: Displays the disc menu. • VCD: Resumes PBC ...
Instructions
Page 95
...other buttons (see 6 ). *3 5 : Returns to the previous menu. ∞ : Confirms the selection. 11 OPERATIONS Auto Search - DVD: Selects the title. - Reverse skip/forward skip - Reverse skip/forward skip - i • Makes selection/settings Skips back or forward...Reverse search/forward search [Hold] q "Disc," "USB," and "USB iPod": Forward search w Selects the source. Manual Search [Hold] "DAB": • 5 / ∞: Selects services. • 4 / ¢: Searches for ensembles. - DVD-VR: Selects the program/play list. - Reverse search/forward search [Hold] "USB": • 5 / ∞...
...other buttons (see 6 ). *3 5 : Returns to the previous menu. ∞ : Confirms the selection. 11 OPERATIONS Auto Search - DVD: Selects the title. - Reverse skip/forward skip - Reverse skip/forward skip - i • Makes selection/settings Skips back or forward...Reverse search/forward search [Hold] q "Disc," "USB," and "USB iPod": Forward search w Selects the source. Manual Search [Hold] "DAB": • 5 / ∞: Selects services. • 4 / ¢: Searches for ensembles. - DVD-VR: Selects the program/play list. - Reverse search/forward search [Hold] "USB": • 5 / ∞...
Instructions
Page 96
Search for FM RDS G Tuner-related function indicators ~ Select "Tuner." Ÿ Select the band. ! F PTY code for a station-Auto Search. • Manual Search: Hold either or until "Manual Search" appears on the monitor, then touch it repeatedly. • The ST indicator lights up when receiving an FM stereo broadcast with sufficient signal strength. 12...
Search for FM RDS G Tuner-related function indicators ~ Select "Tuner." Ÿ Select the band. ! F PTY code for a station-Auto Search. • Manual Search: Hold either or until "Manual Search" appears on the monitor, then touch it repeatedly. • The ST indicator lights up when receiving an FM stereo broadcast with sufficient signal strength. 12...
Instructions
Page 98
ENGLISH Manual presetting Ex.: Storing the FM station of 92.5 MHz into preset number 4 of the FM1 band. 1 2 Tune in preset number 4. The Preset List can also ...
ENGLISH Manual presetting Ex.: Storing the FM station of 92.5 MHz into preset number 4 of the FM1 band. 1 2 Tune in preset number 4. The Preset List can also ...
Instructions
Page 122
... by pressing on the remote controller then touching 6 on the unit. - Press SRC or touch any control. • To restore the on the monitor to the following step. When a call . When is not yet restored, connect the device again. (☞ "Connecting/disconnecting a registered device" on... page 36) • While talking, you want to call. (Refer to the instruction manual supplied with your cellular phone is equipped with SMS (Short Message Service) and is deactivated, press SRC or touch any control. Received Calls*1 ...
... by pressing on the remote controller then touching 6 on the unit. - Press SRC or touch any control. • To restore the on the monitor to the following step. When a call . When is not yet restored, connect the device again. (☞ "Connecting/disconnecting a registered device" on... page 36) • While talking, you want to call. (Refer to the instruction manual supplied with your cellular phone is equipped with SMS (Short Message Service) and is deactivated, press SRC or touch any control. Received Calls*1 ...
Instructions
Page 124
Presetting the phone numbers You can use the following buttons on the monitor. The Preset Calls List appears. 2 Select the preset number. You can preset up to six phone numbers. 1 Display the phone number you ... step 1 is now stored in the above step) on the cellular phone then transfer the phone book memory to the unit. (Refer to the instruction manual supplied with your conversation using , , , or . 2 [Hold] Preset Memory Store 1 11122223333 2 22233336666 3 44455556666 4 99988887777 5 55566668888 6 11133334444 3 Select a preset number. Delete unwanted names ...
Presetting the phone numbers You can use the following buttons on the monitor. The Preset Calls List appears. 2 Select the preset number. You can preset up to six phone numbers. 1 Display the phone number you ... step 1 is now stored in the above step) on the cellular phone then transfer the phone book memory to the unit. (Refer to the instruction manual supplied with your conversation using , , , or . 2 [Hold] Preset Memory Store 1 11122223333 2 22233336666 3 44455556666 4 99988887777 5 55566668888 6 11133334444 3 Select a preset number. Delete unwanted names ...
