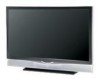
Instructions
Page 2
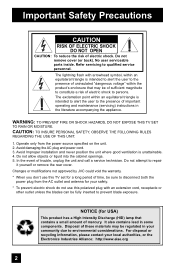
... from the power source specified on the unit. 2. Changes or modifications not approved by JVC could void the warranty. * When you don't use this TV set for a long period of important operating and maintenance (servicing) instructions in the literature accompanying the appliance. Do not allow objects or liquid into the cabinet openings. 5. The lightning flash with an extension cord, receptacle or...
... from the power source specified on the unit. 2. Changes or modifications not approved by JVC could void the warranty. * When you don't use this TV set for a long period of important operating and maintenance (servicing) instructions in the literature accompanying the appliance. Do not allow objects or liquid into the cabinet openings. 5. The lightning flash with an extension cord, receptacle or...
Instructions
Page 4
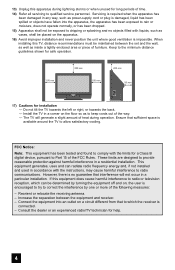
... VIDEO + VOLUME - The TV will not occur in accordance with liquids, such as to allow satisfactory cooling. 13) Unplug this apparatus during operation. Keep to qualified service personnel. This equipment generates, uses and can be maintained between the equipment and receiver. - However, there is required when the apparatus has been damaged in a residential installation. Servicing is no objects filled with the instructions...
... VIDEO + VOLUME - The TV will not occur in accordance with liquids, such as to allow satisfactory cooling. 13) Unplug this apparatus during operation. Keep to qualified service personnel. This equipment generates, uses and can be maintained between the equipment and receiver. - However, there is required when the apparatus has been damaged in a residential installation. Servicing is no objects filled with the instructions...
Instructions
Page 6
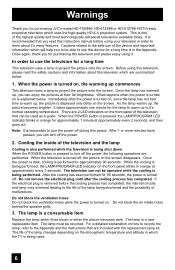
... power, the following operations are summarized below . When the POWER button is one minute for 90 seconds, the power is turned on the screen disappears. Once the screen is dark, cooling is being performed, the LAMP/PROGRAM LED indicator on . It is displayed only dimly on how to recycle the lamp, refer to project the picture onto the screen. Immediately after the cooling process has completed. Cooling the inside of the lamp changes...
... power, the following operations are summarized below . When the POWER button is one minute for 90 seconds, the power is turned on the screen disappears. Once the screen is dark, cooling is being performed, the LAMP/PROGRAM LED indicator on . It is displayed only dimly on how to recycle the lamp, refer to project the picture onto the screen. Immediately after the cooling process has completed. Cooling the inside of the lamp changes...

Instructions
Page 8
... Setup 40 Auto Tuner Setup 40 Channel Summary 41 Channel Label 42 V-Chip 43 Set Lock Code 49 Auto Demo 50 Language 50 Closed Caption 51 Auto Shut Off 53 XDS ID 53 Noise Muting 53 Front Panel Lock 54 V1 Smart Input 54 Video Input Label 55 Position Adjustment 56 Power Indicator 56 Video-1 Monitor Out 57 TV Speaker 57 Audio Out 57 Digital-In 58 Digital-In Audio 58 Center CH Input 58 Picture Adjust 59 Picture Settings 59 Adjust Picture Settings 59 Color Temperature 59 Digital Noise Clear 60 Color...
... Setup 40 Auto Tuner Setup 40 Channel Summary 41 Channel Label 42 V-Chip 43 Set Lock Code 49 Auto Demo 50 Language 50 Closed Caption 51 Auto Shut Off 53 XDS ID 53 Noise Muting 53 Front Panel Lock 54 V1 Smart Input 54 Video Input Label 55 Position Adjustment 56 Power Indicator 56 Video-1 Monitor Out 57 TV Speaker 57 Audio Out 57 Digital-In 58 Digital-In Audio 58 Center CH Input 58 Picture Adjust 59 Picture Settings 59 Adjust Picture Settings 59 Color Temperature 59 Digital Noise Clear 60 Color...
Instructions
Page 10
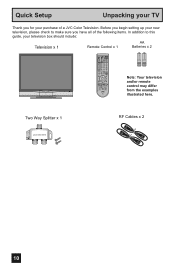
... you for your television box should include: Television x 1 Remote Control x 1 AA Batteries x 2 AA Alkaline AA Alkaline TV CATV VCR DVD POWER ASPECT MULTI SCREEN TWIN INDEX SELECT SLEEP FREEZE SWAP ML/MTS DISPLAY + INPUT 123 D/A 4 5 6 i.LINK MENU 78 TIMER TUNE THEATER FAVORITE PRO 0 VIDEO STATUS C.C. NATURAL SOUND CINEMA 9 RETURN+ TV SUB CHANNEL SUB LIGHT MUTING CH GUIDE VOL OK VOL Note: Your television CH MENU VCR CHANNEL PREV NEXT BACK VCR DVD POWER TV VCR REW...
... you for your television box should include: Television x 1 Remote Control x 1 AA Batteries x 2 AA Alkaline AA Alkaline TV CATV VCR DVD POWER ASPECT MULTI SCREEN TWIN INDEX SELECT SLEEP FREEZE SWAP ML/MTS DISPLAY + INPUT 123 D/A 4 5 6 i.LINK MENU 78 TIMER TUNE THEATER FAVORITE PRO 0 VIDEO STATUS C.C. NATURAL SOUND CINEMA 9 RETURN+ TV SUB CHANNEL SUB LIGHT MUTING CH GUIDE VOL OK VOL Note: Your television CH MENU VCR CHANNEL PREV NEXT BACK VCR DVD POWER TV VCR REW...

Instructions
Page 12
... (DIGITAL) _ AUDIO (DIGITAL) CABLE CARD CENTER CHANNEL INPUT INPUT-2 Y VIDEO L AUDIO R S-VIDEO Pb Pr S-VIDEO L AUDIO R OVER VIDEO L I AUDIO I R OVER Y VIDEO L Pb I AUDIO I R Pr INPUT-3 INPUT-1 i.LINK IN/OUT S400(TS) OPTICAL OUT Digital Audio S-VIDEO VIDEO L AUDIO PC IN (D-SUB) L AUDIO OUTPUT 75Ω (VHF/UHF) R R MONITOR /REC OUT LICENSED UNDER THE FOLLOWING U.S. These will help assist you connect your television to another device, as well as use the remote to set up your specific TV and remote. PATENTS 6,183,091 6,419,362 12 Quick Setup TV Models...
... (DIGITAL) _ AUDIO (DIGITAL) CABLE CARD CENTER CHANNEL INPUT INPUT-2 Y VIDEO L AUDIO R S-VIDEO Pb Pr S-VIDEO L AUDIO R OVER VIDEO L I AUDIO I R OVER Y VIDEO L Pb I AUDIO I R Pr INPUT-3 INPUT-1 i.LINK IN/OUT S400(TS) OPTICAL OUT Digital Audio S-VIDEO VIDEO L AUDIO PC IN (D-SUB) L AUDIO OUTPUT 75Ω (VHF/UHF) R R MONITOR /REC OUT LICENSED UNDER THE FOLLOWING U.S. These will help assist you connect your television to another device, as well as use the remote to set up your specific TV and remote. PATENTS 6,183,091 6,419,362 12 Quick Setup TV Models...
Instructions
Page 15
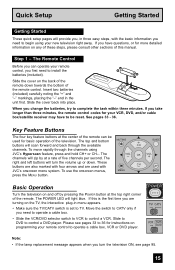
... TV/CATV switch is set to operate a cable box, VCR or DVD player. If you take longer than three minutes, the remote control codes for basic operation of this is the first time you are used for your remote control, you have to be used with the basic information you need to install the batteries (included). The VOL OK VOL right and left buttons will scan forward and back through the channels using...
... TV/CATV switch is set to operate a cable box, VCR or DVD player. If you take longer than three minutes, the remote control codes for basic operation of this is the first time you are used for your remote control, you have to be used with the basic information you need to install the batteries (included). The VOL OK VOL right and left buttons will scan forward and back through the channels using...
Instructions
Page 20
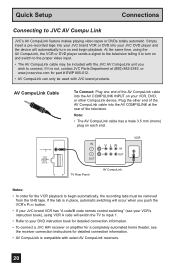
... same time, using VCR A code will automatically turn on each end. Quick Setup Connections Connecting to your DVD instruction book for detailed connection information. • To connect a JVC HiFi receiver or amplifier for a completely automated home theater, see your VCR's instruction book), using the AV CompuLink, the VCR or DVD player sends a signal to the television telling it is not, contact JVC Parts Department at the rear of the AV CompuLink cable into...
... same time, using VCR A code will automatically turn on each end. Quick Setup Connections Connecting to your DVD instruction book for detailed connection information. • To connect a JVC HiFi receiver or amplifier for a completely automated home theater, see your VCR's instruction book), using the AV CompuLink, the VCR or DVD player sends a signal to the television telling it is not, contact JVC Parts Department at the rear of the AV CompuLink cable into...
Instructions
Page 24
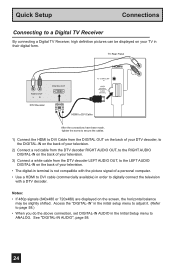
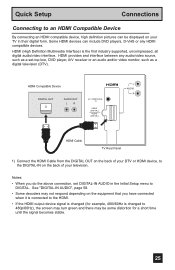
... AUDIO", page 58. 24 Access the "DIGITAL-IN" in the initial setup menu to adjust it. (Refer to page 58.) • When you do the above connection, set DIGITAL-IN AUDIO in their digital form. Quick Setup Connections Connecting to a Digital TV Receiver By connecting a Digital TV Receiver, high definition pictures can be displayed on the screen, the horizontal balance may be slightly shifted. TV Rear Panel AUDIO OUT LR DTV Decoder DIGITAL OUT AV COMPULINK III VIDEO (DIGITAL) _ AUDIO (DIGITAL) HDMI to DVI Cable L AUDIO R After the connections...
... AUDIO", page 58. 24 Access the "DIGITAL-IN" in the initial setup menu to adjust it. (Refer to page 58.) • When you do the above connection, set DIGITAL-IN AUDIO in their digital form. Quick Setup Connections Connecting to a Digital TV Receiver By connecting a Digital TV Receiver, high definition pictures can be displayed on the screen, the horizontal balance may be slightly shifted. TV Rear Panel AUDIO OUT LR DTV Decoder DIGITAL OUT AV COMPULINK III VIDEO (DIGITAL) _ AUDIO (DIGITAL) HDMI to DVI Cable L AUDIO R After the connections...
Instructions
Page 25
... screen may turn green and there may not respond depending on your television. Notes: • When you have connected when it is connected to the HDMI. • If the HDMI output device signal is changed (for a short time until the signal becomes stable. 25 See "DIGITAL-IN AUDIO", page 58. • Some decoders may be displayed on the equipment that you do the above connection, set -top box, DVD player, A/V receiver or...
... screen may turn green and there may not respond depending on your television. Notes: • When you have connected when it is connected to the HDMI. • If the HDMI output device signal is changed (for a short time until the signal becomes stable. 25 See "DIGITAL-IN AUDIO", page 58. • Some decoders may be displayed on the equipment that you do the above connection, set -top box, DVD player, A/V receiver or...
Instructions
Page 26
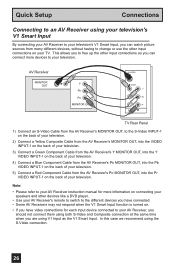
... a DVD player. • Use your AV Receiver's remote to switch to the different devices you have connected. • Some AV Receivers may not respond when the V1 Smart Input function is turned on. • If you have video connections for each input device connected to the S-Video INPUT-1 on the back of your television. 2) Connect a Yellow Composite Cable from the AV Receiver's MONITOR OUT, into the VIDEO INPUT-1 on the back of your television. 3) Connect a Green Component Cable...
... a DVD player. • Use your AV Receiver's remote to switch to the different devices you have connected. • Some AV Receivers may not respond when the V1 Smart Input function is turned on. • If you have video connections for each input device connected to the S-Video INPUT-1 on the back of your television. 2) Connect a Yellow Composite Cable from the AV Receiver's MONITOR OUT, into the VIDEO INPUT-1 on the back of your television. 3) Connect a Green Component Cable...
Instructions
Page 31
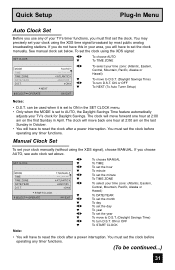
... will move to reset the clock after a power interruption. ON or OFF To NEXT (To Auto Tuner Setup) SELECT OPERATE MENU EXIT Notes: • D.S.T. SET CLOCK MODE TIME TIME ZONE DATE/YEAR D.S.T. NEXT AUTO -- : -- -- See manual clock set above. You may precisely set the clock. Quick Setup Plug-In Menu Auto Clock Set Before you use any of your TV's timer functions, you must first set your clock using the XDS time signal broadcast by most...
... will move to reset the clock after a power interruption. ON or OFF To NEXT (To Auto Tuner Setup) SELECT OPERATE MENU EXIT Notes: • D.S.T. SET CLOCK MODE TIME TIME ZONE DATE/YEAR D.S.T. NEXT AUTO -- : -- -- See manual clock set above. You may precisely set the clock. Quick Setup Plug-In Menu Auto Clock Set Before you use any of your TV's timer functions, you must first set your clock using the XDS time signal broadcast by most...
Instructions
Page 38
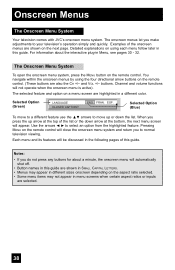
... you make adjustments to move to a different feature use the π† arrows to your television's operation simply and quickly. buttons. Selected Option (Green) LANGUAGE CLOSED CAPTION ENG. The Onscreen Menu System To open the onscreen menu system, press the MENU button on the remote control. (These buttons are shown on the remote control will automatically shut off. • Button names in the following pages of the list or the...
... you make adjustments to move to a different feature use the π† arrows to your television's operation simply and quickly. buttons. Selected Option (Green) LANGUAGE CLOSED CAPTION ENG. The Onscreen Menu System To open the onscreen menu system, press the MENU button on the remote control. (These buttons are shown on the remote control will automatically shut off. • Button names in the following pages of the list or the...

Instructions
Page 39
... MENU button TO INITIAL SETUP 03 Onscreen Menus INITIAL SETUP PREVIOUS AUTO TUNER SETUP CHANNEL SUMMARY V-CHIP SET LOCK CODE AUTO DEMO OFF NEXT PAGE SELECT OPERATE (4/5) MENU EXIT INITIAL SETUP 04 CLOCK / TIMERS PREVIOUS SET CLOCK ON / OFF TIMER LAMP TIMER RESET NEXT PAGE SELECT OPERATE MENU EXIT CLOCK/TIMERS INITIAL SETUP PREVIOUS VIDEO-1MONITOR OUT TV SPEAKER AUDIO OUT DIGITAL-IN DIGITAL-IN AUDIO CENTER CH INPUT NEXT PAGE SELECT OPERATE OFF ON VARI SIZE1 DIGITAL OFF (1/5) MENU EXIT INITIAL SETUP 01 INITIAL SETUP PREVIOUS DIGITAL SETUP MEDIA CARD VIEWER SOUND ADJUST...
... MENU button TO INITIAL SETUP 03 Onscreen Menus INITIAL SETUP PREVIOUS AUTO TUNER SETUP CHANNEL SUMMARY V-CHIP SET LOCK CODE AUTO DEMO OFF NEXT PAGE SELECT OPERATE (4/5) MENU EXIT INITIAL SETUP 04 CLOCK / TIMERS PREVIOUS SET CLOCK ON / OFF TIMER LAMP TIMER RESET NEXT PAGE SELECT OPERATE MENU EXIT CLOCK/TIMERS INITIAL SETUP PREVIOUS VIDEO-1MONITOR OUT TV SPEAKER AUDIO OUT DIGITAL-IN DIGITAL-IN AUDIO CENTER CH INPUT NEXT PAGE SELECT OPERATE OFF ON VARI SIZE1 DIGITAL OFF (1/5) MENU EXIT INITIAL SETUP 01 INITIAL SETUP PREVIOUS DIGITAL SETUP MEDIA CARD VIEWER SOUND ADJUST...

Instructions
Page 58
... the speaker of this feature for more information. • When you need a video signal present as well as SELECT OPERATE MENU EXIT sound. If the displayed picture is being displayed on Digital Sound in the Digital Setup menu. Set CENTER CH INPUT to your DTV or HDMI component is being utilized as a CENTER CHANNEL. This option adjusts the position when an HDMI or DVI 480p picture signal is capable of that when switching CENTER CHANNEL mode ON...
... the speaker of this feature for more information. • When you need a video signal present as well as SELECT OPERATE MENU EXIT sound. If the displayed picture is being displayed on Digital Sound in the Digital Setup menu. Set CENTER CH INPUT to your DTV or HDMI component is being utilized as a CENTER CHANNEL. This option adjusts the position when an HDMI or DVI 480p picture signal is capable of that when switching CENTER CHANNEL mode ON...

Instructions
Page 59
... TV screen, giving you to adjust the levels of fine detail displayed in the TV picture appear either more vivid or subtle. COLOR The color function lets you to the next setting Press the MENU button when finished PICTURE ADJUST PREVIOUS STANDARD TINT 00 COLOR 00 PICTURE 00 BRIGHT 00 DETAIL 00 COLOR TEMPERATURE HIGH NEXT PAGE (1/2) SELECT OPERATE MENU EXIT Color Temperature You can adjust the overall brightness of red and green in your television...
... TV screen, giving you to adjust the levels of fine detail displayed in the TV picture appear either more vivid or subtle. COLOR The color function lets you to the next setting Press the MENU button when finished PICTURE ADJUST PREVIOUS STANDARD TINT 00 COLOR 00 PICTURE 00 BRIGHT 00 DETAIL 00 COLOR TEMPERATURE HIGH NEXT PAGE (1/2) SELECT OPERATE MENU EXIT Color Temperature You can adjust the overall brightness of red and green in your television...

Instructions
Page 65
... you need to change the lamp. THE LAMP TIMER IS RESET SUCCESSFULLY. CLOCK / TIMERS PREVIOUS SET CLOCK ON / OFF TIMER LAMP TIMER RESET PRESS OK TO RESET THE LAMP TIMER. The lamp timer has now been reset. NEXT PAGE SELECT OPERATE MENU EXIT Press the OK button while the above message appears on lamp replacement. 65 Notes: • You can use the Lamp Timer Reset only after replacing the lamp. • See Page 96 for instructions on the television screen. Clock/Timers Lamp Timer Reset The lamp replacement...
... you need to change the lamp. THE LAMP TIMER IS RESET SUCCESSFULLY. CLOCK / TIMERS PREVIOUS SET CLOCK ON / OFF TIMER LAMP TIMER RESET PRESS OK TO RESET THE LAMP TIMER. The lamp timer has now been reset. NEXT PAGE SELECT OPERATE MENU EXIT Press the OK button while the above message appears on lamp replacement. 65 Notes: • You can use the Lamp Timer Reset only after replacing the lamp. • See Page 96 for instructions on the television screen. Clock/Timers Lamp Timer Reset The lamp replacement...

Instructions
Page 92
... the fan is locked or the temperature has increased. Adjust your dealer. LED continues blinking 92 See page 68. • The tuner (Auto Tuner Setup) could be within 23 feet (7 meters). It does not operate correctly The clock is wrong • This television is locked. Check the antenna connection. Troubleshooting PROBLEMS CHECK There is no picture or sound • The antenna could be disconnected. • The input mode could be set improperly. The POWER LED and LAMP/PROGRAM LED...
... the fan is locked or the temperature has increased. Adjust your dealer. LED continues blinking 92 See page 68. • The tuner (Auto Tuner Setup) could be within 23 feet (7 meters). It does not operate correctly The clock is wrong • This television is locked. Check the antenna connection. Troubleshooting PROBLEMS CHECK There is no picture or sound • The antenna could be disconnected. • The input mode could be set improperly. The POWER LED and LAMP/PROGRAM LED...

Instructions
Page 96
... to replace the lamp. Never attempt to replace the lamp with your fingers. You will come away from the rear panel. If you and the panel will need to remove the lamp cover. Please observe all safety warnings. 1) Turn off the television. Wait until the picture has closed and the LAMP/PROGRAM LED on the remote control or TV front panel. Note: • When removing the speaker panel, in . 3) Remove a screw from the television. Set it from the left speaker panel located...
... to replace the lamp. Never attempt to replace the lamp with your fingers. You will come away from the rear panel. If you and the panel will need to remove the lamp cover. Please observe all safety warnings. 1) Turn off the television. Wait until the picture has closed and the LAMP/PROGRAM LED on the remote control or TV front panel. Note: • When removing the speaker panel, in . 3) Remove a screw from the television. Set it from the left speaker panel located...
Instructions
Page 102
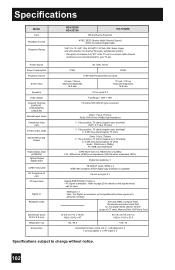
.... Specifications Model Type Reception Format Reception Range Power Source Power Consumption Projection Source Screen Size Speakers Audio Output Antenna Terminal (VHF/UHF, ATSC/DIGITAL CABLE IN) External Input Jacks Component Input Jack S-Video Input Jacks Monitor/Recording Output Audio Output Jacks (VARI/FIX) Optical Output Digital Audio i.LINK In/Out Jack AV CompuLink III Jack PC Input Jack Digital-In Readable Cards Dimensions (inch) W X H X D (cm) Weight (lbs / kg) Accessories HD-61Z886 HD-61Z786 HD-70G886 HD-ILA Device Projection NTSC, BTSC System (Multi-Channel Sound) ATSC...
.... Specifications Model Type Reception Format Reception Range Power Source Power Consumption Projection Source Screen Size Speakers Audio Output Antenna Terminal (VHF/UHF, ATSC/DIGITAL CABLE IN) External Input Jacks Component Input Jack S-Video Input Jacks Monitor/Recording Output Audio Output Jacks (VARI/FIX) Optical Output Digital Audio i.LINK In/Out Jack AV CompuLink III Jack PC Input Jack Digital-In Readable Cards Dimensions (inch) W X H X D (cm) Weight (lbs / kg) Accessories HD-61Z886 HD-61Z786 HD-70G886 HD-ILA Device Projection NTSC, BTSC System (Multi-Channel Sound) ATSC...


