
Instructions
Page 2
No user serviceable parts inside. WARNING: TO PREVENT FIRE OR SHOCK HAZARDS, DO NOT EXPOSE THIS TV SET TO RAIN OR MOISTURE. Operate only from the AC outlet and antenna for your safety. * To prevent electric shock do not use this polarized plug with arrowhead symbol, within an equilateral triangle is intended to alert the user to environmental considerations. Changes or modifications...
No user serviceable parts inside. WARNING: TO PREVENT FIRE OR SHOCK HAZARDS, DO NOT EXPOSE THIS TV SET TO RAIN OR MOISTURE. Operate only from the AC outlet and antenna for your safety. * To prevent electric shock do not use this polarized plug with arrowhead symbol, within an equilateral triangle is intended to alert the user to environmental considerations. Changes or modifications...
Instructions
Page 6
... to project the picture onto the screen. What happens when the power is turned on the front panel blinks in orange at their full brightness. It takes approximately one of the television and the lamp Cooling is also performed while the television is pressed, the Lamp LED indicator blinks in orange for approximately 1 minute at approximately every 2 seconds, and then goes out. Once the screen is dark, cooling is a user replaceable...
... to project the picture onto the screen. What happens when the power is turned on the front panel blinks in orange at their full brightness. It takes approximately one of the television and the lamp Cooling is also performed while the television is pressed, the Lamp LED indicator blinks in orange for approximately 1 minute at approximately every 2 seconds, and then goes out. Once the screen is dark, cooling is a user replaceable...
Instructions
Page 7
... rear cabinet. 13. ILA element characteristics Do not project still pictures or pictures that the television is recommended that have still segments for details on the lamp and screen. Usable Time Do not keep children and pets away from fingers on for cooling. Do not replace the lamp immediately after use . The warm air could cause the color of time. This is used by the screen...
... rear cabinet. 13. ILA element characteristics Do not project still pictures or pictures that the television is recommended that have still segments for details on the lamp and screen. Usable Time Do not keep children and pets away from fingers on for cooling. Do not replace the lamp immediately after use . The warm air could cause the color of time. This is used by the screen...
Instructions
Page 8
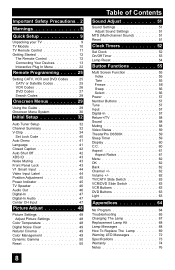
... Using the Guide 29 Onscreen Menu System 30 Initial Setup 32 Auto Tuner Setup 32 Channel Summary 32 V-Chip 34 Set Lock Code 40 Auto Demo 41 Language 41 Closed Caption 42 Auto Shut Off 42 XDS ID 43 Noise Muting 43 Front Panel Lock 43 V1 Smart Input 44 Video Input Label 44 Position Adjustment 45 Power Indicator 45 TV Speaker 46 Audio Out 46 Digital-In 47 Digital-In Audio 47 Center CH Input 47 Picture Adjust 48 Picture Settings 48 Adjust Picture Settings 48 Color Temperature 48 Digital Noise...
... Using the Guide 29 Onscreen Menu System 30 Initial Setup 32 Auto Tuner Setup 32 Channel Summary 32 V-Chip 34 Set Lock Code 40 Auto Demo 41 Language 41 Closed Caption 42 Auto Shut Off 42 XDS ID 43 Noise Muting 43 Front Panel Lock 43 V1 Smart Input 44 Video Input Label 44 Position Adjustment 45 Power Indicator 45 TV Speaker 46 Audio Out 46 Digital-In 47 Digital-In Audio 47 Center CH Input 47 Picture Adjust 48 Picture Settings 48 Adjust Picture Settings 48 Color Temperature 48 Digital Noise...
Instructions
Page 9
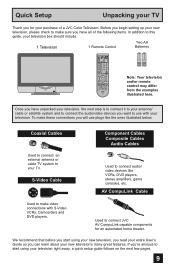
... this guide, your television box should include: 1 Television 1 Remote Control Two AA Batteries AA Alkaline AA Alkaline TV CATV VCR DVD POWER ASPECT TWIN MULTI SCREEN INDEX FREEZE SWAP SELECT INPUT 1 V1 1 2 3 INPUT 2 V2 4 5 6 INPUT 3 V3 7 8 9 INPUT 4 V4 TUNE RETURN+ 0 TV THEATER DIGITAL-IN PRO D-IN VIDEO STATUS SLEEP TIMER DISPLAY SOUND LIGHT + MUTING CH C.C. AV CompuLink Cable Used to make sure you have unpacked your television, the next step is to connect it to your antenna/ cable...
... this guide, your television box should include: 1 Television 1 Remote Control Two AA Batteries AA Alkaline AA Alkaline TV CATV VCR DVD POWER ASPECT TWIN MULTI SCREEN INDEX FREEZE SWAP SELECT INPUT 1 V1 1 2 3 INPUT 2 V2 4 5 6 INPUT 3 V3 7 8 9 INPUT 4 V4 TUNE RETURN+ 0 TV THEATER DIGITAL-IN PRO D-IN VIDEO STATUS SLEEP TIMER DISPLAY SOUND LIGHT + MUTING CH C.C. AV CompuLink Cable Used to make sure you have unpacked your television, the next step is to connect it to your antenna/ cable...
Instructions
Page 10
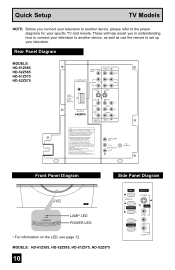
... CHANNEL INPUT INPUT-2 Y VIDEO AV COMPULINK III VIDEO (DIGITAL) AUDIO (DIGITAL) DIGITAL IN L AUDIO R S-VIDEO Pb Pr S-VIDEO L AUDIO R OVER VIDEO L I AUDIO I R OVER Y VIDEO L Pb I AUDIO I R Pr INPUT-3 INPUT-1 UNPLUG THE POWER CORD FROM AC OUTLET BEFORE REMOVING THE REAR COVER When the rear cover is a registered trademark of the television features. DÉBRANCHEZ LE CORDON DE LA PRISE DE COURANT C. Sous licence de BBE Sound, Inc. SUBWOOFER OUT L AUDIO OUTPUT R 75Ω (VHF/UHF) Front Panel Diagram Side Panel Diagram LAMP POWER LAMP POWER LAMP LED POWER LED...
... CHANNEL INPUT INPUT-2 Y VIDEO AV COMPULINK III VIDEO (DIGITAL) AUDIO (DIGITAL) DIGITAL IN L AUDIO R S-VIDEO Pb Pr S-VIDEO L AUDIO R OVER VIDEO L I AUDIO I R OVER Y VIDEO L Pb I AUDIO I R Pr INPUT-3 INPUT-1 UNPLUG THE POWER CORD FROM AC OUTLET BEFORE REMOVING THE REAR COVER When the rear cover is a registered trademark of the television features. DÉBRANCHEZ LE CORDON DE LA PRISE DE COURANT C. Sous licence de BBE Sound, Inc. SUBWOOFER OUT L AUDIO OUTPUT R 75Ω (VHF/UHF) Front Panel Diagram Side Panel Diagram LAMP POWER LAMP POWER LAMP LED POWER LED...
Instructions
Page 13
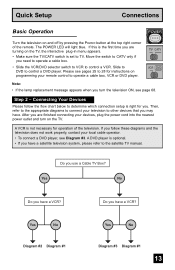
... the TV/CATV switch is right for operation of the remote. Yes No Diagram #2 Diagram #1 Yes No Diagram #3 Diagram #1 13 A DVD player is not necessary for you use a Cable TV Box? Quick Setup Connections Basic Operation POWER T Turn the television on programming your remote control to operate a cable box, VCR or DVD player. Slide to DVD to 28 for instructions on and off by pressing the POWER button at the top right corner of the television. TV CATV VCR DVD A Note: • If the lamp replacement message...
... the TV/CATV switch is right for operation of the remote. Yes No Diagram #2 Diagram #1 Yes No Diagram #3 Diagram #1 13 A DVD player is not necessary for you use a Cable TV Box? Quick Setup Connections Basic Operation POWER T Turn the television on programming your remote control to operate a cable box, VCR or DVD player. Slide to DVD to 28 for instructions on and off by pressing the POWER button at the top right corner of the television. TV CATV VCR DVD A Note: • If the lamp replacement message...
Instructions
Page 16
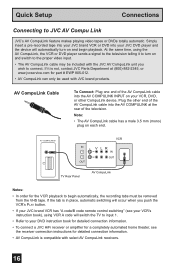
... the receiver connection instructions for detailed connection information. • AV CompuLink is not, contact JVC Parts Department at the rear of the television. At the same time, using VCR A code will switch the TV to input 1. • Refer to your JVC DVD player and the device will occur when you wish to JVC AV Compu Link JVC's AV CompuLink feature makes playing video tapes or DVDs totally automatic. If it to turn...
... the receiver connection instructions for detailed connection information. • AV CompuLink is not, contact JVC Parts Department at the rear of the television. At the same time, using VCR A code will switch the TV to input 1. • Refer to your JVC DVD player and the device will occur when you wish to JVC AV Compu Link JVC's AV CompuLink feature makes playing video tapes or DVDs totally automatic. If it to turn...
Instructions
Page 17
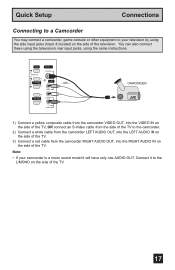
MENU OPERATE + CHANNEL - INPUT 4 S-VIDEO OVER VIDEO + VOLUME - L/MONO R AUDIO - Note: • If your television by using the same instructions. Connect it will have only one AUDIO OUT. OR - CAMCORDER 1) Connect a yellow composite cable from the camcorder VIDEO OUT, into the RIGHT AUDIO IN on the side of the TV. 17 Quick Setup Connections Connecting to a Camcorder You may connect a camcorder, game console or other equipment to your camcorder is a mono sound model it to the...
MENU OPERATE + CHANNEL - INPUT 4 S-VIDEO OVER VIDEO + VOLUME - L/MONO R AUDIO - Note: • If your television by using the same instructions. Connect it will have only one AUDIO OUT. OR - CAMCORDER 1) Connect a yellow composite cable from the camcorder VIDEO OUT, into the RIGHT AUDIO IN on the side of the TV. 17 Quick Setup Connections Connecting to a Camcorder You may connect a camcorder, game console or other equipment to your camcorder is a mono sound model it to the...
Instructions
Page 19
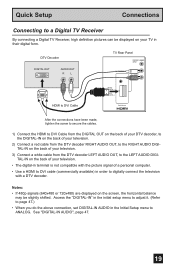
... Setup Connections Connecting to digitally connect the television with the picture signal of a personal computer. • Use a HDMI to DVI cable (commercially available) in order to a Digital TV Receiver By connecting a Digital TV Receiver, high definition pictures can be slightly shifted. DTV Decoder DIGITAL OUT AUDIO OUT RL TV Rear Panel CENTER CHANNEL INPUT AV COMPULINK III L AUDIO R VIDEO (DIGITAL) AUDIO (DIGITAL) HDMI to DVI Cable DIGITAL IN After the connections have been made, tighten the screw to secure the cables. 1) Connect the HDMI to DVI Cable from the DIGITAL...
... Setup Connections Connecting to digitally connect the television with the picture signal of a personal computer. • Use a HDMI to DVI cable (commercially available) in order to a Digital TV Receiver By connecting a Digital TV Receiver, high definition pictures can be slightly shifted. DTV Decoder DIGITAL OUT AUDIO OUT RL TV Rear Panel CENTER CHANNEL INPUT AV COMPULINK III L AUDIO R VIDEO (DIGITAL) AUDIO (DIGITAL) HDMI to DVI Cable DIGITAL IN After the connections have been made, tighten the screw to secure the cables. 1) Connect the HDMI to DVI Cable from the DIGITAL...
Instructions
Page 20
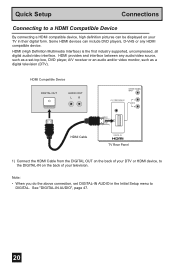
... Connections Connecting to DIGITAL. HDMI (High Definition Multimedia Interface) is the first industry supported, uncompressed, all digital audio/video interface. HDMI Compatible Device DIGITAL OUT AUDIO OUT LR HDMI Cable CENTER CHANNEL INPUT AV COMPULINK III L AUDIO R VIDEO (DIGITAL) AUDIO (DIGITAL) DIGITAL IN TV Rear Panel 1) Connect the HDMI Cable from the DIGITAL OUT on the back of your DTV or HDMI device, to the DIGITAL-IN on your TV in the Initial Setup menu to a HDMI Compatible Device By connecting a HDMI compatible device, high definition pictures can include DVD players...
... Connections Connecting to DIGITAL. HDMI (High Definition Multimedia Interface) is the first industry supported, uncompressed, all digital audio/video interface. HDMI Compatible Device DIGITAL OUT AUDIO OUT LR HDMI Cable CENTER CHANNEL INPUT AV COMPULINK III L AUDIO R VIDEO (DIGITAL) AUDIO (DIGITAL) DIGITAL IN TV Rear Panel 1) Connect the HDMI Cable from the DIGITAL OUT on the back of your DTV or HDMI device, to the DIGITAL-IN on your TV in the Initial Setup menu to a HDMI Compatible Device By connecting a HDMI compatible device, high definition pictures can include DVD players...
Instructions
Page 21
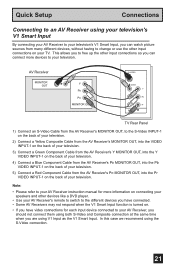
... the VIDEO INPUT-1 on the back of your television. 3) Connect a Green Component Cable from the AV Receiver's Y MONITOR OUT, into the Y VIDEO INPUT-1 on the back of your television. 4) Connect a Blue Component Cable from the AV Receiver's PB MONITOR OUT, into the Pb VIDEO INPUT-1 on the back of your television. 5) Connect a Red Component Cable from many different devices, without having to change or use the other devices like a DVD player. • Use your AV Receiver's remote to switch to...
... the VIDEO INPUT-1 on the back of your television. 3) Connect a Green Component Cable from the AV Receiver's Y MONITOR OUT, into the Y VIDEO INPUT-1 on the back of your television. 4) Connect a Blue Component Cable from the AV Receiver's PB MONITOR OUT, into the Pb VIDEO INPUT-1 on the back of your television. 5) Connect a Red Component Cable from many different devices, without having to change or use the other devices like a DVD player. • Use your AV Receiver's remote to switch to...
Instructions
Page 23
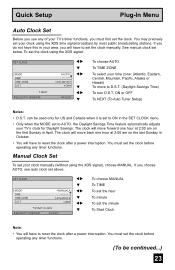
... to reset the clock after a power interruption. MANUAL -- : -- -- ON or OFF To NEXT (To Auto Tuner Setup) Notes: • D.S.T. SET CLOCK MODE TIME TIME ZONE D.S.T. ATLANTIC ON START CLOCK SELECT OPERATE MENU EXIT √® † √® † √® † To choose MANUAL To TIME To set the hour To minute To set to AUTO, the Daylight Savings Time feature automatically adjusts your clock using the XDS signal: SET CLOCK MODE TIME TIME ZONE...
... to reset the clock after a power interruption. MANUAL -- : -- -- ON or OFF To NEXT (To Auto Tuner Setup) Notes: • D.S.T. SET CLOCK MODE TIME TIME ZONE D.S.T. ATLANTIC ON START CLOCK SELECT OPERATE MENU EXIT √® † √® † √® † To choose MANUAL To TIME To set the hour To minute To set to AUTO, the Daylight Savings Time feature automatically adjusts your clock using the XDS signal: SET CLOCK MODE TIME TIME ZONE...
Instructions
Page 30
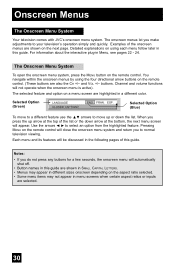
... adjustments to select an option from the highlighted feature. FRAN. Selected Option (Blue) To move to a different feature use the π† arrows to normal television viewing. Pressing MENU on the remote control. (These buttons are highlighted in Menu, see pages 22 - 24. Each menu and its features will automatically shut off. • Button names in this guide. Onscreen Menus The Onscreen Menu System Your television comes...
... adjustments to select an option from the highlighted feature. FRAN. Selected Option (Blue) To move to a different feature use the π† arrows to normal television viewing. Pressing MENU on the remote control. (These buttons are highlighted in Menu, see pages 22 - 24. Each menu and its features will automatically shut off. • Button names in this guide. Onscreen Menus The Onscreen Menu System Your television comes...
Instructions
Page 31
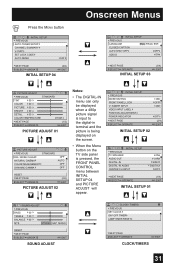
Press the MENU button INITIAL SETUP PREVIOUS AUTO TUNER SETUP CHANNEL SUMMARY V-CHIP SET LOCK CODE AUTO DEMO OFF NEXT PAGE SELECT OPERATE (4/4) MENU EXIT INITIAL SETUP 04 Onscreen Menus INITIAL SETUP PREVIOUS LANGUAGE ENG. CLOSED CAPTION AUTO SHUT OFF OFF XDS ID ON NEXT PAGE (3/4) SELECT OPERATE MENU EXIT INITIAL SETUP 03 PICTURE ADJUST PREVIOUS STANDARD TINT 00 COLOR 00 PICTURE 00 BRIGHT 00 DETAIL 00 COLOR TEMPERATURE HIGH NEXT PAGE (1/2) SELECT OPERATE MENU EXIT PICTURE ADJUST 01 PICTURE ADJUST PREVIOUS STANDARD DIG. FRAN. NOISE CLEAR ...
Press the MENU button INITIAL SETUP PREVIOUS AUTO TUNER SETUP CHANNEL SUMMARY V-CHIP SET LOCK CODE AUTO DEMO OFF NEXT PAGE SELECT OPERATE (4/4) MENU EXIT INITIAL SETUP 04 Onscreen Menus INITIAL SETUP PREVIOUS LANGUAGE ENG. CLOSED CAPTION AUTO SHUT OFF OFF XDS ID ON NEXT PAGE (3/4) SELECT OPERATE MENU EXIT INITIAL SETUP 03 PICTURE ADJUST PREVIOUS STANDARD TINT 00 COLOR 00 PICTURE 00 BRIGHT 00 DETAIL 00 COLOR TEMPERATURE HIGH NEXT PAGE (1/2) SELECT OPERATE MENU EXIT PICTURE ADJUST 01 PICTURE ADJUST PREVIOUS STANDARD DIG. FRAN. NOISE CLEAR ...
Instructions
Page 47
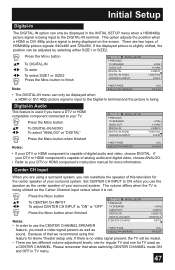
... when switching CENTER CHANNEL mode ON and OFF in the INITIAL SETUP menu when a HDMI480p picture signal is being displayed on the screen. If there is no video signal present, the TV will be displayed when a HDMI or DVI 480p picture signal is input to the Digital-In terminal and the picture is being input to use the CENTER CHANNEL SPEAKER feature, you use the speaker as sound. Initial Setup Digital-In The DIGITAL-IN option can only be adjusted by...
... when switching CENTER CHANNEL mode ON and OFF in the INITIAL SETUP menu when a HDMI480p picture signal is being displayed on the screen. If there is no video signal present, the TV will be displayed when a HDMI or DVI 480p picture signal is input to the Digital-In terminal and the picture is being input to use the CENTER CHANNEL SPEAKER feature, you use the speaker as sound. Initial Setup Digital-In The DIGITAL-IN option can only be adjusted by...

Instructions
Page 48
... setting Press the MENU button when finished PICTURE ADJUST PREVIOUS STANDARD TINT 00 COLOR 00 PICTURE 00 BRIGHT 00 DETAIL 00 COLOR TEMPERATURE HIGH NEXT PAGE (1/2) SELECT OPERATE MENU EXIT Color Temperature You can adjust the overall brightness of red and green in the TV picture appear either more vivid or subtle. DETAIL The Detail feature adjusts the level of black and white on the TV screen, giving you a darker or brighter picture overall. Picture Adjust Picture Settings These settings...
... setting Press the MENU button when finished PICTURE ADJUST PREVIOUS STANDARD TINT 00 COLOR 00 PICTURE 00 BRIGHT 00 DETAIL 00 COLOR TEMPERATURE HIGH NEXT PAGE (1/2) SELECT OPERATE MENU EXIT Color Temperature You can adjust the overall brightness of red and green in the TV picture appear either more vivid or subtle. DETAIL The Detail feature adjusts the level of black and white on the TV screen, giving you a darker or brighter picture overall. Picture Adjust Picture Settings These settings...

Instructions
Page 54
... RESET THE LAMP TIMER. The lamp timer has now been reset. Note: • You can use the Lamp Timer Reset only after replacing the lamp. • See Page 68 for instructions on the television screen. After you replace the lamp, you need to change the lamp. THE LAMP TIMER IS RESET SUCCESSFULLY. Clock/Timers Lamp Timer Reset The lamp replacement message will appear when you need to reset the timer which is built into your television. π† √® Press the MENU button To LAMP TIMER RESET...
... RESET THE LAMP TIMER. The lamp timer has now been reset. Note: • You can use the Lamp Timer Reset only after replacing the lamp. • See Page 68 for instructions on the television screen. After you replace the lamp, you need to change the lamp. THE LAMP TIMER IS RESET SUCCESSFULLY. Clock/Timers Lamp Timer Reset The lamp replacement message will appear when you need to reset the timer which is built into your television. π† √® Press the MENU button To LAMP TIMER RESET...
Instructions
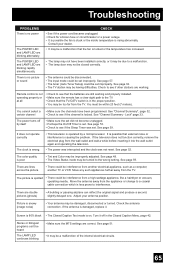
Page 65
..., operating nearby. If the antenna is spotted • There could be set . There is causing the problem. You must be interference from the appliance or change to a coaxial cable connection which is less prone to see that external noise or interference is no power The POWER LED and LAMP LED are blinking alternately. If the television does not function correctly, remove the electrical plug from the TV. The picture...
..., operating nearby. If the antenna is spotted • There could be set . There is causing the problem. You must be interference from the appliance or change to a coaxial cable connection which is less prone to see that external noise or interference is no power The POWER LED and LAMP LED are blinking alternately. If the television does not function correctly, remove the electrical plug from the TV. The picture...
Instructions
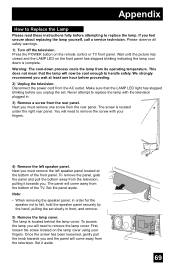
Page 69
... the picture has closed and the LAMP LED on the front panel has stopped blinking indicating the lamp cool down process cools the lamp from its operating temperature. Disconnect the power cord from the television. To access the lamp you and the panel will come away from the rear panel. The lamp is complete. Next you feel unsure about replacing the lamp yourself, call a service technician. The screw is located under the right rear panel. You will come...
... the picture has closed and the LAMP LED on the front panel has stopped blinking indicating the lamp cool down process cools the lamp from its operating temperature. Disconnect the power cord from the television. To access the lamp you and the panel will come away from the rear panel. The lamp is complete. Next you feel unsure about replacing the lamp yourself, call a service technician. The screw is located under the right rear panel. You will come...


