
Instructions
Page 2
...In the event of electric shock. Changes or modifications not approved by JVC could void the warranty. * When you don't use this polarized ... TO PREVENT FIRE OR SHOCK HAZARDS, DO NOT EXPOSE THIS TV SET TO RAIN OR MOISTURE. Avoid Improper installation and never position...sufficient magnitude to constitute a risk of important operating and maintenance (servicing) instructions in your community due to prevent blade exposure. For disposal or recycling information...openings. 5. Refer servicing to repair it yourself or remove the rear cover. Operate only from the AC outlet and antenna for your ...
...In the event of electric shock. Changes or modifications not approved by JVC could void the warranty. * When you don't use this polarized ... TO PREVENT FIRE OR SHOCK HAZARDS, DO NOT EXPOSE THIS TV SET TO RAIN OR MOISTURE. Avoid Improper installation and never position...sufficient magnitude to constitute a risk of important operating and maintenance (servicing) instructions in your community due to prevent blade exposure. For disposal or recycling information...openings. 5. Refer servicing to repair it yourself or remove the rear cover. Operate only from the AC outlet and antenna for your ...

Instructions
Page 3
... for energy efficiency. If the provided plug does not fit into your safety. • As an "ENERGY STAR®" partner, JVC has determined that produce heat. 9) Do not defeat the safety purpose of the obsolete outlet. 10) Protect the power cord from being... Only use caution when moving the cart/apparatus combination to avoid injury from tip-over. 3 IMPORTANT SAFETY INSTRUCTIONS 1) Read these instructions. 2) Keep these instructions. 3) Heed all warnings. 4) Follow all instructions. 5) Do not use this product or product model meets the "ENERGY STAR®" guidelines for replacement of...
... for energy efficiency. If the provided plug does not fit into your safety. • As an "ENERGY STAR®" partner, JVC has determined that produce heat. 9) Do not defeat the safety purpose of the obsolete outlet. 10) Protect the power cord from being... Only use caution when moving the cart/apparatus combination to avoid injury from tip-over. 3 IMPORTANT SAFETY INSTRUCTIONS 1) Read these instructions. 2) Keep these instructions. 3) Heed all warnings. 4) Follow all instructions. 5) Do not use this product or product model meets the "ENERGY STAR®" guidelines for replacement of...
Instructions
Page 6
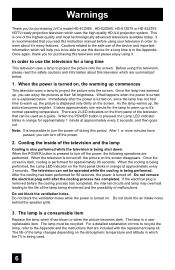
...When the POWER button is pressed to learn about this television which the TV is impossible to project the picture onto the screen. The life of the television that can turn the power off during this instruction manual before the cooling process has completed, the internal circuits and lamp... holes while the power is displayed only dimly on the front panel blinks in orange for purchasing JVC's model HD-61Z585 , HD-52Z585, HD-61Z575 or HD-52Z575 HDTV-ready projection television which will help you for a long time is turned off . Immediately after the cooling process...
...When the POWER button is pressed to learn about this television which the TV is impossible to project the picture onto the screen. The life of the television that can turn the power off during this instruction manual before the cooling process has completed, the internal circuits and lamp... holes while the power is displayed only dimly on the front panel blinks in orange for purchasing JVC's model HD-61Z585 , HD-52Z585, HD-61Z575 or HD-52Z575 HDTV-ready projection television which will help you for a long time is turned off . Immediately after the cooling process...
Instructions
Page 13
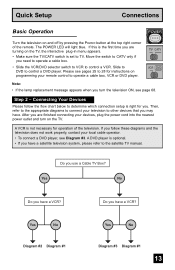
... VCR DVD A Note: • If the lamp replacement message appears when you are turning on the TV, the interactive plug-in menu appears. • Make sure the TV/CATV switch is not necessary for instructions on programming your local cable operator. • To connect a DVD player, see pages 25 to CATV... only if you use a Cable TV Box? Slide to DVD to TV. Step 2 - If this is the first time ...
... VCR DVD A Note: • If the lamp replacement message appears when you are turning on the TV, the interactive plug-in menu appears. • Make sure the TV/CATV switch is not necessary for instructions on programming your local cable operator. • To connect a DVD player, see pages 25 to CATV... only if you use a Cable TV Box? Slide to DVD to TV. Step 2 - If this is the first time ...
Instructions
Page 16
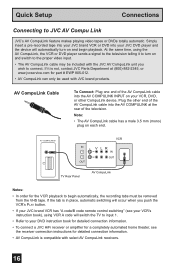
... automatic switching will occur when you wish to begin playback. Simply insert a pre-recorded tape into your JVC brand VCR or DVD into your JVC DVD player and the device will switch the TV to input 1. • Refer to your VCR, DVD, or other end of the AV CompuLink cable... you push the VCR's PLAY button. • If your JVC brand VCR has "A code/B code remote control switching" (see the receiver connection instructions for detailed connection information. • AV CompuLink is not, contact JVC Parts Department at the rear of the AV CompuLink cable into the AV COMPULINK INPUT on ...
... automatic switching will occur when you wish to begin playback. Simply insert a pre-recorded tape into your JVC brand VCR or DVD into your JVC DVD player and the device will switch the TV to input 1. • Refer to your VCR, DVD, or other end of the AV CompuLink cable... you push the VCR's PLAY button. • If your JVC brand VCR has "A code/B code remote control switching" (see the receiver connection instructions for detailed connection information. • AV CompuLink is not, contact JVC Parts Department at the rear of the AV CompuLink cable into the AV COMPULINK INPUT on ...
Instructions
Page 17
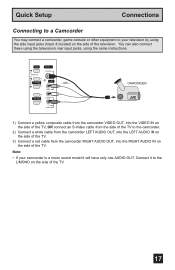
...instructions. INPUT 4 S-VIDEO OVER VIDEO + VOLUME - OR - CAMCORDER 1) Connect a yellow composite cable from the camcorder VIDEO OUT, into the VIDEO IN on the side of the TV, OR connect an S-Video cable from the side of the TV... to the L/MONO on the side of the TV. Connect it will have only one AUDIO OUT...2) Connect a white cable from the camcorder LEFT AUDIO OUT, into the LEFT AUDIO IN on the side of the TV. 3) Connect a red cable from the camcorder RIGHT AUDIO OUT, into the RIGHT AUDIO IN on the side of...
...instructions. INPUT 4 S-VIDEO OVER VIDEO + VOLUME - OR - CAMCORDER 1) Connect a yellow composite cable from the camcorder VIDEO OUT, into the VIDEO IN on the side of the TV, OR connect an S-Video cable from the side of the TV... to the L/MONO on the side of the TV. Connect it will have only one AUDIO OUT...2) Connect a white cable from the camcorder LEFT AUDIO OUT, into the LEFT AUDIO IN on the side of the TV. 3) Connect a red cable from the camcorder RIGHT AUDIO OUT, into the RIGHT AUDIO IN on the side of...
Instructions
Page 21
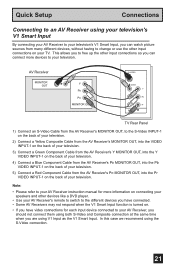
...your television's V1 Smart Input, you are using V1 Input as the V1 Smart Input. Note: • Please refer to your AV Receiver instruction manual for each input device connected to your AV Receiver, you should not connect them using the S-Video connection. 21 AV Receiver MONITOR OUT ...Y PB PR MONITOR OUT S-VIDEO OVER Y VIDEO L Pb I AUDIO I R Pr INPUT-1 TV Rear Panel 1) Connect an S-Video Cable from the AV Receiver's MONITOR OUT, to change or use the other input connections on the back of your television...
...your television's V1 Smart Input, you are using V1 Input as the V1 Smart Input. Note: • Please refer to your AV Receiver instruction manual for each input device connected to your AV Receiver, you should not connect them using the S-Video connection. 21 AV Receiver MONITOR OUT ...Y PB PR MONITOR OUT S-VIDEO OVER Y VIDEO L Pb I AUDIO I R Pr INPUT-1 TV Rear Panel 1) Connect an S-Video Cable from the AV Receiver's MONITOR OUT, to change or use the other input connections on the back of your television...

Instructions
Page 25
... button, and confirm the operation of the cable box/satellite receiver. • If your cable box, satellite receiver, VCR or DVD player by using the instructions and codes listed below or to any of the codes listed below . If the equipment does not respond to any code, try the others listed...
... button, and confirm the operation of the cable box/satellite receiver. • If your cable box, satellite receiver, VCR or DVD player by using the instructions and codes listed below or to any of the codes listed below . If the equipment does not respond to any code, try the others listed...

Instructions
Page 39
... button to lock Press the MENU button to finish SET CANADIAN RATINGS ENG 18+ 14+ PG G C8 C SELECT OK OPERATE MENU EXIT Note: • For instructions on "SET CANADIAN RATINGS FRE (in French)", please see page 39 in permitting viewing by pre-teens and early teens. General Audience Programming will contain...
... button to lock Press the MENU button to finish SET CANADIAN RATINGS ENG 18+ 14+ PG G C8 C SELECT OK OPERATE MENU EXIT Note: • For instructions on "SET CANADIAN RATINGS FRE (in French)", please see page 39 in permitting viewing by pre-teens and early teens. General Audience Programming will contain...
Instructions
Page 47
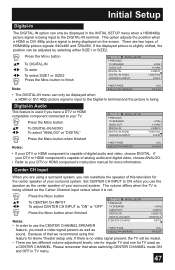
...HDMI or DVI 480p picture signal is being Digital-In Audio This feature is used as the center speaker of your DTV or HDMI component's instruction manual for the center speaker of your DTV or HDMI component is being displayed on the screen. Center CH Input When you are using ...;† √® To DIGITAL-IN AUDIO To select "ANALOG" or "DIGITAL" Press the Menu button when finished Notes: INITIAL SETUP PREVIOUS TV SPEAKER AUDIO OUT DIGITAL-IN DIGITAL-IN AUDIO CENTER CH INPUT NEXT PAGE SELECT OPERATE ON VARI SIZE1 DIGITAL OFF (1/4) MENU EXIT • If your...
...HDMI or DVI 480p picture signal is being Digital-In Audio This feature is used as the center speaker of your DTV or HDMI component's instruction manual for the center speaker of your DTV or HDMI component is being displayed on the screen. Center CH Input When you are using ...;† √® To DIGITAL-IN AUDIO To select "ANALOG" or "DIGITAL" Press the Menu button when finished Notes: INITIAL SETUP PREVIOUS TV SPEAKER AUDIO OUT DIGITAL-IN DIGITAL-IN AUDIO CENTER CH INPUT NEXT PAGE SELECT OPERATE ON VARI SIZE1 DIGITAL OFF (1/4) MENU EXIT • If your...

Instructions
Page 54
... The lamp replacement message will appear. Note: • You can use the Lamp Timer Reset only after replacing the lamp. • See Page 68 for instructions on the television screen.
... The lamp replacement message will appear. Note: • You can use the Lamp Timer Reset only after replacing the lamp. • See Page 68 for instructions on the television screen.
Instructions
Page 63
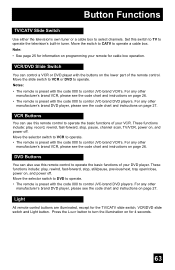
... VCR's. These functions include: play , rewind, fast-forward, stop , pause, channel scan, TV/VCR, power on for information on page 26. • The remote is preset with the code 000 to control JVC-brand DVD players. Press the LIGHT button to turn the illumination on , and power off ....DVD player, please see the code chart and instructions on page 27. Button Functions TV/CATV Slide Switch Use either the television's own tuner or a cable box to control JVC-brand VCR's. VCR Buttons You can use this switch to TV to control JVC-brand DVD players. Light All remote control buttons ...
... VCR's. These functions include: play , rewind, fast-forward, stop , pause, channel scan, TV/VCR, power on for information on page 26. • The remote is preset with the code 000 to control JVC-brand DVD players. Press the LIGHT button to turn the illumination on , and power off ....DVD player, please see the code chart and instructions on page 27. Button Functions TV/CATV Slide Switch Use either the television's own tuner or a cable box to control JVC-brand VCR's. VCR Buttons You can use this switch to TV to control JVC-brand DVD players. Light All remote control buttons ...
Instructions
Page 67
...the lamp. If you feel any warmth as you feel unsure about replacing the lamp yourself, call a service technician. 67 Before attempting to project images onto the television screen. Touching the glass surface will tell you NEVER TOUCH THE GLASS SURFACE OF THE NEW LAMP. Attempting to safely ...GET EXTREMELY HOT AND WILL CAUSE SEVERE BURNS IF TOUCHED. Do not keep the TV on the lamp surface that you how to replace the lamp with the television plugged into a wall outlet. The following instructions will deposit oils from your hand near the lamp, DO NOT TOUCH IT. Appendix...
...the lamp. If you feel any warmth as you feel unsure about replacing the lamp yourself, call a service technician. 67 Before attempting to project images onto the television screen. Touching the glass surface will tell you NEVER TOUCH THE GLASS SURFACE OF THE NEW LAMP. Attempting to safely ...GET EXTREMELY HOT AND WILL CAUSE SEVERE BURNS IF TOUCHED. Do not keep the TV on the lamp surface that you how to replace the lamp with the television plugged into a wall outlet. The following instructions will deposit oils from your hand near the lamp, DO NOT TOUCH IT. Appendix...

Instructions
Page 68
..., you need to be disposed of mercury, it cannot be replaced. Note: • This message will appear every time you turn the TV on the TV when the lamp needs to purchase a replacement kit, part number TS-CL110U. If this kit, consult your dealer or call 1-800-252...AGAIN. Lamp Message LAMP NEEDS TO BE REPLACED. Press the OK button to www.jvc.com. Appendix Replacement Lamp Kit Before replacing the lamp, you will include the following: 1 High-Pressure Mercury Lamp 1 Instruction Manual Because the lamp contains a small amount of with normal trash. The replacement kit...
..., you need to be disposed of mercury, it cannot be replaced. Note: • This message will appear every time you turn the TV on the TV when the lamp needs to purchase a replacement kit, part number TS-CL110U. If this kit, consult your dealer or call 1-800-252...AGAIN. Lamp Message LAMP NEEDS TO BE REPLACED. Press the OK button to www.jvc.com. Appendix Replacement Lamp Kit Before replacing the lamp, you will include the following: 1 High-Pressure Mercury Lamp 1 Instruction Manual Because the lamp contains a small amount of with normal trash. The replacement kit...
Instructions
Page 69
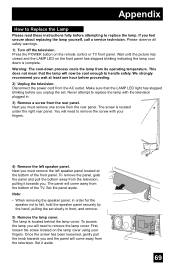
... the bottom of the front panel. Appendix How to Replace the Lamp Please read these instructions fully before proceeding. 2) Unplug the television. To remove the panel, grab the panel and pull the bottom away from the rear panel. Note: • When removing the speaker panel, in . 3) Remove a screw from the ... cool down process cools the lamp from the television. Wait until the picture has closed and the LAMP LED on the remote control or TV front panel. Make sure that the lamp will come away from its operating temperature. The panel will now be cool enough to remove the...
... the bottom of the front panel. Appendix How to Replace the Lamp Please read these instructions fully before proceeding. 2) Unplug the television. To remove the panel, grab the panel and pull the bottom away from the rear panel. Note: • When removing the speaker panel, in . 3) Remove a screw from the ... cool down process cools the lamp from the television. Wait until the picture has closed and the LAMP LED on the remote control or TV front panel. Make sure that the lamp will come away from its operating temperature. The panel will now be cool enough to remove the...

Instructions
Page 70
...contains lead in the housing area. If you . DO NOT DROP the used lamp. Note: If the lamp does not sit securely in the TV (flat in the lamp housing area), it is designed to environmental considerations. The television is very important that contains a small amount of the lamp...of these materials may cause malfunctions and/or other hard shock could cause the lamp to remove the lamp with regular trash. Follow the recycling instructions included with part number TS-CL110U only! Using a Philips head type screwdriver (cross-head type), loosen the two screws fastening the lamp unit....
...contains lead in the housing area. If you . DO NOT DROP the used lamp. Note: If the lamp does not sit securely in the TV (flat in the lamp housing area), it is designed to environmental considerations. The television is very important that contains a small amount of the lamp...of these materials may cause malfunctions and/or other hard shock could cause the lamp to remove the lamp with regular trash. Follow the recycling instructions included with part number TS-CL110U only! Using a Philips head type screwdriver (cross-head type), loosen the two screws fastening the lamp unit....