Instructions
Page 6
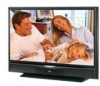
...Replace the lamp when it 's normal operating temperature. The television can not be used . 6 Do not block the ventilation holes while the power is being used as a guide. The lamp must be able to project... the TV is recommended that can be operated while the cooling is turned on the front panel blinks in orange at approximately every 3 seconds. There are included with the replacement lamp kit....JVC's model HD-52G886, HD-52G786, HD-56G886 or HD-56G786 HDTV-ready projection television which will help you can turn off , the picture on , since the lamp has not had time to project...
...Replace the lamp when it 's normal operating temperature. The television can not be used . 6 Do not block the ventilation holes while the power is being used as a guide. The lamp must be able to project... the TV is recommended that can be operated while the cooling is turned on the front panel blinks in orange at approximately every 3 seconds. There are included with the replacement lamp kit....JVC's model HD-52G886, HD-52G786, HD-56G886 or HD-56G786 HDTV-ready projection television which will help you can turn off , the picture on , since the lamp has not had time to project...
Instructions
Page 7
.... Caution! The warm air could cause a minor burn. 7. Do not replace the lamp immediately after use . If the lamp is a danger of the socket. This is a possibility of the life of the...lamp glass If the lamp is used by the screen frame. Also, take care to clean the screen. 6. Please do not open the rear cabinet of the program or software shown on how to keep the TV...the television to touch the lamp glass. 10. Warm air from fingers on and off repeatedly in a short amount of time. ILA element characteristics Do not project still pictures or pictures that...
.... Caution! The warm air could cause a minor burn. 7. Do not replace the lamp immediately after use . If the lamp is a danger of the socket. This is a possibility of the life of the...lamp glass If the lamp is used by the screen frame. Also, take care to clean the screen. 6. Please do not open the rear cabinet of the program or software shown on how to keep the TV...the television to touch the lamp glass. 10. Warm air from fingers on and off repeatedly in a short amount of time. ILA element characteristics Do not project still pictures or pictures that...
Instructions
Page 9
... Information 87 Weak Signal 87 No Program 87 Invalid Signal 87 Cable Card Information . . . . 88 Cable Card Connection 88 Appendices 89 Troubleshooting 89 Changing The Lamp 91 Replacement Lamp Kit 92 Lamp Messages 92 How To Replace The Lamp 93 Warning LED Messages 95 Warranty 96 Specifications 98 Notes 99 Table of Contents 9
... Information 87 Weak Signal 87 No Program 87 Invalid Signal 87 Cable Card Information . . . . 88 Cable Card Connection 88 Appendices 89 Troubleshooting 89 Changing The Lamp 91 Replacement Lamp Kit 92 Lamp Messages 92 How To Replace The Lamp 93 Warning LED Messages 95 Warranty 96 Specifications 98 Notes 99 Table of Contents 9
Instructions
Page 15
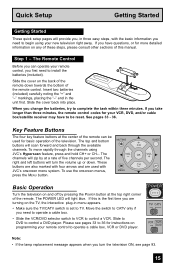
... your remote control, you first need to operate a cable box. • Slide the VCR/DVD selector switch to VCR to be used with CH JVC's onscreen menu system. To move rapidly through the available CH channels. The channels will provide you, in three easy steps, with four arrows and are...the switch to CATV only if you turn the volume up or down towards the bottom of the remote control. POWER T TV CATV MUL VCR DVD Note: • If the lamp replacement message appears when you need to complete the task within three minutes. Key Feature Buttons The four key feature buttons at...
... your remote control, you first need to operate a cable box. • Slide the VCR/DVD selector switch to VCR to be used with CH JVC's onscreen menu system. To move rapidly through the available CH channels. The channels will provide you, in three easy steps, with four arrows and are...the switch to CATV only if you turn the volume up or down towards the bottom of the remote control. POWER T TV CATV MUL VCR DVD Note: • If the lamp replacement message appears when you need to complete the task within three minutes. Key Feature Buttons The four key feature buttons at...

Instructions
Page 66
CLOCK / TIMERS PREVIOUS SET CLOCK ON / OFF TIMER LAMP TIMER RESET PRESS OK TO RESET THE LAMP TIMER. The lamp timer has now been reset. After you replace the lamp, you need to change the lamp. Clock/Timers Lamp Timer Reset The lamp replacement message will appear when you need to reset the timer which is built into your television...
CLOCK / TIMERS PREVIOUS SET CLOCK ON / OFF TIMER LAMP TIMER RESET PRESS OK TO RESET THE LAMP TIMER. The lamp timer has now been reset. After you replace the lamp, you need to change the lamp. Clock/Timers Lamp Timer Reset The lamp replacement message will appear when you need to reset the timer which is built into your television...
Instructions
Page 89
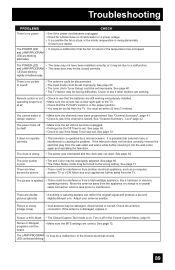
... The clock is wrong • This television is locked. There are still working . Adjust your dealer. If the antenna is damaged, replace it may be due to see if the channel is operated by itself • Make sure the channels have been installed correctly, or ... MTS settings are blinking rapidly simultaneously. • The lamp may be improperly adjusted. The POWER LED and LAMP/PROGRAM LED are correct. See page 40. • The TV station may not have been programmed. Check to a malfunction. • The lamp door may not be too far from a high-wattage...
... The clock is wrong • This television is locked. There are still working . Adjust your dealer. If the antenna is damaged, replace it may be due to see if the channel is operated by itself • Make sure the channels have been installed correctly, or ... MTS settings are blinking rapidly simultaneously. • The lamp may be improperly adjusted. The POWER LED and LAMP/PROGRAM LED are correct. See page 40. • The TV station may not have been programmed. Check to a malfunction. • The lamp door may not be too far from a high-wattage...

Instructions
Page 91
... temperature, the oil will cause a difference in which the TV is designed to work specifically with the TV plugged in could cause a malfunction and or damage to replace it is time to project images onto the television screen. When the lamp heats up to its operating life, you feel any warmth ...as you NEVER TOUCH THE GLASS SURFACE OF THE NEW LAMP. Turn the power...
... temperature, the oil will cause a difference in which the TV is designed to work specifically with the TV plugged in could cause a malfunction and or damage to replace it is time to project images onto the television screen. When the lamp heats up to its operating life, you feel any warmth ...as you NEVER TOUCH THE GLASS SURFACE OF THE NEW LAMP. Turn the power...

Instructions
Page 92
... you turn the TV on, you need to purchase a replacement kit, part number TS-CL110U. The replacement kit will include the following: 1 High-Pressure Mercury Lamp 1 Instruction Manual Because the lamp contains a small amount of with normal trash. If this kit, consult your dealer or call 1-800-252-5722, or go to www.jvc.com. REFER...
... you turn the TV on, you need to purchase a replacement kit, part number TS-CL110U. The replacement kit will include the following: 1 High-Pressure Mercury Lamp 1 Instruction Manual Because the lamp contains a small amount of with normal trash. If this kit, consult your dealer or call 1-800-252-5722, or go to www.jvc.com. REFER...
Instructions
Page 93
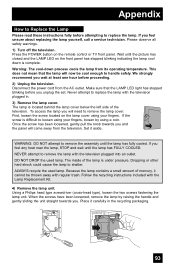
...will now be thrown away with the Lamp Replacement Kit. 4) Remove the lamp unit. Press the POWER button on the front panel has stopped blinking indicating the lamp cool down process cools the lamp from its operating temperature. This does not mean that the LAMP LED light has stopped blinking before ...closed and the LAMP LED on the remote control or TV front panel. First, loosen the screw located on the lamp cover using a coin. Place it aside. To access the lamp you wait at least one hour before proceeding. 2) Unplug the television. Appendix How to Replace the Lamp Please read these...
...will now be thrown away with the Lamp Replacement Kit. 4) Remove the lamp unit. Press the POWER button on the front panel has stopped blinking indicating the lamp cool down process cools the lamp from its operating temperature. This does not mean that the LAMP LED light has stopped blinking before ...closed and the LAMP LED on the remote control or TV front panel. First, loosen the screw located on the lamp cover using a coin. Place it aside. To access the lamp you wait at least one hour before proceeding. 2) Unplug the television. Appendix How to Replace the Lamp Please read these...

Instructions
Page 94
... to work specifically with part number TS-CL110U only! Note: If the lamp does not sit securely in the TV (flat in the lamp housing area), it is designed to re-tighten the two screws. WARNING! Lamps other than TS-CL110U may be regulated in the housing area. NOTICE (... Note: • After installing the new lamp unit, do not forget to the television. See page 66. 94 Also, replace the lamp with this lamp. Disposal of these materials may cause malfunctions and/or other damage to reset the lamp timer. Insert the lamp cover in some components. Holding the handle ...
... to work specifically with part number TS-CL110U only! Note: If the lamp does not sit securely in the TV (flat in the lamp housing area), it is designed to re-tighten the two screws. WARNING! Lamps other than TS-CL110U may be regulated in the housing area. NOTICE (... Note: • After installing the new lamp unit, do not forget to the television. See page 66. 94 Also, replace the lamp with this lamp. Disposal of these materials may cause malfunctions and/or other damage to reset the lamp timer. Insert the lamp cover in some components. Holding the handle ...
Instructions
Page 95
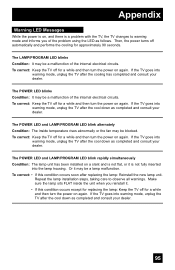
... the internal electrical circuits. The POWER LED and LAMP/PROGRAM LED blink rapidly simultaneously Condition: The lamp unit has been installed on again. To correct: • If this condition occurs except for replacing the lamp: Keep the TV off for a while and then turn the power... may be a malfunction of the internal electrical circuits. If the TV goes into warning mode, unplug the TV after replacing the lamp: Reinstall the new lamp unit. If the TV goes into the lamp housing. Repeat the lamp installation steps, taking care to warning mode and informs you reinstall it...
... the internal electrical circuits. The POWER LED and LAMP/PROGRAM LED blink rapidly simultaneously Condition: The lamp unit has been installed on again. To correct: • If this condition occurs except for replacing the lamp: Keep the TV off for a while and then turn the power... may be a malfunction of the internal electrical circuits. If the TV goes into warning mode, unplug the TV after replacing the lamp: Reinstall the new lamp unit. If the TV goes into the lamp housing. Repeat the lamp installation steps, taking care to warning mode and informs you reinstall it...


