Instructions
Page 1
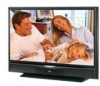
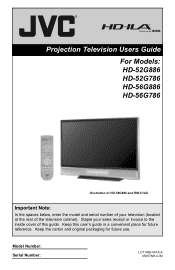
Keep this guide. Projection Television Users Guide For Models: HD-52G886 HD-52G786 HD-56G886 HD-56G786 Illustration of HD-56G886 and RM-C14G Important Note: In the spaces below, enter the model and serial number of your sales receipt or invoice to the inside cover of the television cabinet). Model Number: Serial Number: LCT1866-001A-A 0505TNH-II-IM Staple your television (located at the rear of this user's guide in a convenient place for future use. Keep the carton and original packaging for future reference.
Keep this guide. Projection Television Users Guide For Models: HD-52G886 HD-52G786 HD-56G886 HD-56G786 Illustration of HD-56G886 and RM-C14G Important Note: In the spaces below, enter the model and serial number of your sales receipt or invoice to the inside cover of the television cabinet). Model Number: Serial Number: LCT1866-001A-A 0505TNH-II-IM Staple your television (located at the rear of this user's guide in a convenient place for future use. Keep the carton and original packaging for future reference.

Instructions
Page 4
...Cautions for a Class B digital device, pursuant to the minimum distance guidelines shown for help. 4 Consult the dealer or an experienced radio/TV technician for safe operation. 200 mm 200 mm 150 mm 150 mm 50 mm LAMP/PROGRAM POWER MENU OPERATE + CHANNEL - Keep to ...to keep cords out of the FCC Rules. If this equipment does cause harmful interference to radio or television reception, which the receiver is available around the TV to provide reasonable protection against harmful interference in a residential installation. 13) Unplug this apparatus during operation....
...Cautions for a Class B digital device, pursuant to the minimum distance guidelines shown for help. 4 Consult the dealer or an experienced radio/TV technician for safe operation. 200 mm 200 mm 150 mm 150 mm 50 mm LAMP/PROGRAM POWER MENU OPERATE + CHANNEL - Keep to ...to keep cords out of the FCC Rules. If this equipment does cause harmful interference to radio or television reception, which the receiver is available around the TV to provide reasonable protection against harmful interference in a residential installation. 13) Unplug this apparatus during operation....

Instructions
Page 5
... to the water to help remove spots of oily dirt. • DO NOT allow liquid to enter the TV through the ventilation slots. • DO NOT use strong or abrasive cleaners on the TV. • DO NOT spray liquids or cleaners directly on the screen surface and image distortions. 5 Do not apply... dirty, wipe it . These will keep your TV clean. This could cause scratches on the TV's surface. • DO NOT rub or scrub the TV harshly. Do not push or hit the screen. Warnings Caring for the Screen The screen is very dirty, wipe it down the television, first unplug it gently with a soft...
... to the water to help remove spots of oily dirt. • DO NOT allow liquid to enter the TV through the ventilation slots. • DO NOT use strong or abrasive cleaners on the TV. • DO NOT spray liquids or cleaners directly on the screen surface and image distortions. 5 Do not apply... dirty, wipe it . These will keep your TV clean. This could cause scratches on the TV's surface. • DO NOT rub or scrub the TV harshly. Do not push or hit the screen. Warnings Caring for the Screen The screen is very dirty, wipe it down the television, first unplug it gently with a soft...
Instructions
Page 6
... and important information which are included with the replacement lamp kit. Warnings Thank you for purchasing JVC's model HD-52G886, HD-52G786, HD-56G886 or HD-56G786 HDTV-ready projection television which the TV is removed before using your television in order to learn about this instruction manual before the cooling process has completed, the...
... and important information which are included with the replacement lamp kit. Warnings Thank you for purchasing JVC's model HD-52G886, HD-52G786, HD-56G886 or HD-56G786 HDTV-ready projection television which the TV is removed before using your television in order to learn about this instruction manual before the cooling process has completed, the...
Instructions
Page 7
... connected directly to the wall socket, and not to another device, or when using the television. 12. Do not open the rear cabinet. 13. When placing the television, make sure not to locate it too close to keep the TV on and off repeatedly in a short amount of the wallpaper to a hot place, droplets... to the warm air from the air ducts This unit has an air duct for more than 24 hours consecutively. ILA element characteristics Do not project still pictures or pictures that is being shortened. 7 The still parts of the lamp being used when there is dirt from a cold place to ...
... connected directly to the wall socket, and not to another device, or when using the television. 12. Do not open the rear cabinet. 13. When placing the television, make sure not to locate it too close to keep the TV on and off repeatedly in a short amount of the wallpaper to a hot place, droplets... to the warm air from the air ducts This unit has an air duct for more than 24 hours consecutively. ILA element characteristics Do not project still pictures or pictures that is being shortened. 7 The still parts of the lamp being used when there is dirt from a cold place to ...
Instructions
Page 10
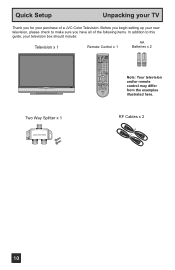
... the following items. In addition to this guide, your purchase of a JVC Color Television. Before you begin setting up your new television, please check to make sure you for your television box should include: Television x 1 Remote Control x 1 AA Batteries x 2 AA Alkaline AA Alkaline TV CATV VCR DVD POWER ASPECT MULTI SCREEN TWIN INDEX SELECT SLEEP FREEZE...
... the following items. In addition to this guide, your purchase of a JVC Color Television. Before you begin setting up your new television, please check to make sure you for your television box should include: Television x 1 Remote Control x 1 AA Batteries x 2 AA Alkaline AA Alkaline TV CATV VCR DVD POWER ASPECT MULTI SCREEN TWIN INDEX SELECT SLEEP FREEZE...
Instructions
Page 11
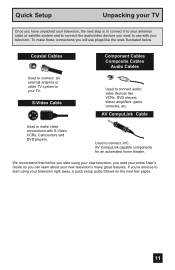
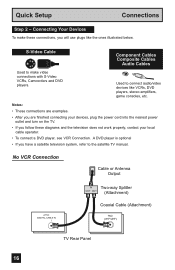
S-Video Cable Component Cables Composite Cables Audio Cables Used to connect JVC AV CompuLink capable components for an automated home theater. Quick Setup Unpacking your TV Once you have unpacked your television, the next step is to connect it to your antenna/ cable or satellite system and to ...DVD players, stereo amplifiers, game consoles, etc. Coaxial Cables Used to connect an external antenna or cable TV system to your television. We recommend that before you start using your new television, you read your entire User's Guide so you will use with S-Video VCRs, Camcorders and DVD ...
S-Video Cable Component Cables Composite Cables Audio Cables Used to connect JVC AV CompuLink capable components for an automated home theater. Quick Setup Unpacking your TV Once you have unpacked your television, the next step is to connect it to your antenna/ cable or satellite system and to ...DVD players, stereo amplifiers, game consoles, etc. Coaxial Cables Used to connect an external antenna or cable TV system to your television. We recommend that before you start using your new television, you read your entire User's Guide so you will use with S-Video VCRs, Camcorders and DVD ...
Instructions
Page 12
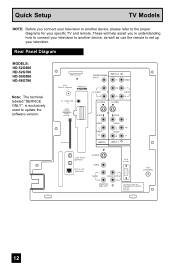
...UNDER THE FOLLOWING U.S. PATENTS 6,183,091 6,419,362 12 Quick Setup TV Models NOTE: Before you in understanding how to connect your television to another device, please refer to the proper diagrams for your television. Rear Panel Diagram MODELS: HD-52G886 HD-52G786 HD-56G886 HD-56G786 Note...: The terminal labeled "SERVICE ONLY", is exclusively used to set up your specific TV and remote. These will help assist you connect your television to another device, as ...
...UNDER THE FOLLOWING U.S. PATENTS 6,183,091 6,419,362 12 Quick Setup TV Models NOTE: Before you in understanding how to connect your television to another device, please refer to the proper diagrams for your television. Rear Panel Diagram MODELS: HD-52G886 HD-52G786 HD-56G886 HD-56G786 Note...: The terminal labeled "SERVICE ONLY", is exclusively used to set up your specific TV and remote. These will help assist you connect your television to another device, as ...
Instructions
Page 15
... the remote can operate your new television right away. To use the onscreen menus, MENU BACK press the MENU button. Step 1 - Insert two batteries (included) carefully noting the "+" and "-" markings, placing the "-" end in three easy steps, with CH JVC's onscreen menu system. Quick Setup ...questions, or for your remote control to control a DVD player. The top and bottom MUTING GUIDE buttons will light blue. POWER T TV CATV MUL VCR DVD Note: • If the lamp replacement message appears when you take longer than three minutes, the remote control codes...
... the remote can operate your new television right away. To use the onscreen menus, MENU BACK press the MENU button. Step 1 - Insert two batteries (included) carefully noting the "+" and "-" markings, placing the "-" end in three easy steps, with CH JVC's onscreen menu system. Quick Setup ...questions, or for your remote control to control a DVD player. The top and bottom MUTING GUIDE buttons will light blue. POWER T TV CATV MUL VCR DVD Note: • If the lamp replacement message appears when you take longer than three minutes, the remote control codes...
Instructions
Page 16
...Cable or Antenna Output ATSC /DIGITAL CABLE IN I IN Two-way Splitter OUT OUT (Attachment) Coaxial Cable (Attachment) 75Ω (VHF/UHF) TV Rear Panel 16 Notes: • These connections are examples. • After you are finished connecting your devices, plug the power cord into the nearest... power outlet and turn on the TV. • If you follow these connections, you have a satellite television system, refer to make these diagrams and the television does not work properly, contact your local cable operator. • To connect a ...
...Cable or Antenna Output ATSC /DIGITAL CABLE IN I IN Two-way Splitter OUT OUT (Attachment) Coaxial Cable (Attachment) 75Ω (VHF/UHF) TV Rear Panel 16 Notes: • These connections are examples. • After you are finished connecting your devices, plug the power cord into the nearest... power outlet and turn on the TV. • If you follow these connections, you have a satellite television system, refer to make these diagrams and the television does not work properly, contact your local cable operator. • To connect a ...
Instructions
Page 20
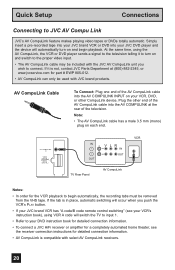
...CompuLink, the VCR or DVD player sends a signal to the television telling it is compatible with select AV CompuLink receivers. 20 At the same time, using VCR A code will switch the TV to input 1. • Refer to your JVC DVD player and the device will occur when you wish to... AV COMPULINK III VIDEO (DIGITAL) _ AUDIO (DIGITAL) IN V L R IN OUT OUT TV Rear Panel AV CompuLink VCR Notes: • In order for detailed connection information. • AV CompuLink is not, contact JVC Parts Department at the rear of the AV CompuLink cable into the AV COMPULINK at (800)-882-2345, or...
...CompuLink, the VCR or DVD player sends a signal to the television telling it is compatible with select AV CompuLink receivers. 20 At the same time, using VCR A code will switch the TV to input 1. • Refer to your JVC DVD player and the device will occur when you wish to... AV COMPULINK III VIDEO (DIGITAL) _ AUDIO (DIGITAL) IN V L R IN OUT OUT TV Rear Panel AV CompuLink VCR Notes: • In order for detailed connection information. • AV CompuLink is not, contact JVC Parts Department at the rear of the AV CompuLink cable into the AV COMPULINK at (800)-882-2345, or...
Instructions
Page 21
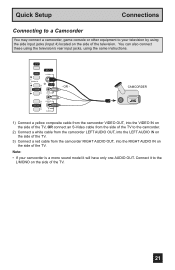
...VIDEO IN on the side of the TV, OR connect an S-Video cable from the side of the TV to the L/MONO on the side of the TV. 21 INPUT MENU INPUT 4 S-VIDEO OPERATE + CHANNEL - OR - You can also connect these using the television's rear input jacks, using the side input ...jacks (Input 4) located on the side of the TV. OVER VIDEO + VOLUME - Connect it will have only one AUDIO OUT. Quick Setup Connections Connecting to a Camcorder You may...
...VIDEO IN on the side of the TV, OR connect an S-Video cable from the side of the TV to the L/MONO on the side of the TV. 21 INPUT MENU INPUT 4 S-VIDEO OPERATE + CHANNEL - OR - You can also connect these using the television's rear input jacks, using the side input ...jacks (Input 4) located on the side of the TV. OVER VIDEO + VOLUME - Connect it will have only one AUDIO OUT. Quick Setup Connections Connecting to a Camcorder You may...
Instructions
Page 24
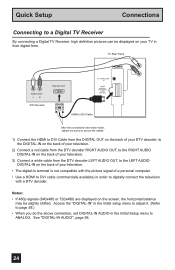
TV Rear Panel AUDIO OUT LR DTV Decoder DIGITAL OUT AV COMPULINK III VIDEO (DIGITAL) _ AUDIO (DIGITAL) HDMI ...on the back of your DTV decoder, to the DIGITAL-IN on the back of your television. 2) Connect a red cable from the DTV decoder RIGHT AUDIO OUT, to the RIGHT AUDIO DIGITAL-IN on the back ... to digitally connect the television with the picture signal of a personal computer. • Use a HDMI to DVI cable (commercially available) in the Initial Setup menu to ANALOG. Quick Setup Connections Connecting to a Digital TV Receiver By connecting a Digital TV Receiver, high definition pictures...
TV Rear Panel AUDIO OUT LR DTV Decoder DIGITAL OUT AV COMPULINK III VIDEO (DIGITAL) _ AUDIO (DIGITAL) HDMI ...on the back of your DTV decoder, to the DIGITAL-IN on the back of your television. 2) Connect a red cable from the DTV decoder RIGHT AUDIO OUT, to the RIGHT AUDIO DIGITAL-IN on the back ... to digitally connect the television with the picture signal of a personal computer. • Use a HDMI to DVI cable (commercially available) in the Initial Setup menu to ANALOG. Quick Setup Connections Connecting to a Digital TV Receiver By connecting a Digital TV Receiver, high definition pictures...
Instructions
Page 25
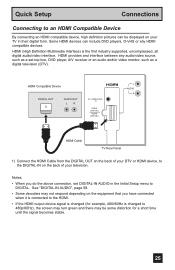
... that you do the above connection, set -top box, DVD player, A/V receiver or an audio and/or video monitor, such as a digital television (DTV). HDMI provides and interface between any HDMI compatible devices. Notes: • When you have connected when it is connected to the HDMI.... OUT AUDIO OUT LR AV COMPULINK III VIDEO (DIGITAL) _ AUDIO (DIGITAL) L AUDIO R HDMI Cable TV Rear Panel 1) Connect the HDMI Cable from the DIGITAL OUT on the back of your television. HDMI (High Definition Multimedia Interface) is changed (for example, 480i/60Hz is the first industry supported, ...
... that you do the above connection, set -top box, DVD player, A/V receiver or an audio and/or video monitor, such as a digital television (DTV). HDMI provides and interface between any HDMI compatible devices. Notes: • When you have connected when it is connected to the HDMI.... OUT AUDIO OUT LR AV COMPULINK III VIDEO (DIGITAL) _ AUDIO (DIGITAL) L AUDIO R HDMI Cable TV Rear Panel 1) Connect the HDMI Cable from the DIGITAL OUT on the back of your television. HDMI (High Definition Multimedia Interface) is changed (for example, 480i/60Hz is the first industry supported, ...
Instructions
Page 26
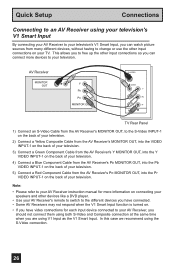
... MONITOR OUT Y PB PR MONITOR OUT S-VIDEO OVER Y VIDEO L Pb I AUDIO I R Pr INPUT-1 TV Rear Panel 1) Connect an S-Video Cable from the AV Receiver's MONITOR OUT, to the S-Video INPUT-1 on the back of your television. 2) Connect a Yellow Composite Cable from the AV Receiver's MONITOR OUT, into the VIDEO INPUT-1 on the...• If you have connected. • Some AV Receivers may not respond when the V1 Smart Input function is turned on the back of your television. 5) Connect a Red Component Cable from the AV Receiver's PB MONITOR OUT, into the Pb VIDEO INPUT-1 on the back of your...
... MONITOR OUT Y PB PR MONITOR OUT S-VIDEO OVER Y VIDEO L Pb I AUDIO I R Pr INPUT-1 TV Rear Panel 1) Connect an S-Video Cable from the AV Receiver's MONITOR OUT, to the S-Video INPUT-1 on the back of your television. 2) Connect a Yellow Composite Cable from the AV Receiver's MONITOR OUT, into the VIDEO INPUT-1 on the...• If you have connected. • Some AV Receivers may not respond when the V1 Smart Input function is turned on the back of your television. 5) Connect a Red Component Cable from the AV Receiver's PB MONITOR OUT, into the Pb VIDEO INPUT-1 on the back of your...
Instructions
Page 27
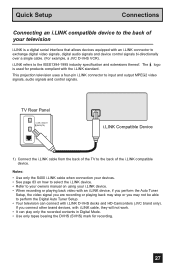
...serial interface that allows devices equipped with i.LINK D-VHS decks and HD-Camcorders (JVC brand only). If you may stop or you connect other brand devices, with the i.LINK standard. TV Rear Panel i.LINK IN/OUT S400(TS) OPTICAL OUT Digital Audio i.LINK Compatible Device... digital video signals, digital audio signals and device control signals bi-directionally over a single cable. (For example, a JVC D-VHS VCR). This projection television uses a four-pin i.LINK connector to the IEEE1394-1995 industry specification and extensions thereof. Quick Setup Connections Connecting an ...
...serial interface that allows devices equipped with i.LINK D-VHS decks and HD-Camcorders (JVC brand only). If you may stop or you connect other brand devices, with the i.LINK standard. TV Rear Panel i.LINK IN/OUT S400(TS) OPTICAL OUT Digital Audio i.LINK Compatible Device... digital video signals, digital audio signals and device control signals bi-directionally over a single cable. (For example, a JVC D-VHS VCR). This projection television uses a four-pin i.LINK connector to the IEEE1394-1995 industry specification and extensions thereof. Quick Setup Connections Connecting an ...
Instructions
Page 30
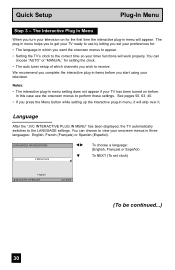
...; The interactive plug-in menu setting does not appear if your television. Language After the "JVC INTERACTIVE PLUG IN MENU" has been displayed, the TV automatically switches to receive. Quick Setup Plug-In Menu Step 3 - The plug-in menu helps you start using your TV has been turned on before you to get your...
...; The interactive plug-in menu setting does not appear if your television. Language After the "JVC INTERACTIVE PLUG IN MENU" has been displayed, the TV automatically switches to receive. Quick Setup Plug-In Menu Step 3 - The plug-in menu helps you start using your TV has been turned on before you to get your...

Instructions
Page 32
...to customize your television viewing experience. You can continue on in this guide for more information on the type of hookup), have only 1 channel, usually 3 or 4 in the auto tuner memory. Quick Setup Plug-In Menu Auto Tuner Setup In auto tuner setup, the TV automatically scans ... you may, (depending on programming your auto tuner setup is displayed. Cable Box and Satellite Users: After your remote control, or using the JVC onscreen menu system to cancel the Auto Tuner Setup, press the MENU button. • Noise muting will receive only clear, active channels. There...
...to customize your television viewing experience. You can continue on in this guide for more information on the type of hookup), have only 1 channel, usually 3 or 4 in the auto tuner memory. Quick Setup Plug-In Menu Auto Tuner Setup In auto tuner setup, the TV automatically scans ... you may, (depending on programming your auto tuner setup is displayed. Cable Box and Satellite Users: After your remote control, or using the JVC onscreen menu system to cancel the Auto Tuner Setup, press the MENU button. • Noise muting will receive only clear, active channels. There...
Instructions
Page 37
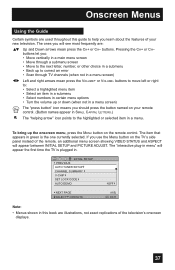
... Pressing the CH+ or CH- The ones you use the Menu button on the remote control. buttons let you learn about the features of the television's onscreen displays. 37 buttons to move left or right to: • Select a highlighted menu item • Select an item in a submenu &#...screen showing VIDEO STATUS and ASPECT will see most frequently are illustrations, not exact replications of your new television. The "interactive plug-in menu" will appear the first time the TV is the one currently selected. Onscreen Menus Using the Guide Certain symbols are used throughout this book are ...
... Pressing the CH+ or CH- The ones you use the Menu button on the remote control. buttons let you learn about the features of the television's onscreen displays. 37 buttons to move left or right to: • Select a highlighted menu item • Select an item in a submenu &#...screen showing VIDEO STATUS and ASPECT will see most frequently are illustrations, not exact replications of your new television. The "interactive plug-in menu" will appear the first time the TV is the one currently selected. Onscreen Menus Using the Guide Certain symbols are used throughout this book are ...
Instructions
Page 38
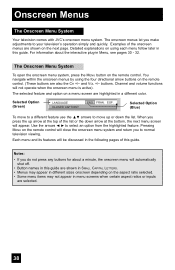
...bottom, the next menu screen will not operate when the onscreen menu is active). Notes: • If you make adjustments to normal television viewing. Selected Option (Blue) To move to a different feature use the π† arrows to select an option from the highlighted ...Button names in menu screens when certain aspect ratios or inputs are also the CH +/- Onscreen Menus The Onscreen Menu System Your television comes with JVC's onscreen menu system. Detailed explanations on using the four directional arrow buttons on the aspect ratio selected. • Some menu ...
...bottom, the next menu screen will not operate when the onscreen menu is active). Notes: • If you make adjustments to normal television viewing. Selected Option (Blue) To move to a different feature use the π† arrows to select an option from the highlighted ...Button names in menu screens when certain aspect ratios or inputs are also the CH +/- Onscreen Menus The Onscreen Menu System Your television comes with JVC's onscreen menu system. Detailed explanations on using the four directional arrow buttons on the aspect ratio selected. • Some menu ...
