

Instructions
Page 6
... turn off the power, the following operations are included with the replacement lamp kit. Once the lamp has warmed up , the picture is displayed only dimly on , since the lamp has not had time to use of the lamp changes depending on the front panel of the television and the...lamp to use this device for a long time is in order to project the picture onto the screen. There are summarized below . Once the screen is dark, cooling is performed for 1 minute, the power is turned off the power. 2. Warnings Thank you for purchasing a JVC HDTV-ready projection television which the TV...
... turn off the power, the following operations are included with the replacement lamp kit. Once the lamp has warmed up , the picture is displayed only dimly on , since the lamp has not had time to use of the lamp changes depending on the front panel of the television and the...lamp to use this device for a long time is in order to project the picture onto the screen. There are summarized below . Once the screen is dark, cooling is performed for 1 minute, the power is turned off the power. 2. Warnings Thank you for purchasing a JVC HDTV-ready projection television which the TV...
Instructions
Page 7
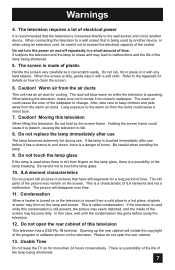
... short amount of this television, Do not hold by another device. Please do not open the rear cabinet of time. Warnings 4. The television requires a lot of burns. When the screen is being...Warm air from the warm air ducts. If the lamp is recommended that have still segments for cooling. ILA element characteristics Do not project still pictures or pictures that the television is connected ... to keep the TV on how to a hot place, droplets of water may remain on the lamp glass, there is dirt from fingers on the screen. Do not replace the lamp immediately after use ...
... short amount of this television, Do not hold by another device. Please do not open the rear cabinet of time. Warnings 4. The television requires a lot of burns. When the screen is being...Warm air from the warm air ducts. If the lamp is recommended that have still segments for cooling. ILA element characteristics Do not project still pictures or pictures that the television is connected ... to keep the TV on how to a hot place, droplets of water may remain on the lamp glass, there is dirt from fingers on the screen. Do not replace the lamp immediately after use ...

Instructions
Page 13
... to operate a cable box. • Slide the VCR/DVD selector switch to VCR to install the batteries (included). If you have to begin using JVC's Hyperscan feature, press and hold CH+ or CH-. See pages 27 - 30. The Remote Control Before you can be reset. Insert two batteries (included... player. The POWER LED will zip by pressing the POWER button at the top right corner of the remote. POWER T TV CATV MUL VCR DVD Note: • If the lamp replacement message appears when you change the batteries, try to control a DVD player. If you take longer than three minutes, the...
... to operate a cable box. • Slide the VCR/DVD selector switch to VCR to install the batteries (included). If you have to begin using JVC's Hyperscan feature, press and hold CH+ or CH-. See pages 27 - 30. The Remote Control Before you can be reset. Insert two batteries (included... player. The POWER LED will zip by pressing the POWER button at the top right corner of the remote. POWER T TV CATV MUL VCR DVD Note: • If the lamp replacement message appears when you change the batteries, try to control a DVD player. If you take longer than three minutes, the...
Instructions
Page 61
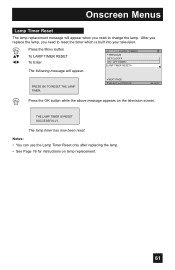
...appears on lamp replacement. 61 THE LAMP TIMER IS RESET SUCCESSFULLY. The lamp timer has now been reset. Onscreen Menus Lamp Timer Reset The lamp replacement message will appear. CLOCK / TIMERS PREVIOUS SET CLOCK ON / OFF TIMER LAMP TIMER RESET PRESS OK TO RESET THE LAMP TIMER. After you replace the lamp, you...960;† √® Press the MENU button To LAMP TIMER RESET To Enter The following message will appear when you need to change the lamp. Notes: • You can use the Lamp Timer Reset only after replacing the lamp. • See Page 76 for instructions on the ...
...appears on lamp replacement. 61 THE LAMP TIMER IS RESET SUCCESSFULLY. The lamp timer has now been reset. Onscreen Menus Lamp Timer Reset The lamp replacement message will appear. CLOCK / TIMERS PREVIOUS SET CLOCK ON / OFF TIMER LAMP TIMER RESET PRESS OK TO RESET THE LAMP TIMER. After you replace the lamp, you...960;† √® Press the MENU button To LAMP TIMER RESET To Enter The following message will appear when you need to change the lamp. Notes: • You can use the Lamp Timer Reset only after replacing the lamp. • See Page 76 for instructions on the ...

Instructions
Page 76
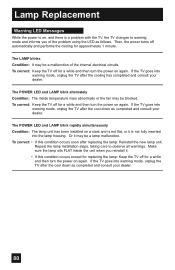
... the TV is being shortened. This television uses a 110-Watt high-pressure mercury lamp to replace the lamp, make sure the television has completely run through its operating life, you how to work specifically with the television plugged into a wall outlet. Lamp Replacement Changing the Lamp WARNING! After turning the power off completely. Before attempting to project images...
... the TV is being shortened. This television uses a 110-Watt high-pressure mercury lamp to replace the lamp, make sure the television has completely run through its operating life, you how to work specifically with the television plugged into a wall outlet. Lamp Replacement Changing the Lamp WARNING! After turning the power off completely. Before attempting to project images...

Instructions
Page 77
... button to replace the lamp. REFER TO OWNER'S MANUAL FOR REPLACEMENT INSTRUCTIONS. AFTER REPLACING THE LAMP, PLEASE RESET TIMER IN THE TV MENU. The replacement kit will need to www.jvc. To purchase this message appears when you turn the TV on, you turn on how to make the message disappear, or replace the lamp. 77 Lamp Replacement Replacement Lamp Kit Before replacing the lamp, you will...
... button to replace the lamp. REFER TO OWNER'S MANUAL FOR REPLACEMENT INSTRUCTIONS. AFTER REPLACING THE LAMP, PLEASE RESET TIMER IN THE TV MENU. The replacement kit will need to www.jvc. To purchase this message appears when you turn the TV on, you turn on how to make the message disappear, or replace the lamp. 77 Lamp Replacement Replacement Lamp Kit Before replacing the lamp, you will...

Instructions
Page 78
...DO NOT DROP the used lamp. The lamp is complete. Set it cannot be cool enough to remove the assembly until the lamp has FULLY COOLED. First, remove the screw located on the remote control or TV front panel. If you feel unsure about replacing the lamp yourself, call a service ...technician. The inside of mercury, it aside. ALWAYS recycle the used lamp. Warning: The cool-down is located behind the lamp cover below the left side of the ...
...DO NOT DROP the used lamp. The lamp is complete. Set it cannot be cool enough to remove the assembly until the lamp has FULLY COOLED. First, remove the screw located on the remote control or TV front panel. If you feel unsure about replacing the lamp yourself, call a service ...technician. The inside of mercury, it aside. ALWAYS recycle the used lamp. Warning: The cool-down is located behind the lamp cover below the left side of the ...

Instructions
Page 79
... help prevent the danger of mercury. Note: If the lamp does not sit securely in the TV (flat in some components. Make sure the lamp sits securely and flat in the right concave and close the lamp cover. For disposal or recycling information, please contact your ...www.eiae.org To purchase a replacement lamp kit, please call 1-800-252-5722. 6) Re-install the lamp cover. Remember it won't turn on page 76 again. Lamp Replacement 4) Remove the lamp unit. It also contains lead in the lamp housing area), it is designed to reset the lamp timer. Using a Philips head...
... help prevent the danger of mercury. Note: If the lamp does not sit securely in the TV (flat in some components. Make sure the lamp sits securely and flat in the right concave and close the lamp cover. For disposal or recycling information, please contact your ...www.eiae.org To purchase a replacement lamp kit, please call 1-800-252-5722. 6) Re-install the lamp cover. Remember it won't turn on page 76 again. Lamp Replacement 4) Remove the lamp unit. It also contains lead in the lamp housing area), it is designed to reset the lamp timer. Using a Philips head...
Instructions
Page 80
... a while and then turn the power on again. The LAMP blinks Condition: It may be blocked. Lamp Replacement Warning LED Messages While the power is on again. If the TV goes into warning mode, unplug the TV after replacing the lamp: Reinstall the new lamp unit. Repeat the lamp installation steps, taking care to warning mode and informs you...
... a while and then turn the power on again. The LAMP blinks Condition: It may be blocked. Lamp Replacement Warning LED Messages While the power is on again. If the TV goes into warning mode, unplug the TV after replacing the lamp: Reinstall the new lamp unit. Repeat the lamp installation steps, taking care to warning mode and informs you...

Instructions
Page 81
...8226; Make sure the channels have analog sound from a DVI device connected to a malfunction. • The lamp door may be damaged, disconnected or turned. See page 34. • The TV station may not be closed correctly. • The antenna could be disconnected. • The input mode ...external noise or interference is locked or the temperature has increased. See page 60. • Check to interference. Remote control is damaged, replace it off by a microprocessor. You cannot select a certain channel The power turns off in the proper position. • You may be...
...8226; Make sure the channels have analog sound from a DVI device connected to a malfunction. • The lamp door may be damaged, disconnected or turned. See page 34. • The TV station may not be closed correctly. • The antenna could be disconnected. • The input mode ...external noise or interference is locked or the temperature has increased. See page 60. • Check to interference. Remote control is damaged, replace it off by a microprocessor. You cannot select a certain channel The power turns off in the proper position. • You may be...


