
User Manual
Page 1
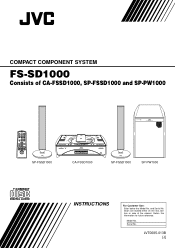
Retain this information for future reference. Model No. Serial No. which are located either on the rear, bottom or side of CA-FSSD1000, SP-FSSD1000 and SP-PW1000 REMOTE CONTROL RM-SFSSD1000J STANDBY/ON DIMMER SLEEP AUTO DISPLAY PRESET FM MODE PROGRAM RANDOM REPEAT DOOR SLIDE CD BASS TREBLE CANCEL UP SET FADE MUTING DOWN CD MD/AUX FM / AM VOLUME SP-FSSD1000 CA-FSSD1000 SP-FSSD1000 SP-PW1000 INSTRUCTIONS For Customer Use: Enter below the Model No. COMPACT COMPONENT SYSTEM FS-SD1000 Consists of the cabinet. and Serial No. LVT0685-013B [J]
Retain this information for future reference. Model No. Serial No. which are located either on the rear, bottom or side of CA-FSSD1000, SP-FSSD1000 and SP-PW1000 REMOTE CONTROL RM-SFSSD1000J STANDBY/ON DIMMER SLEEP AUTO DISPLAY PRESET FM MODE PROGRAM RANDOM REPEAT DOOR SLIDE CD BASS TREBLE CANCEL UP SET FADE MUTING DOWN CD MD/AUX FM / AM VOLUME SP-FSSD1000 CA-FSSD1000 SP-FSSD1000 SP-PW1000 INSTRUCTIONS For Customer Use: Enter below the Model No. COMPACT COMPONENT SYSTEM FS-SD1000 Consists of the cabinet. and Serial No. LVT0685-013B [J]

User Manual
Page 5
...your System both powerful and simple to use the System in addition to just enjoy the music. • With JVC's COMPU PLAY you in enjoying the many different functions - quency. Use the table of contents to look up ...System and automatically start the Radio or CD Player with wet hands! • Some power is the same for purchasing the JVC Compact Component System. FM/AM, "NO DISC". • System functions are written in Music CD format. (However they...MAY OCCUR IF THE SYSTEM IS OPERATED WITHOUT THE TOP COVER. • SUPPLIED SPEAKERS (SP-FSSD1000) ARE EXCLUSIVELY FOR THIS SYSTEM.
...your System both powerful and simple to use the System in addition to just enjoy the music. • With JVC's COMPU PLAY you in enjoying the many different functions - quency. Use the table of contents to look up ...System and automatically start the Radio or CD Player with wet hands! • Some power is the same for purchasing the JVC Compact Component System. FM/AM, "NO DISC". • System functions are written in Music CD format. (However they...MAY OCCUR IF THE SYSTEM IS OPERATED WITHOUT THE TOP COVER. • SUPPLIED SPEAKERS (SP-FSSD1000) ARE EXCLUSIVELY FOR THIS SYSTEM.

User Manual
Page 6
......3 How To Put Batteries In the Remote Control 3 Using the Remote Control...3 Connecting the FM Antenna ...4 Connecting the AM Antenna...5 Connecting the Speakers (SP-FSSD1000 6 Connecting the Powered Subwoofer (SP-PW1000 7 Attaching the Spacers...7 Connecting External Equipment 7 Connecting an MD Recorder, etc (Digital Output 7 Connecting the AC Power Cord 8 COMPU Play...8 Automatic...
......3 How To Put Batteries In the Remote Control 3 Using the Remote Control...3 Connecting the FM Antenna ...4 Connecting the AM Antenna...5 Connecting the Speakers (SP-FSSD1000 6 Connecting the Powered Subwoofer (SP-PW1000 7 Attaching the Spacers...7 Connecting External Equipment 7 Connecting an MD Recorder, etc (Digital Output 7 Connecting the AC Power Cord 8 COMPU Play...8 Automatic...
User Manual
Page 7
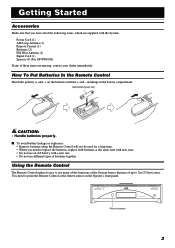
...) CAUTION: • Handle batteries properly. markings in the battery compartment. Power Cord (1) AM Loop Antenna (1) Remote Control (1) Batteries (2) FM Wire Antenna (1) Signal Cord (1) Spacers (4) (For SP-PW1000) If any of the following items, which are missing, contact your dealer immediately.
...) CAUTION: • Handle batteries properly. markings in the battery compartment. Power Cord (1) AM Loop Antenna (1) Remote Control (1) Batteries (2) FM Wire Antenna (1) Signal Cord (1) Spacers (4) (For SP-PW1000) If any of the following items, which are missing, contact your dealer immediately.

User Manual
Page 10
... line to securely connect the cords. Using with other devices will damage the center unit (CA-FSSD1000). Open each of the Unit. Connecting the Speakers (SP-FSSD1000) These speakers are the same, you can put either side and remove the cover. 2) Loosen the terminal screws and remove the speaker cord. 1 Cover...
... line to securely connect the cords. Using with other devices will damage the center unit (CA-FSSD1000). Open each of the Unit. Connecting the Speakers (SP-FSSD1000) These speakers are the same, you can put either side and remove the cover. 2) Loosen the terminal screws and remove the speaker cord. 1 Cover...

User Manual
Page 11
... whose diameter is 11mm or less. Attaching the Spacers Attach the supplied spacers to the bottom of the powered subwoofer (SP-PW1000) to the external unit. Getting Started Connecting the Powered Subwoofer (SP-PW1000) &RQQHFWýDýVLJQDOýFRUGýõVXSSOLHGôýEHWZHHQýWKHý6\VWHP'Vý68...
... whose diameter is 11mm or less. Attaching the Spacers Attach the supplied spacers to the bottom of the powered subwoofer (SP-PW1000) to the external unit. Getting Started Connecting the Powered Subwoofer (SP-PW1000) &RQQHFWýDýVLJQDOýFRUGýõVXSSOLHGôýEHWZHHQýWKHý6\VWHP'Vý68...

User Manual
Page 27
...Loop Antenna (1) Remote Control (1) Batteries R6P (SUM-3)/AA (15F) (2) FM Wire Antenna (1) Signal Cord (1) Spacers (4) (for SP-PW1000) 'HVLJQýDQGýVSHFLILFDWLRQVýDUHýVXEMHFWýWRýFKDQJHýZLWKRXWýQRWLFHï 23 Specifications CA-... (in Standby mode) Center Unit 'LPHQVLRQV 300mm ! 75mm ! 215mm (W/H/D) (11 - 13/16" ! 3" ! 8 - 1/2") 0DVV Approx. 3.0kg (6.7 lbs) Speaker Specifications (each unit) SP-FSSD1000 6SHDNHUV 9.5cm ! 1cm (3 - 3/4" ! 7/16" ) dome ,PSHGDQFH 4 Ω 'LPHQVLRQV 125mm ! 315mm ! 125mm (W/H/D) (4 - 15/16" ! 12 - 7/16" ! 4 - 5/16")...
...Loop Antenna (1) Remote Control (1) Batteries R6P (SUM-3)/AA (15F) (2) FM Wire Antenna (1) Signal Cord (1) Spacers (4) (for SP-PW1000) 'HVLJQýDQGýVSHFLILFDWLRQVýDUHýVXEMHFWýWRýFKDQJHýZLWKRXWýQRWLFHï 23 Specifications CA-... (in Standby mode) Center Unit 'LPHQVLRQV 300mm ! 75mm ! 215mm (W/H/D) (11 - 13/16" ! 3" ! 8 - 1/2") 0DVV Approx. 3.0kg (6.7 lbs) Speaker Specifications (each unit) SP-FSSD1000 6SHDNHUV 9.5cm ! 1cm (3 - 3/4" ! 7/16" ) dome ,PSHGDQFH 4 Ω 'LPHQVLRQV 125mm ! 315mm ! 125mm (W/H/D) (4 - 15/16" ! 12 - 7/16" ! 4 - 5/16")...