BM-H1310SU monitor instruction manual (238KB)
Page 1
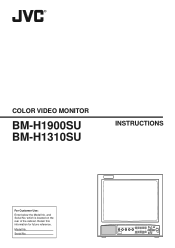
Serial No. which is located on the rear of the cabinet. UNDER PULSE COLOR BLUE MEMORY SCAN CROSS OFF CHECK MODE VOLUME PHASE CHROMA BRIGHT CONTRAST MENU VIDEO A B RGB/ COMPO(SDI) Y/C EXT SYNC INPUT SELECT ENTER DEGAUSS POWER ON OFF COLOR VIDEO MONITOR BM-H1900SU BM-H1310SU INSTRUCTIONS For Customer Use: Enter below the Model No. Retain this information for future reference. Model No. and Serial No.
Serial No. which is located on the rear of the cabinet. UNDER PULSE COLOR BLUE MEMORY SCAN CROSS OFF CHECK MODE VOLUME PHASE CHROMA BRIGHT CONTRAST MENU VIDEO A B RGB/ COMPO(SDI) Y/C EXT SYNC INPUT SELECT ENTER DEGAUSS POWER ON OFF COLOR VIDEO MONITOR BM-H1900SU BM-H1310SU INSTRUCTIONS For Customer Use: Enter below the Model No. Retain this information for future reference. Model No. and Serial No.

BM-H1310SU monitor instruction manual (238KB)
Page 2
... from entering the unit. [Do not remodel or disassemble the unit. Malfunctioning of the unit itself may cause harmful interference to result. [Keep the monitor clean by JVC could become deformed, or the performance of cathode-ray tube. s PRECAUTIONS [Prevent inflammables, water and metallic objects from the AC outlet when you are...
... from entering the unit. [Do not remodel or disassemble the unit. Malfunctioning of the unit itself may cause harmful interference to result. [Keep the monitor clean by JVC could become deformed, or the performance of cathode-ray tube. s PRECAUTIONS [Prevent inflammables, water and metallic objects from the AC outlet when you are...
BM-H1310SU monitor instruction manual (238KB)
Page 3
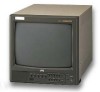
... To program an ID number 19 To call up to 99-unit monitors. 3 ENGLISH The BM-H1310SU has a high-definition picture tube that can be bridge-connected. Thank you for the AFC) ------ 11 COLOR TEMP. (color temperature switching) ----- 11 NTSC SETUP (NTSC set-up level 11 COMPO. s Auto ... (built-in filter selection 10 PEAKING FREQ./PEAKING LEVEL (picture quality improvement) ------ 11 AFC (switching of time constant for purchasing this JVC color video monitor.Before using it, read and follow all instructions carefully to on/off) -- 16 CONTROL LOCK (deactivation of 750 TV lines or more...
... To program an ID number 19 To call up to 99-unit monitors. 3 ENGLISH The BM-H1310SU has a high-definition picture tube that can be bridge-connected. Thank you for the AFC) ------ 11 COLOR TEMP. (color temperature switching) ----- 11 NTSC SETUP (NTSC set-up level 11 COMPO. s Auto ... (built-in filter selection 10 PEAKING FREQ./PEAKING LEVEL (picture quality improvement) ------ 11 AFC (switching of time constant for purchasing this JVC color video monitor.Before using it, read and follow all instructions carefully to on/off) -- 16 CONTROL LOCK (deactivation of 750 TV lines or more...

BM-H1310SU monitor instruction manual (238KB)
Page 4
...by recalling the adjustment data that power is on screen by reducing display area dimensions. w BLUE CHECK switch Push to synchronize the monitor with an external sync signal. e MEMORY MODE switch Push to adjust the picture by delaying input signal phase. t EXT SYNC ... B RGB/ COMPO(SDI) Y/C EXT SYNC INPUT SELECT ENTER DEGAUSS POWER ON OFF 3 r t yo 1 (Front) [ BM-H1310SU ] 2 4 5 6 7 8 9pqwe ui VOLUME PHASE CHROMA BRIGHT CONTRAST UNDER PULSE COLOR BLUE MEMORY SCAN CROSS OFF CHECK MODE VIDEO A B RGB/ COMPO(SDI) Y/C EXT SYNC INPUT SELECT MENU ENTER DEGAUSS POWER...
...by recalling the adjustment data that power is on screen by reducing display area dimensions. w BLUE CHECK switch Push to synchronize the monitor with an external sync signal. e MEMORY MODE switch Push to adjust the picture by delaying input signal phase. t EXT SYNC ... B RGB/ COMPO(SDI) Y/C EXT SYNC INPUT SELECT ENTER DEGAUSS POWER ON OFF 3 r t yo 1 (Front) [ BM-H1310SU ] 2 4 5 6 7 8 9pqwe ui VOLUME PHASE CHROMA BRIGHT CONTRAST UNDER PULSE COLOR BLUE MEMORY SCAN CROSS OFF CHECK MODE VIDEO A B RGB/ COMPO(SDI) Y/C EXT SYNC INPUT SELECT MENU ENTER DEGAUSS POWER...
BM-H1310SU monitor instruction manual (238KB)
Page 5
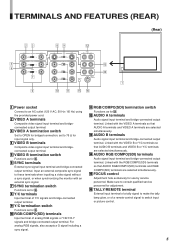
... selected simultaneously. q RGB/COMPO(SDI) termination switch Functions as for 3. set to these terminals when inputting a video signal without a sync signal, or when synchronizing the monitor with the VIDEO A terminals so that AUDIO B terminals and VIDEO B or Y/C terminals are selected simultaneously. For analog RGB signals, also accepts a G signal including a sync signal...
... selected simultaneously. q RGB/COMPO(SDI) termination switch Functions as for 3. set to these terminals when inputting a video signal without a sync signal, or when synchronizing the monitor with the VIDEO A terminals so that AUDIO B terminals and VIDEO B or Y/C terminals are selected simultaneously. For analog RGB signals, also accepts a G signal including a sync signal...

BM-H1310SU monitor instruction manual (238KB)
Page 6
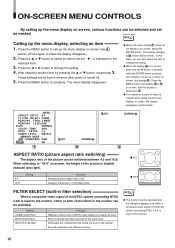
...to complete. 6 qMENU r ASPECT RAT I O :4-3 F I LTER SELECT :COMB PEAK I NG FREQ. :2.6MHZ PEAK I NG LEVEL:0dB AFC :NORMAL COLOR TEMP. :6500 NTSC SETUP :7.5 COMPO. Press the MENU button to set to select RGB/COMPO(SDI). 3. Component that outputs Y/C signals For audio signal input ...3 Composite video 4 Composite video 5 Composite sync 6 Composite sync 7 Y/C 8 Y/C 9 Analogue RGB 0 Component - Push the switch again to OFF, and the monitor operates to synchronize with a component to VIDEO A IN 24 7 8 ~ ! Press the front panel MENU button to call up the MENU display on screen to ...
...to complete. 6 qMENU r ASPECT RAT I O :4-3 F I LTER SELECT :COMB PEAK I NG FREQ. :2.6MHZ PEAK I NG LEVEL:0dB AFC :NORMAL COLOR TEMP. :6500 NTSC SETUP :7.5 COMPO. Press the MENU button to set to select RGB/COMPO(SDI). 3. Component that outputs Y/C signals For audio signal input ...3 Composite video 4 Composite video 5 Composite sync 6 Composite sync 7 Y/C 8 Y/C 9 Analogue RGB 0 Component - Push the switch again to OFF, and the monitor operates to synchronize with a component to VIDEO A IN 24 7 8 ~ ! Press the front panel MENU button to call up the MENU display on screen to ...

BM-H1310SU monitor instruction manual (238KB)
Page 7
... of an input signal are automatically discerned and displayed on : Push the POWER switch. BASIC OPERATION 1. The mode and color system of the picture tube. qRelation between input mode indication and signal input/terminal Input mode indication Signal input/terminal VIDEO ...qThis function is input) To demagnetize the picture tube After positioning near the monitor a speaker (non-magnetshielded) or other equipment that generates a strong magnetic field, or after relocating the monitor, color patches could appear in the picture due to demagnetize the picture tube. When...
... of an input signal are automatically discerned and displayed on : Push the POWER switch. BASIC OPERATION 1. The mode and color system of the picture tube. qRelation between input mode indication and signal input/terminal Input mode indication Signal input/terminal VIDEO ...qThis function is input) To demagnetize the picture tube After positioning near the monitor a speaker (non-magnetshielded) or other equipment that generates a strong magnetic field, or after relocating the monitor, color patches could appear in the picture due to demagnetize the picture tube. When...
BM-H1310SU monitor instruction manual (238KB)
Page 10
... same time. qMENU r ASPECT RAT I O :4-3 F I L TER SE LEC T :COMB PEAK I NG FREQ. :2.6MHZ PEAK I NG LEVEL:0dB AFC :NORMAL COLOR TEMP. :6500 NTSC SETUP :7.5 COMPO. q 4:3 4-3 16-9 Setting Function Standard picture aspect ratio (4:3) Displays the picture in 16:9 aspect ratio q 16:9 FILTER SELECT (built...43) is on screen, press the ENTER button. Both comb and trap filters function at left below ). (Press again to the monitor, either or both filters) NOTCH (Trap filter) Function Reduces colour noise in the vertical boundary between 4:3 and 16:9. NOTE Calling up...
... same time. qMENU r ASPECT RAT I O :4-3 F I L TER SE LEC T :COMB PEAK I NG FREQ. :2.6MHZ PEAK I NG LEVEL:0dB AFC :NORMAL COLOR TEMP. :6500 NTSC SETUP :7.5 COMPO. q 4:3 4-3 16-9 Setting Function Standard picture aspect ratio (4:3) Displays the picture in 16:9 aspect ratio q 16:9 FILTER SELECT (built...43) is on screen, press the ENTER button. Both comb and trap filters function at left below ). (Press again to the monitor, either or both filters) NOTCH (Trap filter) Function Reduces colour noise in the vertical boundary between 4:3 and 16:9. NOTE Calling up...
BM-H1310SU monitor instruction manual (238KB)
Page 11
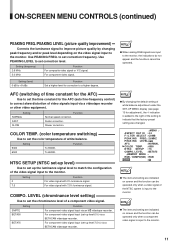
... O :4-3 F I LTER SELECT :COMB PEAK I NG FREQ. :2.6MHZ PEAK I NG LEVEL:0dB AFC :NORMAL COLOR TEMP. :6500 NTSC SETUP :7.5 COMPO. NOTE q When analog RGB signals are input to the monitor, the indications do not appear and the functions cannot be operated only when a video signal of the setting...For component video signal input via a BETACAM videotape recorder. Use PEAKING LEVEL to set the chrominance level of the video signal input to the monitor. Setting NORMAL FAST SLOW Function Normal-speed correction. LEVEL :BETA75 qMEMORY MODE r RGB / COMPO(SDI) :RGB ENTER : NOTE q ...
... O :4-3 F I LTER SELECT :COMB PEAK I NG FREQ. :2.6MHZ PEAK I NG LEVEL:0dB AFC :NORMAL COLOR TEMP. :6500 NTSC SETUP :7.5 COMPO. NOTE q When analog RGB signals are input to the monitor, the indications do not appear and the functions cannot be operated only when a video signal of the setting...For component video signal input via a BETACAM videotape recorder. Use PEAKING LEVEL to set the chrominance level of the video signal input to the monitor. Setting NORMAL FAST SLOW Function Normal-speed correction. LEVEL :BETA75 qMEMORY MODE r RGB / COMPO(SDI) :RGB ENTER : NOTE q ...
BM-H1310SU monitor instruction manual (238KB)
Page 12
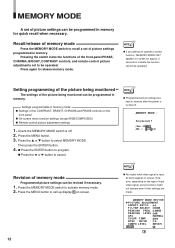
... MODE switch to program. Pressing the switch locks the functions of picture settings programmed in memory. Setting programming of the picture being monitored The settings of the picture being monitored can be programmed in memory. Check the MEMORY MODE switch is off . Press the MENU button. 3. q Press the ENTER button to recall... revised if necessary. 1. qMEMORY MODE REV I SE P I C TURE AD JUSTMENT ASPECT RAT I O :4-3 F I LTER SELECT :COMB PEAK I NG FREQ. :2.6MHZ PEAK I NG LEVEL :0dB AFC :NORMAL COLOR TEMP. :6500 NTSC SETUP :7.5 COMPO.
... MODE switch to program. Pressing the switch locks the functions of picture settings programmed in memory. Setting programming of the picture being monitored The settings of the picture being monitored can be programmed in memory. Check the MEMORY MODE switch is off . Press the MENU button. 3. q Press the ENTER button to recall... revised if necessary. 1. qMEMORY MODE REV I SE P I C TURE AD JUSTMENT ASPECT RAT I O :4-3 F I LTER SELECT :COMB PEAK I NG FREQ. :2.6MHZ PEAK I NG LEVEL :0dB AFC :NORMAL COLOR TEMP. :6500 NTSC SETUP :7.5 COMPO.

BM-H1310SU monitor instruction manual (238KB)
Page 14
...GREEN CUTOFF :0 BLUE CUTOFF :0 ENTER : 2 NOTE q Each time the MENU button is pressed, the previous menu is operable only when monitoring the picture of RGB signal pictures) For analog RGB video signal pictures, horizontal size, vertical size, horizontal positioning and vertical positioning can be adjusted... 4. Press the v or w button to select a function to be used. Press the or button to right. - SET-UP FOR MONITOR INSTALLATION When installing the monitor, make set STATUS DISPLAY or CONTROL LOCK, steps 3 and 4 are not necessary.) 3. Press the ENTER button to call up . + ...
...GREEN CUTOFF :0 BLUE CUTOFF :0 ENTER : 2 NOTE q Each time the MENU button is pressed, the previous menu is operable only when monitoring the picture of RGB signal pictures) For analog RGB video signal pictures, horizontal size, vertical size, horizontal positioning and vertical positioning can be adjusted... 4. Press the v or w button to select a function to be used. Press the or button to right. - SET-UP FOR MONITOR INSTALLATION When installing the monitor, make set STATUS DISPLAY or CONTROL LOCK, steps 3 and 4 are not necessary.) 3. Press the ENTER button to call up . + ...
BM-H1310SU monitor instruction manual (238KB)
Page 15
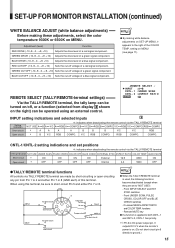
... - RGB COMPO. When using an external control. Front UNDER SCAN, PULSE CROSS, COLOR OFF and BLUE CHECK switches - On-screen MENU's ASPECT RATIO and COLOR TEMP. SET-UP FOR MONITOR INSTALLATION (continued) WHITE BALANCE ADJUST (white balance adjustments) Before making white balance adjustments on... SET-UP MENU, T appears to the right of the COLOR TEMP. REMOTE SELECT (TALLY/REMOTE-terminal ...
... - RGB COMPO. When using an external control. Front UNDER SCAN, PULSE CROSS, COLOR OFF and BLUE CHECK switches - On-screen MENU's ASPECT RATIO and COLOR TEMP. SET-UP FOR MONITOR INSTALLATION (continued) WHITE BALANCE ADJUST (white balance adjustments) Before making white balance adjustments on... SET-UP MENU, T appears to the right of the COLOR TEMP. REMOTE SELECT (TALLY/REMOTE-terminal ...

BM-H1310SU monitor instruction manual (238KB)
Page 16
...function cannot be set to on or off ) When the power is turned on or the input mode is switched, the status display (color system and input mode) appears on screen. Setting ON OFF Function Deactivates the front controls (except front/remote volume controls). appears on ...screen for approx. 2 seconds to operate a locked function, "CONTROL LOCK ON!!" SET-UP FOR MONITOR INSTALLATION (continued) STATUS DISPLAY (setting the status display to on/off . CONTROL LOCK (deactivation of the front-control knobs and buttons are operable). ...
...function cannot be set to on or off ) When the power is turned on or the input mode is switched, the status display (color system and input mode) appears on screen. Setting ON OFF Function Deactivates the front controls (except front/remote volume controls). appears on ...screen for approx. 2 seconds to operate a locked function, "CONTROL LOCK ON!!" SET-UP FOR MONITOR INSTALLATION (continued) STATUS DISPLAY (setting the status display to on/off . CONTROL LOCK (deactivation of the front-control knobs and buttons are operable). ...

BM-H1310SU monitor instruction manual (238KB)
Page 17
... initialize MENU settings only MENU settings (except MEMORY MODE and RGB/COMPO(SDI)) can be simultaneously reset via remote control are also reset, and the monitor's ID number is also reset to their initial (default) settings. q Press the ENTER button to turn the power on screen. 2. gYes hthEeNnTER gNo h then or...
... initialize MENU settings only MENU settings (except MEMORY MODE and RGB/COMPO(SDI)) can be simultaneously reset via remote control are also reset, and the monitor's ID number is also reset to their initial (default) settings. q Press the ENTER button to turn the power on screen. 2. gYes hthEeNnTER gNo h then or...
BM-H1310SU monitor instruction manual (238KB)
Page 18
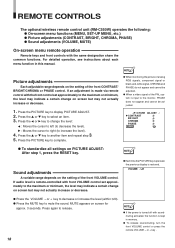
q When monitoring the picture of the front CONTRAST/ BRIGHT/CHROMA or PHASE control. qP I CTURE ADJUST r CONTRAST :0 BR I GHT :0 CHROMA :0 PHASE :0 ENTER : q To standardize all settings on ... be adjusted. q When a video signal of the front VOLUME control. If an adjustment is remote-controlled with soundmuting activated, the function is input to the monitor, PHASE does not appear and cannot be adjusted. Press the v or w key to another item and repeat step 3. 5. Press the v or w key to select an...
q When monitoring the picture of the front CONTRAST/ BRIGHT/CHROMA or PHASE control. qP I CTURE ADJUST r CONTRAST :0 BR I GHT :0 CHROMA :0 PHASE :0 ENTER : q To standardize all settings on ... be adjusted. q When a video signal of the front VOLUME control. If an adjustment is remote-controlled with soundmuting activated, the function is input to the monitor, PHASE does not appear and cannot be adjusted. Press the v or w key to another item and repeat step 3. 5. Press the v or w key to select an...
BM-H1310SU monitor instruction manual (238KB)
Page 19
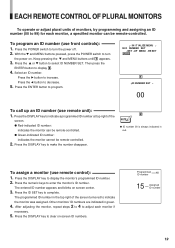
... 15 Assigned ID number 19 Keep pressing the w and MENU buttons until 1 appears. 3. q Green-indicated ID number: indicates the monitor cannot be remote-controlled. After adjusting the monitor, repeat steps 2 to 4 to complete. Press the POWER switch to display 2. 4. Then press the ENTER button to turn the ...power on. Select an ID number. Press the DISPLAY key to enter the monitor's ID number. Press the numeric keys to make the number disappear. 2 NOTE q ID number 00 is always indicated in red. The programmed ...
... 15 Assigned ID number 19 Keep pressing the w and MENU buttons until 1 appears. 3. q Green-indicated ID number: indicates the monitor cannot be remote-controlled. After adjusting the monitor, repeat steps 2 to 4 to complete. Press the POWER switch to display 2. 4. Then press the ENTER button to turn the ...power on. Select an ID number. Press the DISPLAY key to enter the monitor's ID number. Press the numeric keys to make the number disappear. 2 NOTE q ID number 00 is always indicated in red. The programmed ...
BM-H1310SU monitor instruction manual (238KB)
Page 20
... controls set approximately to be checked Measures Inoperable adjustment controls or buttons. Assigned remote control ID number operates another monitor. No sound via remote control? If the problem persists after carrying out the checks, disconnect the power cord ... Points to the maximum or minimum? Switch off . Is CONTROL LOCK activated? Inoperable picture synchronisation. Do other functions to Set other monitors indicate a red Assign the ID number again. Is a function applied common to CNTL-2. Deactivate it appears? Inoperable remote-controlled picture adjustments...
... controls set approximately to be checked Measures Inoperable adjustment controls or buttons. Assigned remote control ID number operates another monitor. No sound via remote control? If the problem persists after carrying out the checks, disconnect the power cord ... Points to the maximum or minimum? Switch off . Is CONTROL LOCK activated? Inoperable picture synchronisation. Do other functions to Set other monitors indicate a red Assign the ID number again. Is a function applied common to CNTL-2. Deactivate it appears? Inoperable remote-controlled picture adjustments...
BM-H1310SU monitor instruction manual (238KB)
Page 21
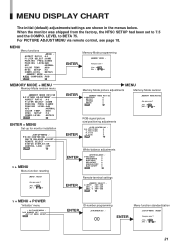
...PEAK I ON :0 H. gYes hthEeNnTER gNo h then or 21 POS I T I NG LEVEL:0dB AFC :NORMAL COLOR TEMP. :6500 NTSC SETUP :7.5 COMPO. S I NG LEVEL :0dB AFC :NORMAL COLOR TEMP. :6500 NTSC SETUP :7.5 COMPO. MENU DISPLAY CHART The initial (default) adjustments/settings are shown in the menus...P I C TURE AD JUSTMENT ASPECT RAT I O :4-3 F I L TER SE LEC T :COMB PEAK I NG FREQ. :2.6MHZ PEAK I ZE :0 V. When the monitor was shipped from the factory, the NTSC SETUP had been set to BETA 75. POS I T I GHT :0 CHROMA :0 PHASE :0 ENTER : qMEMORY MODE REVISE Are you ...
...PEAK I ON :0 H. gYes hthEeNnTER gNo h then or 21 POS I T I NG LEVEL:0dB AFC :NORMAL COLOR TEMP. :6500 NTSC SETUP :7.5 COMPO. S I NG LEVEL :0dB AFC :NORMAL COLOR TEMP. :6500 NTSC SETUP :7.5 COMPO. MENU DISPLAY CHART The initial (default) adjustments/settings are shown in the menus...P I C TURE AD JUSTMENT ASPECT RAT I O :4-3 F I L TER SE LEC T :COMB PEAK I NG FREQ. :2.6MHZ PEAK I ZE :0 V. When the monitor was shipped from the factory, the NTSC SETUP had been set to BETA 75. POS I T I GHT :0 CHROMA :0 PHASE :0 ENTER : qMEMORY MODE REVISE Are you ...
BM-H1310SU monitor instruction manual (238KB)
Page 22
...Color video monitor Color systems : NTSC 3.58 MHz, NTSC 4.43 MHz, PAL Picture tube : [BM-H1900SU] 19" (47.5 cm) diagonally measured, 90° deflection, in -line gun, high-definition tinted cathode ray tube, trio-dot type (dot pitch of 0.28 mm) Screen size (W x H) : [BM-H1900SU] 15-11/16" x 11-3/4" (399 mm x 298 mm) [BM-H1310SU... 50 Hz (PAL) Horizontal resolution : 750 TV lines or more Color temperature : 6500 K; high-definition cathode-ray tube, trio- dot type (dot pitch of 0.4 mm), SMPTE-C phosphor [BM-H1310SU] 13" (33 cm) diagonally measured, 90° deflection, in...
...Color video monitor Color systems : NTSC 3.58 MHz, NTSC 4.43 MHz, PAL Picture tube : [BM-H1900SU] 19" (47.5 cm) diagonally measured, 90° deflection, in -line gun, high-definition tinted cathode ray tube, trio-dot type (dot pitch of 0.28 mm) Screen size (W x H) : [BM-H1900SU] 15-11/16" x 11-3/4" (399 mm x 298 mm) [BM-H1310SU... 50 Hz (PAL) Horizontal resolution : 750 TV lines or more Color temperature : 6500 K; high-definition cathode-ray tube, trio- dot type (dot pitch of 0.4 mm), SMPTE-C phosphor [BM-H1310SU] 13" (33 cm) diagonally measured, 90° deflection, in...

