Instructions
Page 7
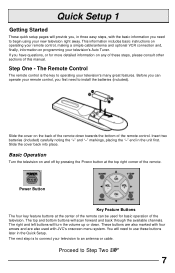
...of the remote. These buttons are also used for more detailed information on and off by pressing the POWER button at the center of this manual. Slide the cover on programming your remote control, making a simple cable/antenna and optional VCR connection and, finally, information on the back of... with the basic information you need to begin using your remote control, you can be used with four arrows and are also marked with JVC's onscreen menu system. Slide the cover back into place. Power Button Key Feature Buttons The four key feature buttons at the top right ...
...of the remote. These buttons are also used for more detailed information on and off by pressing the POWER button at the center of this manual. Slide the cover on programming your remote control, making a simple cable/antenna and optional VCR connection and, finally, information on the back of... with the basic information you need to begin using your remote control, you can be used with four arrows and are also marked with JVC's onscreen menu system. Slide the cover back into place. Power Button Key Feature Buttons The four key feature buttons at the top right ...
Instructions
Page 10
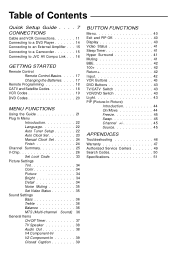
... Connections 11 Connecting to a DVD Player 14 Connecting to an External Amplifier . . . 15 Connecting to a Camcorder 15 Connecting to JVC AV Compu Link . . . 16 GETTING STARTED Remote Control Remote Control Basics. . . . . 17 Changing the Batteries. . . ...21 Plug In Menu Introduction 22 Language 22 Auto Tuner Setup 22 Auto Clock Set 23 Manual Clock Set 24 Finish 24 Channel Summary 25 V-Chip 26 Set Lock Code 33 Picture ...Balance 36 MTS (Multi-channel Sound) 36 General Items On/Off Timer 37 TV Speaker 38 Audio Out 38 V4 Component-In/ V2 Component-In 39 Closed ...
... Connections 11 Connecting to a DVD Player 14 Connecting to an External Amplifier . . . 15 Connecting to a Camcorder 15 Connecting to JVC AV Compu Link . . . 16 GETTING STARTED Remote Control Remote Control Basics. . . . . 17 Changing the Batteries. . . ...21 Plug In Menu Introduction 22 Language 22 Auto Tuner Setup 22 Auto Clock Set 23 Manual Clock Set 24 Finish 24 Channel Summary 25 V-Chip 26 Set Lock Code 33 Picture ...Balance 36 MTS (Multi-channel Sound) 36 General Items On/Off Timer 37 TV Speaker 38 Audio Out 38 V4 Component-In/ V2 Component-In 39 Closed ...
Instructions
Page 11
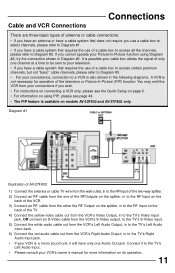
... using PIP, please see the Quick Setup on page 8. • For information on models AV-32F802 and AV-27F802 only. Connect it to the TV's Left Audio Input. • Please consult your VCR's owner 's manual for operation of the television or Picture-In-Picture (PIP) function. Cable and VCR Connections ...back of the VCR. 3) Connect an RF cable from the VCR's Right Audio Output, in Diagram #3. Diagram #1 Illustration of AV-27F802 1) Connect the antenna or cable TV wire from the wall outlet, in to the RFInput of the two-way splitter. 2) Connect an RF cable from the one channel...
... using PIP, please see the Quick Setup on page 8. • For information on models AV-32F802 and AV-27F802 only. Connect it to the TV's Left Audio Input. • Please consult your VCR's owner 's manual for operation of the television or Picture-In-Picture (PIP) function. Cable and VCR Connections ...back of the VCR. 3) Connect an RF cable from the VCR's Right Audio Output, in Diagram #3. Diagram #1 Illustration of AV-27F802 1) Connect the antenna or cable TV wire from the wall outlet, in to the RFInput of the two-way splitter. 2) Connect an RF cable from the one channel...

Instructions
Page 12
Continued Diagram #2 Illustration of AV-27F802 1) Connect the antenna or cable TV wire from the wall outlet, in to the RFInput of the cable box. 2) Connect an RF cable from the RF Output of the cable box, ... red audio cable out from the VCR's Right Audio Output, in to the TV's Left Audio Input. • Please consult your VCR's owner's manual for information on its operation. 12 Connections Cable and VCR Connections - Connect it to the TV's Right Audio Input jack. • Please see page 44 for more information on...
Continued Diagram #2 Illustration of AV-27F802 1) Connect the antenna or cable TV wire from the wall outlet, in to the RFInput of the cable box. 2) Connect an RF cable from the RF Output of the cable box, ... red audio cable out from the VCR's Right Audio Output, in to the TV's Left Audio Input. • Please consult your VCR's owner's manual for information on its operation. 12 Connections Cable and VCR Connections - Connect it to the TV's Right Audio Input jack. • Please see page 44 for more information on...
Instructions
Page 13
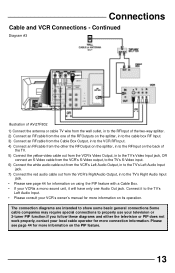
... of AV-27F802 1) Connect the antenna or cable TV wire from the wall outlet, in to the RFInput of the TV. 5) Connect the yellow video cable out from the VCR's Video Output, in to the TV's Video Input jack, OR connect an S-Video cable from the VCR's S-Video output, to the TV's ... The connection diagrams are intended to show some basic general connections.Some cable companies may require special connections to the TV's Left Audio Input. • Please consult your VCR's owner 's manual for information on using the PIP feature with a Cable Box. • If your local cable operator for more...
... of AV-27F802 1) Connect the antenna or cable TV wire from the wall outlet, in to the RFInput of the TV. 5) Connect the yellow video cable out from the VCR's Video Output, in to the TV's Video Input jack, OR connect an S-Video cable from the VCR's S-Video output, to the TV's ... The connection diagrams are intended to show some basic general connections.Some cable companies may require special connections to the TV's Left Audio Input. • Please consult your VCR's owner 's manual for information on using the PIP feature with a Cable Box. • If your local cable operator for more...
Instructions
Page 14
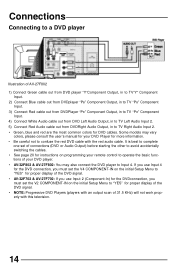
... set the V2 COMPONENT-IN on programming your DVD player. • AV-32F802 & AV-27F802: You may vary colors, please consult the user 's manual for your DVD Player for proper display of the DVD signal. •... Audio cable out from DVD Left Audio Output, in to TV Left Audio Input 2. 5) Connect Red Audio cable out from DVDRight Audio Output, in to TV Right Audio Input 2. • Green, blue and red ...-IN on the initial Setup Menu to "YES" for proper display of the DVD signal. • AV-32F702 & AV-27F702: If you use Input 2 (Component-In) for the DVDconnection, you must set of connections (...
... set the V2 COMPONENT-IN on programming your DVD player. • AV-32F802 & AV-27F802: You may vary colors, please consult the user 's manual for your DVD Player for proper display of the DVD signal. •... Audio cable out from DVD Left Audio Output, in to TV Left Audio Input 2. 5) Connect Red Audio cable out from DVDRight Audio Output, in to TV Right Audio Input 2. • Green, blue and red ...-IN on the initial Setup Menu to "YES" for proper display of the DVD signal. • AV-32F702 & AV-27F702: If you use Input 2 (Component-In) for the DVDconnection, you must set of connections (...

Instructions
Page 23
...at 2:00 am on the next page for Daylight Savings. To set the clock manually. See 'Manual Clock Set'on the first Sunday in October. • You will not need to press the MENU button to enter this screen from the Plug In Menu. 23 EASTERN ON OFF FINISH To TIME ZONE To... select your TV's clock for instructions. • The Daylight Savings Time feature automatically adjusts your ...
...at 2:00 am on the next page for Daylight Savings. To set the clock manually. See 'Manual Clock Set'on the first Sunday in October. • You will not need to press the MENU button to enter this screen from the Plug In Menu. 23 EASTERN ON OFF FINISH To TIME ZONE To... select your TV's clock for instructions. • The Daylight Savings Time feature automatically adjusts your ...
Instructions
Page 24
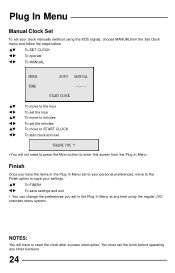
... MANUALfrom the Set Clock menu and follow the steps below. Finish Once you set to your clock manually (without using the regular JVC onscreen menu system. To SET CLOCK To operate To MANUAL MODE TIME AUTO MANUAL --:-- -- NOTES: You will not need to press the MENU button to save settings and exit • You... the Plug In Menu set in the Plug In Menu at any timer functions. 24 Plug In Menu Manual Clock Set To set the minutes To move to the Finish option to enter this screen from the Plug In Menu. START CLOCK To move to the hour To set the hour To...
... MANUALfrom the Set Clock menu and follow the steps below. Finish Once you set to your clock manually (without using the regular JVC onscreen menu system. To SET CLOCK To operate To MANUAL MODE TIME AUTO MANUAL --:-- -- NOTES: You will not need to press the MENU button to save settings and exit • You... the Plug In Menu set in the Plug In Menu at any timer functions. 24 Plug In Menu Manual Clock Set To set the minutes To move to the Finish option to enter this screen from the Plug In Menu. START CLOCK To move to the hour To set the hour To...

Instructions
Page 47
... Stylus (Needle) are warranted only for Canadian Warranty information. All products and parts thereof may be defective within the warranty period,JVC will be given to abuse, accident,alteration,modification, tampering, negligence, misuse, faulty installation,lack of 25 inches and larger may...not available, carry in its original carton, and ship, insured, with a screen size of reasonable care, or if repaired or serviced by anyone other mounting systems; 3) Operational adjustments covered in the Owner's Manual, normal maintenance , video and audio head cleaning; 4) Damage that occurs ...
... Stylus (Needle) are warranted only for Canadian Warranty information. All products and parts thereof may be defective within the warranty period,JVC will be given to abuse, accident,alteration,modification, tampering, negligence, misuse, faulty installation,lack of 25 inches and larger may...not available, carry in its original carton, and ship, insured, with a screen size of reasonable care, or if repaired or serviced by anyone other mounting systems; 3) Operational adjustments covered in the Owner's Manual, normal maintenance , video and audio head cleaning; 4) Damage that occurs ...


