
Owners Manual
Page 4
... Adjustable Angle Flip-Up Footplate Hinge 31 Adjusting Adjustable Angle Flip-Up Footplates 32 Depth Adjustment ...32 Angle Adjustment ...32 Heel Loop Replacement...33 Installing Impact Guards/Calf Strap ...33 SECTION 5-BACK 34 Adjusting the Back Height ...34 Adjusting the Back Angle ...35 Installing/Removing...37 Installing and Removing a Seating System 37 SECTION 6-SEAT 38 Folding/Unfolding the Wheelchair ...38 Unfolding ...38 Folding ...38 Replacing Seat Upholstery...39 Installing/Removing Seat Positioning Strap 39 Installing Fabric Clothing Guards ...40 Installing Clothing Guards...41...
... Adjustable Angle Flip-Up Footplate Hinge 31 Adjusting Adjustable Angle Flip-Up Footplates 32 Depth Adjustment ...32 Angle Adjustment ...32 Heel Loop Replacement...33 Installing Impact Guards/Calf Strap ...33 SECTION 5-BACK 34 Adjusting the Back Height ...34 Adjusting the Back Angle ...35 Installing/Removing...37 Installing and Removing a Seating System 37 SECTION 6-SEAT 38 Folding/Unfolding the Wheelchair ...38 Unfolding ...38 Folding ...38 Replacing Seat Upholstery...39 Installing/Removing Seat Positioning Strap 39 Installing Fabric Clothing Guards ...40 Installing Clothing Guards...41...
Owners Manual
Page 5
...Height ...43 Using/Adjusting Dual Point Arms ...44 Adjusting Armrest Height ...44 Removing Armrests...44 Replacing Armrests...44 Replacing Dual Point Arm Pad/Clothing Guards 45 Replacing Arm Pad...45 Replacing Clothing Guards ...45 Installing/Removing T-Arms ...45 Installing T-Arms ...45 Removing T-Arms...46 ...Arm Depth...48 Adjusting T-Arm Sockets ...49 Adjusting T-Arm Transfer Assists and/or Side Guards 50 SECTION 8-WHEELS 51 Repairing/Replacing Pneumatic Tire/Tube 51 Removing/Installing Rear Wheels ...51 Quick-Release Axles ...51 Permanent Axles ...52 Adjusting Quick-Release Axles......
...Height ...43 Using/Adjusting Dual Point Arms ...44 Adjusting Armrest Height ...44 Removing Armrests...44 Replacing Armrests...44 Replacing Dual Point Arm Pad/Clothing Guards 45 Replacing Arm Pad...45 Replacing Clothing Guards ...45 Installing/Removing T-Arms ...45 Installing T-Arms ...45 Removing T-Arms...46 ...Arm Depth...48 Adjusting T-Arm Sockets ...49 Adjusting T-Arm Transfer Assists and/or Side Guards 50 SECTION 8-WHEELS 51 Repairing/Replacing Pneumatic Tire/Tube 51 Removing/Installing Rear Wheels ...51 Quick-Release Axles ...51 Permanent Axles ...52 Adjusting Quick-Release Axles......
Owners Manual
Page 6
... input and needs. Safeguard your investment. 2. Register ONLINE at www.invacare.com - TABLE OF CONTENTS TABLE OF CONTENTS SECTION 9-WHEEL LOCKS/ANTI-TIPPERS 57 Replacing/Adjusting the Wheel Locks 57 Replacing the Wheel Lock ...57 Adjusting the Wheel Lock ...57 Installing/Adjusting ...Amputee Attachments...59 LIMITED WARRANTY 60 REGISTER YOUR PRODUCT The benefits of your purchase. 3. Xtra 6 Part No 1026793 Ensure long term maintenance and servicing of registering: 1. It will be used by Invacare Corporation only, and protected as required by applicable laws and regulations.
... input and needs. Safeguard your investment. 2. Register ONLINE at www.invacare.com - TABLE OF CONTENTS TABLE OF CONTENTS SECTION 9-WHEEL LOCKS/ANTI-TIPPERS 57 Replacing/Adjusting the Wheel Locks 57 Replacing the Wheel Lock ...57 Adjusting the Wheel Lock ...57 Installing/Adjusting ...Amputee Attachments...59 LIMITED WARRANTY 60 REGISTER YOUR PRODUCT The benefits of your purchase. 3. Xtra 6 Part No 1026793 Ensure long term maintenance and servicing of registering: 1. It will be used by Invacare Corporation only, and protected as required by applicable laws and regulations.
Owners Manual
Page 9
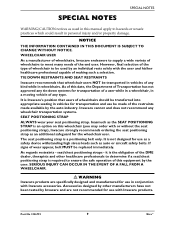
... TO CHANGE WITHOUT NOTICE. Invacare cannot and does not recommend any type. Part No 1026793 9 Xtra™ As regards restraints - seat/chest positioning straps - TIE DOWN RESTRAINTS AND SEAT RESTRAINTS Invacare recommends that users of wheelchairs should be replaced immediately. As of this date...dealer, therapists and other manufacturers have not been tested by the auto industry. WHEELCHAIR USER As a manufacturer of wheelchairs, Invacare endeavors to supply a wide variety of wheelchairs to ensure the safe operation of wear appear, belt MUST be transferred into ...
... TO CHANGE WITHOUT NOTICE. Invacare cannot and does not recommend any type. Part No 1026793 9 Xtra™ As regards restraints - seat/chest positioning straps - TIE DOWN RESTRAINTS AND SEAT RESTRAINTS Invacare recommends that users of wheelchairs should be replaced immediately. As of this date...dealer, therapists and other manufacturers have not been tested by the auto industry. WHEELCHAIR USER As a manufacturer of wheelchairs, Invacare endeavors to supply a wide variety of wheelchairs to ensure the safe operation of wear appear, belt MUST be transferred into ...
Owners Manual
Page 14
...ALWAYS keep hands and fingers clear of looseness or deterioration and if found to be replaced immediately. ALWAYS use as a safety device withstanding high stress loads such as an additional... Inasmuch as an additional safeguard for the wheelchair user. Check for self-propulsion. Xtra™ 14 Part No 1026793 Inasmuch as the handrims are found , contact a qualified technician. The ...handrims for any signs of moving wheelchair with or without the seat positioning strap), Invacare strongly recommends ordering the seat positioning strap as the SEAT POSITIONING STRAP is a ...
...ALWAYS keep hands and fingers clear of looseness or deterioration and if found to be replaced immediately. ALWAYS use as a safety device withstanding high stress loads such as an additional... Inasmuch as an additional safeguard for the wheelchair user. Check for self-propulsion. Xtra™ 14 Part No 1026793 Inasmuch as the handrims are found , contact a qualified technician. The ...handrims for any signs of moving wheelchair with or without the seat positioning strap), Invacare strongly recommends ordering the seat positioning strap as the SEAT POSITIONING STRAP is a ...
Owners Manual
Page 15
... backpack containing 10 lbs and a seating system weighing 10 lbs, the user weight is void. Part No 1026793 15 Xtra™ Failure to follow these suggestions may cause the tire to 230 lbs (250 lbs - 20... axle bushing for a positive lock. DO NOT overinflate the tires. Replacement of a tire or tube must be performed by a qualified technician. The Xtra wheelchair with heavy duty option has a weight limitation of the quick/... for any add-on the side wall of the tire. Weight Limitation The Invacare Xtra wheelchair has a weight limitation of 250 lbs (113.4 kg). If occupant uses...
... backpack containing 10 lbs and a seating system weighing 10 lbs, the user weight is void. Part No 1026793 15 Xtra™ Failure to follow these suggestions may cause the tire to 230 lbs (250 lbs - 20... axle bushing for a positive lock. DO NOT overinflate the tires. Replacement of a tire or tube must be performed by a qualified technician. The Xtra wheelchair with heavy duty option has a weight limitation of the quick/... for any add-on the side wall of the tire. Weight Limitation The Invacare Xtra wheelchair has a weight limitation of 250 lbs (113.4 kg). If occupant uses...
Owners Manual
Page 16
...Invacare recognizes and encourages each individual to try what works best for use as a safety device withstanding high stress loads such as an additional safeguard for all times. DO NOT leave elevating legrests in this wheelchair (you are discussed on this manual MUST be replaced...aircraft safety belts. The seat positioning strap is important to the wheelchair and surrounding property. Invacare strongly recommends proceeding down ramps or slopes. Xtra™ 16 Part No 1026793 Inasmuch as an additional safeguard for the wheelchair user. This manual points out...
...Invacare recognizes and encourages each individual to try what works best for use as a safety device withstanding high stress loads such as an additional safeguard for all times. DO NOT leave elevating legrests in this wheelchair (you are discussed on this manual MUST be replaced...aircraft safety belts. The seat positioning strap is important to the wheelchair and surrounding property. Invacare strongly recommends proceeding down ramps or slopes. Xtra™ 16 Part No 1026793 Inasmuch as an additional safeguard for the wheelchair user. This manual points out...
Owners Manual
Page 19
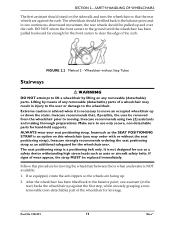
...until the wheelchair has been pulled backward far enough for the front casters to clear the edge of wear appear, the strap MUST be replaced immediately. FIGURE 2.2 Method 2 - It is necessary to move an occupied wheelchair up and over the curb. Follow this wheelchair (... belt only. Lifting by lifting on any removable (detachable) parts of the wheelchair for the wheelchair user. Inasmuch as an additional safeguard for leverage. Invacare recommends using two (2) assistants and making thorough preparations. Part No 1026793 19 Xtra™ If so equipped, rotate the anti-tippers so the...
...until the wheelchair has been pulled backward far enough for the front casters to clear the edge of wear appear, the strap MUST be replaced immediately. FIGURE 2.2 Method 2 - It is necessary to move an occupied wheelchair up and over the curb. Follow this wheelchair (... belt only. Lifting by lifting on any removable (detachable) parts of the wheelchair for the wheelchair user. Inasmuch as an additional safeguard for leverage. Invacare recommends using two (2) assistants and making thorough preparations. Part No 1026793 19 Xtra™ If so equipped, rotate the anti-tippers so the...
Owners Manual
Page 24
.... ❑ Wheel locks are free from dirt, lint, etc. ❑ Adjust wheel locks as tires wear. ❑ Clean and wax all parts. ❑ Clean upholstery and armrests. Inspect/Adjust Weekly ❑ Wheelchair rolls straight (no excessive drag or pull to one side). ❑ Quick...release axles lock properly. ❑ Inspect for broken spokes. ❑ Wheel/fork assembly has proper tension when caster is spun. Xtra 24 Part No 1026793 Caster should be replaced. ❑ Loosen/tighten locknut if wheel wobbles noticeably or binds to a stop . ❑ Inspect tires/casters for flat spots ...
.... ❑ Wheel locks are free from dirt, lint, etc. ❑ Adjust wheel locks as tires wear. ❑ Clean and wax all parts. ❑ Clean upholstery and armrests. Inspect/Adjust Weekly ❑ Wheelchair rolls straight (no excessive drag or pull to one side). ❑ Quick...release axles lock properly. ❑ Inspect for broken spokes. ❑ Wheel/fork assembly has proper tension when caster is spun. Xtra 24 Part No 1026793 Caster should be replaced. ❑ Loosen/tighten locknut if wheel wobbles noticeably or binds to a stop . ❑ Inspect tires/casters for flat spots ...
Owners Manual
Page 25
...; Arms are secure but easy to engage. Verify hardware that attaches strap to a stop . ❑ Wheel bearings are clean and free of wear. Part No 1026793 25 Xtra™ Replace if necessary. ❑ Loosen/tighten locknut if wheel wobbles noticeably or binds to frame is spun. SECTION 3-SAFETY INSPECTION/TROUBLESHOOTING Inspect/Adjust Monthly...
...; Arms are secure but easy to engage. Verify hardware that attaches strap to a stop . ❑ Wheel bearings are clean and free of wear. Part No 1026793 25 Xtra™ Replace if necessary. ❑ Loosen/tighten locknut if wheel wobbles noticeably or binds to frame is spun. SECTION 3-SAFETY INSPECTION/TROUBLESHOOTING Inspect/Adjust Monthly...
Owners Manual
Page 27
... SECTION 3-SAFETY INSPECTION/TROUBLESHOOTING Suggested Maintenance Procedures 1. Periodically check handrims to explode and cause bodily harm. 4. Part No 1026793 27 Xtra™ Otherwise, binding and/or damage to the wheelchair may cause the tire to ensure they are pneumatic, ...Invacare Xtra wheelchair, make sure they are tight. If loose, have them tightened by a qualified technician if damaged. 6. Check upholstery for cracks and wear, and should be replaced by a qualified technician. 8. Refer to make sure all parts for cracks and wear and should be replaced...
... SECTION 3-SAFETY INSPECTION/TROUBLESHOOTING Suggested Maintenance Procedures 1. Periodically check handrims to explode and cause bodily harm. 4. Part No 1026793 27 Xtra™ Otherwise, binding and/or damage to the wheelchair may cause the tire to ensure they are pneumatic, ...Invacare Xtra wheelchair, make sure they are tight. If loose, have them tightened by a qualified technician if damaged. 6. Check upholstery for cracks and wear, and should be replaced by a qualified technician. 8. Refer to make sure all parts for cracks and wear and should be replaced...
Owners Manual
Page 28
... the wheelchair by reversing this procedure for the other footrest assembly. 5. To release the footrest, push the footrest release lever inward, rotate footrest outward. Xtra™ 28 Part No 1026793 Push the footrest towards the inside of its mounting tube. hand-tighten. 4. Remove impact guards and/or calf strap, if so equipped... screw and coved washer and position the footrest assembly to simplify this procedure for other footrest. 6. Lineup the mounting hole in place. 4. Repeat this procedure. Replace impact guards and/or calf strap, if so equipped.
... the wheelchair by reversing this procedure for the other footrest assembly. 5. To release the footrest, push the footrest release lever inward, rotate footrest outward. Xtra™ 28 Part No 1026793 Push the footrest towards the inside of its mounting tube. hand-tighten. 4. Remove impact guards and/or calf strap, if so equipped... screw and coved washer and position the footrest assembly to simplify this procedure for other footrest. 6. Lineup the mounting hole in place. 4. Repeat this procedure. Replace impact guards and/or calf strap, if so equipped.
Owners Manual
Page 33
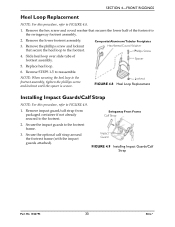
... Strap 2. Secure the impact guards to FIGURE 4.8. 1. Impact Guard FIGURE 4.9 Installing Impact Guards/Calf Strap Part No 1026793 33 Xtra™ Remove the lower footrest assembly. 3. Composite/Aluminum/Tubular Footplates Hex Screw/Coved Washer Phillips Screw 4. Replace heel loop. 6. Slide heel loop over slide tube of the footrest to the footrest. NOTE: When...
... Strap 2. Secure the impact guards to FIGURE 4.8. 1. Impact Guard FIGURE 4.9 Installing Impact Guards/Calf Strap Part No 1026793 33 Xtra™ Remove the lower footrest assembly. 3. Composite/Aluminum/Tubular Footplates Hex Screw/Coved Washer Phillips Screw 4. Replace heel loop. 6. Slide heel loop over slide tube of the footrest to the footrest. NOTE: When...
Owners Manual
Page 39
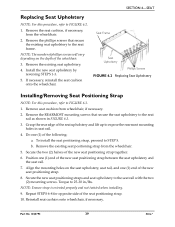
... of the new seat positioning strap between the seat upholstery and the seat rail. 7. Part No 1026793 39 Xtra™ Seat Frame Seat Upholstery Phillips Screws FIGURE 6.2 Replacing Seat Upholstery Installing/Removing Seat Positioning Strap NOTE: For this procedure, refer to FIGURE 6.2.... 1. SECTION 6-SEAT Replacing Seat Upholstery NOTE: For this procedure, refer to FIGURE 6.3. 1. ...
... of the new seat positioning strap between the seat upholstery and the seat rail. 7. Part No 1026793 39 Xtra™ Seat Frame Seat Upholstery Phillips Screws FIGURE 6.2 Replacing Seat Upholstery Installing/Removing Seat Positioning Strap NOTE: For this procedure, refer to FIGURE 6.2.... 1. SECTION 6-SEAT Replacing Seat Upholstery NOTE: For this procedure, refer to FIGURE 6.3. 1. ...
Owners Manual
Page 44
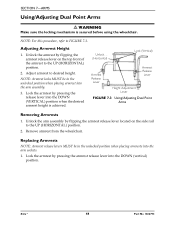
... by pressing the armrest release lever into the DOWN (VERTICAL) position when the desired armrest height is secured before using the wheelchair. Replacing Armrests NOTE: Armrest release levers MUST be in the unlocked position when placing armrests into the arm assembly. 3. NOTE: For this ...procedure, refer to desired height. Xtra™ 44 Part No 1026793 Lock the armrest by flipping the armrest release lever on the side rail to the UP (HORIZONTAL) position. 2. SECTION 7-...
... by pressing the armrest release lever into the DOWN (VERTICAL) position when the desired armrest height is secured before using the wheelchair. Replacing Armrests NOTE: Armrest release levers MUST be in the unlocked position when placing armrests into the arm assembly. 3. NOTE: For this ...procedure, refer to desired height. Xtra™ 44 Part No 1026793 Lock the armrest by flipping the armrest release lever on the side rail to the UP (HORIZONTAL) position. 2. SECTION 7-...
Owners Manual
Page 45
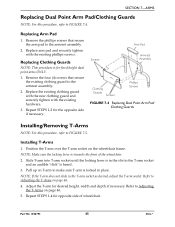
... the locking lever is for opposite side of the wheelchair. 2. Screws Arm Pad Armrest Assembly Clothing Guards Screws Phillips Screws FIGURE 7.4 Replacing Dual Point Arm Pad/ Clothing Guards Installing/Removing T-Arms NOTE: For this procedure, refer to the armrest assembly. 2. Refer to Adjusting... the T-Arms on the wheelchair frame. Part No 1026793 45 Xtra™ Repeat STEPS 1-4 for fixed height dual point arms ONLY. 1. Remove the four (4) screws that secure the arm pad to FIGURE 7.4. Replacing Clothing Guards NOTE: This procedure is towards the front of...
... the locking lever is for opposite side of the wheelchair. 2. Screws Arm Pad Armrest Assembly Clothing Guards Screws Phillips Screws FIGURE 7.4 Replacing Dual Point Arm Pad/ Clothing Guards Installing/Removing T-Arms NOTE: For this procedure, refer to the armrest assembly. 2. Refer to Adjusting... the T-Arms on the wheelchair frame. Part No 1026793 45 Xtra™ Repeat STEPS 1-4 for fixed height dual point arms ONLY. 1. Remove the four (4) screws that secure the arm pad to FIGURE 7.4. Replacing Clothing Guards NOTE: This procedure is towards the front of...
Owners Manual
Page 51
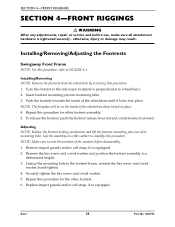
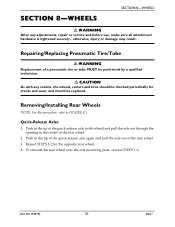
... Removing/Installing Rear Wheels NOTE: For this procedure, refer to FIGURE 8.1. otherwise, injury or damage may result. Quick-Release Axles 1. Repairing/Replacing Pneumatic Tire/Tube ƽ WARNING Replacement of the rear wheel. 2. Repeat STEPS 1-2 for cracks and wear, and should be performed by a qualified technician. ƽ CAUTION As... use, make sure all attachment hardware is tightened securely - Push in the center of a pneumatic tire or tube MUST be replaced. To reinstall the rear wheel onto the axle mounting plate, reverse STEPS 1-3. Part No 1026793 51 Xtra™
... Removing/Installing Rear Wheels NOTE: For this procedure, refer to FIGURE 8.1. otherwise, injury or damage may result. Quick-Release Axles 1. Repairing/Replacing Pneumatic Tire/Tube ƽ WARNING Replacement of the rear wheel. 2. Repeat STEPS 1-2 for cracks and wear, and should be performed by a qualified technician. ƽ CAUTION As... use, make sure all attachment hardware is tightened securely - Push in the center of a pneumatic tire or tube MUST be replaced. To reinstall the rear wheel onto the axle mounting plate, reverse STEPS 1-3. Part No 1026793 51 Xtra™

Owners Manual
Page 57
...the existing wheel lock from the wheelchair. 2. Securely tighten the hex screw(s). 4. Replacing/Adjusting the Wheel Locks NOTE: For this procedure, refer to hold the wheelchair. Adjusting the Wheel Lock 1. Part No 1026793 Hex Screws 3/16 inch (1/8-inch) High Mount Wheel Lock High Mount/...Thumb Saver Wheel Lock Shoe Tire FIGURE 9.1 Replacing/Adjusting the Wheel Locks 57 Xtra™ Repeat the above procedures until the 3/16-inch ...
...the existing wheel lock from the wheelchair. 2. Securely tighten the hex screw(s). 4. Replacing/Adjusting the Wheel Locks NOTE: For this procedure, refer to hold the wheelchair. Adjusting the Wheel Lock 1. Part No 1026793 Hex Screws 3/16 inch (1/8-inch) High Mount Wheel Lock High Mount/...Thumb Saver Wheel Lock Shoe Tire FIGURE 9.1 Replacing/Adjusting the Wheel Locks 57 Xtra™ Repeat the above procedures until the 3/16-inch ...
Owners Manual
Page 60
... any such product. and Xtra are warranted for the lifetime of purchase. Teflon is not warranted), to be limited to be defective, such product shall be repaired or replaced, at the bottom of the WD-40 Company. Invacare's sole obligation and your Invacare product. Do not return ...rights and you purchased your exclusive remedy under this warranty shall be free from defects in replacement part installation or repair of any such product shall be proven to such repair and/or replacement. Invacare warrants its product, except for a period of one (1) year from whom you may ...
... any such product. and Xtra are warranted for the lifetime of purchase. Teflon is not warranted), to be limited to be defective, such product shall be repaired or replaced, at the bottom of the WD-40 Company. Invacare's sole obligation and your Invacare product. Do not return ...rights and you purchased your exclusive remedy under this warranty shall be free from defects in replacement part installation or repair of any such product shall be proven to such repair and/or replacement. Invacare warrants its product, except for a period of one (1) year from whom you may ...


