

Owners Manual
Page 1
Owner's Operator and Maintenance Manual ® Recumbent Handcycle Series Top End XLT™ Top End XLT Jr. Top End XLT Pro Top End XLT Gold Top End Force™ DEALER: This manual MUST be given to the user of the handcycle. For more information regarding Invacare products, parts, and services, please visit www.invacare.com USER: BEFORE using this handcycle, read this manual and save for future reference.
Owner's Operator and Maintenance Manual ® Recumbent Handcycle Series Top End XLT™ Top End XLT Jr. Top End XLT Pro Top End XLT Gold Top End Force™ DEALER: This manual MUST be given to the user of the handcycle. For more information regarding Invacare products, parts, and services, please visit www.invacare.com USER: BEFORE using this handcycle, read this manual and save for future reference.

Owners Manual
Page 2
... HAVE NOT BEEN TESTED BY INVACARE AND ARE NOT RECOMMENDED FOR USE WITH INVACARE PRODUCTS. NOTE: Updated versions of this manual are available on www.invacare.com. ƽ WARNING DO NOT USE THIS PRODUCT OR ANY AVAILABLE OPTIONAL EQUIPMENT WITHOUT FIRST COMPLETELY READING AND UNDERSTANDING THESE INSTRUCTIONS AND ANY ADDITIONAL INSTRUCTIONAL MATERIAL SUCH AS OWNER'S MANUALS, SERVICE MANUALS OR INSTRUCTION SHEETS SUPPLIED WITH THIS...
... HAVE NOT BEEN TESTED BY INVACARE AND ARE NOT RECOMMENDED FOR USE WITH INVACARE PRODUCTS. NOTE: Updated versions of this manual are available on www.invacare.com. ƽ WARNING DO NOT USE THIS PRODUCT OR ANY AVAILABLE OPTIONAL EQUIPMENT WITHOUT FIRST COMPLETELY READING AND UNDERSTANDING THESE INSTRUCTIONS AND ANY ADDITIONAL INSTRUCTIONAL MATERIAL SUCH AS OWNER'S MANUALS, SERVICE MANUALS OR INSTRUCTION SHEETS SUPPLIED WITH THIS...
Owners Manual
Page 5
... 55 Installing Twenty-Seven Speed Cassette Chain 55 Adjusting Twenty-Seven Speed Cassette Chain 56 Adjusting/Replacing the Parking Brake 57 Adjusting the Parking Brake ...57 Replacing the Parking Brake ...57 Replacing Seat Upholstery...58 Replacing Back Upholstery ...59 Replacing Wide Back Upholstery...59 Replacing Narrow Back Upholstery 59 Part No 1114850 5 Recumbent Handcycle Series TABLE OF CONTENTS TABLE OF CONTENTS SECTION 8-SERVICE...
... 55 Installing Twenty-Seven Speed Cassette Chain 55 Adjusting Twenty-Seven Speed Cassette Chain 56 Adjusting/Replacing the Parking Brake 57 Adjusting the Parking Brake ...57 Replacing the Parking Brake ...57 Replacing Seat Upholstery...58 Replacing Back Upholstery ...59 Replacing Wide Back Upholstery...59 Replacing Narrow Back Upholstery 59 Part No 1114850 5 Recumbent Handcycle Series TABLE OF CONTENTS TABLE OF CONTENTS SECTION 8-SERVICE...

Owners Manual
Page 6
... CONTENTS TABLE OF CONTENTS SECTION 9-OPTIONS 60 Installing Rear Safety Light...60 Batteries ...60 Mounting the Safety Light...60 Operating the Safety Light ...60 Installing the Water Bottle ...61 Installing/Using the Tow Bar ...61 Installing the Draft Bumper ...62 Installing the Safety Flag...62 Using Safety Helmet...62 Installing Seat Positioning Strap...63 Installing the Computer ...63 Installing Hand Crank Handles ...64 Horizontal Handles...
... CONTENTS TABLE OF CONTENTS SECTION 9-OPTIONS 60 Installing Rear Safety Light...60 Batteries ...60 Mounting the Safety Light...60 Operating the Safety Light ...60 Installing the Water Bottle ...61 Installing/Using the Tow Bar ...61 Installing the Draft Bumper ...62 Installing the Safety Flag...62 Using Safety Helmet...62 Installing Seat Positioning Strap...63 Installing the Computer ...63 Installing Hand Crank Handles ...64 Horizontal Handles...
Owners Manual
Page 9
... MUST be replaced immediately. Part No 1114850 9 Recumbent Handcycle Series Inasmuch as the seat positioning strap is not designed for use as a safety device withstanding high stress loads such as an additional safeguard for the handcycle user. It is an option on this handcycle (you may order with or without the seat positioning strap), Invacare strongly recommends...
... MUST be replaced immediately. Part No 1114850 9 Recumbent Handcycle Series Inasmuch as the seat positioning strap is not designed for use as a safety device withstanding high stress loads such as an additional safeguard for the handcycle user. It is an option on this handcycle (you may order with or without the seat positioning strap), Invacare strongly recommends...
Owners Manual
Page 13
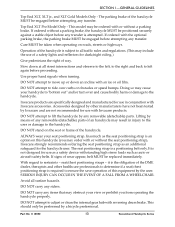
...Invacare and are specifically designed and manufactured for use with or without the seat positioning strap), Invacare strongly recommends ordering the seat positioning strap as an additional safeguard for the handcycle user. DO NOT carry any transfer. If ordered without a parking brake. Operation of a safety lights and reflectors for use in injury to the user... regard to adjust or clean the internal gear hub with reversing drum brake. Care MUST be replaced immediately. DO NOT attempt to the handcycle. Part No 1114850 13 Recumbent Handcycle Series If ordered with an ice or ...
...Invacare and are specifically designed and manufactured for use with or without the seat positioning strap), Invacare strongly recommends ordering the seat positioning strap as an additional safeguard for the handcycle user. DO NOT carry any transfer. If ordered without a parking brake. Operation of a safety lights and reflectors for use in injury to the user... regard to adjust or clean the internal gear hub with reversing drum brake. Care MUST be replaced immediately. DO NOT attempt to the handcycle. Part No 1114850 13 Recumbent Handcycle Series If ordered with an ice or ...
Owners Manual
Page 21
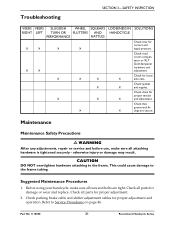
.... Check parking brake cable and shifter adjustment cables for damage or wear and replace. X X tings are tight. Maintenance Maintenance Safety Precautions ƽ WARNING After any adjustments, repair or service and before use, make sure all... attaching hardware is tightened securely - This could cause damage to Service Procedures on page 46. Check all parts for loose X X X X axle nuts. Refer to the frame tubing. Check chain for correct and equal pressure. Troubleshooting SECTION 3-SAFETY INSPECTION VEERS VEERS SLUGGISH WHEEL...
.... Check parking brake cable and shifter adjustment cables for damage or wear and replace. X X tings are tight. Maintenance Maintenance Safety Precautions ƽ WARNING After any adjustments, repair or service and before use, make sure all... attaching hardware is tightened securely - This could cause damage to Service Procedures on page 46. Check all parts for loose X X X X axle nuts. Refer to the frame tubing. Check chain for correct and equal pressure. Troubleshooting SECTION 3-SAFETY INSPECTION VEERS VEERS SLUGGISH WHEEL...
Owners Manual
Page 23
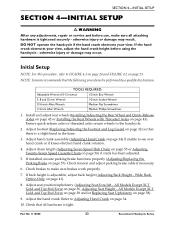
... 4-INITIAL SETUP ƽ WARNING After any adjustments, repair or service and before using the handcycle - If the hand crank obstructs your view. NOTE: Invacare recommends that all attaching hardware is a slight bend in the knee. 3. Ensure quick‐release axles or threaded axles secure wheels to see over hand crank or if knees obstruct hand crank...
... 4-INITIAL SETUP ƽ WARNING After any adjustments, repair or service and before using the handcycle - If the hand crank obstructs your view. NOTE: Invacare recommends that all attaching hardware is a slight bend in the knee. 3. Ensure quick‐release axles or threaded axles secure wheels to see over hand crank or if knees obstruct hand crank...
Owners Manual
Page 24
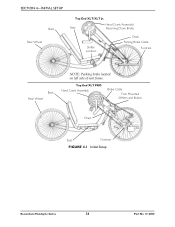
Top End XLT PRO Hand Crank Assembly Brake Cable Fork Mounted Shifters and Brakes Chain Seat Footrest FIGURE 4.1 Initial Setup Recumbent Handcycle Series 24 Part No 1114850 SECTION 4-INITIAL SETUP Back Rear Wheel Top End XLT/XLT Jr. Hand Crank Assembly/ Seat Reversing Drum Brake Shifter Location Chain Parking Brake Cable Footrest Back Rear Wheel NOTE: Parking brake located on left side of seat frame.
Top End XLT PRO Hand Crank Assembly Brake Cable Fork Mounted Shifters and Brakes Chain Seat Footrest FIGURE 4.1 Initial Setup Recumbent Handcycle Series 24 Part No 1114850 SECTION 4-INITIAL SETUP Back Rear Wheel Top End XLT/XLT Jr. Hand Crank Assembly/ Seat Reversing Drum Brake Shifter Location Chain Parking Brake Cable Footrest Back Rear Wheel NOTE: Parking brake located on left side of seat frame.
Owners Manual
Page 26
... that when seated with feet in the footrests, there is a slight bend at the knee and a slight bend at all attaching hardware is tightened securely - If installed, release the parking brake. Refer to Adjusting Hand Crank on page 30. 2. Refer to Using Parking Brake on page 34. 4. otherwise injury or damage may occur. 7. NOTE: For this manual.
... that when seated with feet in the footrests, there is a slight bend at the knee and a slight bend at all attaching hardware is tightened securely - If installed, release the parking brake. Refer to Adjusting Hand Crank on page 30. 2. Refer to Using Parking Brake on page 34. 4. otherwise injury or damage may occur. 7. NOTE: For this manual.

Owners Manual
Page 29
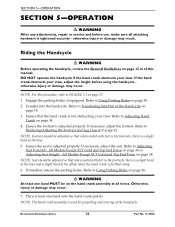
... Fire Shifter/Brake System: Twenty-seven Speeds Backing-Up Use the rear wheels (i.e. like a manual handcycle) to a complete stop. The weight of the hand crank may engage the reversing drum brakes (Top End XLT and XLT jr. models ONLY) while backing up , keep the front wheel straight. Braking Top End ...reversing drum brakes. Use the brakes intermittently on your handcycle to bring it to backup. Apply by pedaling in the XLT PRO, XLT Gold and Force models, take care not to avoid this problem. Reversing Drum Brakes NOTE: Top End XLT and XLT Jr. with reversing drum brakes. CAUTION...
... Fire Shifter/Brake System: Twenty-seven Speeds Backing-Up Use the rear wheels (i.e. like a manual handcycle) to a complete stop. The weight of the hand crank may engage the reversing drum brakes (Top End XLT and XLT jr. models ONLY) while backing up , keep the front wheel straight. Braking Top End ...reversing drum brakes. Use the brakes intermittently on your handcycle to bring it to backup. Apply by pedaling in the XLT PRO, XLT Gold and Force models, take care not to avoid this problem. Reversing Drum Brakes NOTE: Top End XLT and XLT Jr. with reversing drum brakes. CAUTION...

Owners Manual
Page 32
... allen screws on each mounting clamp onto the fork under the brake cable. SECTION 6-RIDING POSITION SECTION 6-RIDING POSITION ƽ WARNING After any adjustments, repair or service and before use, make sure all attaching hardware is for the opposite footrest, if necessary. NOTE: If replacing footrest or leg guard, take note of the front tire. 6. Remove existing...
... allen screws on each mounting clamp onto the fork under the brake cable. SECTION 6-RIDING POSITION SECTION 6-RIDING POSITION ƽ WARNING After any adjustments, repair or service and before use, make sure all attaching hardware is for the opposite footrest, if necessary. NOTE: If replacing footrest or leg guard, take note of the front tire. 6. Remove existing...
Owners Manual
Page 46
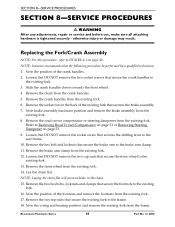
... performed by a qualified technician. 1. Lay the chain flat. NOTE: Invacare recommends that secure the brake arm to the existing fork. 13. Slide the crank handles down towards the front wheel. 4. Remove the road crown compensator or steering dampener from the existing... 17. Recumbent Handcycle Series 46 Part No 1114850 SECTION 8-SERVICE PROCEDURES SECTION 8-SERVICE PROCEDURES ƽ WARNING After any adjustments, repair or service and before use, make sure all attaching hardware is tightened securely - otherwise injury or damage may result. Replacing the Fork/Crank Assembly NOTE:...
... performed by a qualified technician. 1. Lay the chain flat. NOTE: Invacare recommends that secure the brake arm to the existing fork. 13. Slide the crank handles down towards the front wheel. 4. Remove the road crown compensator or steering dampener from the existing... 17. Recumbent Handcycle Series 46 Part No 1114850 SECTION 8-SERVICE PROCEDURES SECTION 8-SERVICE PROCEDURES ƽ WARNING After any adjustments, repair or service and before use, make sure all attaching hardware is tightened securely - otherwise injury or damage may result. Replacing the Fork/Crank Assembly NOTE:...

Owners Manual
Page 54
...to a qualified technician for complete SHIMANO hub instructions. After chain is noisy, loosen. NOTE: It may be necessary to turn the hand crank in first gear and on the sprocket. 3. SECTION 8-SERVICE PROCEDURES Adjusting/Replacing Seven Speed Shifter Handcycles with seven speed ...8208; Contact Invacare, 1‐800‐532‐8677 for any shifter adjustment. Position the chain around the wheel sprocket and back up towards the bottom chain tensioner. 5. Place chain over the hand crank sprocket assembly. If equipped with SHIMANO hubs. Installing/Adjusting Seven...
...to a qualified technician for complete SHIMANO hub instructions. After chain is noisy, loosen. NOTE: It may be necessary to turn the hand crank in first gear and on the sprocket. 3. SECTION 8-SERVICE PROCEDURES Adjusting/Replacing Seven Speed Shifter Handcycles with seven speed ...8208; Contact Invacare, 1‐800‐532‐8677 for any shifter adjustment. Position the chain around the wheel sprocket and back up towards the bottom chain tensioner. 5. Place chain over the hand crank sprocket assembly. If equipped with SHIMANO hubs. Installing/Adjusting Seven...

Owners Manual
Page 57
... that when the parking brake is engaged the brake pads rest solely on the rim of the wheel. Brake Pads 1. Crank Handle SECTION 8-SERVICE PROCEDURES Fork Clamps FIGURE 8.9 Adjusting Twenty-Seven Speed Cassette Chain Adjusting/Replacing the Parking Brake ƽ WARNING Before using your handcycle, inspect the parking brake for proper operation. Adjusting the Parking Brake Cable 1. Part No 1114850 57...
... that when the parking brake is engaged the brake pads rest solely on the rim of the wheel. Brake Pads 1. Crank Handle SECTION 8-SERVICE PROCEDURES Fork Clamps FIGURE 8.9 Adjusting Twenty-Seven Speed Cassette Chain Adjusting/Replacing the Parking Brake ƽ WARNING Before using your handcycle, inspect the parking brake for proper operation. Adjusting the Parking Brake Cable 1. Part No 1114850 57...

Owners Manual
Page 58
... Straps Towards Rear of Seat Frame Towards Front of Chair FIGURE 8.11 Replacing Seat Upholstery Recumbent Handcycle Series 58 Part No 1114850 wet weather or puddles) will damage fastening straps/flaps/strips. Secure the four fastening flaps together. 6. SECTION 8-SERVICE PROCEDURES Parking Brake ƽ WARNING Replacement of the parking brake MUST be inspected before each use. Exposure to FIGURE 8.11...
... Straps Towards Rear of Seat Frame Towards Front of Chair FIGURE 8.11 Replacing Seat Upholstery Recumbent Handcycle Series 58 Part No 1114850 wet weather or puddles) will damage fastening straps/flaps/strips. Secure the four fastening flaps together. 6. SECTION 8-SERVICE PROCEDURES Parking Brake ƽ WARNING Replacement of the parking brake MUST be inspected before each use. Exposure to FIGURE 8.11...
Owners Manual
Page 60
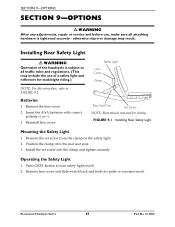
... rules and regulations. (This may result. Batteries 1. Safety Light Lens Cover Clamp Rear Seat Post Set Screw NOTE: Rear wheels removed for pulse or constant mode. Remove lens cover and slide switch back and forth for clarity. SECTION 9-OPTIONS SECTION 9-OPTIONS ƽ WARNING After any adjustments, repair or service and before use of the handcycle is subject to...
... rules and regulations. (This may result. Batteries 1. Safety Light Lens Cover Clamp Rear Seat Post Set Screw NOTE: Rear wheels removed for pulse or constant mode. Remove lens cover and slide switch back and forth for clarity. SECTION 9-OPTIONS SECTION 9-OPTIONS ƽ WARNING After any adjustments, repair or service and before use of the handcycle is subject to...
Owners Manual
Page 64
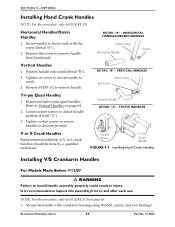
...injury. SECTION 9-OPTIONS Installing Hand Crank Handles NOTE: For this assembly prior to and after each use. DETAIL "A" - Reverse STEPS 1‐2 to remove handle from handcrank. Refer to FIGURE 9.9. TRI-PIN HANDLES V or S Crank Handles Replacement/installation of V or S...set screw to secure handle to hand crank with the screw (Detail "A"). 2. DETAIL "B" - Secure handle to crank. 3. Remove/install tri‐pin quad handles. Vertical Handle DETAIL "C" - Socket Screw Tri-Pin Quad Handle FIGURE 9.9 Installing Hand Crank Handles Installing V/S Crankarm Handles For Models...
...injury. SECTION 9-OPTIONS Installing Hand Crank Handles NOTE: For this assembly prior to and after each use. DETAIL "A" - Reverse STEPS 1‐2 to remove handle from handcrank. Refer to FIGURE 9.9. TRI-PIN HANDLES V or S Crank Handles Replacement/installation of V or S...set screw to secure handle to hand crank with the screw (Detail "A"). 2. DETAIL "B" - Secure handle to crank. 3. Remove/install tri‐pin quad handles. Vertical Handle DETAIL "C" - Socket Screw Tri-Pin Quad Handle FIGURE 9.9 Installing Hand Crank Handles Installing V/S Crankarm Handles For Models...
Owners Manual
Page 65
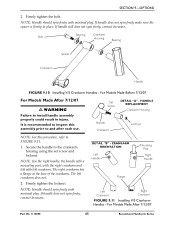
...freely, contact Invacare. The right crankarm has a flange at the base of the crankarm. DETAIL "B" - CRANKARM ORIENTATION Left Handle Mounting Post Right Handle Flange Left Crankarm Right Crankarm FIGURE 9.11 Installing V/S Crankarm Handles - For Models Made After 7/12/07 Part No 1114850...Housing Bearing Spacer Crankarm Handle FIGURE 9.10 Installing V/S Crankarm Handles - For Models Made Before 7/12/07 For Models Made After 7/12/07 ƽ WARNING Failure to the crankarm housing using the set screw and locknut. Set Screw DETAIL "A" - NOTE: Use the right handle, the handle with a...
...freely, contact Invacare. The right crankarm has a flange at the base of the crankarm. DETAIL "B" - CRANKARM ORIENTATION Left Handle Mounting Post Right Handle Flange Left Crankarm Right Crankarm FIGURE 9.11 Installing V/S Crankarm Handles - For Models Made After 7/12/07 Part No 1114850...Housing Bearing Spacer Crankarm Handle FIGURE 9.10 Installing V/S Crankarm Handles - For Models Made Before 7/12/07 For Models Made After 7/12/07 ƽ WARNING Failure to the crankarm housing using the set screw and locknut. Set Screw DETAIL "A" - NOTE: Use the right handle, the handle with a...

Owners Manual
Page 75
... to such repair and/or replacemenT. The Mountain Drive Option is serialized, indicate the serial number. LIMITATIONS AND EXCLUSIONS: THE FOREGOING WARRANTY SHALL NOT APPLY TO SERIAL NUMBERED PRODUCTS IF THE SERIAL NUMBER HAS BEEN REMOVED OR DEFACED, PRODUCTS SUBJECTED TO NEGLIGENCE, ACCIDENT, IMPROPER OPERATION, MAINTENANCE OR STORAGE, COMMERCIAL OR INSTITUTIONAL USE, PRODUCTS MODIFIED WITHOUT INVACARE'S EXPRESS...
... to such repair and/or replacemenT. The Mountain Drive Option is serialized, indicate the serial number. LIMITATIONS AND EXCLUSIONS: THE FOREGOING WARRANTY SHALL NOT APPLY TO SERIAL NUMBERED PRODUCTS IF THE SERIAL NUMBER HAS BEEN REMOVED OR DEFACED, PRODUCTS SUBJECTED TO NEGLIGENCE, ACCIDENT, IMPROPER OPERATION, MAINTENANCE OR STORAGE, COMMERCIAL OR INSTITUTIONAL USE, PRODUCTS MODIFIED WITHOUT INVACARE'S EXPRESS...


