
Owners Manual
Page 4
... 32 Replacing Standard Back Upholstery...32 9 SEAT TO FLOOR 33 Changing Seat-to-Floor Height ...33 10 REAR WHEELS 35 11 FRONT CASTERS/FORKS 36 Removing/Installing Eight Inch Forks ...36 Adjusting Forks...36 Removing/Installing Front Casters ...37 12 ANTI-TIPPERS/WHEEL LOCKS 38 Installing/Adjusting Anti-tippers...38 Using/Adjusting The Wheel Locks...40 Invacare® Veranda™Wheelchair 4 Part No...
... 32 Replacing Standard Back Upholstery...32 9 SEAT TO FLOOR 33 Changing Seat-to-Floor Height ...33 10 REAR WHEELS 35 11 FRONT CASTERS/FORKS 36 Removing/Installing Eight Inch Forks ...36 Adjusting Forks...36 Removing/Installing Front Casters ...37 12 ANTI-TIPPERS/WHEEL LOCKS 38 Installing/Adjusting Anti-tippers...38 Using/Adjusting The Wheel Locks...40 Invacare® Veranda™Wheelchair 4 Part No...

Owners Manual
Page 6
... serialized, indicate the serial number. This warranty gives you specific legal rights and you do not receive satisfactory warranty service, please write directly to such repair and/or replacement. INVACARE SHALL NOT BE LIABLE FOR ANY CONSEQUENTIAL OR INCIDENTAL DAMAGES WHATSOEVER. Invacare's sole obligation and your Invacare product. Invacare® Veranda™Wheelchair 6 Part No. 1148116 For warranty service, please contact the...
... serialized, indicate the serial number. This warranty gives you specific legal rights and you do not receive satisfactory warranty service, please write directly to such repair and/or replacement. INVACARE SHALL NOT BE LIABLE FOR ANY CONSEQUENTIAL OR INCIDENTAL DAMAGES WHATSOEVER. Invacare's sole obligation and your Invacare product. Invacare® Veranda™Wheelchair 6 Part No. 1148116 For warranty service, please contact the...

Owners Manual
Page 7
... correct locking action BEFORE actual use. 00078X021-0394 Part No. 1148116 2 OVERVIEW Serial Number Label Location is embedded into tire material at least 1/8" into tire when locked (3/16" on pneumatic tires). Slide clamp toward rear wheel until wheel lock shoe is on crossbraces Crossmember Lower Frame Tube 7 Invacare® Veranda™Wheelchair Tighten mounting fastener to comply...
... correct locking action BEFORE actual use. 00078X021-0394 Part No. 1148116 2 OVERVIEW Serial Number Label Location is embedded into tire material at least 1/8" into tire when locked (3/16" on pneumatic tires). Slide clamp toward rear wheel until wheel lock shoe is on crossbraces Crossmember Lower Frame Tube 7 Invacare® Veranda™Wheelchair Tighten mounting fastener to comply...

Owners Manual
Page 10
also, a qualified technician must perform all parts for further instruction. Invacare® Veranda™Wheelchair 10 Part No. 1148116 otherwise, injury or damage may occur. A qualified technician MUST perform the initial set up of damage, DO NOT use. Check all procedures specifically indicated in conjunction with Invacare accessories. In case of this wheelchair. Contact Invacare/Carrier for shipping damage and test before...
also, a qualified technician must perform all parts for further instruction. Invacare® Veranda™Wheelchair 10 Part No. 1148116 otherwise, injury or damage may occur. A qualified technician MUST perform the initial set up of damage, DO NOT use. Check all procedures specifically indicated in conjunction with Invacare accessories. In case of this wheelchair. Contact Invacare/Carrier for shipping damage and test before...

Owners Manual
Page 11
... from a wheelchair. ƽ 3 SAFETY WARNING Wheelchair User As a manufacturer of wheelchairs, Invacare endeavors to supply a wide variety of wheelchairs to seat/chest positioning straps - It is Invacare's position that users of wheelchairs should NOT be transported in vehicles of wear appear, strap MUST be made of making such a selection. Part No. 1148116 11 Invacare® Veranda™Wheelchair If signs of any wheelchair transportation systems. ALWAYS...
... from a wheelchair. ƽ 3 SAFETY WARNING Wheelchair User As a manufacturer of wheelchairs, Invacare endeavors to supply a wide variety of wheelchairs to seat/chest positioning straps - It is Invacare's position that users of wheelchairs should NOT be transported in vehicles of wear appear, strap MUST be made of making such a selection. Part No. 1148116 11 Invacare® Veranda™Wheelchair If signs of any wheelchair transportation systems. ALWAYS...

Owners Manual
Page 12
... additional safeguard for the wheelchair user. Operating Information After any adjustments, repair or service and before attempting active use , ensure that grips are in injury to observe this wheelchair (you may order with or without the anti-tippers), Invacare strongly recommends ordering the anti...the cane assembly. Use of soap or ammonia based cleaning solutions will result in the presence of a qualified healthcare professional before use, make sure all times. If the wheelchair is tightened securely. Serious injury or damage to use only a clean towel lightly dampened with a...
... additional safeguard for the wheelchair user. Operating Information After any adjustments, repair or service and before attempting active use , ensure that grips are in injury to observe this wheelchair (you may order with or without the anti-tippers), Invacare strongly recommends ordering the anti...the cane assembly. Use of soap or ammonia based cleaning solutions will result in the presence of a qualified healthcare professional before use, make sure all times. If the wheelchair is tightened securely. Serious injury or damage to use only a clean towel lightly dampened with a...
Owners Manual
Page 13
... attempt to the wheelchair. If occupant uses said wheelchair as this may tip over . Wheel locks are in or out of the wheelchair, make sure that the footplates are not brakes. When getting in the upward position or swing footrests towards the outside of the wheelchair. ALWAYS use of its wheelchairs as a seat for any removable (detachable) parts of the wheelchair may cause...
... attempt to the wheelchair. If occupant uses said wheelchair as this may tip over . Wheel locks are in or out of the wheelchair, make sure that the footplates are not brakes. When getting in the upward position or swing footrests towards the outside of the wheelchair. ALWAYS use of its wheelchairs as a seat for any removable (detachable) parts of the wheelchair may cause...

Owners Manual
Page 14
... NOT attempt to avoid hard braking or sudden stops. ALWAYS check hand grips for the new wheelchair user and assistant with safety as the assistant. DO NOT climb, go up, or down ramps or slopes slowly to lift a wheelchair by many. Techniques in this manual. If loose and/or worn, replace IMMEDIATELY. Invacare strongly recommends proceeding down...
... NOT attempt to avoid hard braking or sudden stops. ALWAYS check hand grips for the new wheelchair user and assistant with safety as the assistant. DO NOT climb, go up, or down ramps or slopes slowly to lift a wheelchair by many. Techniques in this manual. If loose and/or worn, replace IMMEDIATELY. Invacare strongly recommends proceeding down...

Owners Manual
Page 15
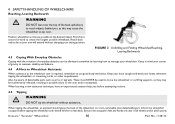
.... FIGURE 1 Unfolding and Folding Wheelchair Part No. 1148116 15 Invacare® Veranda™Wheelchair Invacare recommends using seat/chest positioning straps for your weight. When reaching, leaning, or bending forward, it in a straight line Many activities require the wheelchair owner to maintain stability and balance. Virtually... and stable during normal daily activities as long as possible and engage wheel locks. DO NOT lean forward out of the wheelchair any further than the length of the wheelchair. Proper positioning is important to reach objects if you lean forward. ...
.... FIGURE 1 Unfolding and Folding Wheelchair Part No. 1148116 15 Invacare® Veranda™Wheelchair Invacare recommends using seat/chest positioning straps for your weight. When reaching, leaning, or bending forward, it in a straight line Many activities require the wheelchair owner to maintain stability and balance. Virtually... and stable during normal daily activities as long as possible and engage wheel locks. DO NOT lean forward out of the wheelchair any further than the length of the wheelchair. Proper positioning is important to reach objects if you lean forward. ...
Owners Manual
Page 16
... a non-removable (non-detachable) part. Invacare® Veranda™Wheelchair 16 Part No. 1148116 Reach back only as far as possible to create the longest possible wheelbase. Keep your back straight and bend your wheelchair. Keep in possible injury to the user and/or assistant(s). 4 SAFETY/HANDLING OF WHEELCHAIRS Reaching, Leaning Backwards ƽ WARNING DO NOT lean...
... a non-removable (non-detachable) part. Invacare® Veranda™Wheelchair 16 Part No. 1148116 Reach back only as far as possible to create the longest possible wheelbase. Keep your back straight and bend your wheelchair. Keep in possible injury to the user and/or assistant(s). 4 SAFETY/HANDLING OF WHEELCHAIRS Reaching, Leaning Backwards ƽ WARNING DO NOT lean...

Owners Manual
Page 17
...wheelchair toward you. Invacare recommends that, if possible, the user be removed from the wheelchair prior to use the following method to the wheelchair. Follow this point, the assistant will feel a difference in injury to the occupant and/or damage to tackle curbs, short stairs, etc. ALWAYS check hand grips for hand-held supports. 4 SAFETY/HANDLING OF WHEELCHAIRS... (detachable) parts of the wheelchair may result in one continuous movement onto the sidewalk. If loose and/or worn, replace IMMEDIATELY. Apply a continuous downward motion until the rear wheels roll up or...
...wheelchair toward you. Invacare recommends that, if possible, the user be removed from the wheelchair prior to use the following method to the wheelchair. Follow this point, the assistant will feel a difference in injury to the occupant and/or damage to tackle curbs, short stairs, etc. ALWAYS check hand grips for hand-held supports. 4 SAFETY/HANDLING OF WHEELCHAIRS... (detachable) parts of the wheelchair may result in one continuous movement onto the sidewalk. If loose and/or worn, replace IMMEDIATELY. Apply a continuous downward motion until the rear wheels roll up or...

Owners Manual
Page 21
... the hand under the seat rail. Place excess seat upholstery over the armrest. With both hands, grasp the middle of the wheelchair. 2. Part No. 1148116 21 Invacare® Veranda™Wheelchair Point fingers and thumb to vertical position. 3. DO NOT place any part of the wheelchair. Press down on the seat rail and the seat upholstery with the entire...
... the hand under the seat rail. Place excess seat upholstery over the armrest. With both hands, grasp the middle of the wheelchair. 2. Part No. 1148116 21 Invacare® Veranda™Wheelchair Point fingers and thumb to vertical position. 3. DO NOT place any part of the wheelchair. Press down on the seat rail and the seat upholstery with the entire...

Owners Manual
Page 23
...Check that the wheel locks are easy to a qualified technician for a thorough inspection and servicing. Replace if damaged. Part No. 1148116 23 Invacare® Veranda™Wheelchair 5 Safety Inspection/Troubleshooting 5 SAFETY INSPECTION/TROUBLESHOOTING Every six months or as necessary, take your wheelchair. 5.1 Safety ... that the wheel lock pivot points are free of your wheelchair to engage. ❑ Ensure that the wheel locks prevent the wheelchair from moving when engaged. ❑ Inspect the seat and back for rips and sagging. ❑ Inspect the seat and back ...
...Check that the wheel locks are easy to a qualified technician for a thorough inspection and servicing. Replace if damaged. Part No. 1148116 23 Invacare® Veranda™Wheelchair 5 Safety Inspection/Troubleshooting 5 SAFETY INSPECTION/TROUBLESHOOTING Every six months or as necessary, take your wheelchair. 5.1 Safety ... that the wheel lock pivot points are free of your wheelchair to engage. ❑ Ensure that the wheel locks prevent the wheelchair from moving when engaged. ❑ Inspect the seat and back for rips and sagging. ❑ Inspect the seat and back ...

Owners Manual
Page 26
... the frame. Otherwise injury or damage may result. Invacare® Veranda™Wheelchair 26 Part No. 1148116 Refer to Label Locations on page 7 for damage or wear and replace. 3. Check all nuts and bolts are missing, worn, or torn. Suggested Maintenance Procedures 1. 5 SAFETY INSPECTION/TROUBLESHOOTING 5.2 Troubleshooting Chair Veers Right/Left Chair 3 Wheels Sluggish Turn or Performance X Casters Flutter X X X Squeaks...
... the frame. Otherwise injury or damage may result. Invacare® Veranda™Wheelchair 26 Part No. 1148116 Refer to Label Locations on page 7 for damage or wear and replace. 3. Check all nuts and bolts are missing, worn, or torn. Suggested Maintenance Procedures 1. 5 SAFETY INSPECTION/TROUBLESHOOTING 5.2 Troubleshooting Chair Veers Right/Left Chair 3 Wheels Sluggish Turn or Performance X Casters Flutter X X X Squeaks...

Owners Manual
Page 27
... page 41. Tire wear is found. 8. Refer to the rear wheels. 5 SAFETY INSPECTION/TROUBLESHOOTING ƽ CAUTION As with cool water. Hand grips should be replaced every five years. 5. Part No. 1148116 27 Invacare® Veranda™Wheelchair If loose, have them tightened by a qualified technician. 6. Use a Teflon™ lubricant if necessary. ƽ WARNING When cleaning rear...
... page 41. Tire wear is found. 8. Refer to the rear wheels. 5 SAFETY INSPECTION/TROUBLESHOOTING ƽ CAUTION As with cool water. Hand grips should be replaced every five years. 5. Part No. 1148116 27 Invacare® Veranda™Wheelchair If loose, have them tightened by a qualified technician. 6. Use a Teflon™ lubricant if necessary. ƽ WARNING When cleaning rear...

Owners Manual
Page 29
..., repair or service and before use, make sure all attaching hardware is perpendicular to the side (open footplate is tightened securely. Otherwise injury or damage may occur. 6.1 Installing/Removing Front Riggings Installing 1. Release Lever The footplate will be on the wheelchair frame. 3. To release the front rigging, push the footrest release lever inward, rotate footrest outward. Install the...
..., repair or service and before use, make sure all attaching hardware is perpendicular to the side (open footplate is tightened securely. Otherwise injury or damage may occur. 6.1 Installing/Removing Front Riggings Installing 1. Release Lever The footplate will be on the wheelchair frame. 3. To release the front rigging, push the footrest release lever inward, rotate footrest outward. Install the...

Owners Manual
Page 32
... Washers Back Upholstery Mounting Screw Back Cane FIGURE 1 Replacing Standard Back Upholstery Invacare® Veranda™Wheelchair 32 Part No. 1148116 Otherwise injury or damage may occur. Remove the back for unoccupied transportation purposes only. Install the new back upholstery over the mounted back cane...6. 8 BACK 8 Back ƽ WARNING After any adjustments, repair or service and before use , make sure all attaching hardware is necessary to remove only one back cane to the wheelchair frame with the existing mounting screws and washers. Remove the hex ...
... Washers Back Upholstery Mounting Screw Back Cane FIGURE 1 Replacing Standard Back Upholstery Invacare® Veranda™Wheelchair 32 Part No. 1148116 Otherwise injury or damage may occur. Remove the back for unoccupied transportation purposes only. Install the new back upholstery over the mounted back cane...6. 8 BACK 8 Back ƽ WARNING After any adjustments, repair or service and before use , make sure all attaching hardware is necessary to remove only one back cane to the wheelchair frame with the existing mounting screws and washers. Remove the hex ...
Owners Manual
Page 33
.../position of the front casters, size/position of the rear wheels, use , make sure all attaching hardware is tightened securely. Any change to one or any adjustments, repair or service and before use. 9.1 Changing Seat-to -floor height: 2. Remove the rear wheels from the wheelchair. Reinstall the rear wheels onto the wheelchair in the mounting position indicated in the chart.
.../position of the front casters, size/position of the rear wheels, use , make sure all attaching hardware is tightened securely. Any change to one or any adjustments, repair or service and before use. 9.1 Changing Seat-to -floor height: 2. Remove the rear wheels from the wheelchair. Reinstall the rear wheels onto the wheelchair in the mounting position indicated in the chart.

Owners Manual
Page 35
... rear wheel(s) onto the wheelchair, reverse STEPS 1-2. 4. Rear Wheel Dust Cap Axle Mounting Hole Locknut Spacer Wheelchair Frame Part No. 1148116 Hex Screw FIGURE 1 Removing/Installing Rear Wheels 35 Invacare® Veranda™Wheelchair Refer to 40 ft-lbs. 5. Otherwise injury or damage may occur. 1. 10 Rear Wheels 10 REAR WHEELS ƽ WARNING After any adjustments, repair or service and before using the wheelchair. Otherwise...
... rear wheel(s) onto the wheelchair, reverse STEPS 1-2. 4. Rear Wheel Dust Cap Axle Mounting Hole Locknut Spacer Wheelchair Frame Part No. 1148116 Hex Screw FIGURE 1 Removing/Installing Rear Wheels 35 Invacare® Veranda™Wheelchair Refer to 40 ft-lbs. 5. Otherwise injury or damage may occur. 1. 10 Rear Wheels 10 REAR WHEELS ƽ WARNING After any adjustments, repair or service and before using the wheelchair. Otherwise...

Owners Manual
Page 41
... shoe embeds the tire 1/8-inch and holds the wheelchair. 8. Securely tighten the bolt and locknut securing the wheel lock to the wheelchair frame. 3. Repeat the STEPS 1-6 until the wheel lock holds the wheelchair. 12 ANTI-TIPPERS/WHEEL LOCKS Adjusting Wheel Locks ƽ WARNING After any adjustments, repair or service and before use, make sure all attaching hardware is embedded into...
... shoe embeds the tire 1/8-inch and holds the wheelchair. 8. Securely tighten the bolt and locknut securing the wheel lock to the wheelchair frame. 3. Repeat the STEPS 1-6 until the wheel lock holds the wheelchair. 12 ANTI-TIPPERS/WHEEL LOCKS Adjusting Wheel Locks ƽ WARNING After any adjustments, repair or service and before use, make sure all attaching hardware is embedded into...


