

Owners Manual
Page 3
... Adjusting Footplate Height ...33 Raising/Lowering Elevating Legrest Assembly ...35 Installing Impact Guards/Calf Strap...36 Replacing Heel Loop ...37 6 ARMS 39 Adjusting Armrest Height ...39 Removing/Installing Armrests...40 7 SEAT AND BACK 41 Replacing Back Upholstery ...41 Replacing Seat Upholstery ...41 Adjusting the Seat Width ...42 8 REAR WHEELS 46 Removing/Installing Rear Wheels...46 Part No 1110546 3 Invacare® Tracer™ EX2 Wheelchair
... Adjusting Footplate Height ...33 Raising/Lowering Elevating Legrest Assembly ...35 Installing Impact Guards/Calf Strap...36 Replacing Heel Loop ...37 6 ARMS 39 Adjusting Armrest Height ...39 Removing/Installing Armrests...40 7 SEAT AND BACK 41 Replacing Back Upholstery ...41 Replacing Seat Upholstery ...41 Adjusting the Seat Width ...42 8 REAR WHEELS 46 Removing/Installing Rear Wheels...46 Part No 1110546 3 Invacare® Tracer™ EX2 Wheelchair

Owners Manual
Page 4
... Replacing Front Casters ...50 10 ANTI-TIPPERS/WHEEL LOCKS 51 Installing/Adjusting Anti-Tippers...51 Using/Adjusting Patient Operated Wheel Locks...54 11 SEAT-TO-FLOOR 57 Changing Seat-to-Floor Height ...57 12 OPTIONS 59 Installing Amputee Bracket...59 Installing Crutch and Cane Carrier...61 Installing the Seat Positioning Strap ...62 Installing the Wheel Lock Extension Handle...63 Invacare® Tracer™ EX2 Wheelchair 4 Part...
... Replacing Front Casters ...50 10 ANTI-TIPPERS/WHEEL LOCKS 51 Installing/Adjusting Anti-Tippers...51 Using/Adjusting Patient Operated Wheel Locks...54 11 SEAT-TO-FLOOR 57 Changing Seat-to-Floor Height ...57 12 OPTIONS 59 Installing Amputee Bracket...59 Installing Crutch and Cane Carrier...61 Installing the Seat Positioning Strap ...62 Installing the Wheel Lock Extension Handle...63 Invacare® Tracer™ EX2 Wheelchair 4 Part...

Owners Manual
Page 6
This warranty gives you specific legal rights and you purchased your exclusive remedy under this warranty. Invacare warrants the side frames and cross members of this product when purchased new and unused to be free from defects in replacement part installation or repair of this product when new and unused from whom you may also have other...
This warranty gives you specific legal rights and you purchased your exclusive remedy under this warranty. Invacare warrants the side frames and cross members of this product when purchased new and unused to be free from defects in replacement part installation or repair of this product when new and unused from whom you may also have other...

Owners Manual
Page 7
... Lower Frame Tube 7 Invacare® Tracer™ EX2 Wheelchair WARNING Do not operate without the antitip tubes installed. ! 2 Overview 2.1 Label Locations Serial Number Label located on X-Brace that attaches at the left hip. 2 OVERVIEW Crossmember Part No 1110546 On all adjustable anti-tippers ! WARNING Refer to the Owner's Manual for proper anti-tipper setting. ! No. 1091554...
... Lower Frame Tube 7 Invacare® Tracer™ EX2 Wheelchair WARNING Do not operate without the antitip tubes installed. ! 2 Overview 2.1 Label Locations Serial Number Label located on X-Brace that attaches at the left hip. 2 OVERVIEW Crossmember Part No 1110546 On all adjustable anti-tippers ! WARNING Refer to the Owner's Manual for proper anti-tipper setting. ! No. 1091554...

Owners Manual
Page 10
... equipped. Weights will vary depending on 18-inch wide wheelchair without front riggings. These options are based on urethane tires. Invacare® Tracer™ EX2 Wheelchair 10 Part No 1110546 The seat-to-floor heights are standard for this model. ** - 2 OVERVIEW Tracer EX2 Wheel Locks Caster Size Upholstery Frame Colors Weight *** (Approx) Permanent Arm: Removable Arm: Shipping Weight...
... equipped. Weights will vary depending on 18-inch wide wheelchair without front riggings. These options are based on urethane tires. Invacare® Tracer™ EX2 Wheelchair 10 Part No 1110546 The seat-to-floor heights are standard for this model. ** - 2 OVERVIEW Tracer EX2 Wheel Locks Caster Size Upholstery Frame Colors Weight *** (Approx) Permanent Arm: Removable Arm: Shipping Weight...

Owners Manual
Page 11
... perform all parts for further instruction. ACCESSORIES WARNINGS Invacare products are unable to use in the manual. WARNING DO NOT use with this wheelchair. If you are specifically designed and manufactured for use this product or any available optional equipment without first completely reading and understanding these instructions and any additional instructional material such as owner's manuals, service manuals or instruction sheets supplied with Invacare products. NOTICE...
... perform all parts for further instruction. ACCESSORIES WARNINGS Invacare products are unable to use in the manual. WARNING DO NOT use with this wheelchair. If you are specifically designed and manufactured for use this product or any available optional equipment without first completely reading and understanding these instructions and any additional instructional material such as owner's manuals, service manuals or instruction sheets supplied with Invacare products. NOTICE...
Owners Manual
Page 12
... are specific to the different seat-to-floor angles and/or seat-to the same mounting hole. Extra caution MUST be achieved, DO NOT use anti-tippers. If so equipped, anti-tippers MUST be fully engaged and release buttons fully protruding out of the manual for the wheelchair user. Anti-tippers MUST be attached at all times. Invacare...
... are specific to the different seat-to-floor angles and/or seat-to the same mounting hole. Extra caution MUST be achieved, DO NOT use anti-tippers. If so equipped, anti-tippers MUST be fully engaged and release buttons fully protruding out of the manual for the wheelchair user. Anti-tippers MUST be attached at all times. Invacare...

Owners Manual
Page 14
... to the user or bystanders. Invacare® Tracer™ EX2 Wheelchair 14 Part No 1110546 Verify that the handgrips DO NOT twist on the handle. If the wheelchair is required, remember to observe this warning may occur. Failure to use good body mechanics. Information for looseness before attempting it alone. If loose and/or worn, replace IMMEDIATELY.
... to the user or bystanders. Invacare® Tracer™ EX2 Wheelchair 14 Part No 1110546 Verify that the handgrips DO NOT twist on the handle. If the wheelchair is required, remember to observe this warning may occur. Failure to use good body mechanics. Information for looseness before attempting it alone. If loose and/or worn, replace IMMEDIATELY.

Owners Manual
Page 15
...wheelchair is required to seat/chest positioning straps - NEVER leave an unoccupied wheelchair on a sloped surface. Seat Positioning Straps ƽ WARNING ALWAYS wear your wheelchair to tip over curbs or obstacles. Inasmuch as the seat positioning strap is not designed for the wheelchair user...the seat positioning strap), Invacare strongly recommends ordering the seat positioning strap as auto or aircraft safety belts. DO NOT attempt to stop the wheelchair while on an incline. Part No 1110546 15 Invacare® Tracer™ EX2 Wheelchair Repair and Service Information ...
...wheelchair is required to seat/chest positioning straps - NEVER leave an unoccupied wheelchair on a sloped surface. Seat Positioning Straps ƽ WARNING ALWAYS wear your wheelchair to tip over curbs or obstacles. Inasmuch as the seat positioning strap is not designed for the wheelchair user...the seat positioning strap), Invacare strongly recommends ordering the seat positioning strap as auto or aircraft safety belts. DO NOT attempt to stop the wheelchair while on an incline. Part No 1110546 15 Invacare® Tracer™ EX2 Wheelchair Repair and Service Information ...

Owners Manual
Page 16
...; • Invacare® Tracer™ EX2 Wheelchair 16 Part No 1110546 These adjustments MUST be performed by a qualified technician. Any change to one or any combination of the wheelchair. CASTER SIZE CASTER POSITION WHEEL SIZE WHEEL POSITION ANTI-TIPPERS USER CONDITION 3 SAFETY Stability All Models ƽ WARNING The seat depth, size/position of the front...
...; • Invacare® Tracer™ EX2 Wheelchair 16 Part No 1110546 These adjustments MUST be performed by a qualified technician. Any change to one or any combination of the wheelchair. CASTER SIZE CASTER POSITION WHEEL SIZE WHEEL POSITION ANTI-TIPPERS USER CONDITION 3 SAFETY Stability All Models ƽ WARNING The seat depth, size/position of the front...
Owners Manual
Page 17
... are not brakes. 3 SAFETY Weight Training ƽ WARNING Invacare does not recommend the use be liable for bodily injury or damage to the wheelchair and the warranty is void. Wheel Locks ƽ WARNING DO NOT attempt to stop a moving on all floor surfaces including those that users of its wheelchairs as a seat for transportation of a user while in a wheelchair, in vehicles...
... are not brakes. 3 SAFETY Weight Training ƽ WARNING Invacare does not recommend the use be liable for bodily injury or damage to the wheelchair and the warranty is void. Wheel Locks ƽ WARNING DO NOT attempt to stop a moving on all floor surfaces including those that users of its wheelchairs as a seat for transportation of a user while in a wheelchair, in vehicles...

Owners Manual
Page 18
... in this manual MUST be used successfully by an individual rests solely with daily living activities that they may adversely affect the stability of wheelchair to be heeded. Invacare® Tracer™ EX2 Wheelchair 18 Part No 1110546 3 SAFETY Wheelchair User ƽ WARNING As a manufacturer of wheelchairs, Invacare endeavors to supply a wide variety of wheelchairs to meet many . Individual wheelchair users often develop...
... in this manual MUST be used successfully by an individual rests solely with daily living activities that they may adversely affect the stability of wheelchair to be heeded. Invacare® Tracer™ EX2 Wheelchair 18 Part No 1110546 3 SAFETY Wheelchair User ƽ WARNING As a manufacturer of wheelchairs, Invacare endeavors to supply a wide variety of wheelchairs to meet many . Individual wheelchair users often develop...
Owners Manual
Page 19
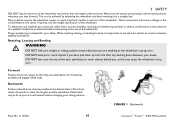
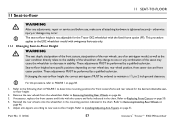
...the back upholstery to reach objects behind you are reaching as your arm will cause a change to use of the wheelchair. Many activities require the wheelchair owner to the desired object. Forward Position the front casters so that they are pointing in the presence of.... Reach back only as far as the wheelchair may cause the wheelchair to maintain stability and balance. Backwards Position wheelchair as close as possible and engage wheel locks. FIGURE 1 Backwards Part No 1110546 19 Invacare® Tracer™ EX2 Wheelchair Reaching, Leaning and Bending ƽ WARNING ...
...the back upholstery to reach objects behind you are reaching as your arm will cause a change to use of the wheelchair. Many activities require the wheelchair owner to the desired object. Forward Position the front casters so that they are pointing in the presence of.... Reach back only as far as the wheelchair may cause the wheelchair to maintain stability and balance. Backwards Position wheelchair as close as possible and engage wheel locks. FIGURE 1 Backwards Part No 1110546 19 Invacare® Tracer™ EX2 Wheelchair Reaching, Leaning and Bending ƽ WARNING ...

Owners Manual
Page 24
... Other Seats on Seat Rail FIGURE 6 Unfolding and Folding Wheelchair FIGURE 7 Folding Hammock or Sling Seat Models Invacare® Tracer™ EX2 Wheelchair 24 Part No 1110546 Press downward on the top of the seat rail closest to front of the seat rail until the wheelchair is ...seat upholstery is fully open the footrest/legrest for clearance and transfer into the wheelchair. Press DOWN on page 22. Engage both hands, grasp the middle of the wheelchair. 4. With both wheel locks, open and the seat rails are fully seated in locked position to you . Swing footrest...
... Other Seats on Seat Rail FIGURE 6 Unfolding and Folding Wheelchair FIGURE 7 Folding Hammock or Sling Seat Models Invacare® Tracer™ EX2 Wheelchair 24 Part No 1110546 Press downward on the top of the seat rail closest to front of the seat rail until the wheelchair is ...seat upholstery is fully open the footrest/legrest for clearance and transfer into the wheelchair. Press DOWN on page 22. Engage both hands, grasp the middle of the wheelchair. 4. With both wheel locks, open and the seat rails are fully seated in locked position to you . Swing footrest...
Owners Manual
Page 25
...rolling. ❑ Check that the wheel lock pivot points are free of wear and looseness. ❑ Check that the wheel locks are easy to engage. ❑ Ensure that attaches strap to frame is secure and undamaged. Replace if necessary. ❑ Inspect ...; Inspect seat positioning strap for proper inflation. Part No 1110546 25 Invacare® Tracer™ EX2 Wheelchair Ensure buckle latches. Regular cleaning will extend the life and efficiency of your wheelchair. 4.1 Safety Inspection Checklist Initial adjustments should be cared for a thorough inspection and servicing. To ...
...rolling. ❑ Check that the wheel lock pivot points are free of wear and looseness. ❑ Check that the wheel locks are easy to engage. ❑ Ensure that attaches strap to frame is secure and undamaged. Replace if necessary. ❑ Inspect ...; Inspect seat positioning strap for proper inflation. Part No 1110546 25 Invacare® Tracer™ EX2 Wheelchair Ensure buckle latches. Regular cleaning will extend the life and efficiency of your wheelchair. 4.1 Safety Inspection Checklist Initial adjustments should be cared for a thorough inspection and servicing. To ...

Owners Manual
Page 29
... the frame. Suggested Maintenance Procedures 1. Before using your wheelchair, make sure all nuts and bolts are missing, worn, or torn. 4.3 Maintenance 4 SAFETY INSPECTION/TROUBLESHOOTING Maintenance Safety Precautions ƽ WARNING After any adjustments, repair or service and before use, make sure all attaching hardware is tightened securely. Replace if damaged. Periodically adjust wheel locks in correlation to Adjusting Patient...
... the frame. Suggested Maintenance Procedures 1. Before using your wheelchair, make sure all nuts and bolts are missing, worn, or torn. 4.3 Maintenance 4 SAFETY INSPECTION/TROUBLESHOOTING Maintenance Safety Precautions ƽ WARNING After any adjustments, repair or service and before use, make sure all attaching hardware is tightened securely. Replace if damaged. Periodically adjust wheel locks in correlation to Adjusting Patient...
Owners Manual
Page 51
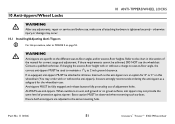
... 10 ANTI-TIPPERS/WHEEL LOCKS ƽ WARNING After any adjustments, repair or service and before use anti-tippers. Anti-tippers MUST be observed when traversing such surfaces. Contact a qualified technician. otherwise injury or damage may occur. 10.1 Installing/Adjusting Anti-Tippers For this wheelchair (You may order with or without the anti-tippers), Invacare strongly recommends...
... 10 ANTI-TIPPERS/WHEEL LOCKS ƽ WARNING After any adjustments, repair or service and before use anti-tippers. Anti-tippers MUST be observed when traversing such surfaces. Contact a qualified technician. otherwise injury or damage may occur. 10.1 Installing/Adjusting Anti-Tippers For this wheelchair (You may order with or without the anti-tippers), Invacare strongly recommends...

Owners Manual
Page 52
... IN INCHES) LENGTH HEIGHT MODEL PART NO. 13½ 3¼ 1360 1058836 12 2¾ 9758 1086190 Anti-Tipper Height Flat Surface Bottom Position Anti-Tipper Length FIGURE 1 Installing Anti-Tippers - WHEELCHAIR MODEL TRACER EX2 TRACER EX2 FF SEAT-TO-FLOOR HEIGHT IN INCHES... Tubing FIGURE 2 Installing Anti-Tippers Invacare® Tracer™ EX2 Wheelchair 52 Part No 1110546 Measurements for anti-tippers are approximate and are taken with the antitipper wheels pointing toward the ground/floor into the wheelchair frame tubing. 2. Anti-Tipper Wheels Anti-Tipper Anti...
... IN INCHES) LENGTH HEIGHT MODEL PART NO. 13½ 3¼ 1360 1058836 12 2¾ 9758 1086190 Anti-Tipper Height Flat Surface Bottom Position Anti-Tipper Length FIGURE 1 Installing Anti-Tippers - WHEELCHAIR MODEL TRACER EX2 TRACER EX2 FF SEAT-TO-FLOOR HEIGHT IN INCHES... Tubing FIGURE 2 Installing Anti-Tippers Invacare® Tracer™ EX2 Wheelchair 52 Part No 1110546 Measurements for anti-tippers are approximate and are taken with the antitipper wheels pointing toward the ground/floor into the wheelchair frame tubing. 2. Anti-Tipper Wheels Anti-Tipper Anti...
Owners Manual
Page 57
... technician. Seat-to Removing/Installing Rear Wheels on page 58. 1. Remove the rear wheels from the wheelchair. Refer to -floor heights have specific positions depending on page 50. 4. 11 Seat-to-floor 11 SEAT-TO-FLOOR...repair or service and before use of an anti-tipper model, as well as the user condition directly relate to the EX2 wheelchair model with the casters and forks indicated in FIGURE 1 to Replacing Front Casters on rear wheel size, rear wheel position, front caster size and front caster position. Adjust anti-tippers according to new seat-to Installing...
... technician. Seat-to Removing/Installing Rear Wheels on page 58. 1. Remove the rear wheels from the wheelchair. Refer to -floor heights have specific positions depending on page 50. 4. 11 Seat-to-floor 11 SEAT-TO-FLOOR...repair or service and before use of an anti-tipper model, as well as the user condition directly relate to the EX2 wheelchair model with the casters and forks indicated in FIGURE 1 to Replacing Front Casters on rear wheel size, rear wheel position, front caster size and front caster position. Adjust anti-tippers according to new seat-to Installing...
Owners Manual
Page 61
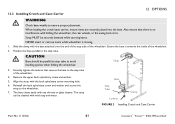
...screw mounting hole. 6. Base Step Tube Locknut Clamp FIGURE 2 Installing Crutch and Cane Carrier Part No 1110546 61 Invacare® Tracer™ EX2 Wheelchair Reinstall the back upholstery screw and washer and secure the strap to the step tube of the wheelchair. 4. Align the strap...wheelchair, the rear wheels, or the swing-back arms. Strap MUST be cleaned with the base attached over the end of the step tube of the wheelchair. 2. Position the base parallel to the step tube. ƽ CAUTION Base should be parallel to step tube to ensure proper placement. 12.2 Installing...
...screw mounting hole. 6. Base Step Tube Locknut Clamp FIGURE 2 Installing Crutch and Cane Carrier Part No 1110546 61 Invacare® Tracer™ EX2 Wheelchair Reinstall the back upholstery screw and washer and secure the strap to the step tube of the wheelchair. 4. Align the strap...wheelchair, the rear wheels, or the swing-back arms. Strap MUST be cleaned with the base attached over the end of the step tube of the wheelchair. 2. Position the base parallel to the step tube. ƽ CAUTION Base should be parallel to step tube to ensure proper placement. 12.2 Installing...


