Owners Manual
Page 4
... Height...62 Using/Installing/Adjusting Non-Locking Cantilever Arms...64 Arm Pad Replacement for Cantilever Arms...66 9 BACK/SEAT ...67 Folding/Unfolding the Back Assembly ...67 Adjusting the Height of the Adjustable Height Back Canes...68 Adjusting the Back Angle ...68 Installing/Removing Non-Adjustable Stroller Handles ...71 Invacare® Solara®3G/Spree 3G Wheelchair 4 Part No...
... Height...62 Using/Installing/Adjusting Non-Locking Cantilever Arms...64 Arm Pad Replacement for Cantilever Arms...66 9 BACK/SEAT ...67 Folding/Unfolding the Back Assembly ...67 Adjusting the Height of the Adjustable Height Back Canes...68 Adjusting the Back Angle ...68 Installing/Removing Non-Adjustable Stroller Handles ...71 Invacare® Solara®3G/Spree 3G Wheelchair 4 Part No...

Owners Manual
Page 5
... Quick-Release Axle ...86 Seat-To-Floor Height Adjustment ...87 Adjusting Forks...87 13 WHEEL LOCKS/ANTI-TIPPERS ...88 Wheel Lock Adjustment ...88 Using the Wheel Locks ...91 Operating Hublocks ...95 Installing/Adjusting Anti-Tippers...97 14 RECLINER BACK OPTION ...98 Recliner Operation...98 Replacing Back/Headrest Upholstery...100 Part No 1154295 5 Invacare® Solara®3G/Spree 3G Wheelchair
... Quick-Release Axle ...86 Seat-To-Floor Height Adjustment ...87 Adjusting Forks...87 13 WHEEL LOCKS/ANTI-TIPPERS ...88 Wheel Lock Adjustment ...88 Using the Wheel Locks ...91 Operating Hublocks ...95 Installing/Adjusting Anti-Tippers...97 14 RECLINER BACK OPTION ...98 Recliner Operation...98 Replacing Back/Headrest Upholstery...100 Part No 1154295 5 Invacare® Solara®3G/Spree 3G Wheelchair
Owners Manual
Page 8
... defects in replacement part installation or repair of purchase when purchased new and unused from Invacare or an authorized provider for the original purchaser/user. coverage for the seat cushion (which vary from whom you do not receive satisfactory warranty service, please write directly to Invacare at Invacare's option, with refurbished or new parts. PRODUCTS DAMAGED BY REASON OF REPAIRS MADE TO...
... defects in replacement part installation or repair of purchase when purchased new and unused from Invacare or an authorized provider for the original purchaser/user. coverage for the seat cushion (which vary from whom you do not receive satisfactory warranty service, please write directly to Invacare at Invacare's option, with refurbished or new parts. PRODUCTS DAMAGED BY REASON OF REPAIRS MADE TO...
Owners Manual
Page 10
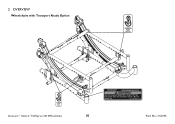
2 OVERVIEW Wheelchairs with Transport Ready Option Invacare® Solara®3G/Spree 3G Wheelchair 10 Refer to attached TRANSPORT READY OPTION Instruction Card and wheelchair Owner's Manual before use. P/N 1120033 REV B - 08/05 Part No 1154295
2 OVERVIEW Wheelchairs with Transport Ready Option Invacare® Solara®3G/Spree 3G Wheelchair 10 Refer to attached TRANSPORT READY OPTION Instruction Card and wheelchair Owner's Manual before use. P/N 1120033 REV B - 08/05 Part No 1154295

Owners Manual
Page 15
... and understanding these instructions and any additional instructional material such as owner's manuals, service manuals or instruction sheets supplied with this equipment - Anti-tippers ƽ WARNING Anti-tippers MUST be observed when traversing such surfaces. ALWAYS use . Accessories designed by other manufacturers have not been tested by Invacare and are specifically designed and manufactured for use in conjunction with Invacare products. NOTICE...
... and understanding these instructions and any additional instructional material such as owner's manuals, service manuals or instruction sheets supplied with this equipment - Anti-tippers ƽ WARNING Anti-tippers MUST be observed when traversing such surfaces. ALWAYS use . Accessories designed by other manufacturers have not been tested by Invacare and are specifically designed and manufactured for use in conjunction with Invacare products. NOTICE...
Owners Manual
Page 17
... position (frame stops in injury to the user or bystanders. Anterior (Forward) Tilt DO NOT operate the wheelchair when the seat frame is needed, it alone. Make sure the occupant of a healthcare professional or assistant only. Part No 1154295 17 Invacare® Solara®3G/Spree 3G Wheelchair Verify that the handgrips DO NOT twist on...
... position (frame stops in injury to the user or bystanders. Anterior (Forward) Tilt DO NOT operate the wheelchair when the seat frame is needed, it alone. Make sure the occupant of a healthcare professional or assistant only. Part No 1154295 17 Invacare® Solara®3G/Spree 3G Wheelchair Verify that the handgrips DO NOT twist on...
Owners Manual
Page 18
... handles for lifting or transporting the wheelchair. Doing so may result in the fully extended position when proceeding down ramps or slopes. DO NOT leave elevating legrests in injury to the user or damage to the wheelchair. DO NOT use the spreader bar as a weight bearing support. DO NOT attempt to the wheelchair. Invacare strongly recommends proceeding down...
... handles for lifting or transporting the wheelchair. Doing so may result in the fully extended position when proceeding down ramps or slopes. DO NOT leave elevating legrests in injury to the user or damage to the wheelchair. DO NOT use the spreader bar as a weight bearing support. DO NOT attempt to the wheelchair. Invacare strongly recommends proceeding down...
Owners Manual
Page 19
..., strap MUST be performed by the user. Stability - These adjustments must be replaced IMMEDIATELY. Serious injury can occur in -space Part No 1154295 19 Invacare® Solara®3G/Spree 3G Wheelchair All Models ƽ WARNING The back height, seat depth, back angle, seating system, tilt angle, seat height, size/position of the rear wheels, size/position of the DME...
..., strap MUST be performed by the user. Stability - These adjustments must be replaced IMMEDIATELY. Serious injury can occur in -space Part No 1154295 19 Invacare® Solara®3G/Spree 3G Wheelchair All Models ƽ WARNING The back height, seat depth, back angle, seating system, tilt angle, seat height, size/position of the rear wheels, size/position of the DME...
Owners Manual
Page 47
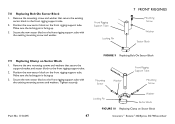
... sector block on Sector Block 47 Invacare® Solara®3G/Spree 3G Wheelchair Tighten securely. Secure the new sector block to the front rigging support tube with the existing mounting screw and washer. FIGURE 9 Replacing Bolt On Sector Block Mounting Screw Washer Front Rigging Support Tube Mounting Screw Part No 1154295 Locking Pin Washer Sector...
... sector block on Sector Block 47 Invacare® Solara®3G/Spree 3G Wheelchair Tighten securely. Secure the new sector block to the front rigging support tube with the existing mounting screw and washer. FIGURE 9 Replacing Bolt On Sector Block Mounting Screw Washer Front Rigging Support Tube Mounting Screw Part No 1154295 Locking Pin Washer Sector...
Owners Manual
Page 49
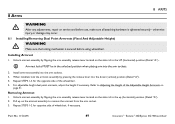
... damage may occur. 8.1 Installing/Removing Dual Point Armrests (Fixed And Adjustable Height) ƽ WARNING Make sure the locking mechanism is secured before use, make sure all attaching hardware is tightened securely - For adjustable height dual point armrests, adjust the height if necessary. 8 Arms 8 ARMS ƽ WARNING After any adjustments, repair or service and before using wheelchair.
... damage may occur. 8.1 Installing/Removing Dual Point Armrests (Fixed And Adjustable Height) ƽ WARNING Make sure the locking mechanism is secured before use, make sure all attaching hardware is tightened securely - For adjustable height dual point armrests, adjust the height if necessary. 8 Arms 8 ARMS ƽ WARNING After any adjustments, repair or service and before using wheelchair.
Owners Manual
Page 67
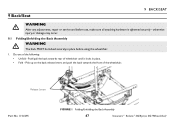
Push/pull the back towards the front of the wheelchair. Release Levers Part No 1154295 FIGURE 1 Folding/Unfolding the Back Assembly 67 Invacare® Solara®3G/Spree 3G Wheelchair otherwise injury or damage may occur. 9.1 Folding/Unfolding the Back Assembly ƽ WARNING The... and push the back towards rear of the following: • Unfold - Do one of wheelchair until it locks in place before use, make sure all attaching hardware is tightened securely - 9 Back/Seat 9 BACK/SEAT ƽ WARNING After any adjustments, repair or service and before using the wheelchair. 1.
Push/pull the back towards the front of the wheelchair. Release Levers Part No 1154295 FIGURE 1 Folding/Unfolding the Back Assembly 67 Invacare® Solara®3G/Spree 3G Wheelchair otherwise injury or damage may occur. 9.1 Folding/Unfolding the Back Assembly ƽ WARNING The... and push the back towards rear of the following: • Unfold - Do one of wheelchair until it locks in place before use, make sure all attaching hardware is tightened securely - 9 Back/Seat 9 BACK/SEAT ƽ WARNING After any adjustments, repair or service and before using the wheelchair. 1.

Owners Manual
Page 72
... back cane to the wheelchair with the locknut. 5. Position the seat positioning strap against the back plate. 3. Invacare® Solara®3G/Spree 3G Wheelchair 72 Installing/Replacing Seat Positioning Straps Part No 1154295 Remove the hex screw, locknut and seat positioning strap from the back plate of the wheelchair frame. Install the new seat positioning strap to Installing/Replacing Seat Positioning Straps on page...
... back cane to the wheelchair with the locknut. 5. Position the seat positioning strap against the back plate. 3. Invacare® Solara®3G/Spree 3G Wheelchair 72 Installing/Replacing Seat Positioning Straps Part No 1154295 Remove the hex screw, locknut and seat positioning strap from the back plate of the wheelchair frame. Install the new seat positioning strap to Installing/Replacing Seat Positioning Straps on page...

Owners Manual
Page 73
... Locknut Replacing Chest Positioning Strap 1. Repeat STEPS 1-2 for opposite side, if necessary. Part No 1154295 73 Invacare® Solara®3G/Spree 3G Wheelchair Discard existing chest positioning strap. 3. FIGURE 8 Installing/Replacing Chest Positioning Straps 4. This wheelchair has been tested for seating in the top hole of the holes on page 73. 9.8 Installing and Removing a Seating System ƽ WARNING Transport ready...
... Locknut Replacing Chest Positioning Strap 1. Repeat STEPS 1-2 for opposite side, if necessary. Part No 1154295 73 Invacare® Solara®3G/Spree 3G Wheelchair Discard existing chest positioning strap. 3. FIGURE 8 Installing/Replacing Chest Positioning Straps 4. This wheelchair has been tested for seating in the top hole of the holes on page 73. 9.8 Installing and Removing a Seating System ƽ WARNING Transport ready...

Owners Manual
Page 74
...seat parallel with the floor, reverse the following : A. Invacare® Solara®3G/Spree 3G Wheelchair 74 Part No 1154295 Make sure the occupant's hands and body are clear of the wheelchair that the wheelchair is stable before using the tilt-in -space required. ii. Stand behind the wheelchair and grasp both wheel... Tilt ƽ WARNING After any adjustments, repair or service and before use, make sure that the wheelchair is about to be tilted and remind them to ensure safety. Always engage both wheel locks while using maximum amount of the following procedure.. 1. ...
...seat parallel with the floor, reverse the following : A. Invacare® Solara®3G/Spree 3G Wheelchair 74 Part No 1154295 Make sure the occupant's hands and body are clear of the wheelchair that the wheelchair is stable before using the tilt-in -space required. ii. Stand behind the wheelchair and grasp both wheel... Tilt ƽ WARNING After any adjustments, repair or service and before use, make sure that the wheelchair is about to be tilted and remind them to ensure safety. Always engage both wheel locks while using maximum amount of the following procedure.. 1. ...

Owners Manual
Page 85
... wheels will install/remove in the same manner. 5. All other wheels will install/remove in the same manner. 12 WHEELS/FORKS Rear Wheel Locking Pins Detent Pin Quick-Release Axle Wheelchair Frame Axle Mounting Plate FIGURE 1 Installing/Removing Rear Wheels Permanent Axle To remove rear wheels, reverse STEPS 3-6 this procedure. 1. Part No 1154295 85 Invacare® Solara®3G/Spree 3G Wheelchair...
... wheels will install/remove in the same manner. 5. All other wheels will install/remove in the same manner. 12 WHEELS/FORKS Rear Wheel Locking Pins Detent Pin Quick-Release Axle Wheelchair Frame Axle Mounting Plate FIGURE 1 Installing/Removing Rear Wheels Permanent Axle To remove rear wheels, reverse STEPS 3-6 this procedure. 1. Part No 1154295 85 Invacare® Solara®3G/Spree 3G Wheelchair...

Owners Manual
Page 89
...) Socket Screws Wheel Lock Assembly Wheel Lock Assembly Wheel Lock Shoe Wheel Lock Shoe Rear Wheel FIGURE 1 Wheel Lock Adjustment - Measure the distance between the wheel lock shoe and rear wheel is not achievable, perform the following: A. Push to Lock or Pull to the wheelchair frame. (Detail "A") 2. If 1.25 inch measurement is approximately 1.25 inches. Part No 1154295 89 Invacare®...
...) Socket Screws Wheel Lock Assembly Wheel Lock Assembly Wheel Lock Shoe Wheel Lock Shoe Rear Wheel FIGURE 1 Wheel Lock Adjustment - Measure the distance between the wheel lock shoe and rear wheel is not achievable, perform the following: A. Push to Lock or Pull to the wheelchair frame. (Detail "A") 2. If 1.25 inch measurement is approximately 1.25 inches. Part No 1154295 89 Invacare®...

Owners Manual
Page 95
...wheels move while hublocks are not brakes. Always keep hands and fingers clear of your wheelchair. Push hublock lever down to disengage the hublocks. ALWAYS engage both hublocks and reduce the gap distance before use, make sure all attaching hardware is fully open and the seat frame rails are fully seated...• Engaging the Hublocks - Part No 1154295 95 Invacare® Solara®3G/Spree 3G Wheelchair Users should be wet or slick. ALWAYS... hub lock option. 13 WHEEL LOCKS/ANTI-TIPPERS ƽ WARNING After any adjustments, repair or service and before transferring to and...
...wheels move while hublocks are not brakes. Always keep hands and fingers clear of your wheelchair. Push hublock lever down to disengage the hublocks. ALWAYS engage both hublocks and reduce the gap distance before use, make sure all attaching hardware is fully open and the seat frame rails are fully seated...• Engaging the Hublocks - Part No 1154295 95 Invacare® Solara®3G/Spree 3G Wheelchair Users should be wet or slick. ALWAYS... hub lock option. 13 WHEEL LOCKS/ANTI-TIPPERS ƽ WARNING After any adjustments, repair or service and before transferring to and...
Owners Manual
Page 110
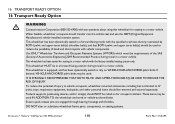
... a motor vehicle with the factory installed seating system only. Ensure quick-release pins are engaged through bearing housings and tilt slides. This wheelchair MUST be relied on WHEELCHAIR-ANCHORED pelvic belts. 16 TRANSPORT READY OPTION 16 Transport Ready Option ƽ WARNING Contact Invacare Corporation (800-333-6900) with any questions about using this wheelchair for seating in a motor vehicle. This...
... a motor vehicle with the factory installed seating system only. Ensure quick-release pins are engaged through bearing housings and tilt slides. This wheelchair MUST be relied on WHEELCHAIR-ANCHORED pelvic belts. 16 TRANSPORT READY OPTION 16 Transport Ready Option ƽ WARNING Contact Invacare Corporation (800-333-6900) with any questions about using this wheelchair for seating in a motor vehicle. This...

Owners Manual
Page 119
... belt should transfer into the vehicle seat and use Steeper belt angles also reduce the tendency for upper-torso belts to the seating system owner's manual. Part No 1154295 119 Invacare® Solara®3G/Spree 3G Wheelchair Refer to pull the pelvic belt onto the abdomen during frontal impact loading. Seating System 16 TRANSPORT READY OPTION ƽ WARNING This...
... belt should transfer into the vehicle seat and use Steeper belt angles also reduce the tendency for upper-torso belts to the seating system owner's manual. Part No 1154295 119 Invacare® Solara®3G/Spree 3G Wheelchair Refer to pull the pelvic belt onto the abdomen during frontal impact loading. Seating System 16 TRANSPORT READY OPTION ƽ WARNING This...
Owners Manual
Page 120
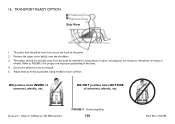
... of the belts. 4. DO position belts INSIDE of user comfort. Adjust belts as firmly as possible, being mindful of armrests, wheels, etc. Invacare® Solara®3G/Spree 3G Wheelchair FIGURE 5 Positioning Belts 120 Part No 1154295 Position the upper torso belt(s) over the shoulders. 3. 16 TRANSPORT READY OPTION Preferred Zone Optional Zone Side View 45...
... of the belts. 4. DO position belts INSIDE of user comfort. Adjust belts as firmly as possible, being mindful of armrests, wheels, etc. Invacare® Solara®3G/Spree 3G Wheelchair FIGURE 5 Positioning Belts 120 Part No 1154295 Position the upper torso belt(s) over the shoulders. 3. 16 TRANSPORT READY OPTION Preferred Zone Optional Zone Side View 45...


