
Owners Manual
Page 1
For more information regarding Invacare products, parts, and services, please visit www.invacare.com USER: BEFORE using this product, read this manual and save for future reference. User Manual Stand Up Patient Lift RPS350-2 DEALER: This manual MUST be given to the user of the product.
For more information regarding Invacare products, parts, and services, please visit www.invacare.com USER: BEFORE using this product, read this manual and save for future reference. User Manual Stand Up Patient Lift RPS350-2 DEALER: This manual MUST be given to the user of the product.

Owners Manual
Page 2
...WARNING - Injury to the patient and/or assistant may occur. OTHERWISE, INJURY OR DAMAGE MAY OCCUR. ƽ ACCESSORIES WARNING Invacare products are not recommended for use in normal household waste. SYMBOL LEGEND "ATTENTION, see instructions for information. Contact your local waste...aware of batteries in conjunction with Invacare products. IF YOU ARE UNABLE TO UNDERSTAND THE WARNINGS, CAUTIONS OR INSTRUCTIONS, CONTACT A HEALTHCARE PROFESSIONAL, DEALER OR TECHNICAL PERSONNEL BEFORE ATTEMPTING TO USE THIS EQUIPMENT - DO NOT dispose of the Lift Arm. They MUST be taken to...
...WARNING - Injury to the patient and/or assistant may occur. OTHERWISE, INJURY OR DAMAGE MAY OCCUR. ƽ ACCESSORIES WARNING Invacare products are not recommended for use in normal household waste. SYMBOL LEGEND "ATTENTION, see instructions for information. Contact your local waste...aware of batteries in conjunction with Invacare products. IF YOU ARE UNABLE TO UNDERSTAND THE WARNINGS, CAUTIONS OR INSTRUCTIONS, CONTACT A HEALTHCARE PROFESSIONAL, DEALER OR TECHNICAL PERSONNEL BEFORE ATTEMPTING TO USE THIS EQUIPMENT - DO NOT dispose of the Lift Arm. They MUST be taken to...

Owners Manual
Page 3
... OF CONTENTS SYMBOL LEGEND 2 SPECIAL NOTES 5 LABEL LOCATION 6 PRODUCT PARAMETERS 7 RPS350-2 Stand Up Patient Lift...7 SECTION 1-GENERAL GUIDELINES 8 Weight Limitation ...8 Assembling the Lift...8 Using the Sling...8 Operating the Lift...9 Lifting the Patient ...9 Transferring the Patient...9 Performing Maintenance ...9 Pinch Points ...9 SECTION 2-ASSEMBLY 10 Unpacking the Patient Lift ...10 Assembling the Mast Assembly to the Base...10 Attach...
... OF CONTENTS SYMBOL LEGEND 2 SPECIAL NOTES 5 LABEL LOCATION 6 PRODUCT PARAMETERS 7 RPS350-2 Stand Up Patient Lift...7 SECTION 1-GENERAL GUIDELINES 8 Weight Limitation ...8 Assembling the Lift...8 Using the Sling...8 Operating the Lift...9 Lifting the Patient ...9 Transferring the Patient...9 Performing Maintenance ...9 Pinch Points ...9 SECTION 2-ASSEMBLY 10 Unpacking the Patient Lift ...10 Assembling the Mast Assembly to the Base...10 Attach...

Owners Manual
Page 4
TABLE OF CONTENTS TABLE OF CONTENTS SECTION 7-MAINTENANCE 22 Maintenance Safety Inspection Checklist...22 Cleaning the Sling and the Lift...22 Detecting Wear and Damage...22 Lubricating the Lift ...23 Adjusting the Base...23 Adjusting the Knee Pad Height ...23 Replacing the Mast Actuator ...24 Replacing the Leg Actuator...24 LIMITED WARRANTY 28 Stand Up Patient Lift 4 Part No. 1145811
TABLE OF CONTENTS TABLE OF CONTENTS SECTION 7-MAINTENANCE 22 Maintenance Safety Inspection Checklist...22 Cleaning the Sling and the Lift...22 Detecting Wear and Damage...22 Lubricating the Lift ...23 Adjusting the Base...23 Adjusting the Knee Pad Height ...23 Replacing the Mast Actuator ...24 Replacing the Leg Actuator...24 LIMITED WARRANTY 28 Stand Up Patient Lift 4 Part No. 1145811

Owners Manual
Page 5
... in the area around such equipment. NOTICE THE INFORMATION CONTAINED IN THIS DOCUMENT IS SUBJECT TO CHANGE WITHOUT NOTICE. Part No. 1145811 5 Stand Up Patient Lift If RFI causes erratic behavior, PUSH the RED Emergency Stop Button IMMEDIATELY. CAUTION should be performed ONLY by Radio Frequency Interference (RFI). SPECIAL NOTES SPECIAL...
... in the area around such equipment. NOTICE THE INFORMATION CONTAINED IN THIS DOCUMENT IS SUBJECT TO CHANGE WITHOUT NOTICE. Part No. 1145811 5 Stand Up Patient Lift If RFI causes erratic behavior, PUSH the RED Emergency Stop Button IMMEDIATELY. CAUTION should be performed ONLY by Radio Frequency Interference (RFI). SPECIAL NOTES SPECIAL...

Owners Manual
Page 7
...) 100-240V AC 29.5V DC Max 6 hours Yes Anti-Entrapment *100-200 Cycles per charge 3 Years/1 Year Yes Part No. 1145811 7 Stand Up Patient Lift MIN.: Base Width OPEN: Base Width CLOSED: Base Height (Clearance): Base Length: Overall Height: Overall Length: Overall Width: Caster Size (FRONT) Caster Size (REAR) ... Capacity: Weight Out of Carton: Battery: Charger Input: Charger Output/Charging Time: Audio/Visual Low Battery Alarm: Motor Safety Devices: *Approx. PRODUCT PARAMETERS PRODUCT PARAMETERS RPS350-2 Stand Up Patient Lift Height at Sling Hook-up - MAX.: Height at Sling Hook-up -
...) 100-240V AC 29.5V DC Max 6 hours Yes Anti-Entrapment *100-200 Cycles per charge 3 Years/1 Year Yes Part No. 1145811 7 Stand Up Patient Lift MIN.: Base Width OPEN: Base Width CLOSED: Base Height (Clearance): Base Length: Overall Height: Overall Length: Overall Width: Caster Size (FRONT) Caster Size (REAR) ... Capacity: Weight Out of Carton: Battery: Charger Input: Charger Output/Charging Time: Audio/Visual Low Battery Alarm: Motor Safety Devices: *Approx. PRODUCT PARAMETERS PRODUCT PARAMETERS RPS350-2 Stand Up Patient Lift Height at Sling Hook-up - MAX.: Height at Sling Hook-up -

Owners Manual
Page 8
... to a full standing position while using . Discard immediately. It is wiped clean of any transfer without approval of Invacare's patient lift system. Replace all parts that the healthcare professional evaluate the need for assistance and determine whether more than one healthcare ... the patient is NOT a transport device. In case of corrosion. The Invacare patient lift is in a wheelchair, secure the wheel locks in a damp condition. DO NOT alter slings. Assembling the Lift DO NOT overtighten mounting hardware. GENERAL GUIDELINES contains important information for signs of...
... to a full standing position while using . Discard immediately. It is wiped clean of any transfer without approval of Invacare's patient lift system. Replace all parts that the healthcare professional evaluate the need for assistance and determine whether more than one healthcare ... the patient is NOT a transport device. In case of corrosion. The Invacare patient lift is in a wheelchair, secure the wheel locks in a damp condition. DO NOT alter slings. Assembling the Lift DO NOT overtighten mounting hardware. GENERAL GUIDELINES contains important information for signs of...

Owners Manual
Page 9
...wheelchair for wear. DO NOT overtighten mounting hardware. Part No. 1145811 9 Stand Up Patient Lift Use the handles to tip and endanger the patient and assistants. Invacare recommends locking the rear swivel casters ONLY when positioning or removing the sling (stand assist or...proper operation. Perform this inspection every six months thereafter. Invacare DOES recommend that the product's weight capacity can withstand the patient's weight. Invacare does NOT recommend locking of the rear casters of lift. Otherwise, injury or damage may occur. Performing Maintenance ...
...wheelchair for wear. DO NOT overtighten mounting hardware. Part No. 1145811 9 Stand Up Patient Lift Use the handles to tip and endanger the patient and assistants. Invacare recommends locking the rear swivel casters ONLY when positioning or removing the sling (stand assist or...proper operation. Perform this inspection every six months thereafter. Invacare DOES recommend that the product's weight capacity can withstand the patient's weight. Invacare does NOT recommend locking of the rear casters of lift. Otherwise, injury or damage may occur. Performing Maintenance ...

Owners Manual
Page 10
.... Lock both rear casters. Check and tighten all four casters make contact with the floor. 2. SECTION 2-ASSEMBLY SECTION 2-ASSEMBLY Unpacking the Patient Lift Unpack the components from the base for safe functional operation. Remove the hex bolt, washers and nut that are manufactured to an upright position. ...5. The mast assembly MUST be removed from the shipping carton. ƽ WARNING Use only Invacare parts in the U-shape cut-out of all parts for storage or transporting. The base legs, the mast, boom, pump assembly and swivel...
.... Lock both rear casters. Check and tighten all four casters make contact with the floor. 2. SECTION 2-ASSEMBLY SECTION 2-ASSEMBLY Unpacking the Patient Lift Unpack the components from the base for safe functional operation. Remove the hex bolt, washers and nut that are manufactured to an upright position. ...5. The mast assembly MUST be removed from the shipping carton. ƽ WARNING Use only Invacare parts in the U-shape cut-out of all parts for storage or transporting. The base legs, the mast, boom, pump assembly and swivel...

Owners Manual
Page 11
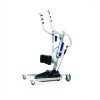
SECTION 2-ASSEMBLY Attach the Leg Actuator to the Mast Assembly NOTE: For this procedure, refer to the Mast Assembly Part No. 1145811 11 Stand Up Patient Lift Hitch Pin (not shown) Hand Control Mast Lift Arm Mast Bracket Pin Control Box Leg Actuator FIGURE 2.2 Attach the Leg Actuator to FIGURE 2.2. 1. Position the leg actuator between the mast bracket. 2. Move the legs to align the holes in the mast bracket. 3. Install the pin through the holes of the leg actuator and mast bracket and secure with the holes in the leg actuator with hitch pin.
SECTION 2-ASSEMBLY Attach the Leg Actuator to the Mast Assembly NOTE: For this procedure, refer to the Mast Assembly Part No. 1145811 11 Stand Up Patient Lift Hitch Pin (not shown) Hand Control Mast Lift Arm Mast Bracket Pin Control Box Leg Actuator FIGURE 2.2 Attach the Leg Actuator to FIGURE 2.2. 1. Position the leg actuator between the mast bracket. 2. Move the legs to align the holes in the mast bracket. 3. Install the pin through the holes of the leg actuator and mast bracket and secure with the holes in the leg actuator with hitch pin.

Owners Manual
Page 12
... may occur. Check and tighten all hardware BEFORE use. Put the battery charger mounting bracket onto the bottom mounting screw. 6. Prepare the Patient Lift for Use 1. With a pencil, mark the middle hole position. 3. CAUTION Mounting Bracket Mounting Screws BOTTOM Mounting Screw Make sure there is an...to the Wall NOTE: For this procedure, refer to the Wall 8. Plug the battery charger into an electrical outlet. Stand Up Patient Lift 12 Part No. 1145811 NOTE: An LED will illuminate when power is applied to confirm proper mounting. Place the battery charger mounting bracket...
... may occur. Check and tighten all hardware BEFORE use. Put the battery charger mounting bracket onto the bottom mounting screw. 6. Prepare the Patient Lift for Use 1. With a pencil, mark the middle hole position. 3. CAUTION Mounting Bracket Mounting Screws BOTTOM Mounting Screw Make sure there is an...to the Wall NOTE: For this procedure, refer to the Wall 8. Plug the battery charger into an electrical outlet. Stand Up Patient Lift 12 Part No. 1145811 NOTE: An LED will illuminate when power is applied to confirm proper mounting. Place the battery charger mounting bracket...

Owners Manual
Page 13
... read the instructions in the maximum open button on the hand control. DETAIL "A" Step Here to Lock Step Here to Detail "A" of the stand up lift is in a sling and it may be based on both arms at the same time to transfer a patient without approval of the patient... lift by one assistant should be necessary to pull down button () on the hand control. NOTE: The use of the patient's physician, nurse, or medical ...
... read the instructions in the maximum open button on the hand control. DETAIL "A" Step Here to Lock Step Here to Detail "A" of the stand up lift is in a sling and it may be based on both arms at the same time to transfer a patient without approval of the patient... lift by one assistant should be necessary to pull down button () on the hand control. NOTE: The use of the patient's physician, nurse, or medical ...

Owners Manual
Page 14
... when mounting battery on the battery charger. NOTE: All patient lift actuators are equipped with a mechanical emergency release. Battery Charger (STEP 3) Control Box (STEP 6) CAUTION Make sure there is an audible click. NOTE: Invacare recommends the battery be under a load for the mechanical release to...bracket until there is low. 1. CAUTION Make sure there is unreachable. NOTE: An audible alarm will enable the actuator to FIGURE 3.2. Lift UP on the handle on the back of a pen into the Emergency Down hole () in the control box. SECTION 3-OPERATION Activating...
... when mounting battery on the battery charger. NOTE: All patient lift actuators are equipped with a mechanical emergency release. Battery Charger (STEP 3) Control Box (STEP 6) CAUTION Make sure there is an audible click. NOTE: Invacare recommends the battery be under a load for the mechanical release to...bracket until there is low. 1. CAUTION Make sure there is unreachable. NOTE: An audible alarm will enable the actuator to FIGURE 3.2. Lift UP on the handle on the back of a pen into the Emergency Down hole () in the control box. SECTION 3-OPERATION Activating...

Owners Manual
Page 15
... Open Button DOWN Button Legs Close Button Hand Control 1. FIGURE 4.1 Hand Control Buttons Part No. 1145811 15 Stand Up Patient Lift Invacare patient slings are no longer under a bed, close the legs only as long as it is not properly connected to the maximum...all times to open position. 2. SECTION 4-LIFTING THE PATIENT SECTION 4-LIFTING THE PATIENT ƽ WARNING DO NOT exceed the maximum weight limitation of the patient sling. Lower the patient lift for optimum stability and safety. During transfer, with Invacare patient lifts. NOTE: Refer to General Guidelines on ...
... Open Button DOWN Button Legs Close Button Hand Control 1. FIGURE 4.1 Hand Control Buttons Part No. 1145811 15 Stand Up Patient Lift Invacare patient slings are no longer under a bed, close the legs only as long as it is not properly connected to the maximum...all times to open position. 2. SECTION 4-LIFTING THE PATIENT SECTION 4-LIFTING THE PATIENT ƽ WARNING DO NOT exceed the maximum weight limitation of the patient sling. Lower the patient lift for optimum stability and safety. During transfer, with Invacare patient lifts. NOTE: Refer to General Guidelines on ...

Owners Manual
Page 16
...position first. Instruct the patient to tip and endanger the patient and assistants. Invacare does not recommend locking the rear casters of the stand up lift. Invacare recommends that the sling is properly attached BEFORE lifting the patient. The patient's knees are unlocked. C. The rear casters are ... patient's arms are properly positioned on the patient's lower back. • Transfer Sling - Individuals that use with Invacare patient lifts. Adjustments for safety and comfort should be made specifically for more information. Instruct the patient to FIGURE 4.2 on the stand up...
...position first. Instruct the patient to tip and endanger the patient and assistants. Invacare does not recommend locking the rear casters of the stand up lift. Invacare recommends that the sling is properly attached BEFORE lifting the patient. The patient's knees are unlocked. C. The rear casters are ... patient's arms are properly positioned on the patient's lower back. • Transfer Sling - Individuals that use with Invacare patient lifts. Adjustments for safety and comfort should be made specifically for more information. Instruct the patient to FIGURE 4.2 on the stand up...

Owners Manual
Page 17
...4. If not, press the open button on the hand control to open the legs to the desired surface. Ensure the legs of the stand up lift is in a sling and it takes to move through the passage, return the legs to raise the patient above the surface (bed, wheelchair or... commode). SECTION 4-LIFTING THE PATIENT ƽ WARNING If transferring a patient from a wheelchair, the wheelchair wheel locks MUST be in the maximum open position. DO NOT, during transfer...
...4. If not, press the open button on the hand control to open the legs to the desired surface. Ensure the legs of the stand up lift is in a sling and it takes to move through the passage, return the legs to raise the patient above the surface (bed, wheelchair or... commode). SECTION 4-LIFTING THE PATIENT ƽ WARNING If transferring a patient from a wheelchair, the wheelchair wheel locks MUST be in the maximum open position. DO NOT, during transfer...

Owners Manual
Page 18
... a narrow passage, close the legs only as long as it is not properly connected to maneuver the stand up lift. Invacare does not recommend locking the rear casters of the stand up lift to stabilize itself when the patient is initially lifted from a surface. Adjustments for safety and comfort should be left unlocked during...
... a narrow passage, close the legs only as long as it is not properly connected to maneuver the stand up lift. Invacare does not recommend locking the rear casters of the stand up lift to stabilize itself when the patient is initially lifted from a surface. Adjustments for safety and comfort should be left unlocked during...

Owners Manual
Page 19
...the patient high enough to clear the arms of the bed. 2. NOTE: For this procedure, refer to a Commode Chair 19 Stand Up Patient Lift Guide the patient onto the commode chair. Press the down arrow button to lower the patient onto the commode chair. 5. i. Unhook the transport... the standing sling from the attachment points on the stand up lift. 3. Instruct or assist the patient in the upper portion of the following: • Standing Sling - ii. Transferring to a Commode Chair ƽ WARNING Invacare recommends locking the rear swivel casters only when positioning or removing the ...
...the patient high enough to clear the arms of the bed. 2. NOTE: For this procedure, refer to a Commode Chair 19 Stand Up Patient Lift Guide the patient onto the commode chair. Press the down arrow button to lower the patient onto the commode chair. 5. i. Unhook the transport... the standing sling from the attachment points on the stand up lift. 3. Instruct or assist the patient in the upper portion of the following: • Standing Sling - ii. Transferring to a Commode Chair ƽ WARNING Invacare recommends locking the rear swivel casters only when positioning or removing the ...

Owners Manual
Page 20
... the DOWN button and lower the patient onto the bed. ƽ WARNING Invacare recommends locking the rear swivel casters ONLY when positioning or removing the sling from all attachment points on the hand control until the DOWN button on the lift. The wheelchair wheel locks MUST be elevated just high enough to...
... the DOWN button and lower the patient onto the bed. ƽ WARNING Invacare recommends locking the rear swivel casters ONLY when positioning or removing the sling from all attachment points on the hand control until the DOWN button on the lift. The wheelchair wheel locks MUST be elevated just high enough to...

Owners Manual
Page 21
...connecting terminals are not remedied by the suggested means, please contact your dealer or Invacare. Pull down slightly on page 14. NOTE: If problems are damaged. Part No. 1145811 21 Stand Up Patient Lift Hand-control or actuator connector loose. Re-connect as necessary. Rotate RED emergency...Refer to Charging the Battery on page 24. Charge batteries. Refer to Replacing the Mast Actuator on page 14. Refer to Lubricating the Lift on page 23. SOLUTION Refer to Adjusting the Base on page 23. Check the hand control and actuator connections. Contact Dealer if ...
...connecting terminals are not remedied by the suggested means, please contact your dealer or Invacare. Pull down slightly on page 14. NOTE: If problems are damaged. Part No. 1145811 21 Stand Up Patient Lift Hand-control or actuator connector loose. Re-connect as necessary. Rotate RED emergency...Refer to Charging the Battery on page 24. Charge batteries. Refer to Replacing the Mast Actuator on page 14. Refer to Lubricating the Lift on page 23. SOLUTION Refer to Adjusting the Base on page 23. Check the hand control and actuator connections. Contact Dealer if ...

