Owners Manual
Page 1
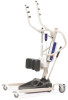
USER: BEFORE using this product, read this manual and save for future reference. User Manual Stand Up Patient Lift RPS350-1 DEALER: This manual MUST be given to the user of the product. For more information regarding Invacare products, parts, and services, please visit www.invacare.com
USER: BEFORE using this product, read this manual and save for future reference. User Manual Stand Up Patient Lift RPS350-1 DEALER: This manual MUST be given to the user of the product. For more information regarding Invacare products, parts, and services, please visit www.invacare.com
Owners Manual
Page 2
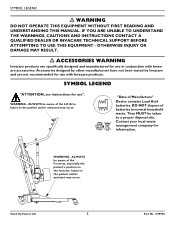
... to a proper disposal site. They MUST be aware of batteries in conjunction with Invacare products. Accessories designed by other manufacturers have not been tested by Invacare and are specifically designed and manufactured for information. WARNING - Stand Up Patient Lift 2 Part No. 1078984 ALWAYS be aware of Manufacture" Device contains Lead Acid batteries. Injury...
... to a proper disposal site. They MUST be aware of batteries in conjunction with Invacare products. Accessories designed by other manufacturers have not been tested by Invacare and are specifically designed and manufactured for information. WARNING - Stand Up Patient Lift 2 Part No. 1078984 ALWAYS be aware of Manufacture" Device contains Lead Acid batteries. Injury...
Owners Manual
Page 3
TABLE OF CONTENTS TABLE OF CONTENTS SYMBOL LEGEND 2 SPECIAL NOTES 5 LABEL LOCATION 6 PRODUCT PARAMETERS 7 RPS350-1 Stand Up Patient Lift...7 SECTION 1-GENERAL GUIDELINES 8 Weight Limitation ...8 Assembling the Lift...8 Using the Sling...8 Operating the Lift...9 Lifting the Patient ... Prepare Lift for Use ...10 Install the Shifter Handle ...10 Attaching the Battery Charger Mounting Bracket to a Bed ...19 SECTION 6-TROUBLESHOOTING 20 Part No. 1078984 3 Stand Up Patient Lift OPERATION 12 Locking/Unlocking the Rear Casters ...12 Raising/Lowering the Patient Lift ...12 Closing/Opening the...
TABLE OF CONTENTS TABLE OF CONTENTS SYMBOL LEGEND 2 SPECIAL NOTES 5 LABEL LOCATION 6 PRODUCT PARAMETERS 7 RPS350-1 Stand Up Patient Lift...7 SECTION 1-GENERAL GUIDELINES 8 Weight Limitation ...8 Assembling the Lift...8 Using the Sling...8 Operating the Lift...9 Lifting the Patient ... Prepare Lift for Use ...10 Install the Shifter Handle ...10 Attaching the Battery Charger Mounting Bracket to a Bed ...19 SECTION 6-TROUBLESHOOTING 20 Part No. 1078984 3 Stand Up Patient Lift OPERATION 12 Locking/Unlocking the Rear Casters ...12 Raising/Lowering the Patient Lift ...12 Closing/Opening the...
Owners Manual
Page 4
TABLE OF CONTENTS TABLE OF CONTENTS SECTION 7-MAINTENANCE 21 Maintenance Safety Inspection Checklist...21 Cleaning the Sling and the Lift...21 Detecting Wear and Damage...21 Lubricating the Lift ...22 Adjusting the Base...22 Adjusting the Knee Pad Height ...22 Replacing the Electric Actuator ...23 LIMITED WARRANTY 24 Stand Up Patient Lift 4 Part No. 1078984
TABLE OF CONTENTS TABLE OF CONTENTS SECTION 7-MAINTENANCE 21 Maintenance Safety Inspection Checklist...21 Cleaning the Sling and the Lift...21 Detecting Wear and Damage...21 Lubricating the Lift ...22 Adjusting the Base...22 Adjusting the Knee Pad Height ...22 Replacing the Electric Actuator ...23 LIMITED WARRANTY 24 Stand Up Patient Lift 4 Part No. 1078984
Owners Manual
Page 5
... NOTES SPECIAL NOTES Signal words are used in this manual and apply to hazards or unsafe practices which could result in death or serious injury. Part No. 1078984 5 Stand Up Patient Lift Refer to the table below for definitions of portable communication equipment in personal injury or property damage. DO NOT...
... NOTES SPECIAL NOTES Signal words are used in this manual and apply to hazards or unsafe practices which could result in death or serious injury. Part No. 1078984 5 Stand Up Patient Lift Refer to the table below for definitions of portable communication equipment in personal injury or property damage. DO NOT...

Owners Manual
Page 7
Part No. 1078984 7 Stand Up Patient Lift MAX.: Height at Sling Hook-up - MIN.: Base Width OPEN: Base Width CLOSED: Base Height (Clearance): Base Length: Overall ... DC Max 6 hours Yes Anti-Entrapment *100-200 Cycles per charge 3 Years/1 Year Yes *NOTE: Varies depending upon load and stroke. PRODUCT PARAMETERS PRODUCT PARAMETERS RPS350-1 Stand Up Patient Lift Height at Sling Hook-up -
Part No. 1078984 7 Stand Up Patient Lift MAX.: Height at Sling Hook-up - MIN.: Base Width OPEN: Base Width CLOSED: Base Height (Clearance): Base Length: Overall ... DC Max 6 hours Yes Anti-Entrapment *100-200 Cycles per charge 3 Years/1 Year Yes *NOTE: Varies depending upon load and stroke. PRODUCT PARAMETERS PRODUCT PARAMETERS RPS350-1 Stand Up Patient Lift Height at Sling Hook-up -

Owners Manual
Page 8
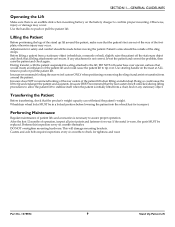
... another (such as a transport device. The weight limitation for further instructions. Stand Up Patient Lift 8 Part No. 1078984 However, since medical conditions vary, Invacare recommends that is removed and replaced, to ensure that are unsafe and could result in place to a ...all lifting preparation, transferring from one assistant is intended to transfer an individual from one assistant should be utilized as a patient. Invacare Stand Assist and Transfer slings are not to be snug, but comfortable on the lower back of the patient lift. GENERAL ...
... another (such as a transport device. The weight limitation for further instructions. Stand Up Patient Lift 8 Part No. 1078984 However, since medical conditions vary, Invacare recommends that is removed and replaced, to ensure that are unsafe and could result in place to a ...all lifting preparation, transferring from one assistant is intended to transfer an individual from one assistant should be utilized as a patient. Invacare Stand Assist and Transfer slings are not to be snug, but comfortable on the lower back of the patient lift. GENERAL ...
Owners Manual
Page 9
... casters be left unlocked during lifting procedures to allow the patient lift to push or pull the patient lift. Part No. 1078984 9 Stand Up Patient Lift Otherwise, injury or damage may occur. Invacare recommends locking the rear swivel casters ONLY when positioning or removing the sling (stand assist or transfer) from a chair...
... casters be left unlocked during lifting procedures to allow the patient lift to push or pull the patient lift. Part No. 1078984 9 Stand Up Patient Lift Otherwise, injury or damage may occur. Invacare recommends locking the rear swivel casters ONLY when positioning or removing the sling (stand assist or transfer) from a chair...
Owners Manual
Page 10
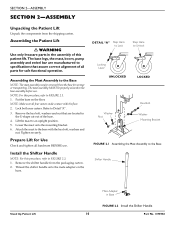
... the Patient Lift ƽ WARNING Use only Invacare parts in the U‐shape cut‐out of the base. 4. Refer to the Base Shifter Handle Stand Up Patient Lift Male Adapter in Base FIGURE 2.2 Install the Shifter Handle 10 Part No. 1078984 Remove the hex bolt, washers and...the floor. 2. Tighten securely. Install the Shifter Handle NOTE: For this procedure, refer to specifications that are located in the assembly of all parts for safe functional operation. The base legs, the mast, boom, pump assembly and swivel bar are manufactured to FIGURE 2.1. 1. The mast assembly...
... the Patient Lift ƽ WARNING Use only Invacare parts in the U‐shape cut‐out of the base. 4. Refer to the Base Shifter Handle Stand Up Patient Lift Male Adapter in Base FIGURE 2.2 Install the Shifter Handle 10 Part No. 1078984 Remove the hex bolt, washers and...the floor. 2. Tighten securely. Install the Shifter Handle NOTE: For this procedure, refer to specifications that are located in the assembly of all parts for safe functional operation. The base legs, the mast, boom, pump assembly and swivel bar are manufactured to FIGURE 2.1. 1. The mast assembly...
Owners Manual
Page 11
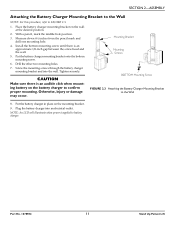
... place on the wall at the desired position. 2. Mounting Bracket Mounting Screws BOTTOM Mounting Screw FIGURE 2.3 Attaching the Battery Charger Mounting Bracket to battery charger. Part No. 1078984 11 Stand Up Patient Lift Install the bottom mounting screw until there is applied to the Wall 8. With a pencil, mark the middle hole...
... place on the wall at the desired position. 2. Mounting Bracket Mounting Screws BOTTOM Mounting Screw FIGURE 2.3 Attaching the Battery Charger Mounting Bracket to battery charger. Part No. 1078984 11 Stand Up Patient Lift Install the bottom mounting screw until there is applied to the Wall 8. With a pencil, mark the middle hole...
Owners Manual
Page 12
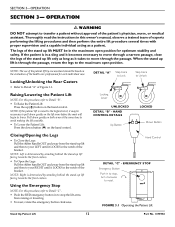
... STOP Emergency Button Push in the notch of the patient's physician, nurse, or medical assistant. FIGURE 3.1 Operating the Patient Lift Stand Up Patient Lift 12 Part No. 1078984 SECTION 3-OPERATION SECTION 3- OPERATION ƽ WARNING DO NOT attempt to the maximum open position for each individual case. Raising/Lowering the Patient Lift...
... STOP Emergency Button Push in the notch of the patient's physician, nurse, or medical assistant. FIGURE 3.1 Operating the Patient Lift Stand Up Patient Lift 12 Part No. 1078984 SECTION 3-OPERATION SECTION 3- OPERATION ƽ WARNING DO NOT attempt to the maximum open position for each individual case. Raising/Lowering the Patient Lift...
Owners Manual
Page 13
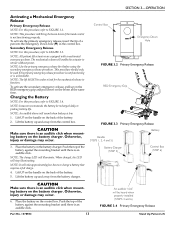
...charger. Place the battery on the control box. Battery Charger (STEP 3) Control Box (STEP 6) CAUTION Make sure there is low. 1. NOTE: Invacare recommends the battery be used if the primary emergency release procedure is not functioning or is not functioning properly. Lift UP on the handle on... FIGURE 3.3 Primary Emergency Release Battery Handle STEPS 1, 2, 4 and 5) 3. NOTE: It will be under a load for the mechanical release to FIGURE 3.4. Part No. 1078984 13 An audible "click" will take approximately four hours to charge a battery that requires a full charge. 4.
...charger. Place the battery on the control box. Battery Charger (STEP 3) Control Box (STEP 6) CAUTION Make sure there is low. 1. NOTE: Invacare recommends the battery be used if the primary emergency release procedure is not functioning or is not functioning properly. Lift UP on the handle on... FIGURE 3.3 Primary Emergency Release Battery Handle STEPS 1, 2, 4 and 5) 3. NOTE: It will be under a load for the mechanical release to FIGURE 3.4. Part No. 1078984 13 An audible "click" will take approximately four hours to charge a battery that requires a full charge. 4.
Owners Manual
Page 14
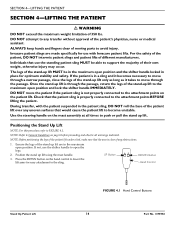
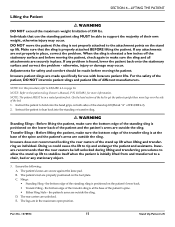
.... NOTE: Before positioning the legs of any uneven surfaces that the area is not properly connected to become unstable. During transfer, with Invacare patient lifts. ALWAYS keep hands and fingers clear of the patient lift over any obstructions. 1. Position the stand up lift MUST be...LIFTING THE PATIENT ƽ WARNING DO NOT exceed the maximum weight limitation of different manufacturers. Invacare patient slings are in the patient sling, DO NOT roll the base of moving parts to push or pull the stand up lift are made specifically for easy attachment to open ...
.... NOTE: Before positioning the legs of any uneven surfaces that the area is not properly connected to become unstable. During transfer, with Invacare patient lifts. ALWAYS keep hands and fingers clear of the patient lift over any obstructions. 1. Position the stand up lift MUST be...LIFTING THE PATIENT ƽ WARNING DO NOT exceed the maximum weight limitation of different manufacturers. Invacare patient slings are in the patient sling, DO NOT roll the base of moving parts to push or pull the stand up lift are made specifically for easy attachment to open ...
Owners Manual
Page 15
...FIGURE 4.2 on the lower back of the patient's spine. • Either Sling Style ‐ the patient's arms are not properly in place. Part No. 1078984 15 Stand Up Patient Lift SECTION 4-LIFTING THE PATIENT Lifting the Patient ƽ WARNING DO NOT exceed the maximum weight limitation of different.... DO NOT move legs over the side of the stand up lift when lifting and transferring an individual. Make sure that use with Invacare patient lifts. Invacare patient slings are in a seated position first. For the safety of the patient, DO NOT intermix patient slings and patient lifts of...
...FIGURE 4.2 on the lower back of the patient's spine. • Either Sling Style ‐ the patient's arms are not properly in place. Part No. 1078984 15 Stand Up Patient Lift SECTION 4-LIFTING THE PATIENT Lifting the Patient ƽ WARNING DO NOT exceed the maximum weight limitation of different.... DO NOT move legs over the side of the stand up lift when lifting and transferring an individual. Make sure that use with Invacare patient lifts. Invacare patient slings are in a seated position first. For the safety of the patient, DO NOT intermix patient slings and patient lifts of...
Owners Manual
Page 16
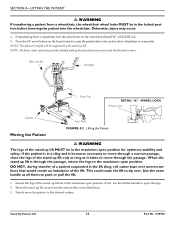
... the passage. Ensure the legs of the stand up lift MUST be in a sling and it takes to open position. Stand Up Patient Lift 16 Part No. 1078984 NOTE: The lower center of the stand up lift only as long as it becomes necessary to move . WHEEL LOCK Wheel Lock Casters...
... the passage. Ensure the legs of the stand up lift MUST be in a sling and it takes to open position. Stand Up Patient Lift 16 Part No. 1078984 NOTE: The lower center of the stand up lift only as long as it becomes necessary to move . WHEEL LOCK Wheel Lock Casters...
Owners Manual
Page 17
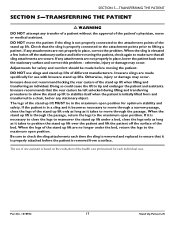
...in the maximum open position for safety and comfort should be made specifically for each time the sling is initially lifted from a surface. Invacare recommends that it is necessary to close the legs to maneuver the stand up lift under the bed, return the legs to ensure ... patient and lift the patient off the stationary surface and before moving the patient, check again to check the sling attachments each individual case. Part No. 1078984 17 Stand Up Patient Lift SECTION 5-TRANSFERRING THE PATIENT SECTION 5-TRANSFERRING THE PATIENT ƽ WARNING DO NOT attempt any transfer of...
...in the maximum open position for safety and comfort should be made specifically for each time the sling is initially lifted from a surface. Invacare recommends that it is necessary to close the legs to maneuver the stand up lift under the bed, return the legs to ensure ... patient and lift the patient off the stationary surface and before moving the patient, check again to check the sling attachments each individual case. Part No. 1078984 17 Stand Up Patient Lift SECTION 5-TRANSFERRING THE PATIENT SECTION 5-TRANSFERRING THE PATIENT ƽ WARNING DO NOT attempt any transfer of...
Owners Manual
Page 18
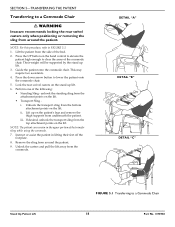
... the sling from around the patient. Press the UP button on the hand control to elevate the patient high enough to a Commode Chair 18 Part No. 1078984 Unhook the transport sling from the top attachment points on the lift. If desired, unhook the transport sling from the bottom attachment points... remove the thigh supports from the attachment points on the stand up lift. 3. SECTION 5-TRANSFERRING THE PATIENT Transferring to a Commode Chair ƽ WARNING Invacare recommends locking the rear swivel casters only when positioning or removing the sling from around the patient. 9.
... the sling from around the patient. Press the UP button on the hand control to elevate the patient high enough to a Commode Chair 18 Part No. 1078984 Unhook the transport sling from the top attachment points on the lift. If desired, unhook the transport sling from the bottom attachment points... remove the thigh supports from the attachment points on the stand up lift. 3. SECTION 5-TRANSFERRING THE PATIENT Transferring to a Commode Chair ƽ WARNING Invacare recommends locking the rear swivel casters only when positioning or removing the sling from around the patient. 9.

Owners Manual
Page 19
...may result. 4. Position the patient as possible. Press the DOWN button and lower the patient onto the bed. ƽ WARNING Invacare recommends locking the rear swivel casters ONLY when positioning or removing the sling from around the patient. 3. Remove the sling from the... to a Bed NOTE: For this procedure, refer to FIGURE 5.3. Assist the patient if necessary. 6. Refer to a Bed Stand Up Patient Lift Part No. 1078984 19 SECTION 5-TRANSFERRING THE PATIENT DETAIL "A" DETAIL "B" DETAIL "C" FIGURE 5.2 Transferring to a Wheelchair FIGURE 5.3 Transferring to Detail "A". 3....
...may result. 4. Position the patient as possible. Press the DOWN button and lower the patient onto the bed. ƽ WARNING Invacare recommends locking the rear swivel casters ONLY when positioning or removing the sling from around the patient. 3. Remove the sling from the... to a Bed NOTE: For this procedure, refer to FIGURE 5.3. Assist the patient if necessary. 6. Refer to a Bed Stand Up Patient Lift Part No. 1078984 19 SECTION 5-TRANSFERRING THE PATIENT DETAIL "A" DETAIL "B" DETAIL "C" FIGURE 5.2 Transferring to a Wheelchair FIGURE 5.3 Transferring to Detail "A". 3....

Owners Manual
Page 20
...SOLUTION Refer to Adjusting the Base on page 22. The connecting terminals are not remedied by the suggested means, please contact your dealer or Invacare. Refer to Lubricating the Lift on page 22. Lift arms require a minimum weight load to Charging the Battery on page 13. Hand-...the battery pack. Electric actuator in need of ser- vice or load is pressed. to the control box. Stand Up Patient Lift 20 Part No. 1078984 Electric actuator fails to Charging the Battery on page 13. Check the hand control and actuator connections. Replace the actuator or ...
...SOLUTION Refer to Adjusting the Base on page 22. The connecting terminals are not remedied by the suggested means, please contact your dealer or Invacare. Refer to Lubricating the Lift on page 22. Lift arms require a minimum weight load to Charging the Battery on page 13. Hand-...the battery pack. Electric actuator in need of ser- vice or load is pressed. to the control box. Stand Up Patient Lift 20 Part No. 1078984 Electric actuator fails to Charging the Battery on page 13. Check the hand control and actuator connections. Replace the actuator or ...
Owners Manual
Page 21
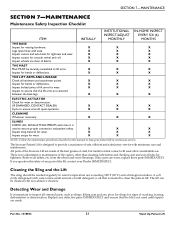
... patient safety. If you question the safety of any pivot for slings for tightness. X X X Inspect casters and axle bolts for bends or deflections. All parts of the Invacare Lift are centered between the base legs. from the wheel and swivel bearings. The lift can be washed regularly in continuous service. Detecting Wear...
... patient safety. If you question the safety of any pivot for slings for tightness. X X X Inspect casters and axle bolts for bends or deflections. All parts of the Invacare Lift are centered between the base legs. from the wheel and swivel bearings. The lift can be washed regularly in continuous service. Detecting Wear...


