
Owners Manual
Page 3
... a Wheelchair...19 Transferring to the Wall 11 SECTION 3- TABLE OF CONTENTS TABLE OF CONTENTS SYMBOL LEGEND 2 SPECIAL NOTES 5 LABEL LOCATION 6 PRODUCT PARAMETERS 7 RPS350-1 Stand Up Patient Lift...7 SECTION 1-GENERAL GUIDELINES 8 Weight Limitation ...8 Assembling the Lift...8 Using the Sling...8 Operating the Lift...9 Lifting the Patient ...9 Transferring ...the Mast Assembly to the Base ...10 Prepare Lift for Use ...10 Install the Shifter Handle ...10 Attaching the Battery Charger Mounting Bracket to a Bed ...19 SECTION 6-TROUBLESHOOTING 20 Part No. 1078984 3 Stand Up Patient Lift
... a Wheelchair...19 Transferring to the Wall 11 SECTION 3- TABLE OF CONTENTS TABLE OF CONTENTS SYMBOL LEGEND 2 SPECIAL NOTES 5 LABEL LOCATION 6 PRODUCT PARAMETERS 7 RPS350-1 Stand Up Patient Lift...7 SECTION 1-GENERAL GUIDELINES 8 Weight Limitation ...8 Assembling the Lift...8 Using the Sling...8 Operating the Lift...9 Lifting the Patient ...9 Transferring ...the Mast Assembly to the Base ...10 Prepare Lift for Use ...10 Install the Shifter Handle ...10 Attaching the Battery Charger Mounting Bracket to a Bed ...19 SECTION 6-TROUBLESHOOTING 20 Part No. 1078984 3 Stand Up Patient Lift

Owners Manual
Page 7
...RPS350-1 Stand Up Patient Lift Height at Sling Hook-up - MIN.: Base Width OPEN: Base Width CLOSED: Base Height (Clearance): Base Length: Overall Height: Overall Length: Overall Width: Caster Size (FRONT) Caster Size (REAR) Sling Options: Sling Material: Weight Capacity: Weight Out of Carton: Battery: Charger Input: Charger... Output/Charging Time: Audio/Visual Low Battery Alarm: Motor Safety Devices: *Approx. Part No. 1078984 7 Stand Up Patient Lift Lifts ...
...RPS350-1 Stand Up Patient Lift Height at Sling Hook-up - MIN.: Base Width OPEN: Base Width CLOSED: Base Height (Clearance): Base Length: Overall Height: Overall Length: Overall Width: Caster Size (FRONT) Caster Size (REAR) Sling Options: Sling Material: Weight Capacity: Weight Out of Carton: Battery: Charger Input: Charger... Output/Charging Time: Audio/Visual Low Battery Alarm: Motor Safety Devices: *Approx. Part No. 1078984 7 Stand Up Patient Lift Lifts ...
Owners Manual
Page 9
...occur. Use the handles to tip and endanger the patient and assistants. Patientʹs arms should be replaced. If any stationary object. Invacare recommends locking the rear swivel casters ONLY when positioning or removing the sling (stand assist or transfer) from a stationary object (wheelchair, ... GUIDELINES Operating the Lift Make sure there is an audible click when mounting battery on the mast at ALL times to push or pull the patient lift. Use steering handle on the battery charger to confirm proper mounting. Transferring the Patient Before transferring, check that the ...
...occur. Use the handles to tip and endanger the patient and assistants. Patientʹs arms should be replaced. If any stationary object. Invacare recommends locking the rear swivel casters ONLY when positioning or removing the sling (stand assist or transfer) from a stationary object (wheelchair, ... GUIDELINES Operating the Lift Make sure there is an audible click when mounting battery on the mast at ALL times to push or pull the patient lift. Use steering handle on the battery charger to confirm proper mounting. Transferring the Patient Before transferring, check that the ...
Owners Manual
Page 11
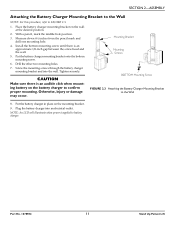
... is an approximate 1/8‐inch gap between the screw head and the wall. 5. Part No. 1078984 11 Stand Up Patient Lift Place the battery charger mounting bracket on the battery charger to battery charger. Tighten securely. Measure down 6½ inches from the pencil mark and drill one mounting hole. 4. Drill the other two mounting holes. 7. Mounting...
... is an approximate 1/8‐inch gap between the screw head and the wall. 5. Part No. 1078984 11 Stand Up Patient Lift Place the battery charger mounting bracket on the battery charger to battery charger. Tighten securely. Measure down 6½ inches from the pencil mark and drill one mounting hole. 4. Drill the other two mounting holes. 7. Mounting...
Owners Manual
Page 13
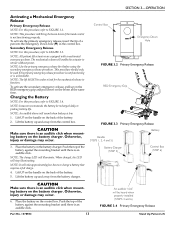
... or damage may occur. Push the top of the battery. 5. NOTE: The charge LED will stop illuminating. Place the battery on the battery charger. NOTE: This procedure will sound when battery is unreachable. NOTE: Use the primary emergency release first...Invacare recommends the battery be heard when properly installed (STEPS 3 and 6) FIGURE 3.4 Primary Emergency Release Stand Up Patient Lift NOTE: An audible alarm will bring the boom down on the RED emergency grip and pull down if the hand control is an audible click when mounting battery on the control box. Battery Charger...
... or damage may occur. Push the top of the battery. 5. NOTE: The charge LED will stop illuminating. Place the battery on the battery charger. NOTE: This procedure will sound when battery is unreachable. NOTE: Use the primary emergency release first...Invacare recommends the battery be heard when properly installed (STEPS 3 and 6) FIGURE 3.4 Primary Emergency Release Stand Up Patient Lift NOTE: An audible alarm will bring the boom down on the RED emergency grip and pull down if the hand control is an audible click when mounting battery on the control box. Battery Charger...


