Owners Manual
Page 2
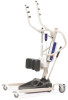
OTHERWISE INJURY OR DAMAGE MAY RESULT. ƽ ACCESSORIES WARNING Invacare products are not recommended for use with Invacare accessories. ALWAYS be aware of batteries in conjunction with Invacare products. Injury to the patient and/or assistant may occur. DO NOT dispose of the Footrest,... footrest. ALWAYS be aware of Manufacture" Device contains Lead Acid batteries. Injury to the patient and/or assistant may occur. Accessories designed by other manufacturers have not been tested by Invacare and are specifically designed and manufactured for use in normal household waste...
OTHERWISE INJURY OR DAMAGE MAY RESULT. ƽ ACCESSORIES WARNING Invacare products are not recommended for use with Invacare accessories. ALWAYS be aware of batteries in conjunction with Invacare products. Injury to the patient and/or assistant may occur. DO NOT dispose of the Footrest,... footrest. ALWAYS be aware of Manufacture" Device contains Lead Acid batteries. Injury to the patient and/or assistant may occur. Accessories designed by other manufacturers have not been tested by Invacare and are specifically designed and manufactured for use in normal household waste...
Owners Manual
Page 3
...Patient Lift ...12 Closing/Opening the Legs...12 Using the Emergency Stop ...12 Activating a Mechanical Emergency Release ...13 Charging the Battery ...13 SECTION 4-LIFTING THE PATIENT 14 Positioning the Stand Up Lift ...14 Lifting the Patient ...15 Moving the Patient ...16...19 Transferring to the Wall 11 SECTION 3- TABLE OF CONTENTS TABLE OF CONTENTS SYMBOL LEGEND 2 SPECIAL NOTES 5 LABEL LOCATION 6 PRODUCT PARAMETERS 7 RPS350-1 Stand Up Patient Lift...7 SECTION 1-GENERAL GUIDELINES 8 Weight Limitation ...8 Assembling the Lift...8 Using the Sling...8 Operating the Lift...9 Lifting the ...
...Patient Lift ...12 Closing/Opening the Legs...12 Using the Emergency Stop ...12 Activating a Mechanical Emergency Release ...13 Charging the Battery ...13 SECTION 4-LIFTING THE PATIENT 14 Positioning the Stand Up Lift ...14 Lifting the Patient ...15 Moving the Patient ...16...19 Transferring to the Wall 11 SECTION 3- TABLE OF CONTENTS TABLE OF CONTENTS SYMBOL LEGEND 2 SPECIAL NOTES 5 LABEL LOCATION 6 PRODUCT PARAMETERS 7 RPS350-1 Stand Up Patient Lift...7 SECTION 1-GENERAL GUIDELINES 8 Weight Limitation ...8 Assembling the Lift...8 Using the Sling...8 Operating the Lift...9 Lifting the ...
Owners Manual
Page 7
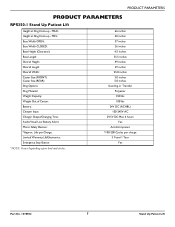
PRODUCT PARAMETERS PRODUCT PARAMETERS RPS350-1 Stand Up Patient Lift Height at Sling Hook-up - Part No. 1078984 7 Stand Up Patient Lift MAX.: Height at Sling Hook-up - MIN.: Base Width ...: Overall Length: Overall Width: Caster Size (FRONT) Caster Size (REAR) Sling Options: Sling Material: Weight Capacity: Weight Out of Carton: Battery: Charger Input: Charger Output/Charging Time: Audio/Visual Low Battery Alarm: Motor Safety Devices: *Approx. Lifts per Charge: Limited Warranty Lift/Electronics: Emergency Stop Button: 66 inches 40 inches 37 inches...
PRODUCT PARAMETERS PRODUCT PARAMETERS RPS350-1 Stand Up Patient Lift Height at Sling Hook-up - Part No. 1078984 7 Stand Up Patient Lift MAX.: Height at Sling Hook-up - MIN.: Base Width ...: Overall Length: Overall Width: Caster Size (FRONT) Caster Size (REAR) Sling Options: Sling Material: Weight Capacity: Weight Out of Carton: Battery: Charger Input: Charger Output/Charging Time: Audio/Visual Low Battery Alarm: Motor Safety Devices: *Approx. Lifts per Charge: Limited Warranty Lift/Electronics: Emergency Stop Button: 66 inches 40 inches 37 inches...
Owners Manual
Page 9
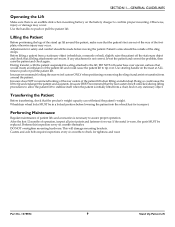
... 1-GENERAL GUIDELINES Operating the Lift Make sure there is an audible click when mounting battery on the mast at ALL times to push or pull the patient lift. Adjustments for transport. Invacare does NOT recommend locking of the rear casters of operation, inspect all sling attachments are...lifts and accessories is necessary to check for wear. Doing so could cause the patient lift to push or pull the patient lift. Invacare DOES recommend that the product's weight capacity can withstand the patientʹs weight. Transferring the Patient Before transferring, check that the ...
... 1-GENERAL GUIDELINES Operating the Lift Make sure there is an audible click when mounting battery on the mast at ALL times to push or pull the patient lift. Adjustments for transport. Invacare does NOT recommend locking of the rear casters of operation, inspect all sling attachments are...lifts and accessories is necessary to check for wear. Doing so could cause the patient lift to push or pull the patient lift. Invacare DOES recommend that the product's weight capacity can withstand the patientʹs weight. Transferring the Patient Before transferring, check that the ...
Owners Manual
Page 11
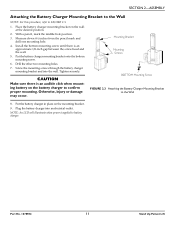
...into an electrical outlet. Mounting Bracket Mounting Screws BOTTOM Mounting Screw FIGURE 2.3 Attaching the Battery Charger Mounting Bracket to confirm proper mounting. Place the battery charger mounting bracket on the mounting bracket. 9. Put the battery charger in place on the wall at the desired position. 2. With a pencil, ...mark the middle hole position. 3. Tighten securely. Put the battery charger mounting bracket onto the bottom mounting screw. 6. Part No. 1078984 11 Stand Up Patient Lift CAUTION Make sure there is ...
...into an electrical outlet. Mounting Bracket Mounting Screws BOTTOM Mounting Screw FIGURE 2.3 Attaching the Battery Charger Mounting Bracket to confirm proper mounting. Place the battery charger mounting bracket on the mounting bracket. 9. Put the battery charger in place on the wall at the desired position. 2. With a pencil, ...mark the middle hole position. 3. Tighten securely. Put the battery charger mounting bracket onto the bottom mounting screw. 6. Part No. 1078984 11 Stand Up Patient Lift CAUTION Make sure there is ...
Owners Manual
Page 13
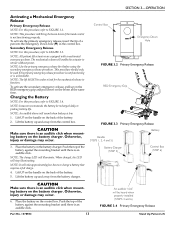
To activate the primary emergency release, insert the tip of the battery. 2. NOTE: Invacare recommends the battery be heard when properly installed (STEPS 3 and 6) FIGURE 3.4 Primary Emergency Release Stand Up Patient Lift NOTE: The charge LED will stop illuminating. When charged, the LED will illuminate. Battery Charger (STEP 3) Control Box (STEP 6) CAUTION Make sure there...
To activate the primary emergency release, insert the tip of the battery. 2. NOTE: Invacare recommends the battery be heard when properly installed (STEPS 3 and 6) FIGURE 3.4 Primary Emergency Release Stand Up Patient Lift NOTE: The charge LED will stop illuminating. When charged, the LED will illuminate. Battery Charger (STEP 3) Control Box (STEP 6) CAUTION Make sure there...

Owners Manual
Page 20
...The connecting terminals are not remedied by the suggested means, please contact your dealer or Invacare. Replace the battery pack. Electric actuator in need of ser- Lift arms require a minimum weight load to Charging the Battery on page 13. Stand Up Patient Lift 20 Part No. 1078984 SECTION 6-TROUBLESHOOTING ... page 13. vice or load is pressed. FAULTS Needs lubrication. Hand-control or actuator connector loose. SOLUTION Refer to Charging the Battery on page 13. Check the hand control and actuator connections. Refer to Lubricating the Lift on the lift arms. NOTE: If...
...The connecting terminals are not remedied by the suggested means, please contact your dealer or Invacare. Replace the battery pack. Electric actuator in need of ser- Lift arms require a minimum weight load to Charging the Battery on page 13. Stand Up Patient Lift 20 Part No. 1078984 SECTION 6-TROUBLESHOOTING ... page 13. vice or load is pressed. FAULTS Needs lubrication. Hand-control or actuator connector loose. SOLUTION Refer to Charging the Battery on page 13. Check the hand control and actuator connections. Refer to Lubricating the Lift on the lift arms. NOTE: If...


