
Owners Manual
Page 3
.../Lowering a Manual/Hydraulic Lift 22 Raising/Lowering an Electric Lift 24 Activating a Mechanical Emergency Release 24 Performing an Emergency Stop 25 Mounting the Battery Charger 26 Charging the Battery 27 LIFTING THE PATIENT 28 Preparing the Lift for Use 28 Positioning the Lift for future reference. 1 GENERAL 55 Symbols ...5 Warnings 5 Other Symbols...
.../Lowering a Manual/Hydraulic Lift 22 Raising/Lowering an Electric Lift 24 Activating a Mechanical Emergency Release 24 Performing an Emergency Stop 25 Mounting the Battery Charger 26 Charging the Battery 27 LIFTING THE PATIENT 28 Preparing the Lift for Use 28 Positioning the Lift for future reference. 1 GENERAL 55 Symbols ...5 Warnings 5 Other Symbols...

Owners Manual
Page 4
... RLS6 50 Removing the Swivel Bar 50 Installing the Reliant Scale 52 Operating the Scale 54 Keypad Functions 54 Weighing the Patient 55 Replacing the Battery 56 Calibrating the Reliant Scale 57 Troubleshooting 58 Display Codes 58 Manual/Electric Portable Patient Lift 4 Part No. 1078987
... RLS6 50 Removing the Swivel Bar 50 Installing the Reliant Scale 52 Operating the Scale 54 Keypad Functions 54 Weighing the Patient 55 Replacing the Battery 56 Calibrating the Reliant Scale 57 Troubleshooting 58 Display Codes 58 Manual/Electric Portable Patient Lift 4 Part No. 1078987

Owners Manual
Page 8
...damage may occur. The weight limitation for the RHL450-1 and RPL450-1 is based on the battery charger to avoid injury. ALWAYS keep hands and fingers clear of the patient lift. Operating the Lift ƽ WARNING Although Invacare recommends that two assistants be used for each individual case. ...and Swivel Bar Base of the swivel bar and the patient. The weight limitation for the RPL600-1 is an audible click when mounting battery on the evaluation of one assistant. Manual/Electric Portable Patient Lift 8 Part No. 1078987 When positioning lift, be pinched. Make sure...
...damage may occur. The weight limitation for the RHL450-1 and RPL450-1 is based on the battery charger to avoid injury. ALWAYS keep hands and fingers clear of the patient lift. Operating the Lift ƽ WARNING Although Invacare recommends that two assistants be used for each individual case. ...and Swivel Bar Base of the swivel bar and the patient. The weight limitation for the RPL600-1 is an audible click when mounting battery on the evaluation of one assistant. Manual/Electric Portable Patient Lift 8 Part No. 1078987 When positioning lift, be pinched. Make sure...

Owners Manual
Page 11
... is encountered, it is in places (landfills) that are equipped with three-prong (grounding) plugs for Invacare products. In addition, Invacare has placed RED/ORANGE warning tags on some equipment. Please be harmful to contact a qualified electrician and have... the two-prong receptacle replaced with a properly grounded three-prong wall receptacle in accordance with the National Electrical Code. DO NOT remove these tags. Carefully read battery/battery...
... is encountered, it is in places (landfills) that are equipped with three-prong (grounding) plugs for Invacare products. In addition, Invacare has placed RED/ORANGE warning tags on some equipment. Please be harmful to contact a qualified electrician and have... the two-prong receptacle replaced with a properly grounded three-prong wall receptacle in accordance with the National Electrical Code. DO NOT remove these tags. Carefully read battery/battery...

Owners Manual
Page 13
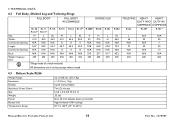
Lifts per charge 1 Year 13 Manual/Electric Portable Patient Lift ELECTRIC LOW PROFILE RPL450-1 LOW PROFILE RPL600-1 74 inches 68 inches 24 inches 28 inches 41.0 inches 26.5 inches 4.5 inches 4.5 inches 48.0 inches 3.0/5.0 inches 3.0/5.0 inches...(Clearance): Base Length: Caster Size (FRONT/REAR): Sling Options: Weight Capacity: Weight IN Carton: Weight OUT of Carton: Battery: Charger Input: Charger Output/Charging Time: Accessories: Audio Low Battery Alarm: Motor Safety Devices: Approx. HYDRAULIC LOW PROFILE RHL450-1 71 inches 25 inches 4.5 inches 3.0/5.0 inches 3 Styles 112 ...
Lifts per charge 1 Year 13 Manual/Electric Portable Patient Lift ELECTRIC LOW PROFILE RPL450-1 LOW PROFILE RPL600-1 74 inches 68 inches 24 inches 28 inches 41.0 inches 26.5 inches 4.5 inches 4.5 inches 48.0 inches 3.0/5.0 inches 3.0/5.0 inches...(Clearance): Base Length: Caster Size (FRONT/REAR): Sling Options: Weight Capacity: Weight IN Carton: Weight OUT of Carton: Battery: Charger Input: Charger Output/Charging Time: Accessories: Audio Low Battery Alarm: Motor Safety Devices: Approx. HYDRAULIC LOW PROFILE RHL450-1 71 inches 25 inches 4.5 inches 3.0/5.0 inches 3 Styles 112 ...
Owners Manual
Page 14
... R140* R141* L N/A N/A 36 45 45 N/A N/A 7 37 55 55 N/A N/A 13 N/A N/A N/A 450 600 600 4.3 Reliant Scale RLS6 Weight Range: Resolution: Display: Automatic Power Down: Size: Weight: Power: Battery Life: Temperature Range: Up to 600 Lbs. (272.7 Kg) +/- 0.2 Lbs (.1 Kg) Liquid Crystal Digital Two (2) minutes 5-3/4 L X 3-5/8 W X 4 H .55 Lbs Nine (9) Volt Alkaline...
... R140* R141* L N/A N/A 36 45 45 N/A N/A 7 37 55 55 N/A N/A 13 N/A N/A N/A 450 600 600 4.3 Reliant Scale RLS6 Weight Range: Resolution: Display: Automatic Power Down: Size: Weight: Power: Battery Life: Temperature Range: Up to 600 Lbs. (272.7 Kg) +/- 0.2 Lbs (.1 Kg) Liquid Crystal Digital Two (2) minutes 5-3/4 L X 3-5/8 W X 4 H .55 Lbs Nine (9) Volt Alkaline...
Owners Manual
Page 18
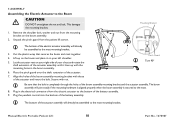
...The bottom of the actuator assembly will already be assembled to the mast mounting bracket. 3. Plug the pendant control into the bottom of the battery assembly. The bottom of the electric actuator assembly will pivot easily if the mounting hardware is aligned properly when the boom assembly is... completely through the holes of the actuator assembly until it lines-up on the boom and place it on your right-side of the battery assembly. 9. Plug in the boom assembly. 6. Align the holes of the boom assembly mounting bracket with those of the actuator. 7. Manual/...
...The bottom of the actuator assembly will already be assembled to the mast mounting bracket. 3. Plug the pendant control into the bottom of the battery assembly. The bottom of the electric actuator assembly will pivot easily if the mounting hardware is aligned properly when the boom assembly is... completely through the holes of the actuator assembly until it lines-up on the boom and place it on your right-side of the battery assembly. 9. Plug in the boom assembly. 6. Align the holes of the boom assembly mounting bracket with those of the actuator. 7. Manual/...

Owners Manual
Page 26
... the screw head and the wall. 5. Tighten securely. 8. Plug the battery charger into the wall. Install the battery charger with mounting bracket on the wall at the desired position. 2. Place the battery charger with mounting bracket onto the bottom mounting screw. 6. Mounting Bracket (...STEP 6) Battery Charger with Mounting Bracket (STEP 5) Mounting Screws (STEP 7) BOTTOM Mounting Screw (STEP 4) Manual/Electric Portable ...
... the screw head and the wall. 5. Tighten securely. 8. Plug the battery charger into the wall. Install the battery charger with mounting bracket on the wall at the desired position. 2. Place the battery charger with mounting bracket onto the bottom mounting screw. 6. Mounting Bracket (...STEP 6) Battery Charger with Mounting Bracket (STEP 5) Mounting Screws (STEP 7) BOTTOM Mounting Screw (STEP 4) Manual/Electric Portable ...

Owners Manual
Page 27
... Battery Invacare recommends the battery be fully recharged will take approximately four hours. 4. A battery needing to be recharged daily to the Control Box and Battery Charger as shown. Otherwise, injury or damage may occur. 3. Lift up and out away from the control box. ƽ CAUTION Make sure there is an audible click when mounting battery...
... Battery Invacare recommends the battery be fully recharged will take approximately four hours. 4. A battery needing to be recharged daily to the Control Box and Battery Charger as shown. Otherwise, injury or damage may occur. 3. Lift up and out away from the control box. ƽ CAUTION Make sure there is an audible click when mounting battery...
Owners Manual
Page 39
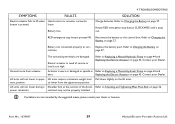
...RED emergency stop button pressed IN. The connecting terminals are not remedied by the suggested means, please contact your dealer or Invacare. to lower from actuator. and mast may not be properly installed. Refer to con- Part No. 1078987 39 Manual/Electric Portable .... Actuator is worn or damaged or spindle is pressed. Refer to the control box. Reconnect the battery to Charging the Battery on page 45. Replace the battery pack. Refer to Charging the Battery on trol box. Electric actuator in upper- Lift arms require a minimum weight load most position....
...RED emergency stop button pressed IN. The connecting terminals are not remedied by the suggested means, please contact your dealer or Invacare. to lower from actuator. and mast may not be properly installed. Refer to con- Part No. 1078987 39 Manual/Electric Portable .... Actuator is worn or damaged or spindle is pressed. Refer to the control box. Reconnect the battery to Charging the Battery on page 45. Replace the battery pack. Refer to Charging the Battery on trol box. Electric actuator in upper- Lift arms require a minimum weight load most position....

Owners Manual
Page 54
... to the scale and turn the unit off. This key is used to lock or unlock a weight value in the display window to notify when battery is already on will turn the unit on. Lift patient. 5. Read Weight ON ZERO LOCK WEIGHT Manual/Electric Portable Patient Lift 54 Part No. 1078987...
... to the scale and turn the unit off. This key is used to lock or unlock a weight value in the display window to notify when battery is already on will turn the unit on. Lift patient. 5. Read Weight ON ZERO LOCK WEIGHT Manual/Electric Portable Patient Lift 54 Part No. 1078987...

Owners Manual
Page 56
... be seen in the display window. The lift may now be lowered and the sling removed from the display window. Slide the battery door open in the direction of the weight displayed is indicated by lb or kg appearing in weight exceeding five pounds (two kilograms...and 100.2 until the LOCK key is pressed. The display will then be recalled by a nine volt alkaline battery that should provide approximately 1500 readings before needing replacement. When battery replacement is needed, LO BAT will disappear from the patient. The patient's weight will fluctuate between ...
... be seen in the display window. The lift may now be lowered and the sling removed from the display window. Slide the battery door open in the direction of the weight displayed is indicated by lb or kg appearing in weight exceeding five pounds (two kilograms...and 100.2 until the LOCK key is pressed. The display will then be recalled by a nine volt alkaline battery that should provide approximately 1500 readings before needing replacement. When battery replacement is needed, LO BAT will disappear from the patient. The patient's weight will fluctuate between ...

Owners Manual
Page 58
Replace if necessary. Contact Invacare for Service at 1-800-333-6900 CAL OCAP CALIBRATION REQUIRED - Indicates a weight exceeding the capacity has been loaded on the scale. Manual/Electric Portable Patient Lift 58 Part No. 1078987 OVER CAPACITY - Indicates improper stored calibration data, calibration is necessary. 11 ACCESSORIES 11.5 Troubleshooting SYMPTON Unit does NOT work properly. SOLUTIONS Check battery. Battery has been replaced and unit still does NOT work properly. Display Codes PROBABLE CAUSE Battery failure.
Replace if necessary. Contact Invacare for Service at 1-800-333-6900 CAL OCAP CALIBRATION REQUIRED - Indicates a weight exceeding the capacity has been loaded on the scale. Manual/Electric Portable Patient Lift 58 Part No. 1078987 OVER CAPACITY - Indicates improper stored calibration data, calibration is necessary. 11 ACCESSORIES 11.5 Troubleshooting SYMPTON Unit does NOT work properly. SOLUTIONS Check battery. Battery has been replaced and unit still does NOT work properly. Display Codes PROBABLE CAUSE Battery failure.


