Owners Manual
Page 3
... 5 SAFETY INSPECTION 32 Safety Inspection Checklists ...32 6 WHEELCHAIR OPERATION 36 Part No 1167418 3 Invacare® MyOn™MyOn Jr Wheelchairs 1 GENERAL CONTENTS 7 Symbols ...7 Limited Warranty ...8 2 SAFETY 9 General Guidelines ...9 3 OVERVIEW 15 Label Locations...15 Component Identification ...17 Typical Product Parameters ...18 4 SAFETY/HANDLING OF WHEELCHAIRS 24 Safety/Handling of Wheelchairs...24 Stability and Balance ...24 Coping with...
... 5 SAFETY INSPECTION 32 Safety Inspection Checklists ...32 6 WHEELCHAIR OPERATION 36 Part No 1167418 3 Invacare® MyOn™MyOn Jr Wheelchairs 1 GENERAL CONTENTS 7 Symbols ...7 Limited Warranty ...8 2 SAFETY 9 General Guidelines ...9 3 OVERVIEW 15 Label Locations...15 Component Identification ...17 Typical Product Parameters ...18 4 SAFETY/HANDLING OF WHEELCHAIRS 24 Safety/Handling of Wheelchairs...24 Stability and Balance ...24 Coping with...
Owners Manual
Page 8
... to such repair and/or replacement. Invacare® MyOn™MyOn Jr Wheelchairs 8 Part No 1167418 INVACARE SHALL NOT BE LIABLE FOR ANY CONSEQUENTIAL OR INCIDENTAL DAMAGES WHATSOEVER. Provide dealer's name, address, the product model number, date of purchase, indicate nature of the defect and, if the product is extended only to state. This warranty gives you specific legal...
... to such repair and/or replacement. Invacare® MyOn™MyOn Jr Wheelchairs 8 Part No 1167418 INVACARE SHALL NOT BE LIABLE FOR ANY CONSEQUENTIAL OR INCIDENTAL DAMAGES WHATSOEVER. Provide dealer's name, address, the product model number, date of purchase, indicate nature of the defect and, if the product is extended only to state. This warranty gives you specific legal...
Owners Manual
Page 9
... with the user and his/her healthcare professional capable of wheelchairs to use this product or any available optional equipment without first completely reading and understanding these instructions and any additional instructional material such as owner's manuals, service manuals or instruction sheets supplied with this product or optional equipment. ACCESSORIES WARNINGS Invacare products are specifically designed and manufactured for use with Invacare accessories. Check...
... with the user and his/her healthcare professional capable of wheelchairs to use this product or any available optional equipment without first completely reading and understanding these instructions and any additional instructional material such as owner's manuals, service manuals or instruction sheets supplied with this product or optional equipment. ACCESSORIES WARNINGS Invacare products are specifically designed and manufactured for use with Invacare accessories. Check...
Owners Manual
Page 10
... a wheelchair, in this manual. As of this manual. Wheelchair Tie Down Restraints (TRRO or TRBKTS) TRRO includes four factory-installed transport brackets and a wheelchair anchored pelvic belt. otherwise injury or damage may occur. TRBKTS includes four factory-installed wheelchair transport brackets. WHEELCHAIRS WITH TRRO ONLY - DO NOT adjust or replace the caster headtube or center of gravity are factory set. Contact Invacare for transportation and use...
... a wheelchair, in this manual. As of this manual. Wheelchair Tie Down Restraints (TRRO or TRBKTS) TRRO includes four factory-installed transport brackets and a wheelchair anchored pelvic belt. otherwise injury or damage may occur. TRBKTS includes four factory-installed wheelchair transport brackets. WHEELCHAIRS WITH TRRO ONLY - DO NOT adjust or replace the caster headtube or center of gravity are factory set. Contact Invacare for transportation and use...
Owners Manual
Page 13
...the frame. Anti-tippers MUST BE attached at all service and adjustments should be performed while the wheelchair is unoccupied. DO NOT attempt to stop a moving parts to avoid injury. Inasmuch as the anti-tippers are...wheelchair user. DO NOT use the handrims for the wheelchair user. DO NOT place hand or fingers on this wheelchair (you may occur. Part No 1167418 13 Invacare® MyOn™MyOn Jr Wheelchairs arms, serious injury can occur. ALWAYS keep hands and fingers clear of any removable (detachable) parts. ƽ 2 SAFETY WARNING Wheel locks are fully seated...
...the frame. Anti-tippers MUST BE attached at all service and adjustments should be performed while the wheelchair is unoccupied. DO NOT attempt to stop a moving parts to avoid injury. Inasmuch as the anti-tippers are...wheelchair user. DO NOT use the handrims for the wheelchair user. DO NOT place hand or fingers on this wheelchair (you may occur. Part No 1167418 13 Invacare® MyOn™MyOn Jr Wheelchairs arms, serious injury can occur. ALWAYS keep hands and fingers clear of any removable (detachable) parts. ƽ 2 SAFETY WARNING Wheel locks are fully seated...

Owners Manual
Page 14
... or without TRRO option MyOn (Heavy Duty) - 350 lbs (159 kgs) Invacare® MyOn™MyOn Jr Wheelchairs 14 Part No 1167418 If occupant uses said wheelchair as a seat for the wheelchair user. it has the proper tire pressure (p.s.i.). 2 SAFETY ƽ WARNING Seat Positioning Straps ALWAYS wear your wheelchair unless it is the obligation of the DME dealer, therapists and...
... or without TRRO option MyOn (Heavy Duty) - 350 lbs (159 kgs) Invacare® MyOn™MyOn Jr Wheelchairs 14 Part No 1167418 If occupant uses said wheelchair as a seat for the wheelchair user. it has the proper tire pressure (p.s.i.). 2 SAFETY ƽ WARNING Seat Positioning Straps ALWAYS wear your wheelchair unless it is the obligation of the DME dealer, therapists and...

Owners Manual
Page 16
3 OVERVIEW Wheelchairs with Transport Ready Option Wheelchairs without TRRO Auto style seat positioning strap shown. Invacare® MyOn™MyOn Jr Wheelchairs 16 Part No 1167418 This label is also on the airline style seat positioning strap.
3 OVERVIEW Wheelchairs with Transport Ready Option Wheelchairs without TRRO Auto style seat positioning strap shown. Invacare® MyOn™MyOn Jr Wheelchairs 16 Part No 1167418 This label is also on the airline style seat positioning strap.

Owners Manual
Page 24
... Part No 1167418 It is an option on your seat positioning strap. Invacare recognizes and encourages each individual to deal with daily living activities that are a starting point for the new wheelchair user and assistant with or without the seat positioning strap), Invacare strongly recommends ordering the seat positioning strap as the assistant. If loose and/or worn, replace...
... Part No 1167418 It is an option on your seat positioning strap. Invacare recognizes and encourages each individual to deal with daily living activities that are a starting point for the new wheelchair user and assistant with or without the seat positioning strap), Invacare strongly recommends ordering the seat positioning strap as the assistant. If loose and/or worn, replace...

Owners Manual
Page 30
...the wheelchair owner to reach, bend and transfer in stability. Contact Invacare for service. 4 SAFETY/HANDLING OF WHEELCHAIRS 4.9 Percentage of Weight Distribution ƽ WARNING DO NOT attempt to reach objects if you have to move forward in the seat or...seat height, seat depth, back angle, seat system/upholstery, caster size/position, rear wheel size, rear wheel position, correct anti-tipper as well as the end user's disability or end user's physical condition and capabilities directly relate to the normal balance, the center of gravity, and the weight distribution of the wheelchair...
...the wheelchair owner to reach, bend and transfer in stability. Contact Invacare for service. 4 SAFETY/HANDLING OF WHEELCHAIRS 4.9 Percentage of Weight Distribution ƽ WARNING DO NOT attempt to reach objects if you have to move forward in the seat or...seat height, seat depth, back angle, seat system/upholstery, caster size/position, rear wheel size, rear wheel position, correct anti-tipper as well as the end user's disability or end user's physical condition and capabilities directly relate to the normal balance, the center of gravity, and the weight distribution of the wheelchair...
Owners Manual
Page 42
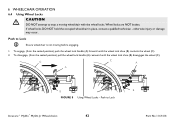
...) pull the wheel lock handle (A) rearward until the wheel lock shoe (B) contacts the wheel (C). 2. If wheel locks DO NOT hold the occupied wheelchair in place, contact a qualified technician - To disengage, (from the seated position) push the wheel lock handle (A) forward until the wheel lock shoe (B) disengages the wheel (C). C A C A B FIGURE 8 Using Wheel Locks - otherwise injury or damage may occur. Wheel locks are NOT brakes.
...) pull the wheel lock handle (A) rearward until the wheel lock shoe (B) contacts the wheel (C). 2. If wheel locks DO NOT hold the occupied wheelchair in place, contact a qualified technician - To disengage, (from the seated position) push the wheel lock handle (A) forward until the wheel lock shoe (B) disengages the wheel (C). C A C A B FIGURE 8 Using Wheel Locks - otherwise injury or damage may occur. Wheel locks are NOT brakes.
Owners Manual
Page 46
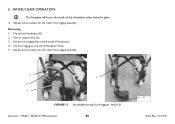
Flip up and off of wheelchair frame. 5. Repeat this procedure for the other front rigging assembly. Push in place. 4. B E C A FIGURE 13 Installing/Removing Front Riggings - Removing 1. Rotate front rigging (A) toward inside of the wheelchair when locked in release lever (E). 3. MyOn JR Invacare® MyOn™MyOn Jr Wheelchairs 46 D Part No 1167418 Lift front riggng up both footplates (D). 2. 6 WHEELCHAIR OPERATION The footplate will be on the inside of wheelchair. 4. Repeat this procedure for the other front rigging assembly.
Flip up and off of wheelchair frame. 5. Repeat this procedure for the other front rigging assembly. Push in place. 4. B E C A FIGURE 13 Installing/Removing Front Riggings - Removing 1. Rotate front rigging (A) toward inside of the wheelchair when locked in release lever (E). 3. MyOn JR Invacare® MyOn™MyOn Jr Wheelchairs 46 D Part No 1167418 Lift front riggng up both footplates (D). 2. 6 WHEELCHAIR OPERATION The footplate will be on the inside of wheelchair. 4. Repeat this procedure for the other front rigging assembly.
Owners Manual
Page 53
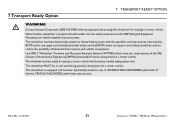
...Wheelchairs 7 Transport Ready Option 7 TRANSPORT READY OPTION ƽ WARNING Contact Invacare Corporation (800-333-6900) with any questions about using this wheelchair for seating in a motor vehicle with the factory installed seating system only. This wheelchair has been dynamically tested in a motor vehicle. This wheelchair has been tested for seating in a forward-facing mode with vehicle components. This wheelchair... the vehicle seat and use the OEM (Original Equipment Manufacturer) vehicle-installed restraint system. When feasible, wheelchair occupants should be used . If desired...
...Wheelchairs 7 Transport Ready Option 7 TRANSPORT READY OPTION ƽ WARNING Contact Invacare Corporation (800-333-6900) with any questions about using this wheelchair for seating in a motor vehicle with the factory installed seating system only. This wheelchair has been dynamically tested in a motor vehicle. This wheelchair has been tested for seating in a forward-facing mode with vehicle components. This wheelchair... the vehicle seat and use the OEM (Original Equipment Manufacturer) vehicle-installed restraint system. When feasible, wheelchair occupants should be used . If desired...

Owners Manual
Page 54
... and secured separately. Invacare recommends that users of the restraints made of wheelchairs should be used only to 165 lbs. Invacare® MyOn™MyOn Jr Wheelchairs 54 Part No 1167418 To reduce the potential of 125 to secure an unoccupied wheelchair during transport. A sudden stop and/or collision may occur. TRBKTS includes four factory-installed wheelchair transport brackets. Postural supports, positioning devices...
... and secured separately. Invacare recommends that users of the restraints made of wheelchairs should be used only to 165 lbs. Invacare® MyOn™MyOn Jr Wheelchairs 54 Part No 1167418 To reduce the potential of 125 to secure an unoccupied wheelchair during transport. A sudden stop and/or collision may occur. TRBKTS includes four factory-installed wheelchair transport brackets. Postural supports, positioning devices...
Owners Manual
Page 61
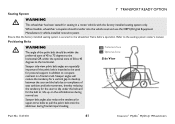
... seating system owner's manual. Seating System 7 TRANSPORT READY OPTION ƽ WARNING This wheelchair has been tested for seating in a frontal crash. Steeper angles will reduce the tendency for postural support in addition to occupant restraint in a motor vehicle with the factory installed seating system only. Preferred Zone Optional Zone Side View 30° 45° 75° Part No 1167418 61 Invacare...
... seating system owner's manual. Seating System 7 TRANSPORT READY OPTION ƽ WARNING This wheelchair has been tested for seating in a frontal crash. Steeper angles will reduce the tendency for postural support in addition to occupant restraint in a motor vehicle with the factory installed seating system only. Preferred Zone Optional Zone Side View 30° 45° 75° Part No 1167418 61 Invacare...
Owners Manual
Page 62
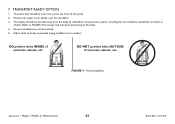
..., wheels, etc. DO NOT position belts OUTSIDE of user comfort. The pelvic belt should not be worn low across the front of the pelvis. 2. Refer to wheelchair armrests or wheels. The belt(s) should be held away from the body by wheelchair components or parts, including... but not limited to FIGURE 4 for proper and improper positioning of armrests, wheels, etc. Ensure the belt(s) are not be twisted. 5. FIGURE 4 Positioning Belts Invacare® MyOn™MyOn Jr Wheelchairs 62 Part No 1167418 7 TRANSPORT READY OPTION 1. ...
..., wheels, etc. DO NOT position belts OUTSIDE of user comfort. The pelvic belt should not be worn low across the front of the pelvis. 2. Refer to wheelchair armrests or wheels. The belt(s) should be held away from the body by wheelchair components or parts, including... but not limited to FIGURE 4 for proper and improper positioning of armrests, wheels, etc. Ensure the belt(s) are not be twisted. 5. FIGURE 4 Positioning Belts Invacare® MyOn™MyOn Jr Wheelchairs 62 Part No 1167418 7 TRANSPORT READY OPTION 1. ...

Owners Manual
Page 66
... support at the telephone numbers on the back of this warning may result in the hand grips sliding off the cane assembly. Refer to the front rigging. Replace mounting pin if worn or damaged. 12. Invacare® MyOn™MyOn Jr Wheelchairs 66 Part No 1167418 Refer to use only a clean towel lightly dampened with any vehicle, the wheels...
... support at the telephone numbers on the back of this warning may result in the hand grips sliding off the cane assembly. Refer to the front rigging. Replace mounting pin if worn or damaged. 12. Invacare® MyOn™MyOn Jr Wheelchairs 66 Part No 1167418 Refer to use only a clean towel lightly dampened with any vehicle, the wheels...
Owners Manual
Page 67
... replaced, Invacare recommends replacing complete caster assembly. Clean upholstery with mild soap and water. 9 TROUBLESHOOTING AND MAINTENANCE Replacing/Repairing Rear Wheel Tire/Tube ƽ WARNING Replacement of solid urethane or semi-pneumatic tires is not recommended. Refer to the seating system Owner's Manual for sagging, rips or tears. 14. Replacement of the seating system. 2. Remove the armrests. Remove the seating system. Check upholstery for installation...
... replaced, Invacare recommends replacing complete caster assembly. Clean upholstery with mild soap and water. 9 TROUBLESHOOTING AND MAINTENANCE Replacing/Repairing Rear Wheel Tire/Tube ƽ WARNING Replacement of solid urethane or semi-pneumatic tires is not recommended. Refer to the seating system Owner's Manual for sagging, rips or tears. 14. Replacement of the seating system. 2. Remove the armrests. Remove the seating system. Check upholstery for installation...
Owners Manual
Page 80
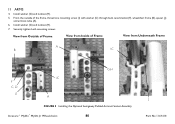
Install washer (G) and locknut (H). 5. View from Outside of Frame View from Inside of the frame, thread one mounting screw (I ,C A FIGURE 5 Installing the Optional Swingaway Padded Armrest Socket Assembly Invacare® MyOn™MyOn Jr Wheelchairs 80 J Part No 1167418 Securely tighten both mounting screws. 11 ARMS 4. Install washer (G) and locknut (H). 7. From the outside of Frame View from Underneath Frame A B I,C G,H F C, D E I ) with washer (C) through back cane bracket (F), wheelchair frame (B), spacer (J) and armrest tube (A). 6.
Install washer (G) and locknut (H). 5. View from Outside of Frame View from Inside of the frame, thread one mounting screw (I ,C A FIGURE 5 Installing the Optional Swingaway Padded Armrest Socket Assembly Invacare® MyOn™MyOn Jr Wheelchairs 80 J Part No 1167418 Securely tighten both mounting screws. 11 ARMS 4. Install washer (G) and locknut (H). 7. From the outside of Frame View from Underneath Frame A B I,C G,H F C, D E I ) with washer (C) through back cane bracket (F), wheelchair frame (B), spacer (J) and armrest tube (A). 6.

Owners Manual
Page 84
...cause the wheelchair to one or any adjustments, repair or service and before use, make sure all attaching hardware is tightened securely - Repeat STEP 1 for service. The seat depth and center of the back cane brackets. otherwise injury or damage may occur. 12.1 Removing/Installing the ...SEAT/BACK 12 Seat/Back ƽ WARNING The seat height, seat depth, back angle, seating system, size/position of the rear wheels, size/position of the front casters, as well as the user condition directly relate to the back cane bracket (D). 2. Invacare® MyOn™MyOn Jr Wheelchairs 84 Part...
...cause the wheelchair to one or any adjustments, repair or service and before use, make sure all attaching hardware is tightened securely - Repeat STEP 1 for service. The seat depth and center of the back cane brackets. otherwise injury or damage may occur. 12.1 Removing/Installing the ...SEAT/BACK 12 Seat/Back ƽ WARNING The seat height, seat depth, back angle, seating system, size/position of the rear wheels, size/position of the front casters, as well as the user condition directly relate to the back cane bracket (D). 2. Invacare® MyOn™MyOn Jr Wheelchairs 84 Part...

Owners Manual
Page 93
... securely - D B A FIGURE 1 Part No 1167418 93 E C Removing/Installing Rear Wheels - WHEELCHAIRS WITH TRRO ONLY - Refer to the axle bracket (E). 2. Remove the permanent axle (A), washer (B) and locknut (C) that secure rear wheel (D) to Removing/Installing Rear Wheels on page 93. Any change to one or any adjustments, repair or service and before use, make sure all attaching hardware is factory set. These adjustments...
... securely - D B A FIGURE 1 Part No 1167418 93 E C Removing/Installing Rear Wheels - WHEELCHAIRS WITH TRRO ONLY - Refer to the axle bracket (E). 2. Remove the permanent axle (A), washer (B) and locknut (C) that secure rear wheel (D) to Removing/Installing Rear Wheels on page 93. Any change to one or any adjustments, repair or service and before use, make sure all attaching hardware is factory set. These adjustments...


