
Owners Manual
Page 2
... INSTALLING/REPLACING FRONT CASTER FORKS ADJUSTING CASTER HEADTUBES REPOSITIONING CASTER HEADTUBES ON WHEELCHAIR FRAME INSTALLING QUICK-RELEASE CASTERS HANDRIMS ADJUSTING REAR WHEEL CAMBER ADJUSTING WHEELBASE LENGTH ADJUSTING WHEELBASE LENGTH TOE-IN/TOE-OUT ALIGNMENT CORRECTING THE TOE-IN/TOE-OUT CONDITION SEAT-TO-FLOOR HEIGHT DETERMINATION CHANGING SEAT-TO-FLOOR HEIGHT INSTALLING ANTI-TIPPER MOUNTING BRACKETS SAVE THESE INSTRUCTIONS...
... INSTALLING/REPLACING FRONT CASTER FORKS ADJUSTING CASTER HEADTUBES REPOSITIONING CASTER HEADTUBES ON WHEELCHAIR FRAME INSTALLING QUICK-RELEASE CASTERS HANDRIMS ADJUSTING REAR WHEEL CAMBER ADJUSTING WHEELBASE LENGTH ADJUSTING WHEELBASE LENGTH TOE-IN/TOE-OUT ALIGNMENT CORRECTING THE TOE-IN/TOE-OUT CONDITION SEAT-TO-FLOOR HEIGHT DETERMINATION CHANGING SEAT-TO-FLOOR HEIGHT INSTALLING ANTI-TIPPER MOUNTING BRACKETS SAVE THESE INSTRUCTIONS...
Owners Manual
Page 3
... CHECKLIST 18 TROUBLESHOOTING ...19 MAINTENANCE ...19 SECTION 3 - GENERAL GUIDELINES 9 STABILITY ...9 OPERATING INFORMATION ...10 WHEELS AND TIRE PRESSURE ...11 WEIGHT TRAINING ...11 WEIGHT LIMITATION ...11 SAFETY/HANDLING OF WHEELCHAIRS 12 SECTION 2 - FRONT RIGGINGS 21 INSTALLING/REMOVING/ADJUSTING THE FOOTREST(S 21 INSTALLING ELEVATING LEGRESTS 23 RAISING/LOWERING ELEVATING LEGRESTS 24 ADJUSTING CALFPADS ...24 USING THE FLIP-UP FOOTREST ...25 ADJUSTING...
... CHECKLIST 18 TROUBLESHOOTING ...19 MAINTENANCE ...19 SECTION 3 - GENERAL GUIDELINES 9 STABILITY ...9 OPERATING INFORMATION ...10 WHEELS AND TIRE PRESSURE ...11 WEIGHT TRAINING ...11 WEIGHT LIMITATION ...11 SAFETY/HANDLING OF WHEELCHAIRS 12 SECTION 2 - FRONT RIGGINGS 21 INSTALLING/REMOVING/ADJUSTING THE FOOTREST(S 21 INSTALLING ELEVATING LEGRESTS 23 RAISING/LOWERING ELEVATING LEGRESTS 24 ADJUSTING CALFPADS ...24 USING THE FLIP-UP FOOTREST ...25 ADJUSTING...
Owners Manual
Page 4
... HEIGHT ...44 USING/ADJUSTING DUAL POINT ARMS 45 REPLACING DUAL POINT ARM PAD 45 REPLACING DUAL POINT ARM CLOTHING GUARDS 45 INSTALLING/REMOVING T-ARMS ...46 ADJUSTING THE T-ARMS ...47 ADJUSTING T-ARM TRANSFER ASSISTS AND/OR SIDE GUARDS 49 CANTILEVER ARM PAD DEPTH ADJUSTMENT/REPLACEMENT 51 SECTION 7 - WHEELS 52 REPAIRING/REPLACING PNEUMATIC TIRE/TUBE 52 REMOVING/INSTALLING REAR WHEELS 52 ADJUSTING...
... HEIGHT ...44 USING/ADJUSTING DUAL POINT ARMS 45 REPLACING DUAL POINT ARM PAD 45 REPLACING DUAL POINT ARM CLOTHING GUARDS 45 INSTALLING/REMOVING T-ARMS ...46 ADJUSTING THE T-ARMS ...47 ADJUSTING T-ARM TRANSFER ASSISTS AND/OR SIDE GUARDS 49 CANTILEVER ARM PAD DEPTH ADJUSTMENT/REPLACEMENT 51 SECTION 7 - WHEELS 52 REPAIRING/REPLACING PNEUMATIC TIRE/TUBE 52 REMOVING/INSTALLING REAR WHEELS 52 ADJUSTING...
Owners Manual
Page 5
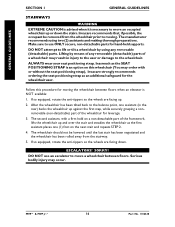
... AND SEAT POSITIONING STRAPS Invacare recommends that users of wheelchairs should be transferred into appropriate seating in vehicles for transportation and use be transported in vehicles of any kind while in this date, the Department of Transportation has not approved any tie-down systems for transportation of the end user. As of this manual apply to meet many needs of a user while in a wheelchair...
... AND SEAT POSITIONING STRAPS Invacare recommends that users of wheelchairs should be transferred into appropriate seating in vehicles for transportation and use be transported in vehicles of any kind while in this date, the Department of Transportation has not approved any tie-down systems for transportation of the end user. As of this manual apply to meet many needs of a user while in a wheelchair...
Owners Manual
Page 9
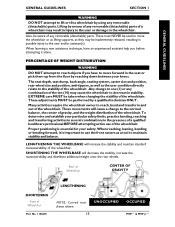
...handling of the wheelchair. Refer to the stability of the wheelchair. These adjustments MUST be taken when changing the stability of the wheelchair. Part No. 1106638 9 MVP™ & MVP jr.™ ALWAYS ensure stability BEFORE moving the rear wheels forward. Any... Weight Limitation Safety/Handling of Wheelchairs STABILITY STABILITY WARNINGS The seat depth, seat dump, back angle, seating system, caster size and position, rear wheel size and position, anti-tippers, as well as the user condition directly relate to the wheelchair owner's manual for these procedures.
...handling of the wheelchair. Refer to the stability of the wheelchair. These adjustments MUST be taken when changing the stability of the wheelchair. Part No. 1106638 9 MVP™ & MVP jr.™ ALWAYS ensure stability BEFORE moving the rear wheels forward. Any... Weight Limitation Safety/Handling of Wheelchairs STABILITY STABILITY WARNINGS The seat depth, seat dump, back angle, seating system, caster size and position, rear wheel size and position, anti-tippers, as well as the user condition directly relate to the wheelchair owner's manual for these procedures.
Owners Manual
Page 10
... your center of gravity and may result in injury to the user or damage to stop a moving wheelchair with a water, ice or oil film. WHEEL LOCKS ARE NOT BRAKES. DO NOT stand on the frame of the back upholstery. DO...seat. Serious bodily injury may occur. When transferring to reduce the gap distance. Doing so may tip over curbs or obstacles. DO NOT use parts, accessories, or adapters other than 9o. Make sure back is locked securely BEFORE using any removable (detachable) parts of any removable (detachable) parts. DO NOT operate on the inside of the wheelchair...
... your center of gravity and may result in injury to the user or damage to stop a moving wheelchair with a water, ice or oil film. WHEEL LOCKS ARE NOT BRAKES. DO NOT stand on the frame of the back upholstery. DO...seat. Serious bodily injury may occur. When transferring to reduce the gap distance. Doing so may tip over curbs or obstacles. DO NOT use parts, accessories, or adapters other than 9o. Make sure back is locked securely BEFORE using any removable (detachable) parts of any removable (detachable) parts. DO NOT operate on the inside of the wheelchair...
Owners Manual
Page 11
... or tested as a weight training apparatus. The Invacare MVP Heavy Duty wheelchair has a weight limitation of its wheelchairs as a seat for the wheelchair user. Part No. 1106638 11 MVP™ & MVP jr.™ WEIGHT TRAINING WARNING Invacare DOES NOT recommend the use your seat positioning strap. The Invacare MVP wheelchair has a weight limitation of the wheelchair. WHEELS AND TIRE PRESSURE WARNING Make sure the...
... or tested as a weight training apparatus. The Invacare MVP Heavy Duty wheelchair has a weight limitation of its wheelchairs as a seat for the wheelchair user. Part No. 1106638 11 MVP™ & MVP jr.™ WEIGHT TRAINING WARNING Invacare DOES NOT recommend the use your seat positioning strap. The Invacare MVP wheelchair has a weight limitation of the wheelchair. WHEELS AND TIRE PRESSURE WARNING Make sure the...
Owners Manual
Page 12
...wheelchair. Use this manual. Individual wheelchair users often develop skills to maintain stability and balance. A NOTE TO WHEELCHAIR ASSISTANTS When assistance to the wheelchair user is important to remain upright and stable during normal daily activities as long as a “basic” guide. This section of the manual points out the most important consideration for the wheelchair user. Your wheelchair...for the new wheelchair user and assistant with the irritation of everyday obstacles can be alleviated somewhat by many. Invacare recommends using seat/chest positioning ...
...wheelchair. Use this manual. Individual wheelchair users often develop skills to maintain stability and balance. A NOTE TO WHEELCHAIR ASSISTANTS When assistance to the wheelchair user is important to remain upright and stable during normal daily activities as long as a “basic” guide. This section of the manual points out the most important consideration for the wheelchair user. Your wheelchair...for the new wheelchair user and assistant with the irritation of everyday obstacles can be alleviated somewhat by many. Invacare recommends using seat/chest positioning ...
Owners Manual
Page 13
...seat depth, seat dump, back angle, seating system, caster size and position, rear wheel size and position, anti-tippers, as well as they may cause the wheelchair to move the wheelchair or as lifting supports, as the user condition directly relate to the stability of the wheelchair...use the front casters as a tool to the user and/or assistant(s). Proper positioning is important to use of the wheelchair. SHORTENING THE WHEELBASE will increase the stability and maintain standard maneuverability of Wheelchair Part... require the wheelchair owner to lift or tilt a wheelchair by a ...
...seat depth, seat dump, back angle, seating system, caster size and position, rear wheel size and position, anti-tippers, as well as they may cause the wheelchair to move the wheelchair or as lifting supports, as the user condition directly relate to the stability of the wheelchair...use the front casters as a tool to the user and/or assistant(s). Proper positioning is important to use of the wheelchair. SHORTENING THE WHEELBASE will increase the stability and maintain standard maneuverability of Wheelchair Part... require the wheelchair owner to lift or tilt a wheelchair by a ...
Owners Manual
Page 16
...-held supports. The second assistant, with or without the seat positioning strap), Invacare strongly recommends ordering the seat positioning strap as the first assistant places one assistant (in injury to the user or damage to the wheelchair. If so equipped, rotate the anti-tippers so the wheels are facing up. 2. MVP™ & MVP jr.™ 16 Part No...
...-held supports. The second assistant, with or without the seat positioning strap), Invacare strongly recommends ordering the seat positioning strap as the first assistant places one assistant (in injury to the user or damage to the wheelchair. If so equipped, rotate the anti-tippers so the wheels are facing up. 2. MVP™ & MVP jr.™ 16 Part No...
Owners Manual
Page 18
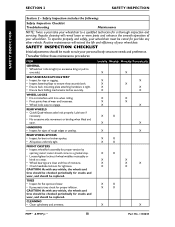
... wheelchair must be cared for just like any vehicle, the wheels and tires should be checked periodically for cracks and wear, and should be replaced. SEAT AND BACK UPHOLSTERY • Inspect for rips or sagging. • Inspect fastening flaps to a qualified technician for tightness. Initially Weekly Monthly Periodically X X X X X X X X X X X X X X X X X X X X X X X X X X X X X X X X X X X X X X X X X MVP™ & MVP jr.™ 18 Part...
... wheelchair must be cared for just like any vehicle, the wheels and tires should be checked periodically for cracks and wear, and should be replaced. SEAT AND BACK UPHOLSTERY • Inspect for rips or sagging. • Inspect fastening flaps to a qualified technician for tightness. Initially Weekly Monthly Periodically X X X X X X X X X X X X X X X X X X X X X X X X X X X X X X X X X X X X X X X X X MVP™ & MVP jr.™ 18 Part...
Owners Manual
Page 19
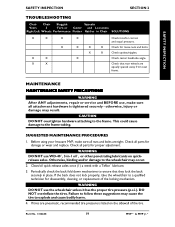
...wear and replace. Failure to follow these suggestions may result. X X X Check caster headtube angle. X X Check that they lock the back securely in place. MAINTENANCE MAINTENANCE SAFETY PRECAUTIONS WARNING After ANY adjustments, repair or service and BEFORE use, make... SAFETY INSPECTION SECTION 2 TROUBLESHOOTING Chair Chair Sluggish Squeaks Veers 3 Turn or Caster and Looseness Right/Left Wheels Performance Flutter Rattles in -1 oil®, or other penetrating lubricants on the sidewall of the locking mechanism. WARNING DO NOT use the wheelchair unless it has the ...
...wear and replace. Failure to follow these suggestions may result. X X X Check caster headtube angle. X X Check that they lock the back securely in place. MAINTENANCE MAINTENANCE SAFETY PRECAUTIONS WARNING After ANY adjustments, repair or service and BEFORE use, make... SAFETY INSPECTION SECTION 2 TROUBLESHOOTING Chair Chair Sluggish Squeaks Veers 3 Turn or Caster and Looseness Right/Left Wheels Performance Flutter Rattles in -1 oil®, or other penetrating lubricants on the sidewall of the locking mechanism. WARNING DO NOT use the wheelchair unless it has the ...
Owners Manual
Page 23
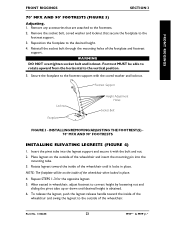
... 90° FOOTRESTS INSTALLING ELEVATING LEGRESTS (FIGURE 4) 1. Part No. 1106638 23 MVP™ & MVP jr.™ Repeat STEPS 1-3 for the opposite legrest. 5. Reposition the footplate to the vertical position. 5. Footrest MUST be on the outside of the wheelchair. Place legrest on the inside of the wheelchair and insert the mounting pin into the legrest support and secure...
... 90° FOOTRESTS INSTALLING ELEVATING LEGRESTS (FIGURE 4) 1. Part No. 1106638 23 MVP™ & MVP jr.™ Repeat STEPS 1-3 for the opposite legrest. 5. Reposition the footplate to the vertical position. 5. Footrest MUST be on the outside of the wheelchair. Place legrest on the inside of the wheelchair and insert the mounting pin into the legrest support and secure...
Owners Manual
Page 29
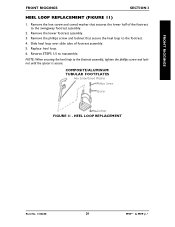
... phillips screw and locknut that secures the lower half of footrest assembly. 5. Reverse STEPS 1-5 to the footrest. 4. Slide heel loop over slide tube of the footrest to the footrest assembly, tighten the phillips screw and locknut until the spacer is secure. Replace heel loop. 6. HEEL LOOP REPLACEMENT Part No. 1106638 29 MVP™ & MVP jr.™ COMPOSITE...
... phillips screw and locknut that secures the lower half of footrest assembly. 5. Reverse STEPS 1-5 to the footrest. 4. Slide heel loop over slide tube of the footrest to the footrest assembly, tighten the phillips screw and locknut until the spacer is secure. Replace heel loop. 6. HEEL LOOP REPLACEMENT Part No. 1106638 29 MVP™ & MVP jr.™ COMPOSITE...
Owners Manual
Page 37
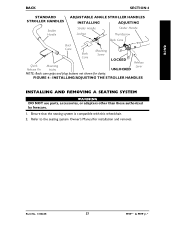
... is compatible with this wheelchair. 2. Part No. 1106638 37 MVP™ & MVP jr.™ Refer to the seating system Owner's Manual for clarity. INSTALLING/ADJUSTING THE STROLLER HANDLES INSTALLING AND REMOVING A SEATING SYSTEM WARNING DO NOT use parts, accessories, or adapters other than those authorized by Invacare. 1. BACK BACK SECTION 4 STANDARD STROLLER HANDLES ADJUSTABLE ANGLE STROLLER HANDLES INSTALLING ADJUSTING Stroller Handle Stroller...
... is compatible with this wheelchair. 2. Part No. 1106638 37 MVP™ & MVP jr.™ Refer to the seating system Owner's Manual for clarity. INSTALLING/ADJUSTING THE STROLLER HANDLES INSTALLING AND REMOVING A SEATING SYSTEM WARNING DO NOT use parts, accessories, or adapters other than those authorized by Invacare. 1. BACK BACK SECTION 4 STANDARD STROLLER HANDLES ADJUSTABLE ANGLE STROLLER HANDLES INSTALLING ADJUSTING Stroller Handle Stroller...
Owners Manual
Page 39
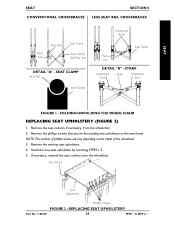
..., from the wheelchair. 2. If necessary, reinstall the seat cushion onto the wheelchair. SEAT CLAMP Seat Rail Seat Clamp Crossbrace Ends Side Frame Pivot Link DETAIL "B" - Install the new seat upholstery by reversing STEPS 1-3. 5. NOTE: The number of phillips screws will vary depending on the depth of the wheelchair. 3. Remove the existing seat upholstery. 4. FOLDING/UNFOLDING THE WHEELCHAIR REPLACING SEAT UPHOLSTERY (FIGURE 2) 1. REPLACING SEAT UPHOLSTERY Part No. 1106638...
..., from the wheelchair. 2. If necessary, reinstall the seat cushion onto the wheelchair. SEAT CLAMP Seat Rail Seat Clamp Crossbrace Ends Side Frame Pivot Link DETAIL "B" - Install the new seat upholstery by reversing STEPS 1-3. 5. NOTE: The number of phillips screws will vary depending on the depth of the wheelchair. 3. Remove the existing seat upholstery. 4. FOLDING/UNFOLDING THE WHEELCHAIR REPLACING SEAT UPHOLSTERY (FIGURE 2) 1. REPLACING SEAT UPHOLSTERY Part No. 1106638...
Owners Manual
Page 51
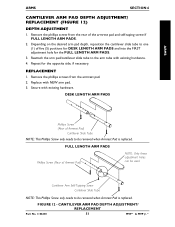
Remove the phillips screw from the armrest pad. 2. Replace with existing hardware. FIGURE 12 - CANTILEVER ARM PAD DEPTH ADJUSTMENT/ REPLACEMENT Part No. 1106638 51 MVP™ & MVP jr.™ Reattach the arm pad/cantilever slide tube to one (1) of the armrest... ARMS SECTION 6 CANTILEVER ARM PAD DEPTH ADJUSTMENT/ REPLACEMENT (FIGURE 12) DEPTH ADJUSTMENT 1. Repeat for the FULL LENGTH ARM PADS. 3. Cantilever Arm Self-Tapping Screw Cantilever Slide Tube NOTE: This Phillips Screw only needs to be used. Depending on the desired arm pad depth, reposition the cantilever...
Remove the phillips screw from the armrest pad. 2. Replace with existing hardware. FIGURE 12 - CANTILEVER ARM PAD DEPTH ADJUSTMENT/ REPLACEMENT Part No. 1106638 51 MVP™ & MVP jr.™ Reattach the arm pad/cantilever slide tube to one (1) of the armrest... ARMS SECTION 6 CANTILEVER ARM PAD DEPTH ADJUSTMENT/ REPLACEMENT (FIGURE 12) DEPTH ADJUSTMENT 1. Repeat for the FULL LENGTH ARM PADS. 3. Cantilever Arm Self-Tapping Screw Cantilever Slide Tube NOTE: This Phillips Screw only needs to be used. Depending on the desired arm pad depth, reposition the cantilever...

Owners Manual
Page 52
...the rear wheel. 3. Keep locking pins clean. 5. Wheels includes the following: Repairing/Replacing Pneumatic Tire/Tube Removing/Installing Rear Wheels Adjusting Quick-Release Axles Installing Quad-Release Axles Adjusting Quad-Release Handles Adjusting Forks WARNING After ANY adjustments, repair or service and BEFORE use, make sure..., Invacare recommends inserting quick-release axles with the head end to ADJUSTING THE QUICK-RELEASE AXLE or ADJUSTING THE QUAD-RELEASE HANDLE in the tip of the quick-release axle again and pull the axle out of the manual. SECTION 7 WHEELS WHEELS Section...
...the rear wheel. 3. Keep locking pins clean. 5. Wheels includes the following: Repairing/Replacing Pneumatic Tire/Tube Removing/Installing Rear Wheels Adjusting Quick-Release Axles Installing Quad-Release Axles Adjusting Quad-Release Handles Adjusting Forks WARNING After ANY adjustments, repair or service and BEFORE use, make sure..., Invacare recommends inserting quick-release axles with the head end to ADJUSTING THE QUICK-RELEASE AXLE or ADJUSTING THE QUAD-RELEASE HANDLE in the tip of the quick-release axle again and pull the axle out of the manual. SECTION 7 WHEELS WHEELS Section...
Owners Manual
Page 56
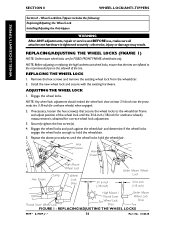
... (1/8-inch for FIXED FRONT FRAME wheelchairs only. Securely tighten the hex screw(s). 4. Wheel Lock/Anti-Tippers includes the following: Replacing/Adjusting the Wheel Lock Installing/Adjusting the Anti-tippers WARNING After ANY adjustments, repair or service and BEFORE use, make sure all attachment hardware is obtained for correct wheel lock adjustment. 3. REPLACING THE WHEEL LOCK 1. Engage the wheel locks. Hex Screws Hex...
... (1/8-inch for FIXED FRONT FRAME wheelchairs only. Securely tighten the hex screw(s). 4. Wheel Lock/Anti-Tippers includes the following: Replacing/Adjusting the Wheel Lock Installing/Adjusting the Anti-tippers WARNING After ANY adjustments, repair or service and BEFORE use, make sure all attachment hardware is obtained for correct wheel lock adjustment. 3. REPLACING THE WHEEL LOCK 1. Engage the wheel locks. Hex Screws Hex...
Owners Manual
Page 60
...PROBLEMS ARISING FROM NORMAL WEAR OR FAILURE TO ADHERE TO THE THESE INSTRUCTIONS. THE APPLICATION OF ANY IMPLIED WARRANTY WHATSOEVER SHALL NOT EXTEND BEYOND THE DURATION OF THE EXPRESS WARRANTY PROVIDED HEREIN. all remaining components for a lifetime from state to Invacare at Invacare's option. and MVP are trademarks of Invacare Corporation. 3-in replacement part installation or repair..., padded materials and tires/wheels. Du Pont De Nemours and Company. © 2002 Invacare Corporation Part No. 1106638 Rev B - 10/02 This warranty gives you specific legal rights and you purchased...
...PROBLEMS ARISING FROM NORMAL WEAR OR FAILURE TO ADHERE TO THE THESE INSTRUCTIONS. THE APPLICATION OF ANY IMPLIED WARRANTY WHATSOEVER SHALL NOT EXTEND BEYOND THE DURATION OF THE EXPRESS WARRANTY PROVIDED HEREIN. all remaining components for a lifetime from state to Invacare at Invacare's option. and MVP are trademarks of Invacare Corporation. 3-in replacement part installation or repair..., padded materials and tires/wheels. Du Pont De Nemours and Company. © 2002 Invacare Corporation Part No. 1106638 Rev B - 10/02 This warranty gives you specific legal rights and you purchased...


