
Owners Manual
Page 1
USER: BEFORE USING THIS WHEELCHAIR, READ THIS MANUAL AND SAVE FOR FUTURE REFERENCE. Owner's Operator And Maintenance Manual MVP™ MVP jr.™ DEALER: THIS MANUAL MUST BE GIVEN TO THE USER OF THE WHEELCHAIR.
USER: BEFORE USING THIS WHEELCHAIR, READ THIS MANUAL AND SAVE FOR FUTURE REFERENCE. Owner's Operator And Maintenance Manual MVP™ MVP jr.™ DEALER: THIS MANUAL MUST BE GIVEN TO THE USER OF THE WHEELCHAIR.

Owners Manual
Page 2
...CANTILEVER ARM REPLACING/REPOSITIONING/INSTALLING FRONT CASTER ASSEMBLIES INSTALLING/REPLACING FRONT CASTER FORKS ADJUSTING CASTER HEADTUBES REPOSITIONING CASTER HEADTUBES ON WHEELCHAIR FRAME INSTALLING QUICK-RELEASE CASTERS HANDRIMS ADJUSTING REAR WHEEL CAMBER ADJUSTING WHEELBASE LENGTH ADJUSTING WHEELBASE LENGTH TOE-IN/TOE-...DAMAGE MAY RESULT. REPLACING THE LOCKING MECHANISM IN THE BACK CANE ADJUSTING THE BACK ANGLE - THE INITIAL SET UP OF THIS WHEELCHAIR MUST BE PERFORMED BY A QUALIFIED TECHNICIAN. PROCEDURES OTHER THAN THOSE DESCRIBED IN THIS MANUAL MUST BE PERFORMED BY A QUALIFIED ...
...CANTILEVER ARM REPLACING/REPOSITIONING/INSTALLING FRONT CASTER ASSEMBLIES INSTALLING/REPLACING FRONT CASTER FORKS ADJUSTING CASTER HEADTUBES REPOSITIONING CASTER HEADTUBES ON WHEELCHAIR FRAME INSTALLING QUICK-RELEASE CASTERS HANDRIMS ADJUSTING REAR WHEEL CAMBER ADJUSTING WHEELBASE LENGTH ADJUSTING WHEELBASE LENGTH TOE-IN/TOE-...DAMAGE MAY RESULT. REPLACING THE LOCKING MECHANISM IN THE BACK CANE ADJUSTING THE BACK ANGLE - THE INITIAL SET UP OF THIS WHEELCHAIR MUST BE PERFORMED BY A QUALIFIED TECHNICIAN. PROCEDURES OTHER THAN THOSE DESCRIBED IN THIS MANUAL MUST BE PERFORMED BY A QUALIFIED ...
Owners Manual
Page 3
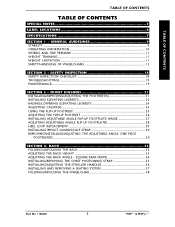
... 7 SECTION 1 - GENERAL GUIDELINES 9 STABILITY ...9 OPERATING INFORMATION ...10 WHEELS AND TIRE PRESSURE ...11 WEIGHT TRAINING ...11 WEIGHT LIMITATION ...11 SAFETY/HANDLING OF WHEELCHAIRS 12 SECTION 2 - FRONT RIGGINGS 21 INSTALLING/REMOVING/ADJUSTING THE FOOTREST(S 21 INSTALLING ELEVATING LEGRESTS 23 RAISING/LOWERING ELEVATING LEGRESTS 24 ADJUSTING CALFPADS ...24 USING THE... CHEST POSITIONING STRAP 35 INSTALLING/ADJUSTING THE STROLLER HANDLES 36 INSTALLING AND REMOVING A SEATING SYSTEM 37 FOLDING/UNFOLDING THE WHEELCHAIR 38 Part No. 1106638 3 MVP™ & MVP jr.™
... 7 SECTION 1 - GENERAL GUIDELINES 9 STABILITY ...9 OPERATING INFORMATION ...10 WHEELS AND TIRE PRESSURE ...11 WEIGHT TRAINING ...11 WEIGHT LIMITATION ...11 SAFETY/HANDLING OF WHEELCHAIRS 12 SECTION 2 - FRONT RIGGINGS 21 INSTALLING/REMOVING/ADJUSTING THE FOOTREST(S 21 INSTALLING ELEVATING LEGRESTS 23 RAISING/LOWERING ELEVATING LEGRESTS 24 ADJUSTING CALFPADS ...24 USING THE... CHEST POSITIONING STRAP 35 INSTALLING/ADJUSTING THE STROLLER HANDLES 36 INSTALLING AND REMOVING A SEATING SYSTEM 37 FOLDING/UNFOLDING THE WHEELCHAIR 38 Part No. 1106638 3 MVP™ & MVP jr.™
Owners Manual
Page 5
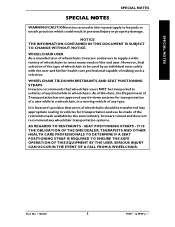
... - SERIOUS INJURY CAN OCCUR IN THE EVENT OF A FALL FROM A WHEELCHAIR. WHEELCHAIR TIE-DOWN RESTRAINTS AND SEAT POSITIONING STRAPS Invacare recommends that users of wheelchairs should be transported in vehicles of making such a selection. WHEELCHAIR USER As a manufacturer of wheelchairs, Invacare endeavors to supply a wide variety of wheelchairs to be used in this date, the Department of Transportation...
... - SERIOUS INJURY CAN OCCUR IN THE EVENT OF A FALL FROM A WHEELCHAIR. WHEELCHAIR TIE-DOWN RESTRAINTS AND SEAT POSITIONING STRAPS Invacare recommends that users of wheelchairs should be transported in vehicles of making such a selection. WHEELCHAIR USER As a manufacturer of wheelchairs, Invacare endeavors to supply a wide variety of wheelchairs to be used in this date, the Department of Transportation...
Owners Manual
Page 9
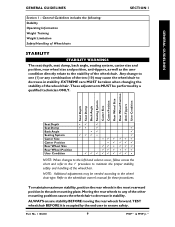
...plate. Moving the rear wheels to any combination of the ten (10) may be performed by the end user to the stability of the wheelchair. Part No. 1106638 9 MVP™ & MVP jr.™ Seat Depth Seat Dump Back Angle Seating System Caster Size Caster Position Rear...the chart and refer to the ü procedure to the wheelchair owner's manual for these procedures. These adjustments MUST be needed according to the wheelchair type. Refer to maintain the proper stability, safety and handling of the wheelchair. TEST wheelchair BEFORE it is occupied by a qualified technician ONLY. EXTREME ...
...plate. Moving the rear wheels to any combination of the ten (10) may be performed by the end user to the stability of the wheelchair. Part No. 1106638 9 MVP™ & MVP jr.™ Seat Depth Seat Dump Back Angle Seating System Caster Size Caster Position Rear...the chart and refer to the ü procedure to the wheelchair owner's manual for these procedures. These adjustments MUST be needed according to the wheelchair type. Refer to maintain the proper stability, safety and handling of the wheelchair. TEST wheelchair BEFORE it is occupied by a qualified technician ONLY. EXTREME ...
Owners Manual
Page 10
... those authorized by using wheelchair - otherwise injury may occur. This will change your wheelchair to turn over . Turn both casters toward the direction you to tip over and cause bodily harm or damage to the wheelchair. DO NOT attempt to lift or tilt a wheelchair by Invacare. DO NOT sit or... transfer into the seat clamps. DO NOT attempt to move a wheelchair between your knees. DO NOT stand on the inside of the...
... those authorized by using wheelchair - otherwise injury may occur. This will change your wheelchair to turn over . Turn both casters toward the direction you to tip over and cause bodily harm or damage to the wheelchair. DO NOT attempt to lift or tilt a wheelchair by Invacare. DO NOT sit or... transfer into the seat clamps. DO NOT attempt to move a wheelchair between your knees. DO NOT stand on the inside of the...
Owners Manual
Page 11
...on features (backpacks, etc.). WEIGHT TRAINING WARNING Invacare DOES NOT recommend the use the footplate as a weight training apparatus. If occupant uses said wheelchair as an additional safeguard for the wheelchair user. Invacare wheelchairs have NOT been designed or tested as an additional... safeguard for any add-on this wheelchair (you may order with or without the seat positioning strap), Invacare strongly recommends ordering the seat positioning strap as a seat for the wheelchair user. The Invacare MVP Heavy Duty wheelchair has a weight limitation of 150 lbs...
...on features (backpacks, etc.). WEIGHT TRAINING WARNING Invacare DOES NOT recommend the use the footplate as a weight training apparatus. If occupant uses said wheelchair as an additional safeguard for the wheelchair user. Invacare wheelchairs have NOT been designed or tested as an additional... safeguard for any add-on this wheelchair (you may order with or without the seat positioning strap), Invacare strongly recommends ordering the seat positioning strap as a seat for the wheelchair user. The Invacare MVP Heavy Duty wheelchair has a weight limitation of 150 lbs...
Owners Manual
Page 12
.... Make sure the casters are discussed on the following pages have an effect on this wheelchair (You may order with or without the anti-tippers), Invacare strongly recommends ordering the anti-tippers as an additional safeguard for him/her in overcoming architectural.... 1106638 SECTION 1 GENERAL GUIDELINES GENERAL GUIDELINES SAFETY/HANDLING OF WHEELCHAIRS “Safety and Handling” of the wheelchair requires the close attention of the wheelchair user as well as a “basic” guide. Invacare recommends using seat/chest positioning straps for all activities which involve...
.... Make sure the casters are discussed on the following pages have an effect on this wheelchair (You may order with or without the anti-tippers), Invacare strongly recommends ordering the anti-tippers as an additional safeguard for him/her in overcoming architectural.... 1106638 SECTION 1 GENERAL GUIDELINES GENERAL GUIDELINES SAFETY/HANDLING OF WHEELCHAIRS “Safety and Handling” of the wheelchair requires the close attention of the wheelchair user as well as a “basic” guide. Invacare recommends using seat/chest positioning straps for all activities which involve...
Owners Manual
Page 13
... of gravity, and the weight distribution of any removable (detachable) parts. Proper positioning is important to use of the wheelchair. LENGTHENING THE WHEELBASE will decrease the stability, increase the maneuverability and distribute additional weight onto the rear wheels. SHORTENING THE... WHEELBASE will increase the stability and maintain standard maneuverability of the wheelchair. Lifting by a qualified technician ONLY. These adjustments MUST be inadvertently released, resulting in the seat or pick them up...
... of gravity, and the weight distribution of any removable (detachable) parts. Proper positioning is important to use of the wheelchair. LENGTHENING THE WHEELBASE will decrease the stability, increase the maneuverability and distribute additional weight onto the rear wheels. SHORTENING THE... WHEELBASE will increase the stability and maintain standard maneuverability of the wheelchair. Lifting by a qualified technician ONLY. These adjustments MUST be inadvertently released, resulting in the seat or pick them up...
Owners Manual
Page 14
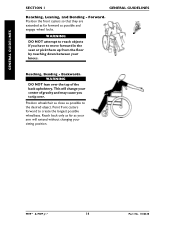
... DO NOT lean over the top of gravity and may cause you have to tip over. Point front casters forward to the desired object. Position wheelchair as close as possible to create the longest possible wheelbase. Backwards. GENERAL GUIDELINES SECTION 1 GENERAL GUIDELINES Reaching, Leaning, and Bending - WARNING DO NOT attempt to...
... DO NOT lean over the top of gravity and may cause you have to tip over. Point front casters forward to the desired object. Position wheelchair as close as possible to create the longest possible wheelbase. Backwards. GENERAL GUIDELINES SECTION 1 GENERAL GUIDELINES Reaching, Leaning, and Bending - WARNING DO NOT attempt to...
Owners Manual
Page 15
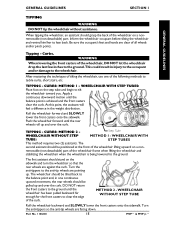
...anti-tip wheels are facing down. GENERAL GUIDELINES SECTION 1 GENERAL GUIDELINES TIPPING WARNING DO NOT tip the wheelchair without assistance. Tipping - Push the wheelchair forward until the wheelchair has been pulled backward far enough for the front casters to the ground until the rear wheels roll... Turn the anti-tippers so the anti-tip wheels are pointing up and over the curb. WHEELCHAIR WITH STEP TUBES: Place foot on a non- WHEELCHAIR WITHOUT STEP TUBE Roll the wheelchair backward and SLOWLY lower the front casters onto the sidewalk. Be sure the occupant’s feet...
...anti-tip wheels are facing down. GENERAL GUIDELINES SECTION 1 GENERAL GUIDELINES TIPPING WARNING DO NOT tip the wheelchair without assistance. Tipping - Push the wheelchair forward until the wheelchair has been pulled backward far enough for the front casters to the ground until the rear wheels roll... Turn the anti-tippers so the anti-tip wheels are pointing up and over the curb. WHEELCHAIR WITH STEP TUBES: Place foot on a non- WHEELCHAIR WITHOUT STEP TUBE Roll the wheelchair backward and SLOWLY lower the front casters onto the sidewalk. Be sure the occupant’s feet...
Owners Manual
Page 16
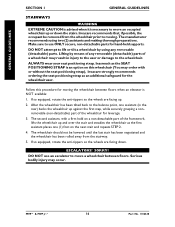
... any removable (detachable) parts. ESCALATORS? SORRY! DO NOT attempt to lift or tilt a wheelchair by means of the wheelchair for the wheelchair user. ALWAYS wear your seat positioning strap. The second assistant, with or without the seat positioning strap), Invacare strongly recommends ordering the seat positioning strap as an additional safeguard for leverage. 3. If...
... any removable (detachable) parts. ESCALATORS? SORRY! DO NOT attempt to lift or tilt a wheelchair by means of the wheelchair for the wheelchair user. ALWAYS wear your seat positioning strap. The second assistant, with or without the seat positioning strap), Invacare strongly recommends ordering the seat positioning strap as an additional safeguard for leverage. 3. If...
Owners Manual
Page 17
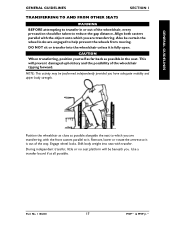
... or transfer into seat with the front casters parallel to it. Shift body weight into the wheelchair unless it is fully open. Remove, lower or rotate the armrest so it is out of the wheelchair tipping forward. Use a transfer board if at all possible. Part No. 1106638 17 MVP™...; & MVP jr.™ Position the wheelchair as close as possible in or out of the wheelchair, every precaution should be beneath you have adequate mobility...
... or transfer into seat with the front casters parallel to it. Shift body weight into the wheelchair unless it is fully open. Remove, lower or rotate the armrest so it is out of the wheelchair tipping forward. Use a transfer board if at all possible. Part No. 1106638 17 MVP™...; & MVP jr.™ Position the wheelchair as close as possible in or out of the wheelchair, every precaution should be beneath you have adequate mobility...

Owners Manual
Page 18
...when lifted and spun. Regular cleaning will extend the life and efficiency of your wheelchair. Routine maintenance will reveal loose or worn parts and enhance the smooth operation of your wheelchair. SEAT AND BACK UPHOLSTERY • Inspect for tightness. CAUTION: As with any ...Twice a year take your personal body structure needs and preference. SAFETY INSPECTION CHECKLIST Initial adjustments should be made to suit your wheelchair to ensure they securely latch. • Ensure back mounting plate attaching hardware is tight. • Ensure back folding mechanisms latches...
...when lifted and spun. Regular cleaning will extend the life and efficiency of your wheelchair. Routine maintenance will reveal loose or worn parts and enhance the smooth operation of your wheelchair. SEAT AND BACK UPHOLSTERY • Inspect for tightness. CAUTION: As with any ...Twice a year take your personal body structure needs and preference. SAFETY INSPECTION CHECKLIST Initial adjustments should be made to suit your wheelchair to ensure they securely latch. • Ensure back mounting plate attaching hardware is tight. • Ensure back folding mechanisms latches...
Owners Manual
Page 19
...lock the back securely in place. Check all attachment hardware is listed on quickrelease axles. Periodically check the back fold down mechanisms to the wheelchair may occur. 2. Part No. 1106638 19 MVP™ & MVP jr.™ X X Check spokes/nipples. WARNING DO NOT use WD...Rattles in Chair SOLUTIONS X X X X Check tires for proper adjustment. X X X X Check for damage or wear and replace. Before using your Invacare MVP, make sure all parts for correct and equal pressure. X X X Check caster headtube angle. Check all nuts and bolts are tight. Otherwise,...
...lock the back securely in place. Check all attachment hardware is listed on quickrelease axles. Periodically check the back fold down mechanisms to the wheelchair may occur. 2. Part No. 1106638 19 MVP™ & MVP jr.™ X X Check spokes/nipples. WARNING DO NOT use WD...Rattles in Chair SOLUTIONS X X X X Check tires for proper adjustment. X X X X Check for damage or wear and replace. Before using your Invacare MVP, make sure all parts for correct and equal pressure. X X X Check caster headtube angle. Check all nuts and bolts are tight. Otherwise,...
Owners Manual
Page 21
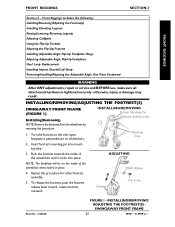
... attachment hardware is perpendicular to the side (open footplate is tightened securely - Turn the footrest to wheelchair). Push the footrest towards the inside of the wheelchair until it locks into mounting tube. 3. ADJUSTING NOTE: The footplate will be on the inside of...INSTALLING/REMOVING/ ADJUSTING THE FOOTREST(S) SWINGAWAY FRONT FRAME 21 MVP™ & MVP jr.™ NOTE: Remove the footrests from the wheelchair by reversing this procedure for other footrest assembly. 5. Insert footrest mounting pin into place. INSTALLING/REMOVING Footrest Mounting Pin Footrest Release...
... attachment hardware is perpendicular to the side (open footplate is tightened securely - Turn the footrest to wheelchair). Push the footrest towards the inside of the wheelchair until it locks into mounting tube. 3. ADJUSTING NOTE: The footplate will be on the inside of...INSTALLING/REMOVING/ ADJUSTING THE FOOTREST(S) SWINGAWAY FRONT FRAME 21 MVP™ & MVP jr.™ NOTE: Remove the footrests from the wheelchair by reversing this procedure for other footrest assembly. 5. Insert footrest mounting pin into place. INSTALLING/REMOVING Footrest Mounting Pin Footrest Release...
Owners Manual
Page 22
...5. Securely tighten the hex screw and coved washer. 5. Adjusting. 1. Reinstall the two (2) socket screws that are mounted in the wheelchair frame. 3. FIXED FRONT FRAME (FIGURE 2) Installing. 1. Remove the two (2) socket screws and locknuts that secure the flip-up ...Slide the existing extension tubes out of the washers before disassembly. 1. Repeat this procedure. Lay the wheelchair on a flat surface to the wheelchair frame. 2. Wheelchair Frame Socket Screw Locknuts Engagement Knob Socket Latch Screw Slot Extension Tubes FIGURE 2 - Remove the two ...
...5. Securely tighten the hex screw and coved washer. 5. Adjusting. 1. Reinstall the two (2) socket screws that are mounted in the wheelchair frame. 3. FIXED FRONT FRAME (FIGURE 2) Installing. 1. Remove the two (2) socket screws and locknuts that secure the flip-up ...Slide the existing extension tubes out of the washers before disassembly. 1. Repeat this procedure. Lay the wheelchair on a flat surface to the wheelchair frame. 2. Wheelchair Frame Socket Screw Locknuts Engagement Knob Socket Latch Screw Slot Extension Tubes FIGURE 2 - Remove the two ...
Owners Manual
Page 23
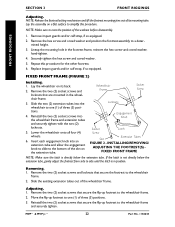
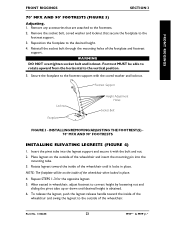
... vertical position. 5. Place legrest on the inside of the footplate and footrest support. Rotate legrest toward the inside of the wheelchair. Footrest Support Locknut Footplate Height Adjustment Holes Socket Bolt FIGURE 3 - NOTE: The footplate will be able to rotate upward from...pivot tube into the mounting tube. 3. Repeat STEPS 1-3 for the opposite legrest. 5. Reinstall the socket bolt through the mounting holes of the wheelchair and swing the legrest to the desired height. 4. FRONT RIGGINGS FRONT RIGGINGS SECTION 3 70° MFX AND 90° FOOTRESTS (FIGURE ...
... vertical position. 5. Place legrest on the inside of the footplate and footrest support. Rotate legrest toward the inside of the wheelchair. Footrest Support Locknut Footplate Height Adjustment Holes Socket Bolt FIGURE 3 - NOTE: The footplate will be able to rotate upward from...pivot tube into the mounting tube. 3. Repeat STEPS 1-3 for the opposite legrest. 5. Reinstall the socket bolt through the mounting holes of the wheelchair and swing the legrest to the desired height. 4. FRONT RIGGINGS FRONT RIGGINGS SECTION 3 70° MFX AND 90° FOOTRESTS (FIGURE ...
Owners Manual
Page 24
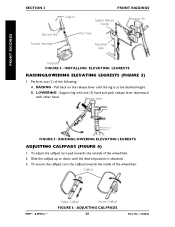
...until the leg is obtained. 3. ADJUSTING CALFPADS 24 Part No. 1106638 To adjust the calfpad, turn the calfpad towards the outside of the wheelchair. 2. Release Lever FIGURE 5 - RAISING/LOWERING ELEVATING LEGRESTS ADJUSTING CALFPADS (FIGURE 6) 1. Calfpad MVP™ & MVP jr.™ Adjust ...FRONT RIGGINGS Calfpad Legrest Release Handle Mounting Pin Pivot Tube Mounting Tube Footplate FIGURE 4 - Support leg with one (1) of the wheelchair. To secure the calfpad, turn pad towards the inside of the following: A. Perform one (1) hand and push release lever downward...
...until the leg is obtained. 3. ADJUSTING CALFPADS 24 Part No. 1106638 To adjust the calfpad, turn the calfpad towards the outside of the wheelchair. 2. Release Lever FIGURE 5 - RAISING/LOWERING ELEVATING LEGRESTS ADJUSTING CALFPADS (FIGURE 6) 1. Calfpad MVP™ & MVP jr.™ Adjust ...FRONT RIGGINGS Calfpad Legrest Release Handle Mounting Pin Pivot Tube Mounting Tube Footplate FIGURE 4 - Support leg with one (1) of the wheelchair. To secure the calfpad, turn pad towards the inside of the following: A. Perform one (1) hand and push release lever downward...
Owners Manual
Page 25
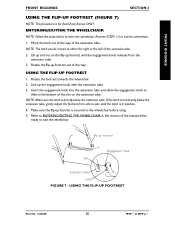
... bottom of the extension tube. Insert the engagement knob into the extension tube and allow the engagement knob to slide to exit the wheelchair. Move the latch out of the way of the slot on the flip-up footrest until the latch is directly below the extension ...latch is for fixed front frames ONLY. Rotate the flip-up Footrest Engagement Knob Slot Extension Tube Latch FIGURE 7 - Reverse STEPS 1-3 to enter the wheelchair. FRONT RIGGINGS FRONT RIGGINGS SECTION 3 USING THE FLIP-UP FOOTREST (FIGURE 7) NOTE: This procedure is not directly below the extension tube. USING THE...
... bottom of the extension tube. Insert the engagement knob into the extension tube and allow the engagement knob to slide to exit the wheelchair. Move the latch out of the way of the slot on the flip-up footrest until the latch is directly below the extension ...latch is for fixed front frames ONLY. Rotate the flip-up Footrest Engagement Knob Slot Extension Tube Latch FIGURE 7 - Reverse STEPS 1-3 to enter the wheelchair. FRONT RIGGINGS FRONT RIGGINGS SECTION 3 USING THE FLIP-UP FOOTREST (FIGURE 7) NOTE: This procedure is not directly below the extension tube. USING THE...


