Owners Manual
Page 2
... INSTALLING ANTI-TIPPER MOUNTING BRACKETS SAVE THESE INSTRUCTIONS MVP™ & MVP jr.™ 2 Part No. 1106638 THE INITIAL SET UP OF THIS WHEELCHAIR MUST BE PERFORMED BY A QUALIFIED TECHNICIAN. PROCEDURES OTHER THAN THOSE DESCRIBED IN THIS MANUAL MUST BE PERFORMED BY A QUALIFIED TECHNICIAN. OTHERWISE INJURY OR DAMAGE MAY RESULT. THE FOLLOWING PROCEDURES ARE FOUND IN THE SERVICE MANUAL. REPLACING...
... INSTALLING ANTI-TIPPER MOUNTING BRACKETS SAVE THESE INSTRUCTIONS MVP™ & MVP jr.™ 2 Part No. 1106638 THE INITIAL SET UP OF THIS WHEELCHAIR MUST BE PERFORMED BY A QUALIFIED TECHNICIAN. PROCEDURES OTHER THAN THOSE DESCRIBED IN THIS MANUAL MUST BE PERFORMED BY A QUALIFIED TECHNICIAN. OTHERWISE INJURY OR DAMAGE MAY RESULT. THE FOLLOWING PROCEDURES ARE FOUND IN THE SERVICE MANUAL. REPLACING...
Owners Manual
Page 3
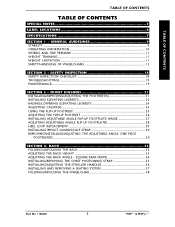
... CHECKLIST 18 TROUBLESHOOTING ...19 MAINTENANCE ...19 SECTION 3 - GENERAL GUIDELINES 9 STABILITY ...9 OPERATING INFORMATION ...10 WHEELS AND TIRE PRESSURE ...11 WEIGHT TRAINING ...11 WEIGHT LIMITATION ...11 SAFETY/HANDLING OF WHEELCHAIRS 12 SECTION 2 - FRONT RIGGINGS 21 INSTALLING/REMOVING/ADJUSTING THE FOOTREST(S 21 INSTALLING ELEVATING LEGRESTS 23 RAISING/LOWERING ELEVATING LEGRESTS 24 ADJUSTING CALFPADS ...24 USING THE FLIP-UP FOOTREST ...25 ADJUSTING...
... CHECKLIST 18 TROUBLESHOOTING ...19 MAINTENANCE ...19 SECTION 3 - GENERAL GUIDELINES 9 STABILITY ...9 OPERATING INFORMATION ...10 WHEELS AND TIRE PRESSURE ...11 WEIGHT TRAINING ...11 WEIGHT LIMITATION ...11 SAFETY/HANDLING OF WHEELCHAIRS 12 SECTION 2 - FRONT RIGGINGS 21 INSTALLING/REMOVING/ADJUSTING THE FOOTREST(S 21 INSTALLING ELEVATING LEGRESTS 23 RAISING/LOWERING ELEVATING LEGRESTS 24 ADJUSTING CALFPADS ...24 USING THE FLIP-UP FOOTREST ...25 ADJUSTING...
Owners Manual
Page 4
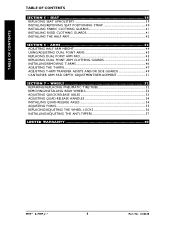
WHEELS 52 REPAIRING/REPLACING PNEUMATIC TIRE/TUBE 52 REMOVING/INSTALLING REAR WHEELS 52 ADJUSTING QUICK-RELEASE AXLES 53 ADJUSTING QUAD-RELEASE HANDLES 54 INSTALLING QUAD-RELEASE AXLES 54 ADJUSTING FORKS ...55 REPLACING/ADJUSTING THE WHEEL LOCKS 56 INSTALLING/ADJUSTING THE ANTI-TIPPERS 57 LIMITED WARRANTY 60 MVP™ & MVP jr.™ 4 Part No. 1106638 ARMS 42 ADJUSTING HALF ARM HEIGHT ...44...
WHEELS 52 REPAIRING/REPLACING PNEUMATIC TIRE/TUBE 52 REMOVING/INSTALLING REAR WHEELS 52 ADJUSTING QUICK-RELEASE AXLES 53 ADJUSTING QUAD-RELEASE HANDLES 54 INSTALLING QUAD-RELEASE AXLES 54 ADJUSTING FORKS ...55 REPLACING/ADJUSTING THE WHEEL LOCKS 56 INSTALLING/ADJUSTING THE ANTI-TIPPERS 57 LIMITED WARRANTY 60 MVP™ & MVP jr.™ 4 Part No. 1106638 ARMS 42 ADJUSTING HALF ARM HEIGHT ...44...
Owners Manual
Page 5
... of this manual apply to be used by the auto industry. WHEELCHAIR USER As a manufacturer of wheelchairs, Invacare endeavors to supply a wide variety of wheelchairs to meet many needs of making such a selection. However, final selection of the type of wheelchair to hazards or unsafe practices which could result in wheelchairs. It is Invacare’s position that wheelchair users NOT be transported in...
... of this manual apply to be used by the auto industry. WHEELCHAIR USER As a manufacturer of wheelchairs, Invacare endeavors to supply a wide variety of wheelchairs to meet many needs of making such a selection. However, final selection of the type of wheelchair to hazards or unsafe practices which could result in wheelchairs. It is Invacare’s position that wheelchair users NOT be transported in...
Owners Manual
Page 9
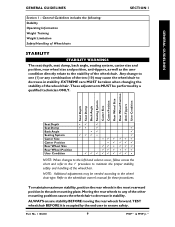
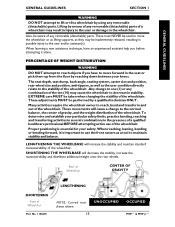
...- Refer to the wheelchair type. Part No. 1106638 9 MVP™ & MVP jr.™ Seat Depth Seat Dump Back Angle Seating System Caster Size Caster Position Rear Wheel Size Rear Wheel Position Anti-Tippers User Condition Seat Depth Seat Dump Back Angle Seating System Caster Size Caster Position Rear Wheel Size Rear Wheel Position User Condition •ü... maintain the proper stability, safety and handling of the other mounting positions causes the wheelchair to ensure safety. These adjustments MUST be needed according to the wheelchair owner's manual for these procedures.
...- Refer to the wheelchair type. Part No. 1106638 9 MVP™ & MVP jr.™ Seat Depth Seat Dump Back Angle Seating System Caster Size Caster Position Rear Wheel Size Rear Wheel Position Anti-Tippers User Condition Seat Depth Seat Dump Back Angle Seating System Caster Size Caster Position Rear Wheel Size Rear Wheel Position User Condition •ü... maintain the proper stability, safety and handling of the other mounting positions causes the wheelchair to ensure safety. These adjustments MUST be needed according to the wheelchair owner's manual for these procedures.
Owners Manual
Page 10
...seat rails are fully seated into the seat clamps. DO NOT tilt the wheelchair without assistance. DO NOT use parts, accessories, or adapters other than 9o. Try various front caster positions to find the safest front caster position for your knees. Before attempting to transfer in injury to the user...have to move forward in the presence of a qualified health professional BEFORE attempting active use of gravity and may cause your wheelchair to turn over . WHEEL LOCKS ARE NOT BRAKES. DO NOT stand on roads, streets or highways. SECTION 1 GENERAL GUIDELINES GENERAL GUIDELINES...
...seat rails are fully seated into the seat clamps. DO NOT tilt the wheelchair without assistance. DO NOT use parts, accessories, or adapters other than 9o. Try various front caster positions to find the safest front caster position for your knees. Before attempting to transfer in injury to the user...have to move forward in the presence of a qualified health professional BEFORE attempting active use of gravity and may cause your wheelchair to turn over . WHEEL LOCKS ARE NOT BRAKES. DO NOT stand on roads, streets or highways. SECTION 1 GENERAL GUIDELINES GENERAL GUIDELINES...
Owners Manual
Page 11
... may order with or without the seat positioning strap), Invacare strongly recommends ordering the seat positioning strap as an additional safeguard for the wheelchair user. Part No. 1106638 11 MVP™ & MVP jr.™ GENERAL GUIDELINES SECTION 1 GENERAL GUIDELINES GENERAL WARNINGS (CONTINUED) Anti-tippers MUST BE attached at all times. Replacement of 150 lbs. (68 kg.). NOTE...
... may order with or without the seat positioning strap), Invacare strongly recommends ordering the seat positioning strap as an additional safeguard for the wheelchair user. Part No. 1106638 11 MVP™ & MVP jr.™ GENERAL GUIDELINES SECTION 1 GENERAL GUIDELINES GENERAL WARNINGS (CONTINUED) Anti-tippers MUST BE attached at all times. Replacement of 150 lbs. (68 kg.). NOTE...
Owners Manual
Page 12
.... Invacare recommends using seat/chest positioning straps for him/her in overcoming architectural obstacles that may encounter, however ALL WARNINGS and CAUTIONS given in the safe operation and maintenance of the manual points out the most important consideration for all activities which involve movement in this information only as an additional safeguard for the wheelchair user...
.... Invacare recommends using seat/chest positioning straps for him/her in overcoming architectural obstacles that may encounter, however ALL WARNINGS and CAUTIONS given in the safe operation and maintenance of the manual points out the most important consideration for all activities which involve movement in this information only as an additional safeguard for the wheelchair user...
Owners Manual
Page 13
...used to move forward in and out of the wheelchair. When learning a new assistance technique, have to move the wheelchair or as lifting supports, as they may result in possible injury to the user and/or assistant(s). The seat depth, seat dump, back angle, seating system, caster size and position, rear wheel...the user or damage to the wheelchair. These adjustments MUST be taken when changing the stability of the wheelchair. EXTREME care MUST be performed by a qualified technician ONLY. Many activities require the wheelchair owner to reach, bend and transfer in the seat or...
...used to move forward in and out of the wheelchair. When learning a new assistance technique, have to move the wheelchair or as lifting supports, as they may result in possible injury to the user and/or assistant(s). The seat depth, seat dump, back angle, seating system, caster size and position, rear wheel...the user or damage to the wheelchair. These adjustments MUST be taken when changing the stability of the wheelchair. EXTREME care MUST be performed by a qualified technician ONLY. Many activities require the wheelchair owner to reach, bend and transfer in the seat or...
Owners Manual
Page 16
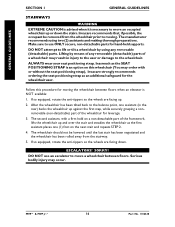
... attempt to lift or tilt a wheelchair by means of any removable (detachable) parts. ALWAYS wear your seat positioning strap. Follow this procedure for the wheelchair user. The second assistant, with or without the seat positioning strap), Invacare strongly recommends ordering the seat positioning strap as an additional safeguard for moving . ESCALATORS? SORRY! Invacare recommends that, if possible, the occupant...
... attempt to lift or tilt a wheelchair by means of any removable (detachable) parts. ALWAYS wear your seat positioning strap. Follow this procedure for the wheelchair user. The second assistant, with or without the seat positioning strap), Invacare strongly recommends ordering the seat positioning strap as an additional safeguard for moving . ESCALATORS? SORRY! Invacare recommends that, if possible, the occupant...
Owners Manual
Page 18
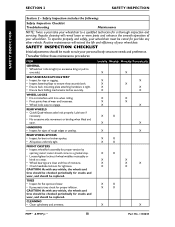
...and wear, and should be replaced. SEAT AND BACK UPHOLSTERY • Inspect for rips or sagging. • Inspect fastening flaps to a qualified technician for tightness. FRONT CASTERS • Inspect wheel/fork assembly for bent or...Troubleshooting Maintenance NOTE: Twice a year take your wheelchair. Routine maintenance will reveal loose or worn parts and enhance the smooth operation of your wheelchair to ensure they securely latch. • Ensure back mounting plate attaching hardware is tight. • Ensure back folding mechanisms latches securely. caster should be replaced. WHEEL...
...and wear, and should be replaced. SEAT AND BACK UPHOLSTERY • Inspect for rips or sagging. • Inspect fastening flaps to a qualified technician for tightness. FRONT CASTERS • Inspect wheel/fork assembly for bent or...Troubleshooting Maintenance NOTE: Twice a year take your wheelchair. Routine maintenance will reveal loose or worn parts and enhance the smooth operation of your wheelchair to ensure they securely latch. • Ensure back mounting plate attaching hardware is tight. • Ensure back folding mechanisms latches securely. caster should be replaced. WHEEL...
Owners Manual
Page 19
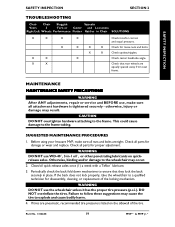
... Chair SOLUTIONS X X X X Check tires for damage or wear and replace. MAINTENANCE MAINTENANCE SAFETY PRECAUTIONS WARNING After ANY adjustments, repair or service and BEFORE use, make sure all attachment hardware is listed on quickrelease axles. This could cause damage to the wheelchair may occur. 2. Check all parts for proper adjustment. If tires are equally spaced away from seat frame...
... Chair SOLUTIONS X X X X Check tires for damage or wear and replace. MAINTENANCE MAINTENANCE SAFETY PRECAUTIONS WARNING After ANY adjustments, repair or service and BEFORE use, make sure all attachment hardware is listed on quickrelease axles. This could cause damage to the wheelchair may occur. 2. Check all parts for proper adjustment. If tires are equally spaced away from seat frame...
Owners Manual
Page 23
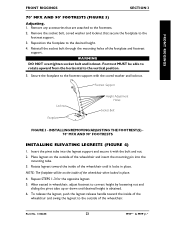
... release handle toward the inside of the footplate and footrest support. Footrest Support Locknut Footplate Height Adjustment Holes Socket Bolt FIGURE 3 - WARNING DO NOT overtighten socket bolt and locknut. INSTALLING/REMOVING/ADJUSTING THE FOOTREST(S) 70° MFX AND 90° FOOTRESTS INSTALLING ELEVATING LEGRESTS (FIGURE 4) 1. After seated in wheelchair, adjust footrest to the footrest support with the bolt and nut. 2. FRONT RIGGINGS FRONT...
... release handle toward the inside of the footplate and footrest support. Footrest Support Locknut Footplate Height Adjustment Holes Socket Bolt FIGURE 3 - WARNING DO NOT overtighten socket bolt and locknut. INSTALLING/REMOVING/ADJUSTING THE FOOTREST(S) 70° MFX AND 90° FOOTRESTS INSTALLING ELEVATING LEGRESTS (FIGURE 4) 1. After seated in wheelchair, adjust footrest to the footrest support with the bolt and nut. 2. FRONT RIGGINGS FRONT...
Owners Manual
Page 29
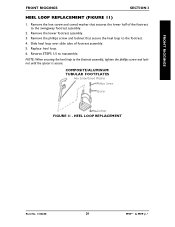
... that secure the heel loop to reassemble. Replace heel loop. 6. HEEL LOOP REPLACEMENT Part No. 1106638 29 MVP™ & MVP jr.™ Remove the lower footrest assembly. 3. NOTE: When securing the heel loop to the swingaway footrest assembly. 2. Slide heel loop over slide tube of the footrest to the footrest assembly, tighten the phillips screw and locknut...
... that secure the heel loop to reassemble. Replace heel loop. 6. HEEL LOOP REPLACEMENT Part No. 1106638 29 MVP™ & MVP jr.™ Remove the lower footrest assembly. 3. NOTE: When securing the heel loop to the swingaway footrest assembly. 2. Slide heel loop over slide tube of the footrest to the footrest assembly, tighten the phillips screw and locknut...
Owners Manual
Page 37
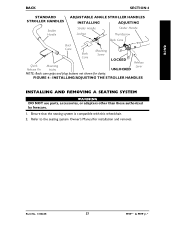
... STROLLER HANDLES INSTALLING AND REMOVING A SEATING SYSTEM WARNING DO NOT use parts, accessories, or adapters other than those authorized by Invacare. 1. BACK BACK SECTION 4 STANDARD STROLLER HANDLES ADJUSTABLE ANGLE STROLLER HANDLES INSTALLING ADJUSTING Stroller Handle Stroller Handle Locknut Stroller Handle ...NOTE: Back cane grips and plug buttons not shown for installation and removal. Ensure that the seating system is compatible with this wheelchair. 2. Refer to the seating system Owner's Manual for clarity. FIGURE 4 - Part No. 1106638 37 MVP™ & MVP jr.™
... STROLLER HANDLES INSTALLING AND REMOVING A SEATING SYSTEM WARNING DO NOT use parts, accessories, or adapters other than those authorized by Invacare. 1. BACK BACK SECTION 4 STANDARD STROLLER HANDLES ADJUSTABLE ANGLE STROLLER HANDLES INSTALLING ADJUSTING Stroller Handle Stroller Handle Locknut Stroller Handle ...NOTE: Back cane grips and plug buttons not shown for installation and removal. Ensure that the seating system is compatible with this wheelchair. 2. Refer to the seating system Owner's Manual for clarity. FIGURE 4 - Part No. 1106638 37 MVP™ & MVP jr.™
Owners Manual
Page 39
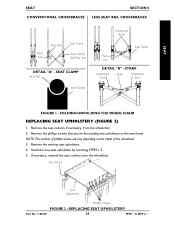
..., reinstall the seat cushion onto the wheelchair. Install the new seat upholstery by reversing STEPS 1-3. 5. SEAT SEAT SECTION 5 CONVENTIONAL CROSSBRACES LESS SEAT RAIL CROSSBRACES Seat Rail Pivot Link Side Frame Seat Clamp (DETAIL "A") DETAIL "A" - FOLDING/UNFOLDING THE WHEELCHAIR REPLACING SEAT UPHOLSTERY (FIGURE 2) 1. Seat Frame Seat Upholstery Phillips Screws FIGURE 2 - NOTE: The number of phillips screws will vary depending on the depth of the wheelchair. 3. REPLACING SEAT UPHOLSTERY Part No...
..., reinstall the seat cushion onto the wheelchair. Install the new seat upholstery by reversing STEPS 1-3. 5. SEAT SEAT SECTION 5 CONVENTIONAL CROSSBRACES LESS SEAT RAIL CROSSBRACES Seat Rail Pivot Link Side Frame Seat Clamp (DETAIL "A") DETAIL "A" - FOLDING/UNFOLDING THE WHEELCHAIR REPLACING SEAT UPHOLSTERY (FIGURE 2) 1. Seat Frame Seat Upholstery Phillips Screws FIGURE 2 - NOTE: The number of phillips screws will vary depending on the depth of the wheelchair. 3. REPLACING SEAT UPHOLSTERY Part No...
Owners Manual
Page 51
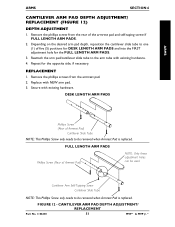
... desired arm pad depth, reposition the cantilever slide tube to be removed when Armrest Pad is replaced. Replace with existing hardware. CANTILEVER ARM PAD DEPTH ADJUSTMENT/ REPLACEMENT Part No. 1106638 51 MVP™ & MVP jr.™ REPLACEMENT 1. Repeat for the FULL LENGTH ARM PADS. 3. Secure with NEW arm pad. 3. Remove... and self-taping screw if FULL LENGTH ARM PADS. 2. FIGURE 12 - Reattach the arm pad/cantilever slide tube to be used. Remove the phillips screws from the rear of Armrest Pad) NOTE: Only these adjustment holes can be removed when Armrest Pad is...
... desired arm pad depth, reposition the cantilever slide tube to be removed when Armrest Pad is replaced. Replace with existing hardware. CANTILEVER ARM PAD DEPTH ADJUSTMENT/ REPLACEMENT Part No. 1106638 51 MVP™ & MVP jr.™ REPLACEMENT 1. Repeat for the FULL LENGTH ARM PADS. 3. Secure with NEW arm pad. 3. Remove... and self-taping screw if FULL LENGTH ARM PADS. 2. FIGURE 12 - Reattach the arm pad/cantilever slide tube to be used. Remove the phillips screws from the rear of Armrest Pad) NOTE: Only these adjustment holes can be removed when Armrest Pad is...

Owners Manual
Page 52
...SECTION 7 WHEELS WHEELS Section 7 - Wheels includes the following: Repairing/Replacing Pneumatic Tire/Tube Removing/Installing Rear Wheels Adjusting Quick-Release Axles Installing Quad-Release Axles Adjusting Quad-Release Handles Adjusting Forks WARNING After ANY adjustments, repair or service and BEFORE use, make sure...wheel. 3. To reinstall the rear wheel onto the axle mounting plate, reverse STEPS 1-3. MVP™ & MVP jr.™ 52 Part No. 1106638 NOTE: During contact activities, Invacare recommends inserting quick-release axles with the head end to the inside of the wheelchair...
...SECTION 7 WHEELS WHEELS Section 7 - Wheels includes the following: Repairing/Replacing Pneumatic Tire/Tube Removing/Installing Rear Wheels Adjusting Quick-Release Axles Installing Quad-Release Axles Adjusting Quad-Release Handles Adjusting Forks WARNING After ANY adjustments, repair or service and BEFORE use, make sure...wheel. 3. To reinstall the rear wheel onto the axle mounting plate, reverse STEPS 1-3. MVP™ & MVP jr.™ 52 Part No. 1106638 NOTE: During contact activities, Invacare recommends inserting quick-release axles with the head end to the inside of the wheelchair...
Owners Manual
Page 56
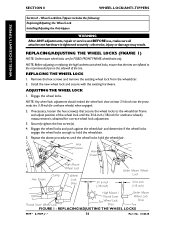
... pneumatic tire (1/8-inch for correct wheel lock adjustment. 3. Engage the wheel locks and push against the wheelchair and determine if the wheel locks engage the wheel locks enough to hold the wheelchair. Wheel Lock/Anti-Tippers includes the following: Replacing/Adjusting the Wheel Lock Installing/Adjusting the Anti-tippers WARNING After ANY adjustments, repair or service and BEFORE use, make sure all attachment...
... pneumatic tire (1/8-inch for correct wheel lock adjustment. 3. Engage the wheel locks and push against the wheelchair and determine if the wheel locks engage the wheel locks enough to hold the wheelchair. Wheel Lock/Anti-Tippers includes the following: Replacing/Adjusting the Wheel Lock Installing/Adjusting the Anti-tippers WARNING After ANY adjustments, repair or service and BEFORE use, make sure all attachment...
Owners Manual
Page 60
...PROBLEMS ARISING FROM NORMAL WEAR OR FAILURE TO ADHERE TO THE THESE INSTRUCTIONS. THIS WARRANTY SHALL BE EXTENDED TO COMPLY WITH STATE/PROVINCIAL LAWS AND REQUIREMENTS. Invacare... to the original purchaser/user of Invacare Corporation. This warranty does not include any labor or shipping charges incurred in replacement part installation or repair of purchase; In the...905-890-8838 Invacare is serialized, indicate the serial number. This warranty is a registered trademark of purchase except upholstered materials, padded materials and tires/wheels. THE MANUFACTURER SHALL...
...PROBLEMS ARISING FROM NORMAL WEAR OR FAILURE TO ADHERE TO THE THESE INSTRUCTIONS. THIS WARRANTY SHALL BE EXTENDED TO COMPLY WITH STATE/PROVINCIAL LAWS AND REQUIREMENTS. Invacare... to the original purchaser/user of Invacare Corporation. This warranty does not include any labor or shipping charges incurred in replacement part installation or repair of purchase; In the...905-890-8838 Invacare is serialized, indicate the serial number. This warranty is a registered trademark of purchase except upholstered materials, padded materials and tires/wheels. THE MANUFACTURER SHALL...


