

Owners Manual
Page 5
TABLE OF CONTENTS TABLE OF CONTENTS SECTION 13-BATTERIES 58 Warnings For Handling and Replacing Batteries 58 Using the Proper Batteries...58 Removing/Installing the Batteries...59 Connecting/Disconnecting Battery Cables 61 Charging Batteries ...63 Battery Charger Operation...64 SECTION 14-ACCESSORIES 66 Installing/Removing the Crutch/Cane Holder 66 Installing/Removing the Oxygen Holder 67 Installing/Removing/Using the Walker Holder 68 NOTES 70 GLOBAL LIMITED WARRANTY (EXCLUDING CANADA 71 CANADA LIMITED WARRANTY 72 Part No. 1143206 5 Pronto® M41 with SureStep®
TABLE OF CONTENTS TABLE OF CONTENTS SECTION 13-BATTERIES 58 Warnings For Handling and Replacing Batteries 58 Using the Proper Batteries...58 Removing/Installing the Batteries...59 Connecting/Disconnecting Battery Cables 61 Charging Batteries ...63 Battery Charger Operation...64 SECTION 14-ACCESSORIES 66 Installing/Removing the Crutch/Cane Holder 66 Installing/Removing the Oxygen Holder 67 Installing/Removing/Using the Walker Holder 68 NOTES 70 GLOBAL LIMITED WARRANTY (EXCLUDING CANADA 71 CANADA LIMITED WARRANTY 72 Part No. 1143206 5 Pronto® M41 with SureStep®

Owners Manual
Page 66
... turning the wheelchair or swiveling the wheelchair seat, it is important to take note of the seat. 3. NOTE: The Crutch/Cane Holder, Oxygen Holder, and Walker Holder all attaching hardware is tightened securely - If necessary, loosen but do not remove the mounting knob. 2. Install the crutch/cane holder into the accessory...
... turning the wheelchair or swiveling the wheelchair seat, it is important to take note of the seat. 3. NOTE: The Crutch/Cane Holder, Oxygen Holder, and Walker Holder all attaching hardware is tightened securely - If necessary, loosen but do not remove the mounting knob. 2. Install the crutch/cane holder into the accessory...

Owners Manual
Page 67
otherwise, injury or damage may be installed at a time. 1. NOTE: The Crutch/Cane Holder, Oxygen Holder, and Walker Holder all install into the welded nut on the accessory tube. 3. Thread the two clamp knobs through the two welded nuts on the upper ... may occur. NOTE: For this increased length - NOTE: Reverse the following procedure to FIGURE 14.2 on the end of the wheelchair. Repeat STEP 4 for Invacare wheelchairs only. When turning the wheelchair it . 4. Install the mounting tube of the oxygen holder into the accessory tube located on the lower support of...
otherwise, injury or damage may be installed at a time. 1. NOTE: The Crutch/Cane Holder, Oxygen Holder, and Walker Holder all install into the welded nut on the accessory tube. 3. Thread the two clamp knobs through the two welded nuts on the upper ... may occur. NOTE: For this increased length - NOTE: Reverse the following procedure to FIGURE 14.2 on the end of the wheelchair. Repeat STEP 4 for Invacare wheelchairs only. When turning the wheelchair it . 4. Install the mounting tube of the oxygen holder into the accessory tube located on the lower support of...
Owners Manual
Page 68
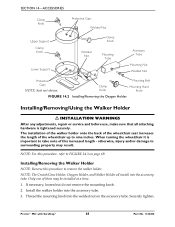
... time. 1. NOTE: The Crutch/Cane Holder, Oxygen Holder, and Walker Holder all attaching hardware is important to remove the walker holder. Thread the mounting knob into the accessory tube. 3. The installation of the walker holder onto the back of the wheelchair seat increases the length of... Mounting Tube Accessory Tube Mounting Nut Welded Nut Protective Caps NOTE: Seat not shown. Install the walker holder into the welded nut on page 69. Installing/Removing the Walker Holder NOTE: Reverse this procedure, refer to nine inches. Clamp Knob Mounting Bolt Mounting Hand Knob...
... time. 1. NOTE: The Crutch/Cane Holder, Oxygen Holder, and Walker Holder all attaching hardware is important to remove the walker holder. Thread the mounting knob into the accessory tube. 3. The installation of the walker holder onto the back of the wheelchair seat increases the length of... Mounting Tube Accessory Tube Mounting Nut Welded Nut Protective Caps NOTE: Seat not shown. Install the walker holder into the welded nut on page 69. Installing/Removing the Walker Holder NOTE: Reverse this procedure, refer to nine inches. Clamp Knob Mounting Bolt Mounting Hand Knob...
Owners Manual
Page 69
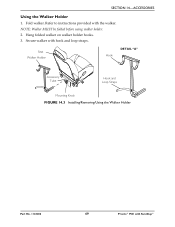
Fold walker. NOTE: Walker MUST be folded before using walker holder. 2. Seat Walker Holder Hook DETAIL "A" Accessory Tube Hook and Loop Straps Mounting Knob FIGURE 14.3 Installing/Removing/Using the Walker Holder Part No. 1143206 69 Pronto® M41 with the walker. Hang folded walker on walker holder hooks. 3. SECTION 14-ACCESSORIES Using the Walker Holder 1. Refer to instructions provided with SureStep® Secure walker with hook and loop straps.
Fold walker. NOTE: Walker MUST be folded before using walker holder. 2. Seat Walker Holder Hook DETAIL "A" Accessory Tube Hook and Loop Straps Mounting Knob FIGURE 14.3 Installing/Removing/Using the Walker Holder Part No. 1143206 69 Pronto® M41 with the walker. Hang folded walker on walker holder hooks. 3. SECTION 14-ACCESSORIES Using the Walker Holder 1. Refer to instructions provided with SureStep® Secure walker with hook and loop straps.