

Owners Manual
Page 1
REFER TO THE INFORMATION ON PAGE 7 OF THIS MANUAL. For more information regarding Invacare products, parts, and services, please visit: www.invacare.com Owner's Operator And Maintenance Manual ® EXCELERATOR™ SERIES Excelerator™ Li'l Excelerator™ DEALER: THIS MANUAL MUST BE GIVEN TO THE USER OF THE HANDCYCLE. USER: BEFORE USING THIS HANDCYCLE, READ THIS MANUAL AND SAVE FOR FUTURE REFERENCE.
REFER TO THE INFORMATION ON PAGE 7 OF THIS MANUAL. For more information regarding Invacare products, parts, and services, please visit: www.invacare.com Owner's Operator And Maintenance Manual ® EXCELERATOR™ SERIES Excelerator™ Li'l Excelerator™ DEALER: THIS MANUAL MUST BE GIVEN TO THE USER OF THE HANDCYCLE. USER: BEFORE USING THIS HANDCYCLE, READ THIS MANUAL AND SAVE FOR FUTURE REFERENCE.
Owners Manual
Page 2
OTHERWISE INJURY OR DAMAGE MAY RESULT. SAVE THESE INSTRUCTIONS Excelerator™Series 2 Part No. 1056188 WARNING WARNING WARNING DO NOT OPERATE THIS EQUIPMENT WITHOUT FIRST READING AND UNDERSTANDING THIS MANUAL. IF YOU ARE UNABLE TO UNDERSTAND THE WARNINGS, CAUTIONS, AND INSTRUCTIONS, CONTACT YOUR INVACARE DEALER OR INVACARE CUSTOMER SUPPORT AT (800) 532-8677 BEFORE ATTEMPTING TO USE THIS EQUIPMENT - THE INITIAL SET UP OF THIS WHEELCHAIR MUST BE PERFORMED BY A QUALIFIED TECHNICIAN.
OTHERWISE INJURY OR DAMAGE MAY RESULT. SAVE THESE INSTRUCTIONS Excelerator™Series 2 Part No. 1056188 WARNING WARNING WARNING DO NOT OPERATE THIS EQUIPMENT WITHOUT FIRST READING AND UNDERSTANDING THIS MANUAL. IF YOU ARE UNABLE TO UNDERSTAND THE WARNINGS, CAUTIONS, AND INSTRUCTIONS, CONTACT YOUR INVACARE DEALER OR INVACARE CUSTOMER SUPPORT AT (800) 532-8677 BEFORE ATTEMPTING TO USE THIS EQUIPMENT - THE INITIAL SET UP OF THIS WHEELCHAIR MUST BE PERFORMED BY A QUALIFIED TECHNICIAN.
Owners Manual
Page 3
... Part No. 1056188 3 Excelerator™Series OPERATION 20 Shifting Gears...21 Backing Up ...22 Braking ...22 Parking Brake ...22 Steering/Cornering ...22 Hand Crank Height Adjustment ...23 Footrest Adjustment/Replacement ...23 SECTION 5 - WHEELS 27 Installing/Adjusting the Rear Wheels and Quick-Release Axles 27 Tire/Tube Replacement and Tuning/Replacement of the handcycle 13 SECTION 2 - RIDING POSITION 23 Sliding Seat Adjustment/Replacement...
... Part No. 1056188 3 Excelerator™Series OPERATION 20 Shifting Gears...21 Backing Up ...22 Braking ...22 Parking Brake ...22 Steering/Cornering ...22 Hand Crank Height Adjustment ...23 Footrest Adjustment/Replacement ...23 SECTION 5 - WHEELS 27 Installing/Adjusting the Rear Wheels and Quick-Release Axles 27 Tire/Tube Replacement and Tuning/Replacement of the handcycle 13 SECTION 2 - RIDING POSITION 23 Sliding Seat Adjustment/Replacement...
Owners Manual
Page 4
....invacare.com - SERVICE PROCEDURES 30 Fork Assembly Installation ...30 Tension Spring Installation ...30 Seven (7) Speed Shifter Cable Installation 31 Seven (7) Speed Shifter Adjustment/Replacement 31 Seven (7) Speed Hub Chain Installation 32 Chain Adjustment ...33 Parking Brake Adjustment/Replacement 34 Seat Upholstery Replacement ...35 Back Upholstery Replacement ...36 SECTION 8 - OPTIONS 37 Water Bottle Installation ...37 Rear Safety Light ...38 Tow Bar Installation and Use ...38 Seat Positioning Strap Installation...
....invacare.com - SERVICE PROCEDURES 30 Fork Assembly Installation ...30 Tension Spring Installation ...30 Seven (7) Speed Shifter Cable Installation 31 Seven (7) Speed Shifter Adjustment/Replacement 31 Seven (7) Speed Hub Chain Installation 32 Chain Adjustment ...33 Parking Brake Adjustment/Replacement 34 Seat Upholstery Replacement ...35 Back Upholstery Replacement ...36 SECTION 8 - OPTIONS 37 Water Bottle Installation ...37 Rear Safety Light ...38 Tow Bar Installation and Use ...38 Seat Positioning Strap Installation...
Owners Manual
Page 5
...use at www.invacare.com - Would you like to see on this form Name Address City State/Province __________ Zip/Postal Code ________ Email Phone No Fold here Invacare Model No Serial No Purchased From Date of Purchase:___________ Cut Along Line 1. This product was purchased for Invacare...if any condition(s) here and we will send you to receive updated information via email or regular mail about the Invacare home medical products sold by email and/or mail about our products, visit www.invacare.com. PRODUCT REGISTRATION FORM Register ONLINE at : ❏ ...
...use at www.invacare.com - Would you like to see on this form Name Address City State/Province __________ Zip/Postal Code ________ Email Phone No Fold here Invacare Model No Serial No Purchased From Date of Purchase:___________ Cut Along Line 1. This product was purchased for Invacare...if any condition(s) here and we will send you to receive updated information via email or regular mail about the Invacare home medical products sold by email and/or mail about our products, visit www.invacare.com. PRODUCT REGISTRATION FORM Register ONLINE at : ❏ ...
Owners Manual
Page 7
... A SEATING POSITIONING STRAP IS REQUIRED TO ENSURE THE SAFE OPERATION OF THIS EQUIPMENT BY THE USER. HANDCYCLE TIE-DOWN RESTRAINTS AND SEAT POSITIONING STRAPS Invacare recommends that handcycle users NOT be used in this manual apply to...USER As a manufacturer of handcycles, Invacare endeavors to supply a handcycle to an Invacare qualified technician or a Shimano® certified bicycle repair technician. SPECIAL NOTES WARNING/CAUTION notices as used by an individual rests solely with the user and his/her health care professional capable of any tie-down systems for transportation of a user...
... A SEATING POSITIONING STRAP IS REQUIRED TO ENSURE THE SAFE OPERATION OF THIS EQUIPMENT BY THE USER. HANDCYCLE TIE-DOWN RESTRAINTS AND SEAT POSITIONING STRAPS Invacare recommends that handcycle users NOT be used in this manual apply to...USER As a manufacturer of handcycles, Invacare endeavors to supply a handcycle to an Invacare qualified technician or a Shimano® certified bicycle repair technician. SPECIAL NOTES WARNING/CAUTION notices as used by an individual rests solely with the user and his/her health care professional capable of any tie-down systems for transportation of a user...

Owners Manual
Page 10
...seat or frame of the handcycle. Slow down an incline with reversing drum brake. Doing so may result in injury to the user or damage to the handcycle. Lifting by means of any removable (detachable) parts..., streets or highways. Excelerator™Series 10 Part No. 1056188 Use proper hand signals when turning. DO NOT use of a safety light and reflectors for dusk/night riding.) Give pedestrians... (This may obstruct your health care professional (doctor - This should be performed by Invacare. DO NOT carry any transfers. Position the handcycle on level ground and as close...
...seat or frame of the handcycle. Slow down an incline with reversing drum brake. Doing so may result in injury to the user or damage to the handcycle. Lifting by means of any removable (detachable) parts..., streets or highways. Excelerator™Series 10 Part No. 1056188 Use proper hand signals when turning. DO NOT use of a safety light and reflectors for dusk/night riding.) Give pedestrians... (This may obstruct your health care professional (doctor - This should be performed by Invacare. DO NOT carry any transfers. Position the handcycle on level ground and as close...
Owners Manual
Page 12
...supports or to the user and/or assistant. STABILITY AND BALANCE For stability and proper operation of your handcycle, you are a starting point for the new handcycle user and assistant with daily living activities that may be inadvertently released, resulting in possible injury to move the handcycle, as a "basic" guide... WEIGHT DISTRIBUTION Transferring in the presence of detachable parts. Use this manual. Invacare recommends using seat positioning straps for additional safety. Also, be used successfully by many. Individual users often develop skills to the normal balance, the...
...supports or to the user and/or assistant. STABILITY AND BALANCE For stability and proper operation of your handcycle, you are a starting point for the new handcycle user and assistant with daily living activities that may be inadvertently released, resulting in possible injury to move the handcycle, as a "basic" guide... WEIGHT DISTRIBUTION Transferring in the presence of detachable parts. Use this manual. Invacare recommends using seat positioning straps for additional safety. Also, be used successfully by many. Individual users often develop skills to the normal balance, the...

Owners Manual
Page 13
... may be difficult to wedge the transfer board between the wheelchair seat and the handcycle seat, use a transfer board if necessary. NOTE: Refer to STEPS...parking brake on level ground and as close as possible along side the object to/from a wheelchair. 7. Refer to SLIDING SEAT ADJUSTMENT/REPLACEMENT ...manual. 6. Secure the object that you are transferring into or out of . Apply wheel locks (if installed) if the object is a wheelchair. Position the handcycle on the handcycle. 4. If necessary, adjust the seat position of MUST also be taken to reduce the gap distance. The parking brake...
... may be difficult to wedge the transfer board between the wheelchair seat and the handcycle seat, use a transfer board if necessary. NOTE: Refer to STEPS...parking brake on level ground and as close as possible along side the object to/from a wheelchair. 7. Refer to SLIDING SEAT ADJUSTMENT/REPLACEMENT ...manual. 6. Secure the object that you are transferring into or out of . Apply wheel locks (if installed) if the object is a wheelchair. Position the handcycle on the handcycle. 4. If necessary, adjust the seat position of MUST also be taken to reduce the gap distance. The parking brake...
Owners Manual
Page 15
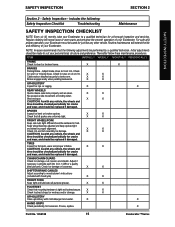
... and proper operation, your Excelerator. X X BRAKES Parking Brake - X X Check footrest straps for looseness. X X No excessive side movement or binding when lifted and spun. SAFETY INSPECTION SECTION 2 SAFETY INSPECTION Section 2 - Keep wheel bearings adjusted and keep spokes tight and wheel in proper alignment. X X FOOTREST Check that the following : Safety Inspection Checklist Troubleshooting Maintenance SAFETY INSPECTION CHECKLIST NOTE: Every...
... and proper operation, your Excelerator. X X BRAKES Parking Brake - X X Check footrest straps for looseness. X X No excessive side movement or binding when lifted and spun. SAFETY INSPECTION SECTION 2 SAFETY INSPECTION Section 2 - Keep wheel bearings adjusted and keep spokes tight and wheel in proper alignment. X X FOOTREST Check that the following : Safety Inspection Checklist Troubleshooting Maintenance SAFETY INSPECTION CHECKLIST NOTE: Every...
Owners Manual
Page 16
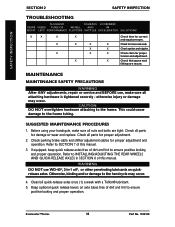
...repair or service and BEFORE use WD-40®, 3-in SECTION 6 of this manual. Check parking brake cable and shifter adjustment cables for correct and equal pressure. WARNING DO NOT use , make sure all attaching hardware is tightened securely - SAFETY INSPECTION SECTION 2 SAFETY INSPECTION TROUBLESHOOTING SLUGGISH SQUEAKS LOOSENESS VEERS VEERS TURN OR WHEEL... Teflon® lubricant. 5. X Check for proper tension and adjustment. Check all parts for damage or wear and replace. Refer to ensure positive locking and proper operation. If equipped, keep quick release ...
...repair or service and BEFORE use WD-40®, 3-in SECTION 6 of this manual. Check parking brake cable and shifter adjustment cables for correct and equal pressure. WARNING DO NOT use , make sure all attaching hardware is tightened securely - SAFETY INSPECTION SECTION 2 SAFETY INSPECTION TROUBLESHOOTING SLUGGISH SQUEAKS LOOSENESS VEERS VEERS TURN OR WHEEL... Teflon® lubricant. 5. X Check for proper tension and adjustment. Check all parts for damage or wear and replace. Refer to ensure positive locking and proper operation. If equipped, keep quick release ...
Owners Manual
Page 18
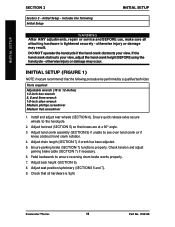
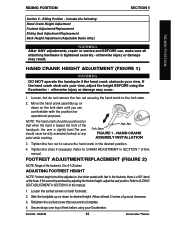
... (SECTION 7) if crank has been adjusted. 5. Check tension and adjust parking brake cable (SECTION 7) if necessary. 6. Pedal backwards to see over hand crank or if knees obstruct hand crank rotation. 4. Check that the following : Initial Setup INITIAL SETUP WARNING After ANY adjustments, repair or service and BEFORE use, make sure all hardware is tightened securely - Initial...
... (SECTION 7) if crank has been adjusted. 5. Check tension and adjust parking brake cable (SECTION 7) if necessary. 6. Pedal backwards to see over hand crank or if knees obstruct hand crank rotation. 4. Check that the following : Initial Setup INITIAL SETUP WARNING After ANY adjustments, repair or service and BEFORE use, make sure all hardware is tightened securely - Initial...
Owners Manual
Page 20
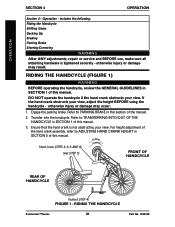
... Gears Backing Up Braking Parking Brake Steering/Cornering WARNING After ANY adjustments, repair or service and BEFORE use, make sure all attaching hardware is not obstructing your view. otherwise injury or damage may result. Refer to PARKING BRAKE in SECTION 1 of the manual. 2. Hand Crank (STEPS 3, 6, 8 AND 9) Seat (STEP 5) FRONT OF HANDCYCLE REAR OF HANDCYCLE Footrest (STEP 4) FIGURE 1 - If...
... Gears Backing Up Braking Parking Brake Steering/Cornering WARNING After ANY adjustments, repair or service and BEFORE use, make sure all attaching hardware is not obstructing your view. otherwise injury or damage may result. Refer to PARKING BRAKE in SECTION 1 of the manual. 2. Hand Crank (STEPS 3, 6, 8 AND 9) Seat (STEP 5) FRONT OF HANDCYCLE REAR OF HANDCYCLE Footrest (STEP 4) FIGURE 1 - If...
Owners Manual
Page 22
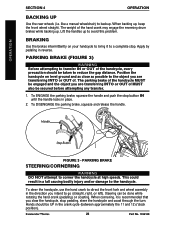
...damage to a complete stop. OPERATION SECTION 4 OPERATION BACKING UP Use the rear wheels (i.e. like a manual wheelchair) to avoid this problem. When backing up . To DISENGAGE the parking brake, squeeze and release the handle. Excelerator™Series 22 Part No. 1056188 The weight of the handcycle MUST be engaged ...attempt to the object you intend to reduce the gap distance. To steer the handcycle, use the hand crank to direct the front fork and wheel assembly in reverse. PARKING BRAKE (FIGURE 3) WARNING Before attempting to transfer IN or OUT of MUST also be taken ...
...damage to a complete stop. OPERATION SECTION 4 OPERATION BACKING UP Use the rear wheels (i.e. like a manual wheelchair) to avoid this problem. When backing up . To DISENGAGE the parking brake, squeeze and release the handle. Excelerator™Series 22 Part No. 1056188 The weight of the handcycle MUST be engaged ...attempt to the object you intend to reduce the gap distance. To steer the handcycle, use the hand crank to direct the front fork and wheel assembly in reverse. PARKING BRAKE (FIGURE 3) WARNING Before attempting to transfer IN or OUT of MUST also be taken ...
Owners Manual
Page 23
Riding Position - Hex Nut Fork Stem FIGURE 1 - Allow at least 2-inches of this manual. 1. includes the following: Hand Crank Height Adjustment Footrest Adjustment/Replacement Sliding Seat Adjustment/Replacement Back Height Adjustment (Adjustable Backs Only) WARNING After ANY adjustments, repair or service and BEFORE use, make sure all attaching hardware is a 90° bend at any point while cranking. Move...
Riding Position - Hex Nut Fork Stem FIGURE 1 - Allow at least 2-inches of this manual. 1. includes the following: Hand Crank Height Adjustment Footrest Adjustment/Replacement Sliding Seat Adjustment/Replacement Back Height Adjustment (Adjustable Backs Only) WARNING After ANY adjustments, repair or service and BEFORE use, make sure all attaching hardware is a 90° bend at any point while cranking. Move...

Owners Manual
Page 25
... to install sliding seat and seat rails onto the seat frame. NOTE: User need not be adjusted so that when seated with feet in seat to slide seat forward or rearward. Reverse STEPS 1-2 to the right and slide seat forward or rearward. SLIDING SEAT ADJUSTMENT/REPLACEMENT Part No. 1056188 25 Excelerator™Series ADJUSTMENT 1. REPLACEMENT 1. RIDING POSITION RIDING POSITION SECTION 5 SLIDING SEAT ADJUSTMENT/REPLACEMENT (FIGURE...
... to install sliding seat and seat rails onto the seat frame. NOTE: User need not be adjusted so that when seated with feet in seat to slide seat forward or rearward. Reverse STEPS 1-2 to the right and slide seat forward or rearward. SLIDING SEAT ADJUSTMENT/REPLACEMENT Part No. 1056188 25 Excelerator™Series ADJUSTMENT 1. REPLACEMENT 1. RIDING POSITION RIDING POSITION SECTION 5 SLIDING SEAT ADJUSTMENT/REPLACEMENT (FIGURE...
Owners Manual
Page 30
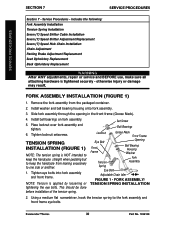
... assembly. 5. This should be done before installation of the tension spring. includes the following: Fork Assembly Installation Tension Spring Installation Seven (7) Speed Shifter Cable Installation Seven (7) Speed Shifter Adjustment/Replacement Seven (7) Speed Hub Chain Installation Chain Adjustment Parking Brake Adjustment/Replacement Seat Upholstery Replacement Back Upholstery Replacement WARNING After ANY adjustments, repair or service and BEFORE use, make sure all attaching hardware is applied...
... assembly. 5. This should be done before installation of the tension spring. includes the following: Fork Assembly Installation Tension Spring Installation Seven (7) Speed Shifter Cable Installation Seven (7) Speed Shifter Adjustment/Replacement Seven (7) Speed Hub Chain Installation Chain Adjustment Parking Brake Adjustment/Replacement Seat Upholstery Replacement Back Upholstery Replacement WARNING After ANY adjustments, repair or service and BEFORE use, make sure all attaching hardware is applied...

Owners Manual
Page 34
... when the parking brake is engaged the brake pads rest solely on the rim of Wheel Adjuster Barrel Brake Pads FIGURE 5 - REPLACEMENT Parking Brake Pads. 1. Mounting Nuts Rim of the wheel. Brake Pads. 1. Secure with existing hardware and adjust. WARNING Replacement of the parking brake MUST be performed by a qualified technician. PARKING BRAKE ADJUSTMENT/REPLACEMENT Excelerator™Series 34 Part No. 1056188 Loosen...
... when the parking brake is engaged the brake pads rest solely on the rim of Wheel Adjuster Barrel Brake Pads FIGURE 5 - REPLACEMENT Parking Brake Pads. 1. Mounting Nuts Rim of the wheel. Brake Pads. 1. Secure with existing hardware and adjust. WARNING Replacement of the parking brake MUST be performed by a qualified technician. PARKING BRAKE ADJUSTMENT/REPLACEMENT Excelerator™Series 34 Part No. 1056188 Loosen...

Owners Manual
Page 35
... back upholstery from chair. 2. Install the new seat upholstery making sure that the three (3) fastening flaps that secure the seat upholstery to the rear of Seat Frame FIGURE 6 - Unlatch the four (4) fastening flaps that are in close proximity to one another are to the seat frame. 3. Reinstall back upholstery and seat cushion onto chair. SEAT UPHOLSTERY REPLACEMENT Part No. 1056188 35...
... back upholstery from chair. 2. Install the new seat upholstery making sure that the three (3) fastening flaps that secure the seat upholstery to the rear of Seat Frame FIGURE 6 - Unlatch the four (4) fastening flaps that are in close proximity to one another are to the seat frame. 3. Reinstall back upholstery and seat cushion onto chair. SEAT UPHOLSTERY REPLACEMENT Part No. 1056188 35...
Owners Manual
Page 47
... product is not warranted. Invacare warrants the frame to our factory without our prior consent. distributed parts and components including compensators, forks, upholstery and miscellaneous bicycle components are not warranted. If within such warranty period any such product. For warranty service, please contact the dealer from defects in replacement part installation or repair of purchase; Do not...
... product is not warranted. Invacare warrants the frame to our factory without our prior consent. distributed parts and components including compensators, forks, upholstery and miscellaneous bicycle components are not warranted. If within such warranty period any such product. For warranty service, please contact the dealer from defects in replacement part installation or repair of purchase; Do not...


