Owners Manual
Page 3
... the Front Wheels - Three Wheel Models ...44 10 BATTERIES 46 Recommended Battery Type ...47 Removing/Installing the Batteries ...48 Charging the Batteries ...50 11 TRANSPORTING 52 Transporting the Scooter...52 12 MAINTENANCE 54 Suggested Maintenance Procedures ...54 13 TROUBLESHOOTING 55 General Troubleshooting...55 Service Indicator Error Codes...57 Part No. 1163141 3 Invacare® Leo™ Scooter
... the Front Wheels - Three Wheel Models ...44 10 BATTERIES 46 Recommended Battery Type ...47 Removing/Installing the Batteries ...48 Charging the Batteries ...50 11 TRANSPORTING 52 Transporting the Scooter...52 12 MAINTENANCE 54 Suggested Maintenance Procedures ...54 13 TROUBLESHOOTING 55 General Troubleshooting...55 Service Indicator Error Codes...57 Part No. 1163141 3 Invacare® Leo™ Scooter

Owners Manual
Page 17
DO NOT lift scooter up by the front or rear shroud. Otherwise injury or damage to the scooter may occur. DO NOT lean against or pull forward on the tiller while mounting or dismounting the scooter. The labels are in the locked position. Otherwise, injury may occur. 1118373 Rev A Part No. 1163141 17 Serial Number Label Invacare® Leo™ Scooter 3 Product Labeling 3 PRODUCT LABELING Four wheel model shown. DO NOT operate the scooter unless the tiller is in the same locations for the three wheel model.
DO NOT lift scooter up by the front or rear shroud. Otherwise injury or damage to the scooter may occur. DO NOT lean against or pull forward on the tiller while mounting or dismounting the scooter. The labels are in the locked position. Otherwise, injury may occur. 1118373 Rev A Part No. 1163141 17 Serial Number Label Invacare® Leo™ Scooter 3 Product Labeling 3 PRODUCT LABELING Four wheel model shown. DO NOT operate the scooter unless the tiller is in the same locations for the three wheel model.

Owners Manual
Page 19
4 Technical Data 4.1 Typical Product Parameters Overall Dimensions Overall Length: Drive Unit Width: Overall Width: Overall Height: Seat Dimensions Width: Depth: Seat Height: Arm Dimensions Armrest Height: Part No. 1163141 4 TECHNICAL DATA 3 WHEEL 4 WHEEL 47.2 in 23.2 in 23 to 29 in (armrest adjustment range) 39 in 3 WHEEL 19 in 16 in 16.5 to 19.5 in 4 WHEEL 3 WHEEL 4 WHEEL 8 in 19 Invacare® Leo™ Scooter
4 Technical Data 4.1 Typical Product Parameters Overall Dimensions Overall Length: Drive Unit Width: Overall Width: Overall Height: Seat Dimensions Width: Depth: Seat Height: Arm Dimensions Armrest Height: Part No. 1163141 4 TECHNICAL DATA 3 WHEEL 4 WHEEL 47.2 in 23.2 in 23 to 29 in (armrest adjustment range) 39 in 3 WHEEL 19 in 16 in 16.5 to 19.5 in 4 WHEEL 3 WHEEL 4 WHEEL 8 in 19 Invacare® Leo™ Scooter

Owners Manual
Page 20
Example: If weight limitation of the scooter is 350 lbs and additional items equal 25 lbs, subtract 25 lbs from 350 lbs this means the maximum weight limitation of Product: Maximum Weight Limitation: 3 WHEEL 173.7 lbs 350 lbs 4 WHEEL 184 lbs All dimensions are ± ...Incline Capability: Turning Radius: 3 WHEEL 6° Grade 47.2 in 5 mph 4 WHEEL 8° Grade 52 in Weight Weight of the user is total weight (user weight plus any additional items that the user may require [back pack, etc.]). Invacare® Leo™ Scooter 20 Part No. 1163141 Weight limitation...
Example: If weight limitation of the scooter is 350 lbs and additional items equal 25 lbs, subtract 25 lbs from 350 lbs this means the maximum weight limitation of Product: Maximum Weight Limitation: 3 WHEEL 173.7 lbs 350 lbs 4 WHEEL 184 lbs All dimensions are ± ...Incline Capability: Turning Radius: 3 WHEEL 6° Grade 47.2 in 5 mph 4 WHEEL 8° Grade 52 in Weight Weight of the user is total weight (user weight plus any additional items that the user may require [back pack, etc.]). Invacare® Leo™ Scooter 20 Part No. 1163141 Weight limitation...

Owners Manual
Page 21
... reveal loose or worn parts and enhance the smooth operation of your powered scooter. ƽ WARNING Before performing any other vehicle. Thereafter follow these maintenance procedures: Part No. 1163141 21 Invacare® Leo™ Scooter CAUTION As with any vehicle, the wheels and tires should be checked periodically for just like any maintenance, adjustment or...
... reveal loose or worn parts and enhance the smooth operation of your powered scooter. ƽ WARNING Before performing any other vehicle. Thereafter follow these maintenance procedures: Part No. 1163141 21 Invacare® Leo™ Scooter CAUTION As with any vehicle, the wheels and tires should be checked periodically for just like any maintenance, adjustment or...
Owners Manual
Page 22
Invacare® Leo™ Scooter 22 Part No. 1163141 5 INSPECTION Inspect/Adjust Initially ❑ Ensure powered scooter drives straight (no excessive drag or pull to one side). ❑ Check frame for damage and corrosion. ❑ Ensure that the .... ❑ Inspect seat swivel for release and engagement (seat locks into the determined swivel positions). ❑ Inspect for proper tension by spinning the wheel. Inspect/Adjust Weekly ❑ Ensure that tiller adjustment mechanism engages and disengages properly and securely. ❑ Ensure that all labels are raised or turned...
Invacare® Leo™ Scooter 22 Part No. 1163141 5 INSPECTION Inspect/Adjust Initially ❑ Ensure powered scooter drives straight (no excessive drag or pull to one side). ❑ Check frame for damage and corrosion. ❑ Ensure that the .... ❑ Inspect seat swivel for release and engagement (seat locks into the determined swivel positions). ❑ Inspect for proper tension by spinning the wheel. Inspect/Adjust Weekly ❑ Ensure that tiller adjustment mechanism engages and disengages properly and securely. ❑ Ensure that all labels are raised or turned...
Owners Manual
Page 23
... frame for damage and corrosion. ❑ Ensure that all labels are tight. Part No. 1163141 23 Invacare® Leo™ Scooter Replace if worn or damaged. 5 INSPECTION Inspect/Adjust Monthly ❑ Check brake for binding or interference with travel. ❑ Inspect front wheel/fork assembly for signs of corrosion. Ensure buckle latches. The front...
... frame for damage and corrosion. ❑ Ensure that all labels are tight. Part No. 1163141 23 Invacare® Leo™ Scooter Replace if worn or damaged. 5 INSPECTION Inspect/Adjust Monthly ❑ Check brake for binding or interference with travel. ❑ Inspect front wheel/fork assembly for signs of corrosion. Ensure buckle latches. The front...

Owners Manual
Page 42
... Shaft Threaded End Large Washer Small Washer Locknut Cap FIGURE 9.1 Removing/Installing the Drive Wheels Invacare® Leo™ Scooter 42 Part No. 1163141 This procedure applies to the rear wheels of the drive shaft. 5. Refer to Removing/Installing the Seat on blocks so that all ... small washer from the threaded end of the four wheel and three wheel models. Set aside. 8. Removing 1. Remove the existing drive wheel assembly from the drive shaft. Use a wheel puller if necessary to remove other drive wheel. Remove the large washer from drive shaft. Remove ...
... Shaft Threaded End Large Washer Small Washer Locknut Cap FIGURE 9.1 Removing/Installing the Drive Wheels Invacare® Leo™ Scooter 42 Part No. 1163141 This procedure applies to the rear wheels of the drive shaft. 5. Refer to Removing/Installing the Seat on blocks so that all ... small washer from the threaded end of the four wheel and three wheel models. Set aside. 8. Removing 1. Remove the existing drive wheel assembly from the drive shaft. Use a wheel puller if necessary to remove other drive wheel. Remove the large washer from drive shaft. Remove ...

Owners Manual
Page 43
... and orientation of the drive shaft. Remove the front wheel from the ignition. 2. Align the front wheel with the cutout in the wheel hub. Use the washer and locknut to secure the front wheel to install the other drive wheel. 7. Part No. 1163141 43 Invacare® Leo™ Scooter Install the large washer onto the drive shaft. 3. Place...
... and orientation of the drive shaft. Remove the front wheel from the ignition. 2. Align the front wheel with the cutout in the wheel hub. Use the washer and locknut to secure the front wheel to install the other drive wheel. 7. Part No. 1163141 43 Invacare® Leo™ Scooter Install the large washer onto the drive shaft. 3. Place...

Owners Manual
Page 44
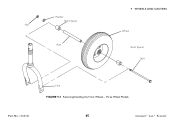
... 9.3 Removing/Installing the Front Wheels - Turn power off the ground. 3. Invacare® Leo™ Scooter 44 Part No. 1163141 Three Wheel Models For this procedure, refer to the fork. 4. Place the front of wheel and mounting hardware before removing. Remove the wheel from the ignition. 2. Installing 1. 9 WHEELS AND CASTERS Front Wheel Front Axle Washer Locknut Cap FIGURE 9.2 Removing...
... 9.3 Removing/Installing the Front Wheels - Turn power off the ground. 3. Invacare® Leo™ Scooter 44 Part No. 1163141 Three Wheel Models For this procedure, refer to the fork. 4. Place the front of wheel and mounting hardware before removing. Remove the wheel from the ignition. 2. Installing 1. 9 WHEELS AND CASTERS Front Wheel Front Axle Washer Locknut Cap FIGURE 9.2 Removing...
Owners Manual
Page 45
Three Wheel Models 45 Invacare® Leo™ Scooter Washer Short Spacer Nut Axle 9 WHEELS AND CASTERS Wheel Short Spacer Bolt Part No. 1163141 Fork FIGURE 9.3 Removing/Installing the Front Wheels -
Three Wheel Models 45 Invacare® Leo™ Scooter Washer Short Spacer Nut Axle 9 WHEELS AND CASTERS Wheel Short Spacer Bolt Part No. 1163141 Fork FIGURE 9.3 Removing/Installing the Front Wheels -

Owners Manual
Page 54
... for cracks and wear, and should be replaced by a qualified technician. 5. Clean dirt, dust and grease from ignition. The wheels and tires should be checked periodically for proper adjustment. 2. Invacare® Leo™ Scooter 54 Part No. 1163141 This could cause damage to the frame. Check any abrasive or scouring liquids. 12.1 Suggested Maintenance...
... for cracks and wear, and should be replaced by a qualified technician. 5. Clean dirt, dust and grease from ignition. The wheels and tires should be checked periodically for proper adjustment. 2. Invacare® Leo™ Scooter 54 Part No. 1163141 This could cause damage to the frame. Check any abrasive or scouring liquids. 12.1 Suggested Maintenance...
