

Owners Manual
Page 1
Owner's Operator and Maintenance Manual Insignia™ DEALER: This manual MUST be given to the user of the wheelchair. For more information regarding Invacare products, parts, and services, please visit www.invacare.com USER: BEFORE using this wheelchair, read this manual and save for future reference.
Owner's Operator and Maintenance Manual Insignia™ DEALER: This manual MUST be given to the user of the wheelchair. For more information regarding Invacare products, parts, and services, please visit www.invacare.com USER: BEFORE using this wheelchair, read this manual and save for future reference.

Owners Manual
Page 2
... versions of this manual are specifically designed and manufactured for use with invacare accessories. ƽ WARNING A QUALIFIED TECHNICIAN MUST PERFORM THE INITIAL SET UP OF THIS WHEELCHAIR. OTHERWISE, INJURY OR DAMAGE MAY OCCUR. ƽ ACCESSORIES WARNING Invacare products are available on www.invacare.com. IF YOU ARE UNABLE TO UNDERSTAND THE WARNINGS, CAUTIONS OR...
... versions of this manual are specifically designed and manufactured for use with invacare accessories. ƽ WARNING A QUALIFIED TECHNICIAN MUST PERFORM THE INITIAL SET UP OF THIS WHEELCHAIR. OTHERWISE, INJURY OR DAMAGE MAY OCCUR. ƽ ACCESSORIES WARNING Invacare products are available on www.invacare.com. IF YOU ARE UNABLE TO UNDERSTAND THE WARNINGS, CAUTIONS OR...
Owners Manual
Page 3
...Weight Limitation ...8 Anti-Tippers...8 Operating Information ...9 SECTION 2-SAFETY/HANDLING OF WHEELCHAIRS 11 Safety/Handling of Wheelchairs ...11 Stability and Balance...11 Coping With Everyday Obstacles...11 A Note to Wheelchair Assistants ...12 Reaching, Leaning and Bending Forward...12 Reaching, Leaning Backwards... ...12 Tipping ...13 Stairways...14 Escalators ...15 Transferring To and From Other Seats ...15 Unfolding and Folding Wheelchair ...15 SECTION 3-SAFETY INSPECTION/TROUBLESHOOTING 17 Safety Inspection Checklist ...17 Troubleshooting ...18 Maintenance...19 SECTION 4-FRONT RIGGINGS...
...Weight Limitation ...8 Anti-Tippers...8 Operating Information ...9 SECTION 2-SAFETY/HANDLING OF WHEELCHAIRS 11 Safety/Handling of Wheelchairs ...11 Stability and Balance...11 Coping With Everyday Obstacles...11 A Note to Wheelchair Assistants ...12 Reaching, Leaning and Bending Forward...12 Reaching, Leaning Backwards... ...12 Tipping ...13 Stairways...14 Escalators ...15 Transferring To and From Other Seats ...15 Unfolding and Folding Wheelchair ...15 SECTION 3-SAFETY INSPECTION/TROUBLESHOOTING 17 Safety Inspection Checklist ...17 Troubleshooting ...18 Maintenance...19 SECTION 4-FRONT RIGGINGS...

Owners Manual
Page 5
... an imminently hazardous situation which, if not avoided, will result in vehicles for definitions of wheelchair to be transferred into appropriate seating in death or serious injury. WHEELCHAIR USER As a manufacturer of wheelchairs, Invacare endeavors to supply a wide variety of wheelchairs to the following table for transportation and use as a safety device withstanding high stress...
... an imminently hazardous situation which, if not avoided, will result in vehicles for definitions of wheelchair to be transferred into appropriate seating in death or serious injury. WHEELCHAIR USER As a manufacturer of wheelchairs, Invacare endeavors to supply a wide variety of wheelchairs to the following table for transportation and use as a safety device withstanding high stress...

Owners Manual
Page 7
... Axle Rear Wheels Handrims Wheel Locks Caster Size Upholstery Weight IN66AHANFR 23 inches 16 inches 16 inches INSIGNIA IN86AHANFR IN86AHANFRFF IN88AHANFR IN88AHANFRFF IN08AHANFR 25 inches 25 inches 25 inches 25 inches 27 inches Without Riggings 32 inches; If wheelchair is equipped with pneumatic flat free add 1/2 inch to the measurements listed above.
... Axle Rear Wheels Handrims Wheel Locks Caster Size Upholstery Weight IN66AHANFR 23 inches 16 inches 16 inches INSIGNIA IN86AHANFR IN86AHANFRFF IN88AHANFR IN88AHANFRFF IN08AHANFR 25 inches 25 inches 25 inches 25 inches 27 inches Without Riggings 32 inches; If wheelchair is equipped with pneumatic flat free add 1/2 inch to the measurements listed above.

Owners Manual
Page 8
...technician. NOTE: When changes to the left hand column occur, follow across the chart and refer to the X procedure to ‐floor heights. Invacare wheelchairs have not been designed or tested as a weight training apparatus. Anti-Tippers Anti‐tippers are specific to the different seat‐to‐floor... stability, safety and handling of the rear wheels, anti‐tipper model, as well as a weight training apparatus, Invacare shall not be achieved, DO NOT use the wheelchair. If changing the seat‐to‐floor height with or without a change to one or any kind of the...
...technician. NOTE: When changes to the left hand column occur, follow across the chart and refer to the X procedure to ‐floor heights. Invacare wheelchairs have not been designed or tested as a weight training apparatus. Anti-Tippers Anti‐tippers are specific to the different seat‐to‐floor... stability, safety and handling of the rear wheels, anti‐tipper model, as well as a weight training apparatus, Invacare shall not be achieved, DO NOT use the wheelchair. If changing the seat‐to‐floor height with or without a change to one or any kind of the...

Owners Manual
Page 9
.... DO NOT traverse, climb or go down an incline with a water, ice or oil film. DO NOT attempt to move a wheelchair between your particular safety limits, practice bending, reaching and transferring activities in several combinations in the presence of a qualified healthcare professional before ...gap distance. DO NOT attempt to transfer in the seat. Before attempting to reach objects if you , as this wheelchair, Invacare strongly recommends using the wheelchair near open and the seat frame rails are transferring onto. Inasmuch as the anti‐tippers are reaching as a ...
.... DO NOT traverse, climb or go down an incline with a water, ice or oil film. DO NOT attempt to move a wheelchair between your particular safety limits, practice bending, reaching and transferring activities in several combinations in the presence of a qualified healthcare professional before ...gap distance. DO NOT attempt to transfer in the seat. Before attempting to reach objects if you , as this wheelchair, Invacare strongly recommends using the wheelchair near open and the seat frame rails are transferring onto. Inasmuch as the anti‐tippers are reaching as a ...

Owners Manual
Page 10
When getting in or out of the wheelchair. ALWAYS use the footplate as a platform. Lifting by any removable (detachable) parts of the wheelchair may result in the upward position. DO NOT stand on the frame of the wheelchair, make sure that the footplates are in injury to the user or damage to lift the wheelchair by means of any removable (detachable) parts. Insignia™ 10 Part No. 1163197 SECTION 1-GENERAL GUIDELINES DO NOT attempt to the wheelchair. DO NOT use the handrims for self‐propulsion.
When getting in or out of the wheelchair. ALWAYS use the footplate as a platform. Lifting by any removable (detachable) parts of the wheelchair may result in the upward position. DO NOT stand on the frame of the wheelchair, make sure that the footplates are in injury to the user or damage to lift the wheelchair by means of any removable (detachable) parts. Insignia™ 10 Part No. 1163197 SECTION 1-GENERAL GUIDELINES DO NOT attempt to the wheelchair. DO NOT use the handrims for self‐propulsion.

Owners Manual
Page 11
...techniques that are comfortable in maneuvering around the frequently encountered architectural barriers. Invacare recognizes and encourages each individual to try what works best for the wheelchair user. This wheelchair has been designed to remain upright and stable during normal daily activities... in the safe operation and maintenance of the wheelchair. Techniques in this wheelchair (you lean forward. Invacare recommends using seat/chest positioning straps for all times. This can be replaced IMMEDIATELY. Individual wheelchair users often develop skills to deal with daily ...
...techniques that are comfortable in maneuvering around the frequently encountered architectural barriers. Invacare recognizes and encourages each individual to try what works best for the wheelchair user. This wheelchair has been designed to remain upright and stable during normal daily activities... in the safe operation and maintenance of the wheelchair. Techniques in this wheelchair (you lean forward. Invacare recommends using seat/chest positioning straps for all times. This can be replaced IMMEDIATELY. Individual wheelchair users often develop skills to deal with daily ...

Owners Manual
Page 12
...mechanics. FIGURE 2.2 Reaching, Leaning Backwards Insignia™ 12 Part No. 1163197 SECTION 2-SAFETY/HANDLING OF WHEELCHAIRS A Note to Wheelchair Assistants When assistance to the wheelchair user is required, remember to FIGURE 2.1. These movements will extend without changing your safety. Proper positioning ... (detachable) parts. FIGURE 2.1 Reaching, Leaning and Bending Forward Reaching, Leaning Backwards ƽ WARNING DO NOT lean over . Position wheelchair as close as a tool to reach, bend and transfer in stability. DO NOT attempt to the desired object. Lifting by a ...
...mechanics. FIGURE 2.2 Reaching, Leaning Backwards Insignia™ 12 Part No. 1163197 SECTION 2-SAFETY/HANDLING OF WHEELCHAIRS A Note to Wheelchair Assistants When assistance to the wheelchair user is required, remember to FIGURE 2.1. These movements will extend without changing your safety. Proper positioning ... (detachable) parts. FIGURE 2.1 Reaching, Leaning and Bending Forward Reaching, Leaning Backwards ƽ WARNING DO NOT lean over . Position wheelchair as close as a tool to reach, bend and transfer in stability. DO NOT attempt to the desired object. Lifting by a ...
Owners Manual
Page 13
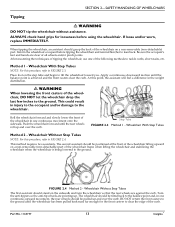
... 2.4 Method 2 - Apply a continuous downward motion until the balance point is being lowered to the ground. At this procedure, refer to lean back. Wheelchair Without Step Tubes NOTE: For this point, the assistant will feel a difference in injury to the occupant and/or damage to FIGURE 2.3. The second assistant...the anti‐tip wheels are against the curb. Be sure the occupant's feet and hands are clear of the wheelchair on the sidewalk and turn the wheelchair so that the rear wheels are pointing up and over the curb. ALWAYS check hand grips for the front casters ...
... 2.4 Method 2 - Apply a continuous downward motion until the balance point is being lowered to the ground. At this procedure, refer to lean back. Wheelchair Without Step Tubes NOTE: For this point, the assistant will feel a difference in injury to the occupant and/or damage to FIGURE 2.3. The second assistant...the anti‐tip wheels are against the curb. Be sure the occupant's feet and hands are clear of the wheelchair on the sidewalk and turn the wheelchair so that the rear wheels are pointing up and over the curb. ALWAYS check hand grips for the front casters ...

Owners Manual
Page 14
... ALWAYS check hand grips for looseness before using two assistants and making thorough preparations. Invacare recommends that, if possible, the user be removed from the stairway. 5. Make sure to the wheelchair. FIGURE 2.5 Stairways Insignia™ 14 Part No. 1163197 It is not designed... positioning strap is a positioning belt only. DO NOT attempt to lift a wheelchair by means of any removable (detachable) parts. The second assistant, with or without the seat positioning strap), Invacare strongly recommends ordering the seat positioning strap as auto or aircraft safety belts....
... ALWAYS check hand grips for looseness before using two assistants and making thorough preparations. Invacare recommends that, if possible, the user be removed from the stairway. 5. Make sure to the wheelchair. FIGURE 2.5 Stairways Insignia™ 14 Part No. 1163197 It is not designed... positioning strap is a positioning belt only. DO NOT attempt to lift a wheelchair by means of any removable (detachable) parts. The second assistant, with or without the seat positioning strap), Invacare strongly recommends ordering the seat positioning strap as auto or aircraft safety belts....

Owners Manual
Page 15
... front rigging. NOTE: For this procedure, refer to you (raising the opposite wheel and caster off the ground/floor). 2. Tilt the wheelchair toward you where the seat upholstery is fully open and the seat frame rails are transferring onto. Also be beneath you are fully seated ...the front casters pointing parallel to FIGURE 2.7 and FIGURE 2.8 on the top of seat frame rail when opening/closing the wheelchair. Shift body weight into the wheelchair unless it . Point your hand on page 16. Transferring To and From Other Seats ƽ WARNING Before attempting to reduce...
... front rigging. NOTE: For this procedure, refer to you (raising the opposite wheel and caster off the ground/floor). 2. Tilt the wheelchair toward you where the seat upholstery is fully open and the seat frame rails are transferring onto. Also be beneath you are fully seated ...the front casters pointing parallel to FIGURE 2.7 and FIGURE 2.8 on the top of seat frame rail when opening/closing the wheelchair. Shift body weight into the wheelchair unless it . Point your hand on page 16. Transferring To and From Other Seats ƽ WARNING Before attempting to reduce...

Owners Manual
Page 16
...side. 5. Pivot footplates upward to the front of the seat rail until the wheelchair begins to close the wheelchair by grasping the armrest furthest from you and pulling the armrest towards you . From behind the wheelchair, grasp the right hand edge of the solid folding seat and lift up ... and back edge and lift up until the wheelchair is fully open the footrest/legrest for clearance and transfer into the wheelchair. Press downward on page 15. SECTION 2-SAFETY/HANDLING OF WHEELCHAIRS 4. Engage both hands, grasp the middle of the wheelchair. 1. With both hands, grasp the middle ...
...side. 5. Pivot footplates upward to the front of the seat rail until the wheelchair begins to close the wheelchair by grasping the armrest furthest from you and pulling the armrest towards you . From behind the wheelchair, grasp the right hand edge of the solid folding seat and lift up ... and back edge and lift up until the wheelchair is fully open the footrest/legrest for clearance and transfer into the wheelchair. Press downward on page 15. SECTION 2-SAFETY/HANDLING OF WHEELCHAIRS 4. Engage both hands, grasp the middle of the wheelchair. 1. With both hands, grasp the middle ...

Owners Manual
Page 17
... body structure and preference. Verify hardware that quick‐release axles lock properly. Caster should be made to suit your wheelchair MUST be cared for just like any other vehicle. Safety Inspection Checklist Initial adjustments should come to a gradual stop. ...is secure and undamaged. SECTION 3-SAFETY INSPECTION/TROUBLESHOOTING SECTION 3-SAFETY INSPECTION/TROUBLESHOOTING NOTE: Every six months or as necessary, take your wheelchair. Regular cleaning will extend the life and efficiency of wear. Ensure buckle latches. Replace if necessary. ❑ Inspect tires for...
... body structure and preference. Verify hardware that quick‐release axles lock properly. Caster should be made to suit your wheelchair MUST be cared for just like any other vehicle. Safety Inspection Checklist Initial adjustments should come to a gradual stop. ...is secure and undamaged. SECTION 3-SAFETY INSPECTION/TROUBLESHOOTING SECTION 3-SAFETY INSPECTION/TROUBLESHOOTING NOTE: Every six months or as necessary, take your wheelchair. Regular cleaning will extend the life and efficiency of wear. Ensure buckle latches. Replace if necessary. ❑ Inspect tires for...

Owners Manual
Page 18
... NOT interfere with tires when rolling. ❑ Check that there is secure and undamaged. Check caster headtube angle. Inspect/Adjust Monthly ❑ Ensure that the wheelchair rolls straight (no excessive side movement or binding in Chair X Solutions Check for cracked, bent or broken spokes. Replace if necessary. Check that attaches strap...
... NOT interfere with tires when rolling. ❑ Check that there is secure and undamaged. Check caster headtube angle. Inspect/Adjust Monthly ❑ Ensure that the wheelchair rolls straight (no excessive side movement or binding in Chair X Solutions Check for cracked, bent or broken spokes. Replace if necessary. Check that attaches strap...
Owners Manual
Page 19
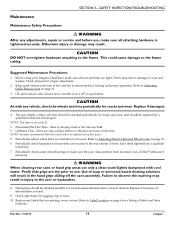
... to use. Replace any labels that grips are dry prior to ensure positive locking and proper operation. Before using your Insignia wheelchair, make sure all attaching hardware is tightened securely. Part No. 1163197 19 Insignia™ Refer to Adjusting Patient‐Operated ...Wheel Locks on the rims. NOTE: Invacare recommends that tires and casters be replaced every five years. 5. CAUTION DO NOT overtighten hardware attaching to the frame tubing. Oil...
... to use. Replace any labels that grips are dry prior to ensure positive locking and proper operation. Before using your Insignia wheelchair, make sure all attaching hardware is tightened securely. Part No. 1163197 19 Insignia™ Refer to Adjusting Patient‐Operated ...Wheel Locks on the rims. NOTE: Invacare recommends that tires and casters be replaced every five years. 5. CAUTION DO NOT overtighten hardware attaching to the frame tubing. Oil...

Owners Manual
Page 20
...SECTION 4-FRONT RIGGINGS ƽ WARNING After any adjustments, repair or service and before use . Push the front rigging assembly towards the inside of the wheelchair until it locks into place. DETAIL "A" Front Rigging Assembly DETAIL "B" Front Rigging Release Lever Hinge Plates/ Hinge Pins Hinge Plates/ Hinge Pins Rotate ...; 20 Part No. 1163197 Install the hinge plates on the front rigging assembly onto the hinge pins on the inside of the wheelchair when locked in place. Lift the swingaway front rigging assembly off the hinge pins. Turn the front rigging assembly to...
...SECTION 4-FRONT RIGGINGS ƽ WARNING After any adjustments, repair or service and before use . Push the front rigging assembly towards the inside of the wheelchair until it locks into place. DETAIL "A" Front Rigging Assembly DETAIL "B" Front Rigging Release Lever Hinge Plates/ Hinge Pins Hinge Plates/ Hinge Pins Rotate ...; 20 Part No. 1163197 Install the hinge plates on the front rigging assembly onto the hinge pins on the inside of the wheelchair when locked in place. Lift the swingaway front rigging assembly off the hinge pins. Turn the front rigging assembly to...
Owners Manual
Page 23
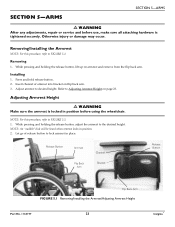
... SECTION 5-ARMS ƽ WARNING After any adjustments, repair or service and before use, make sure all attaching hardware is locked in position before using the wheelchair. Removing 1. Adjusting Armrest Height ƽ WARNING Make sure the armrest is tightened securely. Otherwise injury or damage may occur.
... SECTION 5-ARMS ƽ WARNING After any adjustments, repair or service and before use, make sure all attaching hardware is locked in position before using the wheelchair. Removing 1. Adjusting Armrest Height ƽ WARNING Make sure the armrest is tightened securely. Otherwise injury or damage may occur.

Owners Manual
Page 24
... downward into front and rear arm sockets. Install flip back arm into the front arm socket. Push the release lever toward the front of the wheelchair. 2. Pull the front of the flip back armrest straight up on page 25. Insignia™ 24 Part No. 1163197 Pull up and out of the... back armrest by pressing the release lever toward the front of the chair and remove the front of the flip back arm out of the wheelchair. ƽ WARNING Make sure the flip back armrest is locked in place. NOTE: Ensure that the release lever and plunger pin secure the flip back...
... downward into front and rear arm sockets. Install flip back arm into the front arm socket. Push the release lever toward the front of the wheelchair. 2. Pull the front of the flip back armrest straight up on page 25. Insignia™ 24 Part No. 1163197 Pull up and out of the... back armrest by pressing the release lever toward the front of the chair and remove the front of the flip back arm out of the wheelchair. ƽ WARNING Make sure the flip back armrest is locked in place. NOTE: Ensure that the release lever and plunger pin secure the flip back...


