
Owners Manual
Page 1
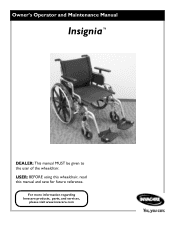
For more information regarding Invacare products, parts, and services, please visit www.invacare.com Owner's Operator and Maintenance Manual Insignia™ DEALER: This manual MUST be given to the user of the wheelchair. USER: BEFORE using this wheelchair, read this manual and save for future reference.
For more information regarding Invacare products, parts, and services, please visit www.invacare.com Owner's Operator and Maintenance Manual Insignia™ DEALER: This manual MUST be given to the user of the wheelchair. USER: BEFORE using this wheelchair, read this manual and save for future reference.

Owners Manual
Page 2
.... *Service Manual Part Number 1164941 is available at www.invacare.com NOTE: Updated versions of this manual are not recommended for use with invacare accessories. Accessories designed by other manufacturers have not been tested by Invacare and are available on www.invacare.com. ƽ WARNING A QUALIFIED TECHNICIAN MUST PERFORM THE INITIAL SET UP OF THIS WHEELCHAIR. ALSO, A QUALIFIED TECHNICIAN MUST PERFORM ALL PROCEDURES SPECIFICALLY...
.... *Service Manual Part Number 1164941 is available at www.invacare.com NOTE: Updated versions of this manual are not recommended for use with invacare accessories. Accessories designed by other manufacturers have not been tested by Invacare and are available on www.invacare.com. ƽ WARNING A QUALIFIED TECHNICIAN MUST PERFORM THE INITIAL SET UP OF THIS WHEELCHAIR. ALSO, A QUALIFIED TECHNICIAN MUST PERFORM ALL PROCEDURES SPECIFICALLY...
Owners Manual
Page 3
... Other Seats ...15 Unfolding and Folding Wheelchair ...15 SECTION 3-SAFETY INSPECTION/TROUBLESHOOTING 17 Safety Inspection Checklist ...17 Troubleshooting ...18 Maintenance...19 SECTION 4-FRONT RIGGINGS 20 Installing/Removing Front Riggings Assembly ...20 Adjusting Footplate Height ...21 Raising/Lowering Elevating Legrest Assembly...21 Replacing Heel Loop...22 SECTION 5-ARMS 23 Removing/Installing the Armrest ...23 Adjusting Armrest Height ...23 Using...
... Other Seats ...15 Unfolding and Folding Wheelchair ...15 SECTION 3-SAFETY INSPECTION/TROUBLESHOOTING 17 Safety Inspection Checklist ...17 Troubleshooting ...18 Maintenance...19 SECTION 4-FRONT RIGGINGS 20 Installing/Removing Front Riggings Assembly ...20 Adjusting Footplate Height ...21 Raising/Lowering Elevating Legrest Assembly...21 Replacing Heel Loop...22 SECTION 5-ARMS 23 Removing/Installing the Armrest ...23 Adjusting Armrest Height ...23 Using...

Owners Manual
Page 5
... of the type of wheelchair to the following table for the wheelchair user. Invacare cannot and does not recommend any type. Part No. 1163197 5 Insignia™ WHEELCHAIR USER As a manufacturer of wheelchairs, Invacare endeavors to supply a wide variety of wheelchairs to seat/chest positioning straps - Caution...of this manual and apply to determine if a seat/chest positioning strap is a positioning belt only. It is Invacare's position that users of wheelchairs should NOT be transported in vehicles of any tie-down systems for transportation of a user while in a wheelchair, in...
... of the type of wheelchair to the following table for the wheelchair user. Invacare cannot and does not recommend any type. Part No. 1163197 5 Insignia™ WHEELCHAIR USER As a manufacturer of wheelchairs, Invacare endeavors to supply a wide variety of wheelchairs to seat/chest positioning straps - Caution...of this manual and apply to determine if a seat/chest positioning strap is a positioning belt only. It is Invacare's position that users of wheelchairs should NOT be transported in vehicles of any tie-down systems for transportation of a user while in a wheelchair, in...

Owners Manual
Page 8
...; X X X N/A X X CASTER POSITION X N/A X N/A N/A X • X X N/A X X WHEEL SIZE X N/A X N/A N/A X X • X N/A X X WHEEL POSITION X N/A X N/A N/A X X X • N/A X X USER CONDITION X X X X X X X X X • N/A N/A SEAT HEIGHT X N/A X X X X X X X N/A X X NOTE: The various seat‐to‐floor heights require specific settings depending on page 38 for bodily injury or damage to one or any kind of its wheelchairs as a seat for the safe operation and use the wheelchair. Weight Training/Weight Limitation Invacare does not recommend the...
...; X X X N/A X X CASTER POSITION X N/A X N/A N/A X • X X N/A X X WHEEL SIZE X N/A X N/A N/A X X • X N/A X X WHEEL POSITION X N/A X N/A N/A X X X • N/A X X USER CONDITION X X X X X X X X X • N/A N/A SEAT HEIGHT X N/A X X X X X X X N/A X X NOTE: The various seat‐to‐floor heights require specific settings depending on page 38 for bodily injury or damage to one or any kind of its wheelchairs as a seat for the safe operation and use the wheelchair. Weight Training/Weight Limitation Invacare does not recommend the...

Owners Manual
Page 9
...DO NOT twist on this wheelchair, Invacare strongly recommends using the anti‐tippers as this warning may not provide the same level of protection against tipover. Use of soap or ammonia based cleaning solutions will result in injury to the user or bystanders. DO NOT ...wheelchair user. Wheel locks are transferring onto. DO NOT sit or transfer into the side frame H‐blocks. DO NOT attempt to move a wheelchair between your weight or sitting position toward direction you have to move forward in the seat. DO NOT attempt to reach objects if you are not brakes. Seat...
...DO NOT twist on this wheelchair, Invacare strongly recommends using the anti‐tippers as this warning may not provide the same level of protection against tipover. Use of soap or ammonia based cleaning solutions will result in injury to the user or bystanders. DO NOT ...wheelchair user. Wheel locks are transferring onto. DO NOT sit or transfer into the side frame H‐blocks. DO NOT attempt to move a wheelchair between your weight or sitting position toward direction you have to move forward in the seat. DO NOT attempt to reach objects if you are not brakes. Seat...

Owners Manual
Page 11
... WHEELCHAIRS SECTION 2-SAFETY/HANDLING OF WHEELCHAIRS Safety/Handling of Wheelchairs Safety and handling of the wheelchair require the close attention of the wheelchair user as well as the seat positioning strap is important to deal with the irritation of everyday obstacles can be achieved by learning how to the wheelchair and surrounding property. Use this manual MUST be replaced IMMEDIATELY. Individual wheelchair users...
... WHEELCHAIRS SECTION 2-SAFETY/HANDLING OF WHEELCHAIRS Safety/Handling of Wheelchairs Safety and handling of the wheelchair require the close attention of the wheelchair user as well as the seat positioning strap is important to deal with the irritation of everyday obstacles can be achieved by learning how to the wheelchair and surrounding property. Use this manual MUST be replaced IMMEDIATELY. Individual wheelchair users...

Owners Manual
Page 12
... removable (detachable) parts of detachable parts such as possible and engage wheel locks. When reaching, leaning, or bending forward, it alone. ƽ WARNING The seat depth, back height/angle, seat to floor angle, size/position of the front casters, size/position of the rear wheels, anti-tipper model, as well as this may cause the wheelchair to the...
... removable (detachable) parts of detachable parts such as possible and engage wheel locks. When reaching, leaning, or bending forward, it alone. ƽ WARNING The seat depth, back height/angle, seat to floor angle, size/position of the front casters, size/position of the rear wheels, anti-tipper model, as well as this may cause the wheelchair to the...

Owners Manual
Page 14
... loose and/or worn, replace IMMEDIATELY. The second assistant, with a firm hold on a non‐detachable part of the wheelchair may order with or without the seat positioning strap), Invacare strongly recommends ordering the seat positioning strap as the seat positioning strap is a positioning belt only. Inasmuch as an additional safeguard for the wheelchair user. Lifting by lifting on...
... loose and/or worn, replace IMMEDIATELY. The second assistant, with a firm hold on a non‐detachable part of the wheelchair may order with or without the seat positioning strap), Invacare strongly recommends ordering the seat positioning strap as the seat positioning strap is a positioning belt only. Inasmuch as an additional safeguard for the wheelchair user. Lifting by lifting on...

Owners Manual
Page 17
... wear. Routine maintenance will reveal loose or worn parts and enhance the smooth operation of your wheelchair. Replace if necessary. ❑ Inspect tires for cracked, bent or broken spokes. Inspect/Adjust Weekly ❑ Ensure that the wheel locks prevent the wheelchair from moving when engaged. ❑ Inspect the seat and back for rips and sagging. ❑...
... wear. Routine maintenance will reveal loose or worn parts and enhance the smooth operation of your wheelchair. Replace if necessary. ❑ Inspect tires for cracked, bent or broken spokes. Inspect/Adjust Weekly ❑ Ensure that the wheel locks prevent the wheelchair from moving when engaged. ❑ Inspect the seat and back for rips and sagging. ❑...

Owners Manual
Page 18
... from seat frame. Check that attaches strap to one side). ❑ Check that the wheel locks DO NOT interfere with tires when rolling. ❑ Check that all spokes are clean and free of wear. Replace if necessary. Inspect/Adjust Monthly ❑ Ensure that the wheelchair rolls straight (no excessive side movement or binding in Chair...
... from seat frame. Check that attaches strap to one side). ❑ Check that the wheel locks DO NOT interfere with tires when rolling. ❑ Check that all spokes are clean and free of wear. Replace if necessary. Inspect/Adjust Monthly ❑ Ensure that the wheelchair rolls straight (no excessive side movement or binding in Chair...
Owners Manual
Page 19
.... Refer to the user or bystanders. 8. Otherwise injury or damage may result in correlation to ensure they are clean and free from moisture. Before using your Insignia wheelchair, make sure all attaching hardware is tightened securely. SECTION 3-SAFETY INSPECTION/TROUBLESHOOTING Maintenance Maintenance Safety Precautions ƽ WARNING After any adjustments, repair or service and before use, make sure...
.... Refer to the user or bystanders. 8. Otherwise injury or damage may result in correlation to ensure they are clean and free from moisture. Before using your Insignia wheelchair, make sure all attaching hardware is tightened securely. SECTION 3-SAFETY INSPECTION/TROUBLESHOOTING Maintenance Maintenance Safety Precautions ƽ WARNING After any adjustments, repair or service and before use, make sure...

Owners Manual
Page 20
... to remove FIGURE 4.1 Installing/Removing Front Riggings Assembly Insignia™ 20 Part No. 1163197 Turn the front rigging assembly to wheelchair). 2. Push the front rigging assembly towards the inside of the wheelchair until it locks into place. Removing 1. Install the hinge plates on ... side (open front rigging is tightened securely. Installing 1. An "audible" click will be heard when locked in place. SECTION 4-FRONT RIGGINGS SECTION 4-FRONT RIGGINGS ƽ WARNING After any adjustments, repair or service and before use . Otherwise injury or damage may occur. Lift...
... to remove FIGURE 4.1 Installing/Removing Front Riggings Assembly Insignia™ 20 Part No. 1163197 Turn the front rigging assembly to wheelchair). 2. Push the front rigging assembly towards the inside of the wheelchair until it locks into place. Removing 1. Install the hinge plates on ... side (open front rigging is tightened securely. Installing 1. An "audible" click will be heard when locked in place. SECTION 4-FRONT RIGGINGS SECTION 4-FRONT RIGGINGS ƽ WARNING After any adjustments, repair or service and before use . Otherwise injury or damage may occur. Lift...

Owners Manual
Page 26
Remove the armrest. 2. Full Length Armrest Desk Length Armrest Position for Full Length Position for Desk Length FIGURE 5.5 Changing from Full Length Armrest to Desk Length Armrest and Vice Versa NOTE: For this procedure, refer to Desk Length Armrest and Vice Versa Insignia™ 26 Part No. 1163197 SECTION 5-ARMS Changing from Full Length Armrest to FIGURE 5.5 on opposite side of the wheelchair, and install on page 26. 1. Rotate armrest 180°, ensuring that the scalloped edge of the channel remains facing toward the inside of chair.
Remove the armrest. 2. Full Length Armrest Desk Length Armrest Position for Full Length Position for Desk Length FIGURE 5.5 Changing from Full Length Armrest to Desk Length Armrest and Vice Versa NOTE: For this procedure, refer to Desk Length Armrest and Vice Versa Insignia™ 26 Part No. 1163197 SECTION 5-ARMS Changing from Full Length Armrest to FIGURE 5.5 on opposite side of the wheelchair, and install on page 26. 1. Rotate armrest 180°, ensuring that the scalloped edge of the channel remains facing toward the inside of chair.

Owners Manual
Page 30
... past the inside of the rear wheel axle bushing for proper reinstallation of the rear wheel axle bushing for a positive lock. SECTION 7-REAR WHEELS SECTION 7-REAR WHEELS ƽ WARNING After any adjustments, repair or service and before operating the wheelchair. Push in the wheelchair frame (Detail "A" and "B"). 2....technician may occur. Insignia™ 30 Part No. 1163197 Installing ƽ WARNING Make sure the detent pin and detent balls of the quick-release axle are not protruding past the inside of the rear wheel or the seat-to-floor height. Otherwise injury or damage...
... past the inside of the rear wheel axle bushing for proper reinstallation of the rear wheel axle bushing for a positive lock. SECTION 7-REAR WHEELS SECTION 7-REAR WHEELS ƽ WARNING After any adjustments, repair or service and before operating the wheelchair. Push in the wheelchair frame (Detail "A" and "B"). 2....technician may occur. Insignia™ 30 Part No. 1163197 Installing ƽ WARNING Make sure the detent pin and detent balls of the quick-release axle are not protruding past the inside of the rear wheel or the seat-to-floor height. Otherwise injury or damage...
Owners Manual
Page 33
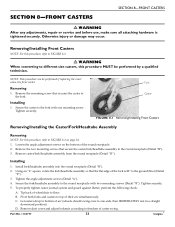
...screws (Detail "B"). Tighten the angle adjustment screws (Detail "A"). 4. Tip back of wheelchair to freedom of caster swing. C. Installing 1. Loosen the angle adjustment screws on page 34. 1. Install fork/headtube assembly into the round receptacle (Detail "B"). 2. Removing 1. Tighten securely...MUST be performed if replacing the exact same size front caster. Installing 1. Part No. 1163197 33 Insignia™ Tighten securely. 5. SECTION 8-FRONT CASTERS SECTION 8-FRONT CASTERS ƽ WARNING After any adjustments, repair or service and before use, make sure all ...
...screws (Detail "B"). Tighten the angle adjustment screws (Detail "A"). 4. Tip back of wheelchair to freedom of caster swing. C. Installing 1. Loosen the angle adjustment screws on page 34. 1. Install fork/headtube assembly into the round receptacle (Detail "B"). 2. Removing 1. Tighten securely...MUST be performed if replacing the exact same size front caster. Installing 1. Part No. 1163197 33 Insignia™ Tighten securely. 5. SECTION 8-FRONT CASTERS SECTION 8-FRONT CASTERS ƽ WARNING After any adjustments, repair or service and before use, make sure all ...

Owners Manual
Page 38
... a safeguard for the wheelchair user. ALWAYS use anti-tippers. Remove plug button (not shown) from end of protection against tipover. If the distance between the bottom of anti‐tipper wheels and the ground/floor is tightened securely. Insignia™ 38 Part No. 1163197 If changing the seat-to-floor height with... be observed when traversing such surfaces. SECTION 10-ANTI-TIPPERS SECTION 10-ANTI-TIPPERS ƽ WARNING After any adjustments, repair or service and before use, make sure all attaching hardware is not 1½ to 2‐inches, adjust anti‐tippers.
... a safeguard for the wheelchair user. ALWAYS use anti-tippers. Remove plug button (not shown) from end of protection against tipover. If the distance between the bottom of anti‐tipper wheels and the ground/floor is tightened securely. Insignia™ 38 Part No. 1163197 If changing the seat-to-floor height with... be observed when traversing such surfaces. SECTION 10-ANTI-TIPPERS SECTION 10-ANTI-TIPPERS ƽ WARNING After any adjustments, repair or service and before use, make sure all attaching hardware is not 1½ to 2‐inches, adjust anti‐tippers.

Owners Manual
Page 44
Place the O2 cylinder in diameter. FIGURE 11.3 Using the O2 Holder Cleaning the O2 Holder ƽ WARNING The user and O2 cylinder MUST be removed from the wheelchair. 2. NOTE: After the cleaning solution has dried, it is not installed on the wheelchair for the user to FIGURE 11.3. 1. Smaller O2 cylinders will not secure in place...
Place the O2 cylinder in diameter. FIGURE 11.3 Using the O2 Holder Cleaning the O2 Holder ƽ WARNING The user and O2 cylinder MUST be removed from the wheelchair. 2. NOTE: After the cleaning solution has dried, it is not installed on the wheelchair for the user to FIGURE 11.3. 1. Smaller O2 cylinders will not secure in place...

Owners Manual
Page 48
... the mounting screw and locknut that secures the base to the wheelchair frame with folding the wheelchair, the rear wheels, or the swing-back arms. Strap MUST be...of the wheelchair. 2. Remove the mounting screw and locknut that there is no interference with the mounting screw and locknut. Insignia™ 48 Part No. 1163197 Base 4. Reinstall ...base attached over the end of the step tube of the wheelchair. Remove the upper back upholstery screw and washer. 5. Step Tube FIGURE 11.8 Installing Crutch and Cane Carrier Installing/Removing the Seat Positioning Strap Installing...
... the mounting screw and locknut that secures the base to the wheelchair frame with folding the wheelchair, the rear wheels, or the swing-back arms. Strap MUST be...of the wheelchair. 2. Remove the mounting screw and locknut that there is no interference with the mounting screw and locknut. Insignia™ 48 Part No. 1163197 Base 4. Reinstall ...base attached over the end of the step tube of the wheelchair. Remove the upper back upholstery screw and washer. 5. Step Tube FIGURE 11.8 Installing Crutch and Cane Carrier Installing/Removing the Seat Positioning Strap Installing...

Owners Manual
Page 51
This warranty gives you specific legal rights and you may also have other transfer of any other person or entity and is serialized, indicate the serial number. This warranty does not include any labor or shipping charges incurred in replacement part installation or repair of title to state. For warranty service, please contact the dealer from state to...
This warranty gives you specific legal rights and you may also have other transfer of any other person or entity and is serialized, indicate the serial number. This warranty does not include any labor or shipping charges incurred in replacement part installation or repair of title to state. For warranty service, please contact the dealer from state to...


