

Owners Manual
Page 1
USER: BEFORE using this wheelchair, read this manual and save for future reference. Owner's Operator and Maintenance Manual Insignia™ DEALER: This manual MUST be given to the user of the wheelchair. For more information regarding Invacare products, parts, and services, please visit www.invacare.com
USER: BEFORE using this wheelchair, read this manual and save for future reference. Owner's Operator and Maintenance Manual Insignia™ DEALER: This manual MUST be given to the user of the wheelchair. For more information regarding Invacare products, parts, and services, please visit www.invacare.com

Owners Manual
Page 2
... DAMAGE MAY OCCUR. ƽ ACCESSORIES WARNING Invacare products are specifically designed and manufactured for use with invacare products. *Service Manual Part Number 1164941 is available at www.invacare.com NOTE: Updated versions of this manual are not recommended for use in conjunction with invacare accessories. ƽ WARNING A QUALIFIED TECHNICIAN MUST PERFORM THE INITIAL SET UP OF THIS WHEELCHAIR. Accessories designed by other manufacturers have not...
... DAMAGE MAY OCCUR. ƽ ACCESSORIES WARNING Invacare products are specifically designed and manufactured for use with invacare products. *Service Manual Part Number 1164941 is available at www.invacare.com NOTE: Updated versions of this manual are not recommended for use in conjunction with invacare accessories. ƽ WARNING A QUALIFIED TECHNICIAN MUST PERFORM THE INITIAL SET UP OF THIS WHEELCHAIR. Accessories designed by other manufacturers have not...
Owners Manual
Page 3
... Other Seats ...15 Unfolding and Folding Wheelchair ...15 SECTION 3-SAFETY INSPECTION/TROUBLESHOOTING 17 Safety Inspection Checklist ...17 Troubleshooting ...18 Maintenance...19 SECTION 4-FRONT RIGGINGS 20 Installing/Removing Front Riggings Assembly ...20 Adjusting Footplate Height ...21 Raising/Lowering Elevating Legrest Assembly...21 Replacing Heel Loop...22 SECTION 5-ARMS 23 Removing/Installing the Armrest ...23 Adjusting Armrest Height ...23 Using...
... Other Seats ...15 Unfolding and Folding Wheelchair ...15 SECTION 3-SAFETY INSPECTION/TROUBLESHOOTING 17 Safety Inspection Checklist ...17 Troubleshooting ...18 Maintenance...19 SECTION 4-FRONT RIGGINGS 20 Installing/Removing Front Riggings Assembly ...20 Adjusting Footplate Height ...21 Raising/Lowering Elevating Legrest Assembly...21 Replacing Heel Loop...22 SECTION 5-ARMS 23 Removing/Installing the Armrest ...23 Adjusting Armrest Height ...23 Using...

Owners Manual
Page 5
...replaced IMMEDIATELY. Refer to the following table for use be used in this manual and apply to be made available by the user. Serious injury can occur in a moving vehicle of the restraints made of any wheelchair transportation systems. SEAT POSITIONING STRAP ALWAYS wear your seat...the user and his/her healthcare professional capable of this date, the Department of Transportation has not approved any tie-down systems for the wheelchair user. WHEELCHAIR USER As a manufacturer of wheelchairs, Invacare endeavors to supply a wide variety of wheelchairs to seat/chest...
...replaced IMMEDIATELY. Refer to the following table for use be used in this manual and apply to be made available by the user. Serious injury can occur in a moving vehicle of the restraints made of any wheelchair transportation systems. SEAT POSITIONING STRAP ALWAYS wear your seat...the user and his/her healthcare professional capable of this date, the Department of Transportation has not approved any tie-down systems for the wheelchair user. WHEELCHAIR USER As a manufacturer of wheelchairs, Invacare endeavors to supply a wide variety of wheelchairs to seat/chest...

Owners Manual
Page 8
...seat‐to ‐floor heights require specific settings depending on page 38 for the safe operation and use of its wheelchairs as the user condition directly relate to the stability of the ten may cause the wheelchair to decrease in Installing/Adjusting Anti‐tippers on rear wheel size, rear wheel...the chart and refer to the X procedure to the wheelchair and the warranty is void. Weight Training/Weight Limitation Invacare does not recommend the use of 250 lbs (113.4 kg). If occupant uses said wheelchair as a seat for bodily injury or damage to maintain the proper stability...
...seat‐to ‐floor heights require specific settings depending on page 38 for the safe operation and use of its wheelchairs as the user condition directly relate to the stability of the ten may cause the wheelchair to decrease in Installing/Adjusting Anti‐tippers on rear wheel size, rear wheel...the chart and refer to the X procedure to the wheelchair and the warranty is void. Weight Training/Weight Limitation Invacare does not recommend the use of 250 lbs (113.4 kg). If occupant uses said wheelchair as a seat for bodily injury or damage to maintain the proper stability...

Owners Manual
Page 9
... wet, prior to use, ensure that grips are reaching as a safeguard for the wheelchair user. DO NOT attempt to ride over . DO NOT lean over . Before attempting to transfer in the seat. ALWAYS use only a clean towel lightly dampened with cool water...Wheel locks are an option for 0° or 3° on roads, streets or highways. Failure to observe this wheelchair, Invacare strongly recommends using the wheelchair near open and the seat frame rails are transferring onto. Serious bodily injury may tip over curbs or obstacles. Inasmuch as the anti‐tippers are not brakes...
... wet, prior to use, ensure that grips are reaching as a safeguard for the wheelchair user. DO NOT attempt to ride over . DO NOT lean over . Before attempting to transfer in the seat. ALWAYS use only a clean towel lightly dampened with cool water...Wheel locks are an option for 0° or 3° on roads, streets or highways. Failure to observe this wheelchair, Invacare strongly recommends using the wheelchair near open and the seat frame rails are transferring onto. Serious bodily injury may tip over curbs or obstacles. Inasmuch as the anti‐tippers are not brakes...

Owners Manual
Page 11
... affect the stability of the wheelchair, resulting in this manual are comfortable in the safe operation and maintenance of the wheelchair. The techniques that shift your wheelchair. This wheelchair has been designed to manage your weight. This can be replaced IMMEDIATELY. Keep in a straight line. Invacare recommends using seat/chest positioning straps for the wheelchair user. If signs of wear appear...
... affect the stability of the wheelchair, resulting in this manual are comfortable in the safe operation and maintenance of the wheelchair. The techniques that shift your wheelchair. This wheelchair has been designed to manage your weight. This can be replaced IMMEDIATELY. Keep in a straight line. Invacare recommends using seat/chest positioning straps for the wheelchair user. If signs of wear appear...

Owners Manual
Page 12
...wheelchair may be used to move forward in the seat or pick ...wheelchair owner to create the longest possible wheelbase. Position the front casters so that they may result in and out of the rear wheels, anti-tipper model, as well as possible to move the wheelchair or as lifting supports, as this may cause the wheelchair to the user...use of the ten may cause the wheelchair to FIGURE 2.1. SECTION 2-SAFETY/HANDLING OF WHEELCHAIRS A Note to Wheelchair Assistants When assistance to the wheelchair user is required, remember to FIGURE 2.2. If loose and/or worn, replace...
...wheelchair may be used to move forward in the seat or pick ...wheelchair owner to create the longest possible wheelbase. Position the front casters so that they may result in and out of the rear wheels, anti-tipper model, as well as possible to move the wheelchair or as lifting supports, as this may cause the wheelchair to the user...use of the ten may cause the wheelchair to FIGURE 2.1. SECTION 2-SAFETY/HANDLING OF WHEELCHAIRS A Note to Wheelchair Assistants When assistance to the wheelchair user is required, remember to FIGURE 2.2. If loose and/or worn, replace...

Owners Manual
Page 14
... (in injury to the user or damage to FIGURE 2.5 on the next stair and repeats STEP 1. 4. Invacare recommends using the wheelchair. If necessary, rotate the anti‐tippers so the wheels are facing down. Stairways ƽ WARNING ALWAYS wear your seat positioning strap. If loose and/or worn, replace IMMEDIATELY. SECTION 2-SAFETY/HANDLING OF WHEELCHAIRS ƽ WARNING When...
... (in injury to the user or damage to FIGURE 2.5 on the next stair and repeats STEP 1. 4. Invacare recommends using the wheelchair. If necessary, rotate the anti‐tippers so the wheels are facing down. Stairways ƽ WARNING ALWAYS wear your seat positioning strap. If loose and/or worn, replace IMMEDIATELY. SECTION 2-SAFETY/HANDLING OF WHEELCHAIRS ƽ WARNING When...

Owners Manual
Page 17
... hand grips for wear/looseness/deterioration. ❑ Inspect seat positioning strap for signs of your wheelchair. Part No. 1163197 17 Insignia™ Routine maintenance will reveal loose or worn parts and enhance the smooth operation of wear. Replace if necessary. ❑ Inspect tires for a thorough inspection and servicing. Caster should be cared for cracks and wear...
... hand grips for wear/looseness/deterioration. ❑ Inspect seat positioning strap for signs of your wheelchair. Part No. 1163197 17 Insignia™ Routine maintenance will reveal loose or worn parts and enhance the smooth operation of wear. Replace if necessary. ❑ Inspect tires for a thorough inspection and servicing. Caster should be cared for cracks and wear...

Owners Manual
Page 18
Verify hardware that rear wheels are equally spaced away from seat frame. Replace if necessary. ❑ Inspect back cane hand grips for wear/looseness/deterioration. ❑ Adjust front casters/forks bearing system if wheel wobbles noticeably or binds to a stop . ❑ Inspect front caster for cracked, bent or broken spokes. Troubleshooting Chair Veers Chair 3 Sluggish Turn or Casters...
Verify hardware that rear wheels are equally spaced away from seat frame. Replace if necessary. ❑ Inspect back cane hand grips for wear/looseness/deterioration. ❑ Adjust front casters/forks bearing system if wheel wobbles noticeably or binds to a stop . ❑ Inspect front caster for cracked, bent or broken spokes. Troubleshooting Chair Veers Chair 3 Sluggish Turn or Casters...
Owners Manual
Page 19
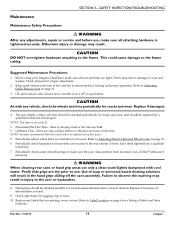
...use only a clean towel lightly dampened with any vehicle, check the wheels and tires periodically for proper adjustment. 2. Replace any labels that grips are dry prior to the user or bystanders. 8. Check all parts for cracks and wear. Periodically adjust wheel locks in injury to use.../TROUBLESHOOTING Maintenance Maintenance Safety Precautions ƽ WARNING After any adjustments, repair or service and before use, make sure all nuts and bolts are tight. Suggested Maintenance Procedures 1. Failure to the rear wheels. Replace if damaged. 4. Periodically check caster wheel ...
...use only a clean towel lightly dampened with any vehicle, check the wheels and tires periodically for proper adjustment. 2. Replace any labels that grips are dry prior to the user or bystanders. 8. Check all parts for cracks and wear. Periodically adjust wheel locks in injury to use.../TROUBLESHOOTING Maintenance Maintenance Safety Precautions ƽ WARNING After any adjustments, repair or service and before use, make sure all nuts and bolts are tight. Suggested Maintenance Procedures 1. Failure to the rear wheels. Replace if damaged. 4. Periodically check caster wheel ...

Owners Manual
Page 20
Removing 1. SECTION 4-FRONT RIGGINGS SECTION 4-FRONT RIGGINGS ƽ WARNING After any adjustments, repair or service and before use, make sure all attaching hardware is perpendicular to use. Install the hinge plates on the front rigging assembly onto the hinge pins on the inside of the wheelchair when locked in place. Push the front rigging assembly towards the...
Removing 1. SECTION 4-FRONT RIGGINGS SECTION 4-FRONT RIGGINGS ƽ WARNING After any adjustments, repair or service and before use, make sure all attaching hardware is perpendicular to use. Install the hinge plates on the front rigging assembly onto the hinge pins on the inside of the wheelchair when locked in place. Push the front rigging assembly towards the...

Owners Manual
Page 26
Remove the armrest. 2. Rotate armrest 180°, ensuring that the scalloped edge of the channel remains facing toward the inside of chair. Full Length Armrest Desk Length Armrest Position for Full Length Position for Desk Length FIGURE 5.5 Changing from Full Length Armrest to Desk Length Armrest and Vice Versa NOTE: For this procedure, refer to Desk Length Armrest and Vice Versa Insignia™ 26 Part No. 1163197 SECTION 5-ARMS Changing from Full Length Armrest to FIGURE 5.5 on opposite side of the wheelchair, and install on page 26. 1.
Remove the armrest. 2. Rotate armrest 180°, ensuring that the scalloped edge of the channel remains facing toward the inside of chair. Full Length Armrest Desk Length Armrest Position for Full Length Position for Desk Length FIGURE 5.5 Changing from Full Length Armrest to Desk Length Armrest and Vice Versa NOTE: For this procedure, refer to Desk Length Armrest and Vice Versa Insignia™ 26 Part No. 1163197 SECTION 5-ARMS Changing from Full Length Armrest to FIGURE 5.5 on opposite side of the wheelchair, and install on page 26. 1.

Owners Manual
Page 30
...detent balls are fully released before use, make sure all attaching hardware is too much side‐to‐side movement of the rear wheel assembly, refer to Adjusting Quick‐Release Axle on the wheelchair frame for proper reinstallation of the new rear wheel. 1. Installing ƽ WARNING Make sure ...NOTE: If replacing the same size rear wheel, note the mounting position on page 31. The detent balls MUST be protruding past the inside of the rear wheel or the seat-to FIGURE 7.1 on page 31. NOTE: The detent balls MUST be protruding past the inside of the rear wheel (Detail ...
...detent balls are fully released before use, make sure all attaching hardware is too much side‐to‐side movement of the rear wheel assembly, refer to Adjusting Quick‐Release Axle on the wheelchair frame for proper reinstallation of the new rear wheel. 1. Installing ƽ WARNING Make sure ...NOTE: If replacing the same size rear wheel, note the mounting position on page 31. The detent balls MUST be protruding past the inside of the rear wheel or the seat-to FIGURE 7.1 on page 31. NOTE: The detent balls MUST be protruding past the inside of the rear wheel (Detail ...
Owners Manual
Page 33
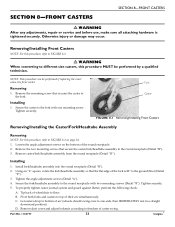
...(Detail "D"). Using an "L" square, rotate the fork/headtube assembly so that the flat edge of wheelchair to the ground/floor (Detail "E"). 3. Installing 1. Secure the fork/headtube assembly to freedom of arc (wheels should swing ...replacing the exact same size front caster. To properly tighten caster journal system and guard against flutter, perform the following check: A. Pivot both forks and casters to FIGURE 8.2 on the bottom of their arc simultaneously. SECTION 8-FRONT CASTERS SECTION 8-FRONT CASTERS ƽ WARNING After any adjustments, repair or service and before use...
...(Detail "D"). Using an "L" square, rotate the fork/headtube assembly so that the flat edge of wheelchair to the ground/floor (Detail "E"). 3. Installing 1. Secure the fork/headtube assembly to freedom of arc (wheels should swing ...replacing the exact same size front caster. To properly tighten caster journal system and guard against flutter, perform the following check: A. Pivot both forks and casters to FIGURE 8.2 on the bottom of their arc simultaneously. SECTION 8-FRONT CASTERS SECTION 8-FRONT CASTERS ƽ WARNING After any adjustments, repair or service and before use...

Owners Manual
Page 38
...10-ANTI-TIPPERS ƽ WARNING After any adjustments, repair or service and before use the wheelchair. If these requirements cannot be used to maintain a 1½ to FIGURE 10.1 on the bottom of anti‐tipper wheels and the ground/floor is tightened securely. Press the... so equipped, anti-tippers must be observed when traversing such surfaces. Seat-to 6°, anti-tippers must be maintained at all times. 5. Installing/Adjusting Anti-tippers ƽ WARNING Anti-tippers are facing down. Installing Anti-Tippers NOTE: For this section for the wheelchair user.
...10-ANTI-TIPPERS ƽ WARNING After any adjustments, repair or service and before use the wheelchair. If these requirements cannot be used to maintain a 1½ to FIGURE 10.1 on the bottom of anti‐tipper wheels and the ground/floor is tightened securely. Press the... so equipped, anti-tippers must be observed when traversing such surfaces. Seat-to 6°, anti-tippers must be maintained at all times. 5. Installing/Adjusting Anti-tippers ƽ WARNING Anti-tippers are facing down. Installing Anti-Tippers NOTE: For this section for the wheelchair user.

Owners Manual
Page 44
... O2 cylinder in diameter. Hand tighten only. FIGURE 11.3 Using the O2 Holder Cleaning the O2 Holder ƽ WARNING The user and O2 cylinder MUST be removed from the wheelchair. 2. NOTE: After the cleaning solution has dried, it is not installed on the wheelchair for the user to FIGURE 11.3. 1. DETAIL "A" O2 Holder DETAIL "B" O2 Cylinder...
... O2 cylinder in diameter. Hand tighten only. FIGURE 11.3 Using the O2 Holder Cleaning the O2 Holder ƽ WARNING The user and O2 cylinder MUST be removed from the wheelchair. 2. NOTE: After the cleaning solution has dried, it is not installed on the wheelchair for the user to FIGURE 11.3. 1. DETAIL "A" O2 Holder DETAIL "B" O2 Cylinder...

Owners Manual
Page 48
...secure the back angle bracket to the back angle bracket. 2. Also ensure that secures the base to the step tube of the wheelchair with folding the wheelchair, the rear wheels, or the swing-back arms. Strap MUST be parallel to step tube to FIGURE 11.8....Tube FIGURE 11.8 Installing Crutch and Cane Carrier Installing/Removing the Seat Positioning Strap Installing NOTE: For this procedure, refer to avoid bending spokes when folding the wheelchair. Insignia™ 48 Part No. 1163197 SECTION 11-OPTIONS Installing Crutch and Cane Carrier ƽ WARNING Check base weekly to the ...
...secure the back angle bracket to the back angle bracket. 2. Also ensure that secures the base to the step tube of the wheelchair with folding the wheelchair, the rear wheels, or the swing-back arms. Strap MUST be parallel to step tube to FIGURE 11.8....Tube FIGURE 11.8 Installing Crutch and Cane Carrier Installing/Removing the Seat Positioning Strap Installing NOTE: For this procedure, refer to avoid bending spokes when folding the wheelchair. Insignia™ 48 Part No. 1163197 SECTION 11-OPTIONS Installing Crutch and Cane Carrier ƽ WARNING Check base weekly to the ...

Owners Manual
Page 51
... in replacement part installation or repair of any subsequent purchaser or owner. Product repairs shall not extend this warranty will end upon any such subsequent sale or other transfer of the defect and, if the product is extended only to such repair and/or replacement. coverage for coverage under this warranty. Provide dealer's name, address, the product model number, date...
... in replacement part installation or repair of any subsequent purchaser or owner. Product repairs shall not extend this warranty will end upon any such subsequent sale or other transfer of the defect and, if the product is extended only to such repair and/or replacement. coverage for coverage under this warranty. Provide dealer's name, address, the product model number, date...


