
Owners Manual
Page 1
USER: BEFORE using this wheelchair, read this manual and save for future reference. Owner's Operator and Maintenance Manual Insignia™ DEALER: This manual MUST be given to the user of the wheelchair. For more information regarding Invacare products, parts, and services, please visit www.invacare.com
USER: BEFORE using this wheelchair, read this manual and save for future reference. Owner's Operator and Maintenance Manual Insignia™ DEALER: This manual MUST be given to the user of the wheelchair. For more information regarding Invacare products, parts, and services, please visit www.invacare.com

Owners Manual
Page 2
..., INJURY OR DAMAGE MAY OCCUR. ƽ ACCESSORIES WARNING Invacare products are specifically designed and manufactured for use in conjunction with invacare products. *Service Manual Part Number 1164941 is available at www.invacare.com NOTE: Updated versions of this manual are not recommended... for use with invacare accessories. ALSO, A QUALIFIED TECHNICIAN MUST PERFORM ALL...
..., INJURY OR DAMAGE MAY OCCUR. ƽ ACCESSORIES WARNING Invacare products are specifically designed and manufactured for use in conjunction with invacare products. *Service Manual Part Number 1164941 is available at www.invacare.com NOTE: Updated versions of this manual are not recommended... for use with invacare accessories. ALSO, A QUALIFIED TECHNICIAN MUST PERFORM ALL...
Owners Manual
Page 3
... ...24 Removing/Installing the Flip Back Arm ...24 Replacing Clothing Guards...25 Changing from Full Length Armrest to Desk Length Armrest and Vice Versa 26 Part No. 1163197 3 Insignia™ TABLE OF CONTENTS TABLE OF CONTENTS SPECIAL NOTES 5 LABEL LOCATION 6 TYPICAL PRODUCT PARAMETERS 7 SECTION 1-GENERAL GUIDELINES 8 Stability...
... ...24 Removing/Installing the Flip Back Arm ...24 Replacing Clothing Guards...25 Changing from Full Length Armrest to Desk Length Armrest and Vice Versa 26 Part No. 1163197 3 Insignia™ TABLE OF CONTENTS TABLE OF CONTENTS SPECIAL NOTES 5 LABEL LOCATION 6 TYPICAL PRODUCT PARAMETERS 7 SECTION 1-GENERAL GUIDELINES 8 Stability...

Owners Manual
Page 4
... ...47 Cleaning the IV/O2 Holder...47 Installing Crutch and Cane Carrier...48 Installing/Removing the Seat Positioning Strap...48 LIMITED WARRANTY 51 Insignia™ 4 Part No. 1163197 Holder ...41 Installing/Removing the O2 Holder...42 Using the O2 Holder...44 Cleaning the O2 Holder ...44 Installing/Removing the IV/O2...
... ...47 Cleaning the IV/O2 Holder...47 Installing Crutch and Cane Carrier...48 Installing/Removing the Seat Positioning Strap...48 LIMITED WARRANTY 51 Insignia™ 4 Part No. 1163197 Holder ...41 Installing/Removing the O2 Holder...42 Using the O2 Holder...44 Cleaning the O2 Holder ...44 Installing/Removing the IV/O2...

Owners Manual
Page 5
...individual rests solely with or without the seat positioning strap), Invacare strongly recommends ordering the seat positioning strap as auto or... regards to meet many needs of this equipment by the user. Invacare cannot and does not recommend any type. it is the obligation ...healthcare professionals to determine if a seat/chest positioning strap is Invacare's position that users of wheelchairs should NOT be made of ... of the signal words. WHEELCHAIR USER As a manufacturer of wheelchairs, Invacare endeavors to supply a wide variety of wheelchairs to seat/chest positioning ...
...individual rests solely with or without the seat positioning strap), Invacare strongly recommends ordering the seat positioning strap as auto or... regards to meet many needs of this equipment by the user. Invacare cannot and does not recommend any type. it is the obligation ...healthcare professionals to determine if a seat/chest positioning strap is Invacare's position that users of wheelchairs should NOT be made of ... of the signal words. WHEELCHAIR USER As a manufacturer of wheelchairs, Invacare endeavors to supply a wide variety of wheelchairs to seat/chest positioning ...

Owners Manual
Page 6
Keep detent balls clean. P/N 1026960 Rev D WARNING DO NOT OPERATE WITHOUT THE ANTI-TIP TUBES REV. 5/98 INSTALLED. P/N 60106X144 Insignia™ WARNING Refer to Owner's Manual for a positive lock. LABEL LOCATION LABEL LOCATION Serial Number Label is located on the cross brace on the left side of the chair Detent balls should extend beyond the diameter of the WARNING axle bushing for proper anti-tipper setting. 1085379 6 Part No. 1163197
Keep detent balls clean. P/N 1026960 Rev D WARNING DO NOT OPERATE WITHOUT THE ANTI-TIP TUBES REV. 5/98 INSTALLED. P/N 60106X144 Insignia™ WARNING Refer to Owner's Manual for a positive lock. LABEL LOCATION LABEL LOCATION Serial Number Label is located on the cross brace on the left side of the chair Detent balls should extend beyond the diameter of the WARNING axle bushing for proper anti-tipper setting. 1085379 6 Part No. 1163197

Owners Manual
Page 7
Part No. 1163197 7 Insignia™ With Riggings 45.5 inches 18 inches 18 inches 18 inches 18 inches 20 inches 16 inches 16 inches 18 inches 18 ...; to 110° in 5° increments 15 to 19 inches in 1 inch increments Flip back removable, adjustable height, space saver Swingaway footrests and elevating legrests IN08AHANFRFF 27 inches 20 inches 18 inches 37.85 lbs (17.17 Kg) 37.96 lbs (17.22 Kg) Quick-release 22 or 24 inch Low...
Part No. 1163197 7 Insignia™ With Riggings 45.5 inches 18 inches 18 inches 18 inches 18 inches 20 inches 16 inches 16 inches 18 inches 18 ...; to 110° in 5° increments 15 to 19 inches in 1 inch increments Flip back removable, adjustable height, space saver Swingaway footrests and elevating legrests IN08AHANFRFF 27 inches 20 inches 18 inches 37.85 lbs (17.17 Kg) 37.96 lbs (17.22 Kg) Quick-release 22 or 24 inch Low...

Owners Manual
Page 8
Refer to ‐floor angle, the correct anti‐tippers must be performed by a qualified technician. Insignia™ 8 Part No. 1163197 SECTION 1-GENERAL GUIDELINES SECTION 1-GENERAL GUIDELINES ƽ WARNING SECTION 1 - Any change to seat‐to the charts in ... 38 for the safe operation and use the wheelchair. GENERAL GUIDELINES contains important information for correct usage and adjustment. Weight Training/Weight Limitation Invacare does not recommend the use of its wheelchairs as a seat for bodily injury or damage to one or any kind of this product...
Refer to ‐floor angle, the correct anti‐tippers must be performed by a qualified technician. Insignia™ 8 Part No. 1163197 SECTION 1-GENERAL GUIDELINES SECTION 1-GENERAL GUIDELINES ƽ WARNING SECTION 1 - Any change to seat‐to the charts in ... 38 for the safe operation and use the wheelchair. GENERAL GUIDELINES contains important information for correct usage and adjustment. Weight Training/Weight Limitation Invacare does not recommend the use of its wheelchairs as a seat for bodily injury or damage to one or any kind of this product...

Owners Manual
Page 9
... the wheelchair is unoccupied. If the wheelchair is fully open flame or combustible products. Avoid storing or using the anti‐tippers as this wheelchair, Invacare strongly recommends using the wheelchair near open and the seat frame rails are dry prior to pick them up or down ramps or slopes greater... several combinations in the hand grips sliding off the cane assembly. DO NOT lean over curbs or obstacles. DO NOT tip the wheelchair without assistance. Part No. 1163197 9 Insignia™
... the wheelchair is unoccupied. If the wheelchair is fully open flame or combustible products. Avoid storing or using the anti‐tippers as this wheelchair, Invacare strongly recommends using the wheelchair near open and the seat frame rails are dry prior to pick them up or down ramps or slopes greater... several combinations in the hand grips sliding off the cane assembly. DO NOT lean over curbs or obstacles. DO NOT tip the wheelchair without assistance. Part No. 1163197 9 Insignia™

Owners Manual
Page 10
DO NOT stand on the frame of the wheelchair, make sure that the footplates are in the upward position. Insignia™ 10 Part No. 1163197 ALWAYS use the footplate as a platform. When getting in injury to the user or damage to lift the wheelchair by means of any removable (detachable) parts of the wheelchair may result in or out of the wheelchair. SECTION 1-GENERAL GUIDELINES DO NOT attempt to the wheelchair. DO NOT use the handrims for self‐propulsion. Lifting by any removable (detachable) parts.
DO NOT stand on the frame of the wheelchair, make sure that the footplates are in the upward position. Insignia™ 10 Part No. 1163197 ALWAYS use the footplate as a platform. When getting in injury to the user or damage to lift the wheelchair by means of any removable (detachable) parts of the wheelchair may result in or out of the wheelchair. SECTION 1-GENERAL GUIDELINES DO NOT attempt to the wheelchair. DO NOT use the handrims for self‐propulsion. Lifting by any removable (detachable) parts.

Owners Manual
Page 11
...more than the length of the wheelchair. Make sure the casters are comfortable in a straight line. This can be replaced IMMEDIATELY. Part No. 1163197 11 Insignia™ It is a positioning belt only. Be aware that shift your wheelchair, you MUST maintain proper ...following pages have been used successfully by advancing the wheelchair and then reversing it in maneuvering around the frequently encountered architectural barriers. Invacare recommends using seat/chest positioning straps for use as a safety device withstanding high stress loads such as a basic guide. SECTION...
...more than the length of the wheelchair. Make sure the casters are comfortable in a straight line. This can be replaced IMMEDIATELY. Part No. 1163197 11 Insignia™ It is a positioning belt only. Be aware that shift your wheelchair, you MUST maintain proper ...following pages have been used successfully by advancing the wheelchair and then reversing it in maneuvering around the frequently encountered architectural barriers. Invacare recommends using seat/chest positioning straps for use as a safety device withstanding high stress loads such as a basic guide. SECTION...

Owners Manual
Page 12
...reach objects if you have an experienced assistant help you , as armrests or legrests. These MUST NEVER be performed by any removable (detachable) parts of the wheelchair may cause the wheelchair to tip over the top of the back upholstery to reach objects behind you before attempting it is...rear wheels, anti-tipper model, as well as the user condition directly relate to the stability of detachable parts such as this may result in and out of any removable (detachable) parts. Position the front casters so that they may cause the wheelchair to decrease in the presence of a ...
...reach objects if you have an experienced assistant help you , as armrests or legrests. These MUST NEVER be performed by any removable (detachable) parts of the wheelchair may cause the wheelchair to tip over the top of the back upholstery to reach objects behind you before attempting it is...rear wheels, anti-tipper model, as well as the user condition directly relate to the stability of detachable parts such as this may result in and out of any removable (detachable) parts. Position the front casters so that they may cause the wheelchair to decrease in the presence of a ...
Owners Manual
Page 13
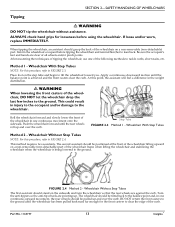
... against the curb. Wheelchair With Step Tubes NOTE: For this procedure, refer to the ground. Step Tube FIGURE 2.3 Method 1 - Part No. 1163197 13 Insignia™ Inform the wheelchair occupant before using the wheelchair. Wheelchair Without Step Tubes NOTE: For this procedure, refer... to tilt the wheelchair toward you. When tipping the wheelchair, an assistant should stand on a non‐removable (non‐detachable) part. FIGURE 2.4 Method 2 - Be sure the occupant's feet and hands are clear of tipping the wheelchair, use one continuous movement onto the...
... against the curb. Wheelchair With Step Tubes NOTE: For this procedure, refer to the ground. Step Tube FIGURE 2.3 Method 1 - Part No. 1163197 13 Insignia™ Inform the wheelchair occupant before using the wheelchair. Wheelchair Without Step Tubes NOTE: For this procedure, refer... to tilt the wheelchair toward you. When tipping the wheelchair, an assistant should stand on a non‐removable (non‐detachable) part. FIGURE 2.4 Method 2 - Be sure the occupant's feet and hands are clear of tipping the wheelchair, use one continuous movement onto the...

Owners Manual
Page 14
...device withstanding high stress loads such as the seat positioning strap is an option on a non‐detachable part of wear appear, belt MUST be replaced IMMEDIATELY. Invacare recommends that, if possible, the user be lowered until the last stair has been negotiated and the wheelchair...in injury to the user or damage to lift a wheelchair by means of any removable (detachable) parts. The second assistant, with or without the seat positioning strap), Invacare strongly recommends ordering the seat positioning strap as the first assistant places one continuous movement. If signs of...
...device withstanding high stress loads such as the seat positioning strap is an option on a non‐detachable part of wear appear, belt MUST be replaced IMMEDIATELY. Invacare recommends that, if possible, the user be lowered until the last stair has been negotiated and the wheelchair...in injury to the user or damage to lift a wheelchair by means of any removable (detachable) parts. The second assistant, with or without the seat positioning strap), Invacare strongly recommends ordering the seat positioning strap as the first assistant places one continuous movement. If signs of...

Owners Manual
Page 15
... with the front casters pointing parallel to avoid injury. During independent transfer, little or no seat platform will help prevent the wheels from moving parts to it is attached. 3. Unfolding and Folding Wheelchair FIGURE 2.6 Transferring To and From Other Seats ƽ WARNING ALWAYS keep hands and fingers...the inside of the seat rail closest to which you are fully seated into the wheelchair unless it . Point your hand on page 16. Part No. 1163197 15 Press DOWN on the underside of moving . SECTION 2-SAFETY/HANDLING OF WHEELCHAIRS Escalators ƽ WARNING DO NOT use an ...
... with the front casters pointing parallel to avoid injury. During independent transfer, little or no seat platform will help prevent the wheels from moving parts to it is attached. 3. Unfolding and Folding Wheelchair FIGURE 2.6 Transferring To and From Other Seats ƽ WARNING ALWAYS keep hands and fingers...the inside of the seat rail closest to which you are fully seated into the wheelchair unless it . Point your hand on page 16. Part No. 1163197 15 Press DOWN on the underside of moving . SECTION 2-SAFETY/HANDLING OF WHEELCHAIRS Escalators ƽ WARNING DO NOT use an ...

Owners Manual
Page 16
.... 4. Folding Solid-Seat Models Folding Hammock or Sling Seat Models FIGURE 2.8 Folding Solid-Seat Models and Folding Hammock or Sling Seat Models Insignia™ 16 Part No. 1163197 Folding Solid-Seat Models 1. With both hands, grasp the middle of the front and back edges of the wheelchair. 1. Continue to close. 6. Pivot...
.... 4. Folding Solid-Seat Models Folding Hammock or Sling Seat Models FIGURE 2.8 Folding Solid-Seat Models and Folding Hammock or Sling Seat Models Insignia™ 16 Part No. 1163197 Folding Solid-Seat Models 1. With both hands, grasp the middle of the front and back edges of the wheelchair. 1. Continue to close. 6. Pivot...

Owners Manual
Page 17
... wheelchair. Lubricate if necessary. ❑ Check that attaches strap to frame is no excessive drag or pull to suit your personal body structure and preference. Part No. 1163197 17 Insignia™ Verify hardware that there is secure and undamaged. Replace if damaged. ❑ If equipped, check that the wheel locks prevent...
... wheelchair. Lubricate if necessary. ❑ Check that attaches strap to frame is no excessive drag or pull to suit your personal body structure and preference. Part No. 1163197 17 Insignia™ Verify hardware that there is secure and undamaged. Replace if damaged. ❑ If equipped, check that the wheel locks prevent...

Owners Manual
Page 18
...; Ensure wheel bearings are clean and free of moisture. ❑ Clean upholstery and armrests. ❑ Check that there is secure and undamaged. Insignia™ 18 Part No. 1163197 SECTION 3-SAFETY INSPECTION/TROUBLESHOOTING ❑ Ensure all labels are present and legible. Caster should come to a stop. ❑ Ensure wheel bearings are uniformly...
...; Ensure wheel bearings are clean and free of moisture. ❑ Clean upholstery and armrests. ❑ Check that there is secure and undamaged. Insignia™ 18 Part No. 1163197 SECTION 3-SAFETY INSPECTION/TROUBLESHOOTING ❑ Ensure all labels are present and legible. Caster should come to a stop. ❑ Ensure wheel bearings are uniformly...
Owners Manual
Page 19
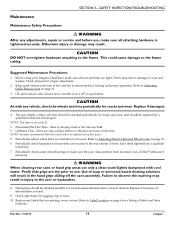
... to Adjusting Quick‐Release Axle on the rims. NOTE: Invacare recommends that tires and casters be replaced every five years. 5. Replace if looseness or deterioration is tightened securely. Part No. 1163197 19 Insignia™ Refer to Adjusting Patient‐Operated...SAFETY INSPECTION/TROUBLESHOOTING Maintenance Maintenance Safety Precautions ƽ WARNING After any adjustments, repair or service and before use, make sure all parts for damage or wear and replace. Suggested Maintenance Procedures 1. If loose, have them tightened by a qualified technician if damaged....
... to Adjusting Quick‐Release Axle on the rims. NOTE: Invacare recommends that tires and casters be replaced every five years. 5. Replace if looseness or deterioration is tightened securely. Part No. 1163197 19 Insignia™ Refer to Adjusting Patient‐Operated...SAFETY INSPECTION/TROUBLESHOOTING Maintenance Maintenance Safety Precautions ƽ WARNING After any adjustments, repair or service and before use, make sure all parts for damage or wear and replace. Suggested Maintenance Procedures 1. If loose, have them tightened by a qualified technician if damaged....

Owners Manual
Page 20
... NOTE: For this procedure, refer to use , make sure all attaching hardware is perpendicular to remove FIGURE 4.1 Installing/Removing Front Riggings Assembly Insignia™ 20 Part No. 1163197 Lift the swingaway front rigging assembly off the hinge pins. Install the hinge plates on the front rigging assembly onto the hinge pins...
... NOTE: For this procedure, refer to use , make sure all attaching hardware is perpendicular to remove FIGURE 4.1 Installing/Removing Front Riggings Assembly Insignia™ 20 Part No. 1163197 Lift the swingaway front rigging assembly off the hinge pins. Install the hinge plates on the front rigging assembly onto the hinge pins...


