Owners Manual
Page 1
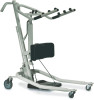
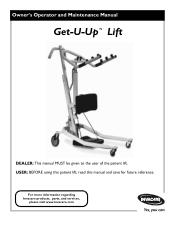
For more information regarding Invacare products, parts, and services, please visit www.invacare.com Owner's Operator and Maintenance Manual Get-U-Up™ Lift DEALER: This manual MUST be given to the user of the patient lift. USER: BEFORE using this patient lift, read this manual and save for future reference.
For more information regarding Invacare products, parts, and services, please visit www.invacare.com Owner's Operator and Maintenance Manual Get-U-Up™ Lift DEALER: This manual MUST be given to the user of the patient lift. USER: BEFORE using this patient lift, read this manual and save for future reference.
Owners Manual
Page 2
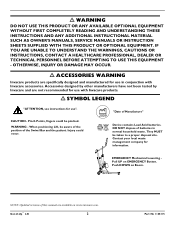
..., INJURY OR DAMAGE MAY OCCUR. ƽ ACCESSORIES WARNING Invacare products are specifically designed and manufactured for use ". Contact your local waste management company for use in normal household waste. Get-U-Up™ Lift 2 Part No 1148115 CAUTION - WARNING - DO NOT dispose...the position of this manual are not recommended for use with Invacare products. ƽ SYMBOL LEGEND "ATTENTION, see instructions for information. EMERGENCY Mechanical Lowering Pull UP on www.invacare.com. When positioning Lift, be taken to a proper disposal site. NOTE: Updated versions...
..., INJURY OR DAMAGE MAY OCCUR. ƽ ACCESSORIES WARNING Invacare products are specifically designed and manufactured for use ". Contact your local waste management company for use in normal household waste. Get-U-Up™ Lift 2 Part No 1148115 CAUTION - WARNING - DO NOT dispose...the position of this manual are not recommended for use with Invacare products. ƽ SYMBOL LEGEND "ATTENTION, see instructions for information. EMERGENCY Mechanical Lowering Pull UP on www.invacare.com. When positioning Lift, be taken to a proper disposal site. NOTE: Updated versions...
Owners Manual
Page 3
... NOTES 5 LABEL LOCATIONS 6 TYPICAL PRODUCT PARAMETERS 7 SECTION 1-GENERAL GUIDELINES 8 Weight Limitation ...8 Assembling the Lift...8 Using the Sling...8 Operating the Lift...9 Lifting the Patient ...9 Transferring the Patient...9 Performing Maintenance...9 SECTION 2-ASSEMBLY 10 Attach the Mast to the Base Assembly......12 SECTION 3-OPERATION 13 Introduction...13 Operating the Lift...14 Opening/Closing the Legs ...14 Raising/Lowering Model Hydraulic Lifts ...15 Adjusting Knee Pad Height ...15 SECTION 4-LIFTING 16 Introduction...16 Lifting the Patient ...17 Moving the Patient ...18 SECTION...
... NOTES 5 LABEL LOCATIONS 6 TYPICAL PRODUCT PARAMETERS 7 SECTION 1-GENERAL GUIDELINES 8 Weight Limitation ...8 Assembling the Lift...8 Using the Sling...8 Operating the Lift...9 Lifting the Patient ...9 Transferring the Patient...9 Performing Maintenance...9 SECTION 2-ASSEMBLY 10 Attach the Mast to the Base Assembly......12 SECTION 3-OPERATION 13 Introduction...13 Operating the Lift...14 Opening/Closing the Legs ...14 Raising/Lowering Model Hydraulic Lifts ...15 Adjusting Knee Pad Height ...15 SECTION 4-LIFTING 16 Introduction...16 Lifting the Patient ...17 Moving the Patient ...18 SECTION...
Owners Manual
Page 4
TABLE OF CONTENTS TABLE OF CONTENTS SECTION 8-MAINTENANCE 25 Maintenance Safety Inspection Checklist...25 Hydraulic Pump...25 Lubricating the Lift ...26 Detecting Wear and Damage...26 Cleaning the Sling and the Lift...26 Replacing the Knee Pad ...26 LIMITED WARRANTY 27 Get-U-Up™ Lift 4 Part No 1148115
TABLE OF CONTENTS TABLE OF CONTENTS SECTION 8-MAINTENANCE 25 Maintenance Safety Inspection Checklist...25 Hydraulic Pump...25 Lubricating the Lift ...26 Detecting Wear and Damage...26 Cleaning the Sling and the Lift...26 Replacing the Knee Pad ...26 LIMITED WARRANTY 27 Get-U-Up™ Lift 4 Part No 1148115
Owners Manual
Page 5
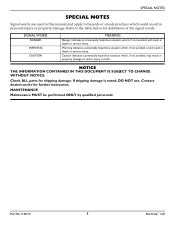
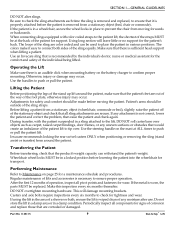
.... NOTICE THE INFORMATION CONTAINED IN THIS DOCUMENT IS SUBJECT TO CHANGE WITHOUT NOTICE. Contact dealer/carrier for shipping damage. Part No 1148115 5 Get-U-Up™ Lift Refer to hazards or unsafe practices which could result in death or serious injury. MAINTENANCE Maintenance MUST be performed ONLY by qualified personnel. SIGNAL WORD...
.... NOTICE THE INFORMATION CONTAINED IN THIS DOCUMENT IS SUBJECT TO CHANGE WITHOUT NOTICE. Contact dealer/carrier for shipping damage. Part No 1148115 5 Get-U-Up™ Lift Refer to hazards or unsafe practices which could result in death or serious injury. MAINTENANCE Maintenance MUST be performed ONLY by qualified personnel. SIGNAL WORD...
Owners Manual
Page 6
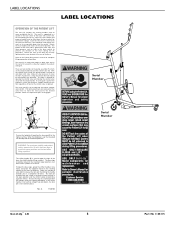
... position. A patient in the center to the horn would be elevated by securely tightening the screw located at the rear of the mast during lift. Pull both sides and in a sling attached to accept the sling that prevents sudden lowering of the horn regardless of the base with slow ... legs should be vertical. When the footplate is grooved on either side, and those grooves seat on the steering handle of the base for complete lifting preparation information. The bottom of the mast tube is up and down into a hole in place. Secure the mast to a narrow position for ...
... position. A patient in the center to the horn would be elevated by securely tightening the screw located at the rear of the mast during lift. Pull both sides and in a sling attached to accept the sling that prevents sudden lowering of the horn regardless of the base with slow ... legs should be vertical. When the footplate is grooved on either side, and those grooves seat on the steering handle of the base for complete lifting preparation information. The bottom of the mast tube is up and down into a hole in place. Secure the mast to a narrow position for ...

Owners Manual
Page 7
... / 3 inches Standing or Transport Polyester 36 inches 13 inches 38.5 inches 36 inches 350 lbs 100 lbs 88 lbs Part No 1148115 7 Get-U-Up™ Lift TYPICAL PRODUCT PARAMETERS TYPICAL PRODUCT PARAMETERS HEIGHT AT SLING HOOK-UP -
... / 3 inches Standing or Transport Polyester 36 inches 13 inches 38.5 inches 36 inches 350 lbs 100 lbs 88 lbs Part No 1148115 7 Get-U-Up™ Lift TYPICAL PRODUCT PARAMETERS TYPICAL PRODUCT PARAMETERS HEIGHT AT SLING HOOK-UP -
Owners Manual
Page 8
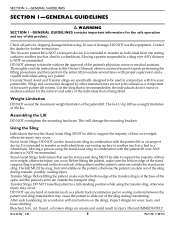
...with proper supervision and a capable individual acting as a bed to slide out of experts performing the lifting procedures and then perform the entire lift procedure several times with Invacare patient lifts. Before lifting the patient, make sure the bottom edge of the transfer sling is positioned on the patient, ...the stand assist sling MUST be able to support the majority of their own weight, otherwise injury may occur. The Invacare patient lift is being lifted. Invacare Stand Assist and Transfer slings are unsafe and could result in this product. The Get‐U‐Up...
...with proper supervision and a capable individual acting as a bed to slide out of experts performing the lifting procedures and then perform the entire lift procedure several times with Invacare patient lifts. Before lifting the patient, make sure the bottom edge of the transfer sling is positioned on the patient, ...the stand assist sling MUST be able to support the majority of their own weight, otherwise injury may occur. The Invacare patient lift is being lifted. Invacare Stand Assist and Transfer slings are unsafe and could result in this product. The Get‐U‐Up...
Owners Manual
Page 9
...equipped with the patient suspended in various positions. Use the handles to the patient lift, the shortest of the patient for support. During transfer, with color coded straps to push or pull the patient. Invacare recommends locking the rear swivel casters ONLY when positioning or removing the sling (... attachments are corroded or damaged. The loops of the sling are out of the way of the patient lift to Maintenance on page 25 for tightness and wear. Use an Invacare sling that it easy to check for a maintenance schedule and procedures. Use the steering handle on the ...
...equipped with the patient suspended in various positions. Use the handles to the patient lift, the shortest of the patient for support. During transfer, with color coded straps to push or pull the patient. Invacare recommends locking the rear swivel casters ONLY when positioning or removing the sling (... attachments are corroded or damaged. The loops of the sling are out of the way of the patient lift to Maintenance on page 25 for tightness and wear. Use an Invacare sling that it easy to check for a maintenance schedule and procedures. Use the steering handle on the ...
Owners Manual
Page 10
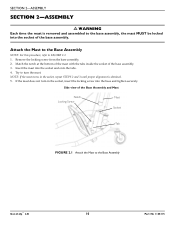
Attach the Mast to the Base Assembly NOTE: For this procedure, refer to the Base Assembly Get-U-Up™ Lift 10 Part No 1148115 If the mast does not turn the mast. Remove the locking screw from the base assembly. 2. Try to turn in the ...
Attach the Mast to the Base Assembly NOTE: For this procedure, refer to the Base Assembly Get-U-Up™ Lift 10 Part No 1148115 If the mast does not turn the mast. Remove the locking screw from the base assembly. 2. Try to turn in the ...
Owners Manual
Page 11
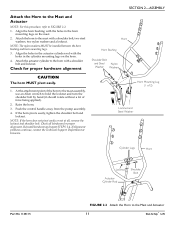
... Bushing Shoulder Bolt and Steel Nylon Washer Washers CAUTION The horn MUST pivot easily. 1. NOTE: If the horn does not pivot easily or not at Invacare. SECTION 2-ASSEMBLY Attach the Horn to the Mast and Actuator NOTE: For this procedure, refer to the Mast and Actuator 11 Get-U-Up™...
... Bushing Shoulder Bolt and Steel Nylon Washer Washers CAUTION The horn MUST pivot easily. 1. NOTE: If the horn does not pivot easily or not at Invacare. SECTION 2-ASSEMBLY Attach the Horn to the Mast and Actuator NOTE: For this procedure, refer to the Mast and Actuator 11 Get-U-Up™...
Owners Manual
Page 12
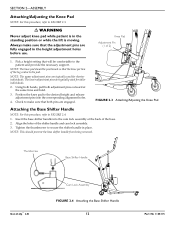
...Pad NOTE: For this procedure, refer to FIGURE 2.3. ƽ WARNING Never adjust knee pad while patient is in the standing position or while the lift is moving. FIGURE 2.3 Attaching/Adjusting the Knee Pad Attaching the Base Shifter Handle NOTE: For this procedure, refer to FIGURE 2.4. 1. Insert the base... used for shorter individuals. NOTE: The upper adjustment pins are fully engaged in place. Thumbscrew Base Shifter Handle Get-U-Up™ Lift Cam Lock Assembly FIGURE 2.4 Attaching the Base Shifter Handle 12 Part No 1148115 Knee Pad Adjustment Pin (1 of the base. 2.
...Pad NOTE: For this procedure, refer to FIGURE 2.3. ƽ WARNING Never adjust knee pad while patient is in the standing position or while the lift is moving. FIGURE 2.3 Attaching/Adjusting the Knee Pad Attaching the Base Shifter Handle NOTE: For this procedure, refer to FIGURE 2.4. 1. Insert the base... used for shorter individuals. NOTE: The upper adjustment pins are fully engaged in place. Thumbscrew Base Shifter Handle Get-U-Up™ Lift Cam Lock Assembly FIGURE 2.4 Attaching the Base Shifter Handle 12 Part No 1148115 Knee Pad Adjustment Pin (1 of the base. 2.
Owners Manual
Page 13
... keep hands, fingers, feet and toes clear of the stand up lift only as long as it takes to the maximum open position. Part No 1148115 13 Get-U-Up™ Lift Invacare slings and lift accessories are specifically designed to move through the passage. DO NOT exceed... maximum weight limitation of the lift in conjunction with the legs of the lift. The use of one assistant. Thoroughly read the instructions...
... keep hands, fingers, feet and toes clear of the stand up lift only as long as it takes to the maximum open position. Part No 1148115 13 Get-U-Up™ Lift Invacare slings and lift accessories are specifically designed to move through the passage. DO NOT exceed... maximum weight limitation of the lift in conjunction with the legs of the lift. The use of one assistant. Thoroughly read the instructions...
Owners Manual
Page 14
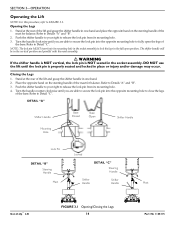
... Open Shifter Handle Mounting Hole Lock Pin Locked DETAIL "B" Steering Handle DETAIL "C" Steering Handle Mast Shifter Handle Shifter Handle Mast Get-U-Up™ Lift FIGURE 3.1 Opening/Closing the Legs 14 Part No 1148115 Stand at the rear of the mast for balance. Place the opposite hand on the ... the shifter handle in one ‐hand and place the opposite hand on the steering handle of the base. Stand at the rear of the lift and grasp the shifter handle in one ‐hand. 2. Refer to Detail "C". Refer to Details "A" and "B". 2. The shifter handle will be in ...
... Open Shifter Handle Mounting Hole Lock Pin Locked DETAIL "B" Steering Handle DETAIL "C" Steering Handle Mast Shifter Handle Shifter Handle Mast Get-U-Up™ Lift FIGURE 3.1 Opening/Closing the Legs 14 Part No 1148115 Stand at the rear of the mast for balance. Place the opposite hand on the ... the shifter handle in one ‐hand and place the opposite hand on the steering handle of the base. Stand at the rear of the lift and grasp the shifter handle in one ‐hand. 2. Refer to Detail "C". Refer to Details "A" and "B". 2. The shifter handle will be in ...
Owners Manual
Page 15
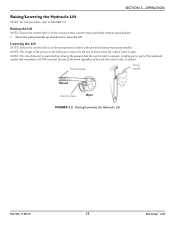
... is in the closed position (control valve positioned towards pump handle). 1. Lowering the Lift NOTE: Ensure the control valve is opened . NOTE: The rate of the person on the lifting arm causes the lift arm to lower when the control valve is opened . Pump Handle Pump Handle Closed ...Control Valve Open FIGURE 3.2 Raising/Lowering the Hydraulic Lift Part No 1148115 15 Get-U-Up™ Lift Move the pump handle up and down to FIGURE 3.2. NOTE: The weight of descent is controlled by varying the amount...
... is in the closed position (control valve positioned towards pump handle). 1. Lowering the Lift NOTE: Ensure the control valve is opened . NOTE: The rate of the person on the lifting arm causes the lift arm to lower when the control valve is opened . Pump Handle Pump Handle Closed ...Control Valve Open FIGURE 3.2 Raising/Lowering the Hydraulic Lift Part No 1148115 15 Get-U-Up™ Lift Move the pump handle up and down to FIGURE 3.2. NOTE: The weight of descent is controlled by varying the amount...
Owners Manual
Page 16
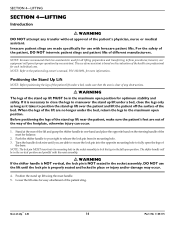
...legs of the health care professional for each individual case. Lower the lift arms for all lifting preparation and transferring to/from its mounting hole in the socket assembly to release the lock pin from procedures; NOTE: Invacare recommends that the area is necessary to close the legs to secure... the lock pin into its mounting hole. 3. Position the stand up lift near the patient, make sure that two assistants be in the vertical position and parallel with Invacare patient lifts. Turn the handle clockwise until the lock pin is based on the steering handle of ...
...legs of the health care professional for each individual case. Lower the lift arms for all lifting preparation and transferring to/from its mounting hole in the socket assembly to release the lock pin from procedures; NOTE: Invacare recommends that the area is necessary to close the legs to secure... the lock pin into its mounting hole. 3. Position the stand up lift near the patient, make sure that two assistants be in the vertical position and parallel with Invacare patient lifts. Turn the handle clockwise until the lock pin is based on the steering handle of ...
Owners Manual
Page 17
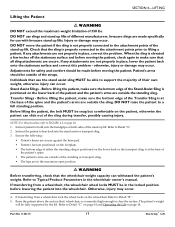
...edge of either the standing sling is at the base of the patient and the patient's arms are outside the standing sling. SECTION 4-LIFTING Lifting the Patient ƽ WARNING DO NOT exceed the maximum weight limitation of the sling during transfer, possibly causing injury. Instruct the patient to...ƽ WARNING Before transferring, check that all sling attachments are not properly in place, correct the problem. Adjustments for use with Invacare stand up lifts of the Stand Assist Sling is positioned on page 18. 1. DO NOT raise the patient to Typical Product Parameters in the locked ...
...edge of either the standing sling is at the base of the patient and the patient's arms are outside the standing sling. SECTION 4-LIFTING Lifting the Patient ƽ WARNING DO NOT exceed the maximum weight limitation of the sling during transfer, possibly causing injury. Instruct the patient to...ƽ WARNING Before transferring, check that all sling attachments are not properly in place, correct the problem. Adjustments for use with Invacare stand up lifts of the Stand Assist Sling is positioned on page 18. 1. DO NOT raise the patient to Typical Product Parameters in the locked ...
Owners Manual
Page 18
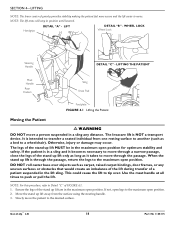
LIFT DETAIL "B" - The Invacare lift is intended to move a person suspended in a sling any uneven surfaces or obstacles that would create an imbalance of the lift during transfer of the stand up lift are in the maximum open position. When the stand up lift MUST be in a sling and it becomes necessary to a wheelchair). Get-U-Up™...
LIFT DETAIL "B" - The Invacare lift is intended to move a person suspended in a sling any uneven surfaces or obstacles that would create an imbalance of the lift during transfer of the stand up lift are in the maximum open position. When the stand up lift MUST be in a sling and it becomes necessary to a wheelchair). Get-U-Up™...
Owners Manual
Page 19
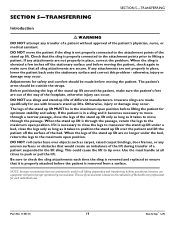
...check the sling attachments each individual case. NOTE: Invacare recommends that all times to tip over. If any transfer of a patient without approval of the stand up lift MUST be made specifically for optimum stability and safety. Invacare slings are made before the patient is properly attached... before moving the patient, check again to maneuver the stand up lifts. When the stand up lift over objects such as it ...
...check the sling attachments each individual case. NOTE: Invacare recommends that all times to tip over. If any transfer of a patient without approval of the stand up lift MUST be made specifically for optimum stability and safety. Invacare slings are made before the patient is properly attached... before moving the patient, check again to maneuver the stand up lifts. When the stand up lift over objects such as it ...
Owners Manual
Page 20
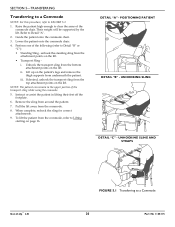
...‐ unhook the standing sling from underneath the patient. DETAIL "A" - UNHOOKING SLING DETAIL "C" - UNHOOKING SLING AND STRAPS Get-U-Up™ Lift FIGURE 5.1 Transferring to clear the arms of the commode chair. Raise the patient high enough to a Commode 20 Part No 1148115 Perform one ... iii. Refer to FIGURE 5.1. 1. Unhook the transport sling from the top attachment points on the lift. • Transport Sling ‐ i. NOTE: The patient can remain in lifting their feet off the footplate. 6. Instruct or assist the patient in the upper portion of the following...
...‐ unhook the standing sling from underneath the patient. DETAIL "A" - UNHOOKING SLING DETAIL "C" - UNHOOKING SLING AND STRAPS Get-U-Up™ Lift FIGURE 5.1 Transferring to clear the arms of the commode chair. Raise the patient high enough to a Commode 20 Part No 1148115 Perform one ... iii. Refer to FIGURE 5.1. 1. Unhook the transport sling from the top attachment points on the lift. • Transport Sling ‐ i. NOTE: The patient can remain in lifting their feet off the footplate. 6. Instruct or assist the patient in the upper portion of the following...

