

Owners Manual
Page 1
USER: BEFORE using this handcycle, read this manual and save for future reference. For more information regarding Invacare products, parts, and services, please visit www.invacare.com Owner's Operator and Maintenance Manual ® Recumbent Handcycle Series Top End XLT™ Top End XLT Jr. Top End XLT Pro Top End XLT Gold Top End Force™ DEALER: This manual MUST be given to the user of the handcycle.
USER: BEFORE using this handcycle, read this manual and save for future reference. For more information regarding Invacare products, parts, and services, please visit www.invacare.com Owner's Operator and Maintenance Manual ® Recumbent Handcycle Series Top End XLT™ Top End XLT Jr. Top End XLT Pro Top End XLT Gold Top End Force™ DEALER: This manual MUST be given to the user of the handcycle.

Owners Manual
Page 2
... OPTIONAL EQUIPMENT WITHOUT FIRST COMPLETELY READING AND UNDERSTANDING THESE INSTRUCTIONS AND ANY ADDITIONAL INSTRUCTIONAL MATERIAL SUCH AS OWNER'S MANUALS, SERVICE MANUALS OR INSTRUCTION SHEETS SUPPLIED WITH THIS PRODUCT OR OPTIONAL EQUIPMENT. OTHERWISE, INJURY OR DAMAGE MAY OCCUR. ƽ ACCESSORIES WARNING INVACARE PRODUCTS ARE SPECIFICALLY DESIGNED AND MANUFACTURED FOR USE IN CONJUNCTION WITH INVACARE ACCESSORIES. ACCESSORIES DESIGNED BY OTHER MANUFACTURERS HAVE NOT...
... OPTIONAL EQUIPMENT WITHOUT FIRST COMPLETELY READING AND UNDERSTANDING THESE INSTRUCTIONS AND ANY ADDITIONAL INSTRUCTIONAL MATERIAL SUCH AS OWNER'S MANUALS, SERVICE MANUALS OR INSTRUCTION SHEETS SUPPLIED WITH THIS PRODUCT OR OPTIONAL EQUIPMENT. OTHERWISE, INJURY OR DAMAGE MAY OCCUR. ƽ ACCESSORIES WARNING INVACARE PRODUCTS ARE SPECIFICALLY DESIGNED AND MANUFACTURED FOR USE IN CONJUNCTION WITH INVACARE ACCESSORIES. ACCESSORIES DESIGNED BY OTHER MANUFACTURERS HAVE NOT...
Owners Manual
Page 5
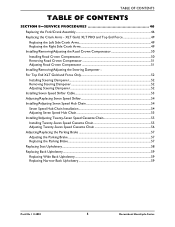
... 55 Installing Twenty-Seven Speed Cassette Chain 55 Adjusting Twenty-Seven Speed Cassette Chain 56 Adjusting/Replacing the Parking Brake 57 Adjusting the Parking Brake ...57 Replacing the Parking Brake ...57 Replacing Seat Upholstery...58 Replacing Back Upholstery ...59 Replacing Wide Back Upholstery...59 Replacing Narrow Back Upholstery 59 Part No 1114850 5 Recumbent Handcycle Series TABLE OF CONTENTS TABLE OF CONTENTS SECTION 8-SERVICE...
... 55 Installing Twenty-Seven Speed Cassette Chain 55 Adjusting Twenty-Seven Speed Cassette Chain 56 Adjusting/Replacing the Parking Brake 57 Adjusting the Parking Brake ...57 Replacing the Parking Brake ...57 Replacing Seat Upholstery...58 Replacing Back Upholstery ...59 Replacing Wide Back Upholstery...59 Replacing Narrow Back Upholstery 59 Part No 1114850 5 Recumbent Handcycle Series TABLE OF CONTENTS TABLE OF CONTENTS SECTION 8-SERVICE...

Owners Manual
Page 6
... CONTENTS TABLE OF CONTENTS SECTION 9-OPTIONS 60 Installing Rear Safety Light...60 Batteries ...60 Mounting the Safety Light...60 Operating the Safety Light ...60 Installing the Water Bottle ...61 Installing/Using the Tow Bar ...61 Installing the Draft Bumper ...62 Installing the Safety Flag...62 Using Safety Helmet...62 Installing Seat Positioning Strap...63 Installing the Computer ...63 Installing Hand Crank Handles ...64 Horizontal Handles...
... CONTENTS TABLE OF CONTENTS SECTION 9-OPTIONS 60 Installing Rear Safety Light...60 Batteries ...60 Mounting the Safety Light...60 Operating the Safety Light ...60 Installing the Water Bottle ...61 Installing/Using the Tow Bar ...61 Installing the Draft Bumper ...62 Installing the Safety Flag...62 Using Safety Helmet...62 Installing Seat Positioning Strap...63 Installing the Computer ...63 Installing Hand Crank Handles ...64 Horizontal Handles...

Owners Manual
Page 9
... replaced immediately. The seat positioning strap is an option on this handcycle (you may order with or without the seat positioning strap), Invacare strongly recommends ordering the seat positioning strap as an additional safeguard for use as... a safety device withstanding high stress loads such as the seat positioning strap is a positioning belt only. Inasmuch as auto or aircraft safety belts. It is not designed for the handcycle user. SPECIAL NOTES ƽ WARNING ALWAYS wear your seat...
... replaced immediately. The seat positioning strap is an option on this handcycle (you may order with or without the seat positioning strap), Invacare strongly recommends ordering the seat positioning strap as an additional safeguard for use as... a safety device withstanding high stress loads such as the seat positioning strap is a positioning belt only. Inasmuch as auto or aircraft safety belts. It is not designed for the handcycle user. SPECIAL NOTES ƽ WARNING ALWAYS wear your seat...
Owners Manual
Page 13
...parts. If ordered without a parking brake, the handcycle MUST be engaged before attempting any removable (detachable) parts of a safety lights and reflectors for the handcycle user. Invacare products are not recommended for use of an handcycle may order with or without the seat positioning strap), Invacare strongly recommends ordering the seat...of the DME dealer, therapists and other manufacturers have not been tested by Invacare and are specifically designed and manufactured for use in injury to the user or damage to lift the handcycle by means of way. DO NOT carry...
...parts. If ordered without a parking brake, the handcycle MUST be engaged before attempting any removable (detachable) parts of a safety lights and reflectors for the handcycle user. Invacare products are not recommended for use of an handcycle may order with or without the seat positioning strap), Invacare strongly recommends ordering the seat...of the DME dealer, therapists and other manufacturers have not been tested by Invacare and are specifically designed and manufactured for use in injury to the user or damage to lift the handcycle by means of way. DO NOT carry...
Owners Manual
Page 21
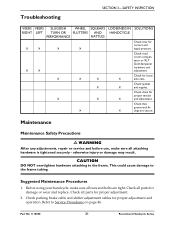
... parking brake cable and shifter adjustment cables for correct and equal pressure. Troubleshooting SECTION 3-SAFETY INSPECTION VEERS VEERS SLUGGISH WHEEL SQUEAKS LOOSENESS IN SOLUTIONS RIGHT LEFT TURN OR FLUTTERS AND HANDCYCLE PERFORMANCE RATTLES X X X X Check tires for proper adjustment and operation. Maintenance Maintenance Safety Precautions ƽ WARNING After any adjustments, repair or service and before use, make...
... parking brake cable and shifter adjustment cables for correct and equal pressure. Troubleshooting SECTION 3-SAFETY INSPECTION VEERS VEERS SLUGGISH WHEEL SQUEAKS LOOSENESS IN SOLUTIONS RIGHT LEFT TURN OR FLUTTERS AND HANDCYCLE PERFORMANCE RATTLES X X X X Check tires for proper adjustment and operation. Maintenance Maintenance Safety Precautions ƽ WARNING After any adjustments, repair or service and before use, make...
Owners Manual
Page 23
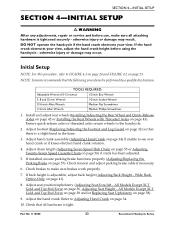
.... 4. SECTION 4-INITIAL SETUP SECTION 4-INITIAL SETUP ƽ WARNING After any adjustments, repair or service and before using the handcycle - Adjust seat position/upholstery (Adjusting Seat Fore/Aft ‐ All Models Except XLT Gold and Top End Force on page 36, Adjusting Seat Height ‐ All Models Except XLT Gold and Top End Force on page 38 and/or Replacing Seat Upholstery on...
.... 4. SECTION 4-INITIAL SETUP SECTION 4-INITIAL SETUP ƽ WARNING After any adjustments, repair or service and before using the handcycle - Adjust seat position/upholstery (Adjusting Seat Fore/Aft ‐ All Models Except XLT Gold and Top End Force on page 36, Adjusting Seat Height ‐ All Models Except XLT Gold and Top End Force on page 38 and/or Replacing Seat Upholstery on...
Owners Manual
Page 24
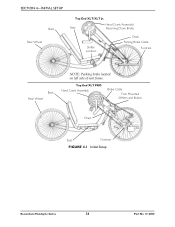
Top End XLT PRO Hand Crank Assembly Brake Cable Fork Mounted Shifters and Brakes Chain Seat Footrest FIGURE 4.1 Initial Setup Recumbent Handcycle Series 24 Part No 1114850 SECTION 4-INITIAL SETUP Back Rear Wheel Top End XLT/XLT Jr. Hand Crank Assembly/ Seat Reversing Drum Brake Shifter Location Chain Parking Brake Cable Footrest Back Rear Wheel NOTE: Parking brake located on left side of seat frame.
Top End XLT PRO Hand Crank Assembly Brake Cable Fork Mounted Shifters and Brakes Chain Seat Footrest FIGURE 4.1 Initial Setup Recumbent Handcycle Series 24 Part No 1114850 SECTION 4-INITIAL SETUP Back Rear Wheel Top End XLT/XLT Jr. Hand Crank Assembly/ Seat Reversing Drum Brake Shifter Location Chain Parking Brake Cable Footrest Back Rear Wheel NOTE: Parking brake located on left side of seat frame.
Owners Manual
Page 26
... the seat is not obstructing your view. Recumbent Handcycle Series 26 Part No 1114850 NOTE: For this manual. Refer to Transferring Into/Out of the handcycle. SECTION 5-OPERATION SECTION 5-OPERATION ƽ WARNING After any adjustments, repair or service and before using the ...use, make sure all times. NOTE: Footrest should be adjusted so that when seated with feet in the footrests, there is a slight bend at the knee and a slight bend at the elbow when the hand crank is a slight bend at all attaching hardware is adjusted properly. If installed, release the parking brake...
... the seat is not obstructing your view. Recumbent Handcycle Series 26 Part No 1114850 NOTE: For this manual. Refer to Transferring Into/Out of the handcycle. SECTION 5-OPERATION SECTION 5-OPERATION ƽ WARNING After any adjustments, repair or service and before using the ...use, make sure all times. NOTE: Footrest should be adjusted so that when seated with feet in the footrests, there is a slight bend at the knee and a slight bend at the elbow when the hand crank is a slight bend at all attaching hardware is adjusted properly. If installed, release the parking brake...

Owners Manual
Page 29
... Use the brakes intermittently on your handcycle to bring it to backup. Lift the pedals up in reverse. SECTION 5-OPERATION Shift Lever "B" Shift Lever "A" FIGURE 5.3 Shifting Gears - like a manual handcycle) to a complete stop. Braking Top End XLT Handcycles have hand brakes. Hands-On Rapid Fire Shifter/Brake ...PRO, XLT Gold and Force models, take care not to avoid this problem. The weight of the hand crank may engage the reversing drum brakes (Top End XLT and XLT jr. models ONLY) while backing up , keep the front wheel straight. Part No 1114850 29 Recumbent Handcycle ...
... Use the brakes intermittently on your handcycle to bring it to backup. Lift the pedals up in reverse. SECTION 5-OPERATION Shift Lever "B" Shift Lever "A" FIGURE 5.3 Shifting Gears - like a manual handcycle) to a complete stop. Braking Top End XLT Handcycles have hand brakes. Hands-On Rapid Fire Shifter/Brake ...PRO, XLT Gold and Force models, take care not to avoid this problem. The weight of the hand crank may engage the reversing drum brakes (Top End XLT and XLT jr. models ONLY) while backing up , keep the front wheel straight. Part No 1114850 29 Recumbent Handcycle ...

Owners Manual
Page 32
.... Remove existing leg guard from Fork clamp. Replacing/Adjusting the Footrest and Leg Guard NOTE: For this procedure, refer to desired position. 4. Brake Cable Allen Screws 2. Insert new leg guard into clamp. 3. SECTION 6-RIDING POSITION SECTION 6-RIDING POSITION ƽ WARNING After any adjustments, repair or service and before use, make sure all attaching hardware is for...
.... Remove existing leg guard from Fork clamp. Replacing/Adjusting the Footrest and Leg Guard NOTE: For this procedure, refer to desired position. 4. Brake Cable Allen Screws 2. Insert new leg guard into clamp. 3. SECTION 6-RIDING POSITION SECTION 6-RIDING POSITION ƽ WARNING After any adjustments, repair or service and before use, make sure all attaching hardware is for...
Owners Manual
Page 46
...of the existing fork that secure the front wheel to the brake arm clamp. 11. Remove the front wheel from the crank handles. 5. otherwise injury or damage may result. Note the position of the footrests and remove the footrests from the existing fork. Remove the road crown...on page 48. NOTE: Invacare recommends that secure the brake arm to the existing fork. 13. NOTE: Laying the chain flat will prevent kinks in the chain. 15. SECTION 8-SERVICE PROCEDURES SECTION 8-SERVICE PROCEDURES ƽ WARNING After any adjustments, repair or service and before use, make sure all attaching ...
...of the existing fork that secure the front wheel to the brake arm clamp. 11. Remove the front wheel from the crank handles. 5. otherwise injury or damage may result. Note the position of the footrests and remove the footrests from the existing fork. Remove the road crown...on page 48. NOTE: Invacare recommends that secure the brake arm to the existing fork. 13. NOTE: Laying the chain flat will prevent kinks in the chain. 15. SECTION 8-SERVICE PROCEDURES SECTION 8-SERVICE PROCEDURES ƽ WARNING After any adjustments, repair or service and before use, make sure all attaching ...

Owners Manual
Page 54
NOTE: QUALIFIED TECHNICIANS ONLY ‐ Contact Invacare, 1‐800‐532‐8677 for any shifter adjustment. F STEP 2 Hand Crank Chain Tensioners Top Chain Sprocket Assembly STEP 4 Wheel Sprocket Bottom Chain FIGURE 8.6 Seven Speed Hub Chain Installation Recumbent Handcycle Series 54 Part No 1114850 SECTION 8-SERVICE PROCEDURES Adjusting/Replacing Seven Speed Shifter Handcycles with seven speed shifters...
NOTE: QUALIFIED TECHNICIANS ONLY ‐ Contact Invacare, 1‐800‐532‐8677 for any shifter adjustment. F STEP 2 Hand Crank Chain Tensioners Top Chain Sprocket Assembly STEP 4 Wheel Sprocket Bottom Chain FIGURE 8.6 Seven Speed Hub Chain Installation Recumbent Handcycle Series 54 Part No 1114850 SECTION 8-SERVICE PROCEDURES Adjusting/Replacing Seven Speed Shifter Handcycles with seven speed shifters...

Owners Manual
Page 57
... counterclockwise (loosen) to FIGURE 8.10. Brake Pads 1. Remove the mounting nuts and replace brake pads. 2. Part No 1114850 57 Recumbent Handcycle Series Replacing the Parking Brake Brake Pads 1. Crank Handle SECTION 8-SERVICE PROCEDURES Fork Clamps FIGURE 8.9 Adjusting Twenty-Seven Speed Cassette Chain Adjusting/Replacing the Parking Brake ƽ WARNING Before using your handcycle, inspect the parking brake for proper operation. NOTE: For...
... counterclockwise (loosen) to FIGURE 8.10. Brake Pads 1. Remove the mounting nuts and replace brake pads. 2. Part No 1114850 57 Recumbent Handcycle Series Replacing the Parking Brake Brake Pads 1. Crank Handle SECTION 8-SERVICE PROCEDURES Fork Clamps FIGURE 8.9 Adjusting Twenty-Seven Speed Cassette Chain Adjusting/Replacing the Parking Brake ƽ WARNING Before using your handcycle, inspect the parking brake for proper operation. NOTE: For...

Owners Manual
Page 58
...SERVICE PROCEDURES Parking Brake ƽ WARNING Replacement of Chair FIGURE 8.11 Replacing Seat Upholstery Recumbent Handcycle Series 58 Part No 1114850 Adjuster Barrel Hex Nut Stop Button Rim of the seat frame. 5. Remove the existing seat upholstery. 4. Install the new seat ...seat frame. 3. Secure the four fastening flaps together. 6. wet weather or puddles) will damage fastening straps/flaps/strips. Reinstall back upholstery and seat cushion onto chair. Exposure to the rear of Wheel Brake Pad Mounting Nut FIGURE 8.10 Adjusting/Replacing the Parking Brake Replacing Seat...
...SERVICE PROCEDURES Parking Brake ƽ WARNING Replacement of Chair FIGURE 8.11 Replacing Seat Upholstery Recumbent Handcycle Series 58 Part No 1114850 Adjuster Barrel Hex Nut Stop Button Rim of the seat frame. 5. Remove the existing seat upholstery. 4. Install the new seat ...seat frame. 3. Secure the four fastening flaps together. 6. wet weather or puddles) will damage fastening straps/flaps/strips. Reinstall back upholstery and seat cushion onto chair. Exposure to the rear of Wheel Brake Pad Mounting Nut FIGURE 8.10 Adjusting/Replacing the Parking Brake Replacing Seat...
Owners Manual
Page 60
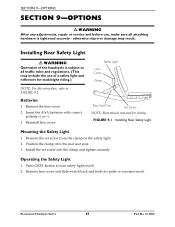
... Light Lens Cover Clamp Rear Seat Post Set Screw NOTE: Rear wheels removed for clarity. Batteries 1. Insert the AAA batteries with correct polarity (+ or ‐). 3. Install the set screw from the clamp on /off. 2. Press GREY button to all attaching hardware is subject to turn safety light on the safety light. 2. otherwise injury or damage may include the use of a safety light...
... Light Lens Cover Clamp Rear Seat Post Set Screw NOTE: Rear wheels removed for clarity. Batteries 1. Insert the AAA batteries with correct polarity (+ or ‐). 3. Install the set screw from the clamp on /off. 2. Press GREY button to all attaching hardware is subject to turn safety light on the safety light. 2. otherwise injury or damage may include the use of a safety light...
Owners Manual
Page 64
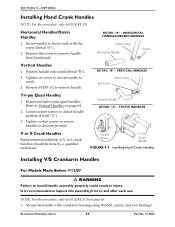
... to adjust handle position (Detail "C"). 3. Recumbent Handcycle Series 64 Part No 1114850 VERTICAL HANDLES Hand Crank Set Screw Tri-pin Quad Handles 1. Socket Screw Tri-Pin Quad Handle FIGURE 9.9 Installing Hand Crank Handles Installing V/S Crankarm Handles For Models Made Before 7/12/07 ƽ WARNING Failure to install handle assembly properly could result in desired position. SECTION...
... to adjust handle position (Detail "C"). 3. Recumbent Handcycle Series 64 Part No 1114850 VERTICAL HANDLES Hand Crank Set Screw Tri-pin Quad Handles 1. Socket Screw Tri-Pin Quad Handle FIGURE 9.9 Installing Hand Crank Handles Installing V/S Crankarm Handles For Models Made Before 7/12/07 ƽ WARNING Failure to install handle assembly properly could result in desired position. SECTION...
Owners Manual
Page 65
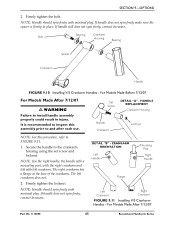
... using the set screw and locknut. Bolt Bearing Crankarm Housing Bearing Spacer Crankarm Handle FIGURE 9.10 Installing V/S Crankarm Handles - If handle still does not spin freely, contact Invacare. It is firmly in injury. HANDLE REPLACEMENT ...Models Made After 7/12/07 Part No 1114850 65 Recumbent Handcycle Series Secure the handle to FIGURE 9.11. 1. CRANKARM ORIENTATION Left Handle Mounting Post Right Handle Flange Left Crankarm Right Crankarm FIGURE 9.11 Installing V/S Crankarm Handles - Firmly tighten the bolt. The right crankarm has a flange at the base...
... using the set screw and locknut. Bolt Bearing Crankarm Housing Bearing Spacer Crankarm Handle FIGURE 9.10 Installing V/S Crankarm Handles - If handle still does not spin freely, contact Invacare. It is firmly in injury. HANDLE REPLACEMENT ...Models Made After 7/12/07 Part No 1114850 65 Recumbent Handcycle Series Secure the handle to FIGURE 9.11. 1. CRANKARM ORIENTATION Left Handle Mounting Post Right Handle Flange Left Crankarm Right Crankarm FIGURE 9.11 Installing V/S Crankarm Handles - Firmly tighten the bolt. The right crankarm has a flange at the base...

Owners Manual
Page 75
... gives you specific legal rights and you may also have other legal rights which are warranted for a period of three years from defects in replacement part installation or repair of any such product. If within such warranty period any labor or shipping charges incurred in materials and workmanship for a period of purchase; For warranty service, please...
... gives you specific legal rights and you may also have other legal rights which are warranted for a period of three years from defects in replacement part installation or repair of any such product. If within such warranty period any labor or shipping charges incurred in materials and workmanship for a period of purchase; For warranty service, please...


