Owners Manual
Page 4
... Wheels...55 Replacing Rear Wheel Handrim ...57 Replacing/Repairing Rear Wheel Tire/Tube ...58 Adjusting Quick-Release Axle...58 9 FRONT CASTERS ...60 Installing/Replacing Six or Eight-Inch Front Casters and Forks...60 Adjusting Front Caster Mounting...61 10 ANTI-TIPPERS/WHEEL LOCKS ...62 Installing/Adjusting Anti-tippers...62 Using/Adjusting Disk Wheel Locks...65 Installing Wheel Lock Shoe Extensions ...69 Invacare® 9000 Series Wheelchair 4 Part...
... Wheels...55 Replacing Rear Wheel Handrim ...57 Replacing/Repairing Rear Wheel Tire/Tube ...58 Adjusting Quick-Release Axle...58 9 FRONT CASTERS ...60 Installing/Replacing Six or Eight-Inch Front Casters and Forks...60 Adjusting Front Caster Mounting...61 10 ANTI-TIPPERS/WHEEL LOCKS ...62 Installing/Adjusting Anti-tippers...62 Using/Adjusting Disk Wheel Locks...65 Installing Wheel Lock Shoe Extensions ...69 Invacare® 9000 Series Wheelchair 4 Part...

Owners Manual
Page 5
......86 Installing the Wheel Lock Extension Handle...91 Part No. 1056953 5 Invacare® 9000 Series Wheelchair 11 RECLINER ...70 Operating Recliner ...70 Replacing Headrest Pillow ...72 Replacing Headrest/Back Upholstery ...73 Adjusting Headrest/Back Upholstery Tension ...74 Adjusting Seat Depth ...74 Adjusting Seat Width ...74 Storing/Replacing Spreader Bar ...75 Installing Anti-Tippers ...76 Removing/Installing Rear Wheels...77 Using/Adjusting Wheel Locks ...78 Installing Telescoping...
......86 Installing the Wheel Lock Extension Handle...91 Part No. 1056953 5 Invacare® 9000 Series Wheelchair 11 RECLINER ...70 Operating Recliner ...70 Replacing Headrest Pillow ...72 Replacing Headrest/Back Upholstery ...73 Adjusting Headrest/Back Upholstery Tension ...74 Adjusting Seat Depth ...74 Adjusting Seat Width ...74 Storing/Replacing Spreader Bar ...75 Installing Anti-Tippers ...76 Removing/Installing Rear Wheels...77 Using/Adjusting Wheel Locks ...78 Installing Telescoping...
Owners Manual
Page 7
... defects in replacement part installation or repair of the defect and, if the product is extended only to state. For warranty service, please contact the dealer from Invacare or a dealer, with a copy of the seller's invoice required for coverage under this warranty. PRODUCTS DAMAGED BY REASON OF REPAIRS MADE TO ANY COMPONENT WITHOUT THE SPECIFIC CONSENT OF INVACARE, OR...
... defects in replacement part installation or repair of the defect and, if the product is extended only to state. For warranty service, please contact the dealer from Invacare or a dealer, with a copy of the seller's invoice required for coverage under this warranty. PRODUCTS DAMAGED BY REASON OF REPAIRS MADE TO ANY COMPONENT WITHOUT THE SPECIFIC CONSENT OF INVACARE, OR...
Owners Manual
Page 9
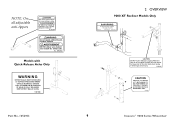
... d'abord avoir installé les antibascules. Keep clear of the chair back when raising or lowering to the Owner's Manual for proper anti-tipper setting. ! P/N 60106X144 CAUTION DO NOT recline without the antitip tubes installed. ! WARNING Do...Part No. 1056953 2 OVERVIEW 9000 XT Recliner Models Only WARNING DO NOT OPERATE WITHOUT THE ANTI-TIP TUBES REV. 5/98 INSTALLED. WARNING Refer to avoid injury. 1023096 CAUTION SERVICE OF SPRING LIFT MECHANISM TO BE PERFORMED BY PROPERLY TRAINED AUTHORIZED SERVICE PERSONNEL ONLY. 1022642 9 Invacare® 9000 Series Wheelchair...
... d'abord avoir installé les antibascules. Keep clear of the chair back when raising or lowering to the Owner's Manual for proper anti-tipper setting. ! P/N 60106X144 CAUTION DO NOT recline without the antitip tubes installed. ! WARNING Do...Part No. 1056953 2 OVERVIEW 9000 XT Recliner Models Only WARNING DO NOT OPERATE WITHOUT THE ANTI-TIP TUBES REV. 5/98 INSTALLED. WARNING Refer to avoid injury. 1023096 CAUTION SERVICE OF SPRING LIFT MECHANISM TO BE PERFORMED BY PROPERLY TRAINED AUTHORIZED SERVICE PERSONNEL ONLY. 1022642 9 Invacare® 9000 Series Wheelchair...
Owners Manual
Page 15
... operation and use of this product. 3.1 General Guidelines ƽ WARNING DO NOT use this product or any available optional equipment without first completely reading and understanding these instructions and any additional instructional material such as owner's manuals, service manuals or instruction sheets supplied with this wheelchair. If you are specifically designed and manufactured for use in conjunction with Invacare accessories. Contact Invacare/Carrier for...
... operation and use of this product. 3.1 General Guidelines ƽ WARNING DO NOT use this product or any available optional equipment without first completely reading and understanding these instructions and any additional instructional material such as owner's manuals, service manuals or instruction sheets supplied with this wheelchair. If you are specifically designed and manufactured for use in conjunction with Invacare accessories. Contact Invacare/Carrier for...
Owners Manual
Page 18
... Invacare® 9000 Series Wheelchair 18 Part No. 1056953 Verify that the handgrips DO NOT twist on page 17. Use caution, otherwise injury may occur. ALWAYS engage both wheel locks while reclining or inclining (reverse recline) the wheelchair. Keep clear when reclining or inclining chair ... sure to avoid injury. If loose and/or worn, replace IMMEDIATELY. If the wheelchair is required, remember to the user or bystanders. Refer to use good body mechanics. Back will result in injury to use . When learning a new assistance technique, have an experienced...
... Invacare® 9000 Series Wheelchair 18 Part No. 1056953 Verify that the handgrips DO NOT twist on page 17. Use caution, otherwise injury may occur. ALWAYS engage both wheel locks while reclining or inclining (reverse recline) the wheelchair. Keep clear when reclining or inclining chair ... sure to avoid injury. If loose and/or worn, replace IMMEDIATELY. If the wheelchair is required, remember to the user or bystanders. Refer to use good body mechanics. Back will result in injury to use . When learning a new assistance technique, have an experienced...
Owners Manual
Page 19
... result in injury to the user or damage to the wheelchair. 9000 XT RECLINER ONLY - DO NOT attempt to stop the wheelchair while on an incline. DO NOT attempt to Storing/Replacing Spreader Bar on page 75. NEVER leave an unoccupied wheelchair on a sloped surface. Part No. 1056953 19 Invacare® 9000 Series Wheelchair Refer to move up...
... result in injury to the user or damage to the wheelchair. 9000 XT RECLINER ONLY - DO NOT attempt to stop the wheelchair while on an incline. DO NOT attempt to Storing/Replacing Spreader Bar on page 75. NEVER leave an unoccupied wheelchair on a sloped surface. Part No. 1056953 19 Invacare® 9000 Series Wheelchair Refer to move up...
Owners Manual
Page 20
... performed by a qualified technician. These adjustments must be replaced IMMEDIATELY. It is an option on rear wheel size, rear wheel position, front caster size/position and desired seat-to the stability of the rear wheels, anti-tipper model, as well as auto or aircraft safety belts. Inasmuch as the seat positioning strap is not designed for the wheelchair user.
... performed by a qualified technician. These adjustments must be replaced IMMEDIATELY. It is an option on rear wheel size, rear wheel position, front caster size/position and desired seat-to the stability of the rear wheels, anti-tipper model, as well as auto or aircraft safety belts. Inasmuch as the seat positioning strap is not designed for the wheelchair user.
Owners Manual
Page 23
...-down systems for transportation and use of its wheelchairs as a seat for any kind of weight training. Invacare wheelchairs have not been designed or tested as a weight training apparatus. ALWAYS exercise caution when transferring into appropriate seating in vehicles for transportation of a user while in a wheelchair, in wheelchairs. Interference between the top of the elevating legrest and the wheel lock extension handle...
...-down systems for transportation and use of its wheelchairs as a seat for any kind of weight training. Invacare wheelchairs have not been designed or tested as a weight training apparatus. ALWAYS exercise caution when transferring into appropriate seating in vehicles for transportation of a user while in a wheelchair, in wheelchairs. Interference between the top of the elevating legrest and the wheel lock extension handle...
Owners Manual
Page 25
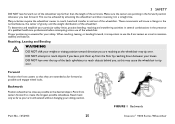
... the front casters so that they are reaching as possible and engage wheel locks. DO NOT lean over the top of the wheelchair. FIGURE 1 Backwards Part No. 1056953 25 Invacare® 9000 Series Wheelchair Make sure the casters are pointing in the presence of a qualified healthcare...reach, bend and transfer in a straight line. 3 SAFETY DO NOT lean forward out of the wheelchair any further than the length of the wheelchair. This can be achieved by reaching down between your safety. Many activities require the wheelchair owner to create the longest possible wheelbase.
... the front casters so that they are reaching as possible and engage wheel locks. DO NOT lean over the top of the wheelchair. FIGURE 1 Backwards Part No. 1056953 25 Invacare® 9000 Series Wheelchair Make sure the casters are pointing in the presence of a qualified healthcare...reach, bend and transfer in a straight line. 3 SAFETY DO NOT lean forward out of the wheelchair any further than the length of the wheelchair. This can be achieved by reaching down between your safety. Many activities require the wheelchair owner to create the longest possible wheelbase.
Owners Manual
Page 51
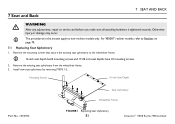
.... 2. Install new seat upholstery by reversing STEPS 1-2. Mounting Screws 16-inch Seat Depth Part No. 1056953 Seat Upholstery Wheelchair Frame FIGURE 1 Replacing Seat Upholstery 51 Invacare® 9000 Series Wheelchair 7 Seat and Back 7 SEAT AND BACK ƽ WARNING After any adjustments, repair or service and before use, make sure all attaching hardware is tightened securely. For 9000XT recliner models, refer to Recliner on page 70. 7.1 Replacing Seat Upholstery...
.... 2. Install new seat upholstery by reversing STEPS 1-2. Mounting Screws 16-inch Seat Depth Part No. 1056953 Seat Upholstery Wheelchair Frame FIGURE 1 Replacing Seat Upholstery 51 Invacare® 9000 Series Wheelchair 7 Seat and Back 7 SEAT AND BACK ƽ WARNING After any adjustments, repair or service and before use, make sure all attaching hardware is tightened securely. For 9000XT recliner models, refer to Recliner on page 70. 7.1 Replacing Seat Upholstery...
Owners Manual
Page 53
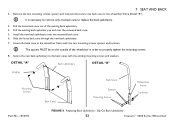
7 SEAT AND BACK 2. Remove the two mounting screws, spacers and locknuts that secure one back cane to the wheelchair frame (Detail "B"). It is necessary to remove only one back cane to the back canes with the two... 53 Invacare® 9000 Series Wheelchair Secure the back cane to properly tighten the mounting screws. 8. Install the new back upholstery over the mounted back cane. 5. DETAIL "A" Back Upholstery DETAIL "B" Washer Mounting Screws Back Cane Back Cane Spacers Mounting Screws Wheelchair Frame Locknuts Part No. 1056953 FIGURE 8 Replacing Back Upholstery...
7 SEAT AND BACK 2. Remove the two mounting screws, spacers and locknuts that secure one back cane to the wheelchair frame (Detail "B"). It is necessary to remove only one back cane to the back canes with the two... 53 Invacare® 9000 Series Wheelchair Secure the back cane to properly tighten the mounting screws. 8. Install the new back upholstery over the mounted back cane. 5. DETAIL "A" Back Upholstery DETAIL "B" Washer Mounting Screws Back Cane Back Cane Spacers Mounting Screws Wheelchair Frame Locknuts Part No. 1056953 FIGURE 8 Replacing Back Upholstery...
Owners Manual
Page 55
... 55 Invacare® 9000 Series Wheelchair Otherwise injury or damage may change the size of the rear wheel or the seat-to Recliner on the wheelchair frame for proper reinstallation of the new rear wheel. 8 Rear Wheels 8 REAR WHEELS ƽ WARNING After any adjustments, repair or service and before use quick-release axles on the 9000 XT (models with permanent axles, removal/installation...
... 55 Invacare® 9000 Series Wheelchair Otherwise injury or damage may change the size of the rear wheel or the seat-to Recliner on the wheelchair frame for proper reinstallation of the new rear wheel. 8 Rear Wheels 8 REAR WHEELS ƽ WARNING After any adjustments, repair or service and before use quick-release axles on the 9000 XT (models with permanent axles, removal/installation...
Owners Manual
Page 62
... NOT use anti-tippers. Seat-to non-recliner models only except where noted. When outdoors on wet, soft ground or on gravel surfaces, anti tippers may occur. The procedures in this section of protection against tipover. 10 ANTI-TIPPERS/WHEEL LOCKS 10 Anti-tippers/Wheel Locks ƽ WARNING After any adjustments, repair or service and before use...
... NOT use anti-tippers. Seat-to non-recliner models only except where noted. When outdoors on wet, soft ground or on gravel surfaces, anti tippers may occur. The procedures in this section of protection against tipover. 10 ANTI-TIPPERS/WHEEL LOCKS 10 Anti-tippers/Wheel Locks ƽ WARNING After any adjustments, repair or service and before use...
Owners Manual
Page 65
... wheel locks. 2. To engage, pull the wheel lock handle backward. Ensure the wheelchair is not moving wheelchair with wheel locks. Depending on the model of wheel lock installed on a flat, level surface to -Lock - Wheel locks are not brakes. Position wheelchair on the wheelchair, perform one of the following: • Push-to perform this procedure. 1. Part No. 1056953 65 Invacare® 9000 Series Wheelchair...
... wheel locks. 2. To engage, pull the wheel lock handle backward. Ensure the wheelchair is not moving wheelchair with wheel locks. Depending on the model of wheel lock installed on a flat, level surface to -Lock - Wheel locks are not brakes. Position wheelchair on the wheelchair, perform one of the following: • Push-to perform this procedure. 1. Part No. 1056953 65 Invacare® 9000 Series Wheelchair...
Owners Manual
Page 69
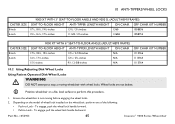
... out side edge of Wheel Lock Shoe Extension Slot FIGURE 5 Installing Wheel Lock Shoe Extensions Part No. 1056953 69 Invacare® 9000 Series Wheelchair 10 ANTI-TIPPERS/WHEEL LOCKS 10.3 Installing Wheel Lock Shoe Extensions 1. Insert the disk wheel lock shoe into the slot. 2. Wheel Lock Shoe Extension Set Screws Pointed End of the wheel lock shoe. 4. Position the wheel lock shoe extension so...
... out side edge of Wheel Lock Shoe Extension Slot FIGURE 5 Installing Wheel Lock Shoe Extensions Part No. 1056953 69 Invacare® 9000 Series Wheelchair 10 ANTI-TIPPERS/WHEEL LOCKS 10.3 Installing Wheel Lock Shoe Extensions 1. Insert the disk wheel lock shoe into the slot. 2. Wheel Lock Shoe Extension Set Screws Pointed End of the wheel lock shoe. 4. Position the wheel lock shoe extension so...
Owners Manual
Page 70
... repair or service and before use, make sure that the wheelchair is stable before using the recliner option. Inasmuch as the seat positioning strap is an option on this wheelchair (you may order with or without the seat positioning strap), Invacare strongly recommends ordering the seat ...be replaced IMMEDIATELY. Ensure the spreader bar is operational. LIFT KIT MODELS ONLY - The seat positioning strap is tightened securely. If signs of the spring lift mechanisms is attached and secured before using the 9000XT Recliner. Invacare® 9000 Series Wheelchair 70 Part ...
... repair or service and before use, make sure that the wheelchair is stable before using the recliner option. Inasmuch as the seat positioning strap is an option on this wheelchair (you may order with or without the seat positioning strap), Invacare strongly recommends ordering the seat ...be replaced IMMEDIATELY. Ensure the spreader bar is operational. LIFT KIT MODELS ONLY - The seat positioning strap is tightened securely. If signs of the spring lift mechanisms is attached and secured before using the 9000XT Recliner. Invacare® 9000 Series Wheelchair 70 Part ...
Owners Manual
Page 71
...445; WARNING After any adjustments, repair or service and before use, make sure all pinch points. 8. DO NOT attempt to Using/Adjusting Wheel Locks on page 31. 1. Unfold wheelchair. Part No. 1056953 71 Invacare® 9000 Series Wheelchair Attach spreader bar. LIft kit models only - Inform the occupant of... the back reaches the desired angle, slowly let go of the wheelchair that the wheelchair is tightened securely. Keep clear when reclining or inclining (reverse recline) chair back to Storing/Replacing Spreader Bar on a level surface before reclining or inclining (reverse ...
...445; WARNING After any adjustments, repair or service and before use, make sure all pinch points. 8. DO NOT attempt to Using/Adjusting Wheel Locks on page 31. 1. Unfold wheelchair. Part No. 1056953 71 Invacare® 9000 Series Wheelchair Attach spreader bar. LIft kit models only - Inform the occupant of... the back reaches the desired angle, slowly let go of the wheelchair that the wheelchair is tightened securely. Keep clear when reclining or inclining (reverse recline) chair back to Storing/Replacing Spreader Bar on a level surface before reclining or inclining (reverse ...
Owners Manual
Page 79
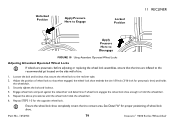
... the side wall of tire. 1. Part No. 1056953 79 Invacare® 9000 Series Wheelchair Unlocked Position Apply Pressure Here to Engage Locked Position 11 RECLINER Apply Pressure Here to Disengage FIGURE 10 Using Attendant Operated Wheel Locks Adjusting Attendant Operated Wheel Locks If wheels are pneumatic, before adjusting or replacing the wheel lock assemblies, ensure that the tires...
... the side wall of tire. 1. Part No. 1056953 79 Invacare® 9000 Series Wheelchair Unlocked Position Apply Pressure Here to Engage Locked Position 11 RECLINER Apply Pressure Here to Disengage FIGURE 10 Using Attendant Operated Wheel Locks Adjusting Attendant Operated Wheel Locks If wheels are pneumatic, before adjusting or replacing the wheel lock assemblies, ensure that the tires...
Owners Manual
Page 85
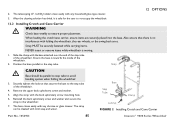
... crutch/cane carrier, ensure items are securely placed into the base. Ensure the base is safe for the user to re-occupy the wheelchair. 12 OPTIONS 12.2 Installing Crutch and Cane Carrier ƽ WARNING Check base weekly to ensure proper placement. The strap can be parallel ... the wheelchair, the rear wheels, or the swing-back arms. Strap MUST be securely fastened while carrying items. NEVER insert or remove items while wheelchair is moving. 1. Base Step Tube Clamp Locknut FIGURE 2 Installing Crutch and Cane Carrier Part No. 1056953 85 Invacare® 9000 Series Wheelchair rod/...
... crutch/cane carrier, ensure items are securely placed into the base. Ensure the base is safe for the user to re-occupy the wheelchair. 12 OPTIONS 12.2 Installing Crutch and Cane Carrier ƽ WARNING Check base weekly to ensure proper placement. The strap can be parallel ... the wheelchair, the rear wheels, or the swing-back arms. Strap MUST be securely fastened while carrying items. NEVER insert or remove items while wheelchair is moving. 1. Base Step Tube Clamp Locknut FIGURE 2 Installing Crutch and Cane Carrier Part No. 1056953 85 Invacare® 9000 Series Wheelchair rod/...


