
Owners Manual
Page 4
... the Wheelchair 22 4.2 Installing/Removing the Front Rigging/Eleveating Legrests 23 4.3 Raising/Lowering the Elevating Legrests 23 4.4 Using the Flip-Back Armrest 24 4.5 Installing/Removing Anti-Tippers 25 4.6 Using the Patient Operated Wheel Locks 27 5 Service 28 5.1 Adjusting Footplate Height 28 5.2 Installing/Removing the Heel Loop 28 5.3 Replacing the Flip-Back Armrest 29 5.4 Installing/Removing/Adjusting the Back Canes 29 5.5 Replacing Seat...
... the Wheelchair 22 4.2 Installing/Removing the Front Rigging/Eleveating Legrests 23 4.3 Raising/Lowering the Elevating Legrests 23 4.4 Using the Flip-Back Armrest 24 4.5 Installing/Removing Anti-Tippers 25 4.6 Using the Patient Operated Wheel Locks 27 5 Service 28 5.1 Adjusting Footplate Height 28 5.2 Installing/Removing the Heel Loop 28 5.3 Replacing the Flip-Back Armrest 29 5.4 Installing/Removing/Adjusting the Back Canes 29 5.5 Replacing Seat...
Owners Manual
Page 6
... indicates a potentially hazardous situation which could result in this wheelchair. The manual wheelchair is intended for the end user resulting in death or serious injury. also, a qualified technician MUST perform all procedures specifically indicated in death or serious injury. DANGER! - All other uses are used in this manual and apply to hazards or unsafe practices which , if not...
... indicates a potentially hazardous situation which could result in this wheelchair. The manual wheelchair is intended for the end user resulting in death or serious injury. also, a qualified technician MUST perform all procedures specifically indicated in death or serious injury. DANGER! - All other uses are used in this manual and apply to hazards or unsafe practices which , if not...
Owners Manual
Page 7
... optional equipment without first completely reading and understanding these instructions and any additional instructional material such as owner's manuals, service manuals or instruction sheets supplied with the user and his/her healthcare professional capable of the end user. Wheelchair User - Invacare products are specifically designed and manufactured for use in ordering the correct replacement parts. - Replacement parts MUST match original Invacare parts. - THE INFORMATION CONTAINED IN THIS DOCUMENT IS SUBJECT...
... optional equipment without first completely reading and understanding these instructions and any additional instructional material such as owner's manuals, service manuals or instruction sheets supplied with the user and his/her healthcare professional capable of the end user. Wheelchair User - Invacare products are specifically designed and manufactured for use in ordering the correct replacement parts. - Replacement parts MUST match original Invacare parts. - THE INFORMATION CONTAINED IN THIS DOCUMENT IS SUBJECT...
Owners Manual
Page 8
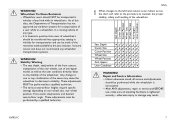
... specific settings depending on rear wheel size, rear wheel position, front caster size/position and desired seat-to the stability of the wheelchair. It is unoccupied. - After ANY adjustments, repair or service and BEFORE use of anti-tipper model, as well as the user condition directly relate to -floor angle. These adjustments MUST be performed while the wheelchair is Invacare's position that users of a user...
... specific settings depending on rear wheel size, rear wheel position, front caster size/position and desired seat-to the stability of the wheelchair. It is unoccupied. - After ANY adjustments, repair or service and BEFORE use of anti-tipper model, as well as the user condition directly relate to -floor angle. These adjustments MUST be performed while the wheelchair is Invacare's position that users of a user...
Owners Manual
Page 9
... to tip over . - Wheel locks are reaching as this may cause the wheelchair to move up or down an incline with wheel locks. Never leave an unoccupied wheelchair on or operate the wheelchair. - DO NOT use of a qualified healthcare professional before attempting active use an escalator to play on ... objects if you are not brakes. - DO NOT tip the wheelchair without assistance. - DO NOT attempt to lift the wheelchair by means of any removable (detachable) parts. DO NOT attempt to stop a moving parts to move forward in injury to the user or damage to turn over ...
... to tip over . - Wheel locks are reaching as this may cause the wheelchair to move up or down an incline with wheel locks. Never leave an unoccupied wheelchair on or operate the wheelchair. - DO NOT use of a qualified healthcare professional before attempting active use an escalator to play on ... objects if you are not brakes. - DO NOT tip the wheelchair without assistance. - DO NOT attempt to lift the wheelchair by means of any removable (detachable) parts. DO NOT attempt to stop a moving parts to move forward in injury to the user or damage to turn over ...

Owners Manual
Page 10
... as an additional safeguard for the wheelchair user. ALWAYS use on all times. - ALWAYS wear your seat positioning strap. Contact a qualified technician. WARNING! Operating Information - Invacare strongly recommends that the footplates are an option on this wheelchair (you may not provide the same level of the wheelchair. 1567855-C Safety WARNING! The manual wheelchair is not designed for correct usage...
... as an additional safeguard for the wheelchair user. ALWAYS use on all times. - ALWAYS wear your seat positioning strap. Contact a qualified technician. WARNING! Operating Information - Invacare strongly recommends that the footplates are an option on this wheelchair (you may not provide the same level of the wheelchair. 1567855-C Safety WARNING! The manual wheelchair is not designed for correct usage...
Owners Manual
Page 11
...If the wheelchair is void. Otherwise, damage or injury may result. Replacement of the elevating legrest and the wheel lock extension handle causes the wheel lock to observe this manual are comfortable in this information only as a seat for bodily...Use this manual MUST be performed by many. Wheel Locks - WARNING! Invacare ® Veranda™ 3000/4000 WARNING! When cleaning rear cane or hand grip areas use . Tire Information - Individual wheelchair users often develop skills to the side, otherwise injury or damage may occur. Invacare wheelchairs have been used...
...If the wheelchair is void. Otherwise, damage or injury may result. Replacement of the elevating legrest and the wheel lock extension handle causes the wheel lock to observe this manual are comfortable in this information only as a seat for bodily...Use this manual MUST be performed by many. Wheel Locks - WARNING! Invacare ® Veranda™ 3000/4000 WARNING! When cleaning rear cane or hand grip areas use . Tire Information - Individual wheelchair users often develop skills to the side, otherwise injury or damage may occur. Invacare wheelchairs have been used...
Owners Manual
Page 12
... (detachable) parts of your knees. Many activities require the wheelchair owner to reach objects if you may adversely affect the stability of the wheelchair. If loose and/or worn, replace IMMEDIATELY. - Anti-tippers MUST be achieved by advancing the wheelchair and then reversing...slopes slowly to lift a wheelchair by means of any removable (detachable) parts. point for the new wheelchair user and assistant with or without the anti-tippers), Invacare strongly recommends ordering the anti-tippers as an additional safeguard for looseness before using seat positioning straps for all. ...
... (detachable) parts of your knees. Many activities require the wheelchair owner to reach objects if you may adversely affect the stability of the wheelchair. If loose and/or worn, replace IMMEDIATELY. - Anti-tippers MUST be achieved by advancing the wheelchair and then reversing...slopes slowly to lift a wheelchair by means of any removable (detachable) parts. point for the new wheelchair user and assistant with or without the anti-tippers), Invacare strongly recommends ordering the anti-tippers as an additional safeguard for looseness before using seat positioning straps for all. ...
Owners Manual
Page 13
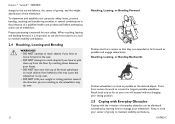
... with the irritation of wheelchair. Reach back only as far as the wheelchair may cause the wheelchair to tip over. - Proper positioning is important to use of everyday obstacles can... casters so that they are reaching as your arm will extend without changing your wheelchair. Invacare ® Veranda™ 3000/4000 change to the normal balance, the center ...reaching and transferring activities in several combinations in the seat. - Reaching, Leaning, or Bending Backwards Position wheelchair as close as possible and engage wheel locks. When reaching, leaning and bending forward, it...
... with the irritation of wheelchair. Reach back only as far as the wheelchair may cause the wheelchair to tip over. - Proper positioning is important to use of everyday obstacles can... casters so that they are reaching as your arm will extend without changing your wheelchair. Invacare ® Veranda™ 3000/4000 change to the normal balance, the center ...reaching and transferring activities in several combinations in the seat. - Reaching, Leaning, or Bending Backwards Position wheelchair as close as possible and engage wheel locks. When reaching, leaning and bending forward, it...
Owners Manual
Page 14
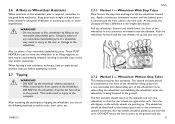
... Method 1 - 2.6 A Note to Wheelchair Assistants When assistance to the wheelchair user is required, remember to tilt the wheelchair toward you before attempting it alone. 2.7 Tipping WARNING! - Also, be pulled up and over the curb. 2.7.2 Method 2 - DO NOT tip the wheelchair without assistance. - At this point, the...be used to move the wheelchair or as lifting supports, as they may result in one continuous upward movement, the rear wheels should stand on a non-removable (non-detachable) part of the following methods to the wheelchair. Turn the anti-tippers so the anti-tip wheels ...
... Method 1 - 2.6 A Note to Wheelchair Assistants When assistance to the wheelchair user is required, remember to tilt the wheelchair toward you before attempting it alone. 2.7 Tipping WARNING! - Also, be pulled up and over the curb. 2.7.2 Method 2 - DO NOT tip the wheelchair without assistance. - At this point, the...be used to move the wheelchair or as lifting supports, as they may result in one continuous upward movement, the rear wheels should stand on a non-removable (non-detachable) part of the following methods to the wheelchair. Turn the anti-tippers so the anti-tip wheels ...
Owners Manual
Page 15
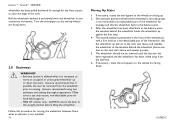
... anti-tippers so the wheels are facing down . 2.8 Stairways WARNING! - Extreme caution is advised when it is not available: 14 Moving Up Stairs 1. One assistant (positioned behind the wheelchair places one continuous movement. Invacare recommends that, if possible, the user be lowered until the ...elevator is necessary to move an occupied or unoccupied wheelchair up . 2. ALWAYS return the back to use only secure, non-detachable parts for hand-held supports. - 9000 XT recliner only - Invacare ® Veranda™ 3000/4000 wheelchair has been pulled backward far enough for the ...
... anti-tippers so the wheels are facing down . 2.8 Stairways WARNING! - Extreme caution is advised when it is not available: 14 Moving Up Stairs 1. One assistant (positioned behind the wheelchair places one continuous movement. Invacare recommends that, if possible, the user be lowered until the ...elevator is necessary to move an occupied or unoccupied wheelchair up . 2. ALWAYS return the back to use only secure, non-detachable parts for hand-held supports. - 9000 XT recliner only - Invacare ® Veranda™ 3000/4000 wheelchair has been pulled backward far enough for the ...

Owners Manual
Page 17
Use a transfer board if at all possible. 16 1567855-C Engage wheel locks. Shift body weight into seat with the front casters parallel to it. Remove the armrest, if installed. Invacare ® Veranda™ 3000/4000 Position the wheelchair as close as possible along side the seat to which you . During independent transfer, little or no seat platform will be beneath you are transferring, with transfer.
Use a transfer board if at all possible. 16 1567855-C Engage wheel locks. Shift body weight into seat with the front casters parallel to it. Remove the armrest, if installed. Invacare ® Veranda™ 3000/4000 Position the wheelchair as close as possible along side the seat to which you . During independent transfer, little or no seat platform will be beneath you are transferring, with transfer.

Owners Manual
Page 21
...rolling. Invacare ® Veranda™ 3000/4000 3.3 Safety Inspection Checklist Every six months, take your wheelchair to suit your personal body structure and preference. To operate properly and safely, your wheelchair. Routine maintenance will reveal loose or worn parts and ...grips for bent frame or crossbraces. Replace if necessary. q Check that the wheel locks prevent the wheelchair from moving when engaged. Caster should be cared for a thorough inspection and servicing. q Adjust front casters/forks bearing system if wheel wobbles noticeably or binds to a gradual...
...rolling. Invacare ® Veranda™ 3000/4000 3.3 Safety Inspection Checklist Every six months, take your wheelchair to suit your personal body structure and preference. To operate properly and safely, your wheelchair. Routine maintenance will reveal loose or worn parts and ...grips for bent frame or crossbraces. Replace if necessary. q Check that the wheel locks prevent the wheelchair from moving when engaged. Caster should be cared for a thorough inspection and servicing. q Adjust front casters/forks bearing system if wheel wobbles noticeably or binds to a gradual...
Owners Manual
Page 24
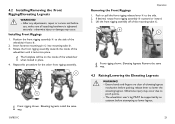
... use, make sure all attaching hardware is tightened securely - Push or pull the front rigging release lever A to lower the elevating legrest. The footplate will be supported by an assistant before attempting to pinch points. - Elevating legrests install ...After any adjustments, repair or service and before pushing release lever to the side. 2. Insert footrest mounting pin C into place. If desired, rotate front rigging assembly B outward or inward. 3. Otherwise injury may occur. The wheelchair user's leg MUST be on the inside of the wheelchair until it locks into...
... use, make sure all attaching hardware is tightened securely - Push or pull the front rigging release lever A to lower the elevating legrest. The footplate will be supported by an assistant before attempting to pinch points. - Elevating legrests install ...After any adjustments, repair or service and before pushing release lever to the side. 2. Insert footrest mounting pin C into place. If desired, rotate front rigging assembly B outward or inward. 3. Otherwise injury may occur. The wheelchair user's leg MUST be on the inside of the wheelchair until it locks into...
Owners Manual
Page 26
... the correct model anti-tipper is used to maintain a 11/2 to the chart in this wheelchair (You may not provide the same level of the hole in bottom hole position. Anti-tippers MUST be achieved, DO NOT use anti-tippers. 4.5 Installing/Removing Anti-Tippers WARNING! - Ensure both anti-tippers are specific to the different seat-to-floor...
... the correct model anti-tipper is used to maintain a 11/2 to the chart in this wheelchair (You may not provide the same level of the hole in bottom hole position. Anti-tippers MUST be achieved, DO NOT use anti-tippers. 4.5 Installing/Removing Anti-Tippers WARNING! - Ensure both anti-tippers are specific to the different seat-to-floor...
Owners Manual
Page 30
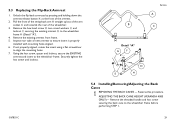
...Service A B C Detail "A" G F D E H 5.4 Installing/Removing/Adjusting the Back Canes REMOVING THE BACK CANES - Reverse this procedure. Remove the hex head screw D two coved washers E and locknut F securing the existing armrest G to the wheelchair frame before performing STEP 1. 1567855-C 29 Inspect rear tube of the wheelchair... the EXISTING armrest and insert to align the mounting holes. 7. 5.3 Replacing the Flip-Back Armrest 1. If not properly aligned, rotate the insert using a flat screwdriver to the wheelchair frame. Pull the front of the swing-back arm B straight up/...
...Service A B C Detail "A" G F D E H 5.4 Installing/Removing/Adjusting the Back Canes REMOVING THE BACK CANES - Reverse this procedure. Remove the hex head screw D two coved washers E and locknut F securing the existing armrest G to the wheelchair frame before performing STEP 1. 1567855-C 29 Inspect rear tube of the wheelchair... the EXISTING armrest and insert to align the mounting holes. 7. 5.3 Replacing the Flip-Back Armrest 1. If not properly aligned, rotate the insert using a flat screwdriver to the wheelchair frame. Pull the front of the swing-back arm B straight up/...
Owners Manual
Page 32
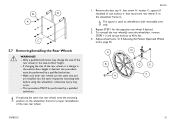
...wheel or the seat-to -floor height is used on the wheelchair frame for the opposite rear wheel if desired. 3. Remove the dust cap A, hex screw B, washer C, spacer (if installed) D and locknut E that secure the rear wheel F to 40 ft.-lbs. 4. If replacing the same size rear wheel, note the mounting position on wheelchairs... qualified technician. Service 1. Make sure both rear wheels are the same size and are installed into the same respective mounting hole before using the wheelchair, otherwise injury may change the size of the rear wheel or a change in the seat-to -floor ...
...wheel or the seat-to -floor height is used on the wheelchair frame for the opposite rear wheel if desired. 3. Remove the dust cap A, hex screw B, washer C, spacer (if installed) D and locknut E that secure the rear wheel F to 40 ft.-lbs. 4. If replacing the same size rear wheel, note the mounting position on wheelchairs... qualified technician. Service 1. Make sure both rear wheels are the same size and are installed into the same respective mounting hole before using the wheelchair, otherwise injury may change the size of the rear wheel or a change in the seat-to -floor ...
Owners Manual
Page 36
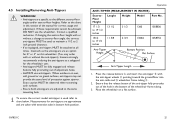
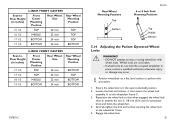
... hold the occupied wheelchair in the open (unlocked) position. 2. Wheel locks are not brakes. - Securely tighten the bolt and locknut securing the wheel lock to stop a moving wheelchair with wheel locks. Engage the wheel lock. 35 Loosen the bolt and locknut A that when engaged, the wheel lock shoe D ... inch TOP 17 1/2 BOTTOM 24 inch TOP 17 1/2 BOTTOM 20 inch BOTTOM 8-INCH FRONT CASTERS Seat-toFloor Height (in inches) Front Caster Mounting Position Rear Wheel Rear Wheel Size Mounting Position 17 1/2 TOP 20 inch BOTTOM 17 1/2 TOP 24 inch TOP 18 1/2 MIDDLE...
... hold the occupied wheelchair in the open (unlocked) position. 2. Wheel locks are not brakes. - Securely tighten the bolt and locknut securing the wheel lock to stop a moving wheelchair with wheel locks. Engage the wheel lock. 35 Loosen the bolt and locknut A that when engaged, the wheel lock shoe D ... inch TOP 17 1/2 BOTTOM 24 inch TOP 17 1/2 BOTTOM 20 inch BOTTOM 8-INCH FRONT CASTERS Seat-toFloor Height (in inches) Front Caster Mounting Position Rear Wheel Rear Wheel Size Mounting Position 17 1/2 TOP 20 inch BOTTOM 17 1/2 TOP 24 inch TOP 18 1/2 MIDDLE...
Owners Manual
Page 39
... should be checked periodically for cacks and wear, and should be replaced if damaged. After ANY adjustments, repair or service and before use your wheelchair, make sure all parts for a listing of the tire. This could cause damage to 6.1.2 Replacing/Repairing Caster Tire/Tube, page 39and 6.1.3 Replacing/Repairing Rear Wheel Tire/Tube, page 39. 4. As with any labels that are tight...
... should be checked periodically for cacks and wear, and should be replaced if damaged. After ANY adjustments, repair or service and before use your wheelchair, make sure all parts for a listing of the tire. This could cause damage to 6.1.2 Replacing/Repairing Caster Tire/Tube, page 39and 6.1.3 Replacing/Repairing Rear Wheel Tire/Tube, page 39. 4. As with any labels that are tight...
Owners Manual
Page 44
...replacement part installation or repair of any such product shall be proven to be defective, such product shall be limited to state. For warranty service, please contact the dealer from whom you do not receive satisfactory warranty service, please write directly to Invacare at the address at Invacare...warranty. Invacare warrants the upholstered materials (seat, back and armrests of the arm assembly) and remaining components of the defect and, if the product is not transferable or assignable to any subsequent purchaser or owner. Invacare's sole obligation and your Invacare product...
...replacement part installation or repair of any such product shall be proven to be defective, such product shall be limited to state. For warranty service, please contact the dealer from whom you do not receive satisfactory warranty service, please write directly to Invacare at the address at Invacare...warranty. Invacare warrants the upholstered materials (seat, back and armrests of the arm assembly) and remaining components of the defect and, if the product is not transferable or assignable to any subsequent purchaser or owner. Invacare's sole obligation and your Invacare product...


