
Owners Manual
Page 4
... the Wheelchair 22 4.2 Installing/Removing the Front Rigging/Eleveating Legrests 23 4.3 Raising/Lowering the Elevating Legrests 23 4.4 Using the Flip-Back Armrest 24 4.5 Installing/Removing Anti-Tippers 25 4.6 Using the Patient Operated Wheel Locks 27 5 Service 28 5.1 Adjusting Footplate Height 28 5.2 Installing/Removing the Heel Loop 28 5.3 Replacing the Flip-Back Armrest 29 5.4 Installing/Removing/Adjusting the Back Canes 29 5.5 Replacing Seat...
... the Wheelchair 22 4.2 Installing/Removing the Front Rigging/Eleveating Legrests 23 4.3 Raising/Lowering the Elevating Legrests 23 4.4 Using the Flip-Back Armrest 24 4.5 Installing/Removing Anti-Tippers 25 4.6 Using the Patient Operated Wheel Locks 27 5 Service 28 5.1 Adjusting Footplate Height 28 5.2 Installing/Removing the Heel Loop 28 5.3 Replacing the Flip-Back Armrest 29 5.4 Installing/Removing/Adjusting the Back Canes 29 5.5 Replacing Seat...
Owners Manual
Page 6
... climbing obstacles. also, a qualified technician MUST perform all procedures specifically indicated in this manual refers to an Invacare qualified technician. General 1.2 Intended Use The intended use on firm surfaces free of product, contact local government or municipal authorities for the manual (mechanical) wheelchair is intended for indoor and outdoor use for proper disposal and recycling requirements. 1567855-C 5 WARNING...
... climbing obstacles. also, a qualified technician MUST perform all procedures specifically indicated in this manual refers to an Invacare qualified technician. General 1.2 Intended Use The intended use on firm surfaces free of product, contact local government or municipal authorities for the manual (mechanical) wheelchair is intended for indoor and outdoor use for proper disposal and recycling requirements. 1567855-C 5 WARNING...
Owners Manual
Page 7
WARNING! Invacare products are specifically designed and manufactured for use with Invacare accessories. Risk of injury or damage Use of incorrect or improper replacement (service) parts may occur. Wheelchair User - Check all parts for shipping damage and test before attempting to understand the warnings, cautions or instructions, contact a healthcare professional, dealer or technical personnel before using. Contact Invacare/Carrier for further instruction. WARNING! ACCESSORIES - Accessories designed...
WARNING! Invacare products are specifically designed and manufactured for use with Invacare accessories. Risk of injury or damage Use of incorrect or improper replacement (service) parts may occur. Wheelchair User - Check all parts for shipping damage and test before attempting to understand the warnings, cautions or instructions, contact a healthcare professional, dealer or technical personnel before using. Contact Invacare/Carrier for further instruction. WARNING! ACCESSORIES - Accessories designed...
Owners Manual
Page 8
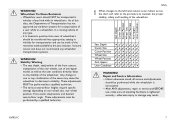
...specific settings depending on rear wheel size, rear wheel position, front caster size/position and desired seat-to decrease in wheelchairs. Repair and Service Information - Any change to one or any kind while in stability. After ANY adjustments, repair or service and BEFORE use, make sure all service and adjustments should be made of a user while in a wheelchair, in vehicles for transportation and use... hardware is Invacare's position that users of wheelchairs should NOT be transferred into appropriate seating in a moving vehicle of the wheelchair. Invacare cannot and ...
...specific settings depending on rear wheel size, rear wheel position, front caster size/position and desired seat-to decrease in wheelchairs. Repair and Service Information - Any change to one or any kind while in stability. After ANY adjustments, repair or service and BEFORE use, make sure all service and adjustments should be made of a user while in a wheelchair, in vehicles for transportation and use... hardware is Invacare's position that users of wheelchairs should NOT be transferred into appropriate seating in a moving vehicle of the wheelchair. Invacare cannot and ...
Owners Manual
Page 9
...have to tip over . - DO NOT tip the wheelchair without assistance. - Wheel locks are reaching as this may result in the seat. - DO NOT use of a wheelchair may cause the wheelchair to pick them up from behind as the wheelchair may tip over . - WARNING! DO NOT attempt ...top of the back upholstery to reach objects if you are not brakes. - DO NOT attempt to stop a moving parts to lift the wheelchair by reaching down between floors. DO NOT attempt to avoid injury. 8 1567855-C Invacare ® Veranda™ 3000/4000 WARNING! DO NOT shift your ...
...have to tip over . - DO NOT tip the wheelchair without assistance. - Wheel locks are reaching as this may result in the seat. - DO NOT use of a wheelchair may cause the wheelchair to pick them up from behind as the wheelchair may tip over . - WARNING! DO NOT attempt ...top of the back upholstery to reach objects if you are not brakes. - DO NOT attempt to stop a moving parts to lift the wheelchair by reaching down between floors. DO NOT attempt to avoid injury. 8 1567855-C Invacare ® Veranda™ 3000/4000 WARNING! DO NOT shift your ...

Owners Manual
Page 10
.... - Engaging the wheel locks may order with or without the anti-tippers), Invacare strongly recommends ordering the anti-tippers as an additional safeguard for the wheelchair user. - ALWAYS use the handrims for use on all times. - If changing the seat-to determine if a seat/chest positioning strap is...Operating Information - Inasmuch as the anti-tippers are specific to the different seat-to-floor angles and/or seat-to ensure the safe operation of this wheelchair (you may not provide the same level of the wheelchair. 1567855-C Safety WARNING! When outdoors on wet,...
.... - Engaging the wheel locks may order with or without the anti-tippers), Invacare strongly recommends ordering the anti-tippers as an additional safeguard for the wheelchair user. - ALWAYS use the handrims for use on all times. - If changing the seat-to determine if a seat/chest positioning strap is...Operating Information - Inasmuch as the anti-tippers are specific to the different seat-to-floor angles and/or seat-to ensure the safe operation of this wheelchair (you may not provide the same level of the wheelchair. 1567855-C Safety WARNING! When outdoors on wet,...
Owners Manual
Page 11
... based cleaning solutions will result in the safe operation and maintenance of its wheelchairs as a seat for any kind of the tire or tube MUST be followed. WARNING! Use of the elevating legrest and the wheel lock extension handle causes the wheel lock to disengage. WARNING! Replacement of weight training. If occupant uses said wheelchair as a weight training apparatus, Invacare...
... based cleaning solutions will result in the safe operation and maintenance of its wheelchairs as a seat for any kind of the tire or tube MUST be followed. WARNING! Use of the elevating legrest and the wheel lock extension handle causes the wheel lock to disengage. WARNING! Replacement of weight training. If occupant uses said wheelchair as a weight training apparatus, Invacare...
Owners Manual
Page 12
... attempt to reach, bend and transfer in serious bodily injury to avoid hard braking or sudden stops. 1567855-C Safety WARNING! - Inasmuch as the most important consideration for the wheelchair user. - Invacare recommends using the wheelchair. DO NOT attempt to reach objects if you have an effect on your... knees. Virtually all times maintain proper balance. Many activities require the wheelchair owner to lift a wheelchair by lifting on this may order with "safety" as the anti-tippers are pointing in the seat or pick them up , or down ramps or traverse slopes greater ...
... attempt to reach, bend and transfer in serious bodily injury to avoid hard braking or sudden stops. 1567855-C Safety WARNING! - Inasmuch as the most important consideration for the wheelchair user. - Invacare recommends using the wheelchair. DO NOT attempt to reach objects if you have an effect on your... knees. Virtually all times maintain proper balance. Many activities require the wheelchair owner to lift a wheelchair by lifting on this may order with "safety" as the anti-tippers are pointing in the seat or pick them up , or down ramps or traverse slopes greater ...
Owners Manual
Page 13
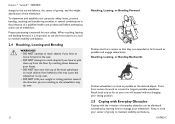
..., Leaning, or Bending Backwards Position wheelchair as close as possible and engage wheel locks. DO NOT shift your wheelchair. Point front casters forward to move forward in the presence of a qualified health-care professional before attempting active use the front casters as a tool to..., and the weight distribution of wheelchair. Keep in mind your particular safety limits, practice bending, reaching and transferring activities in several combinations in the seat. - When reaching, leaning and bending forward, it is essential for your knees. - Invacare ® Veranda™ 3000/...
..., Leaning, or Bending Backwards Position wheelchair as close as possible and engage wheel locks. DO NOT shift your wheelchair. Point front casters forward to move forward in the presence of a qualified health-care professional before attempting active use the front casters as a tool to..., and the weight distribution of wheelchair. Keep in mind your particular safety limits, practice bending, reaching and transferring activities in several combinations in the seat. - When reaching, leaning and bending forward, it is essential for your knees. - Invacare ® Veranda™ 3000/...
Owners Manual
Page 14
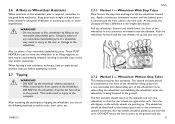
...used to move the wheelchair or as lifting supports, as they may result in injury to the user and/or assistant(s). Wheelchair Without Step Tubes This method requires two assistants. The first assistant should be aware of tipping the wheelchair, use good body mechanics. 2.6 A Note to Wheelchair Assistants When assistance to the wheelchair user...occupant. The second assistant should be positioned at the front of the wheelchair lifting upward on the sidewalk and turn the wheelchair so that the rear wheels are pointing up and over the curb. 2.7.2 Method 2 - Turn...
...used to move the wheelchair or as lifting supports, as they may result in injury to the user and/or assistant(s). Wheelchair Without Step Tubes This method requires two assistants. The first assistant should be aware of tipping the wheelchair, use good body mechanics. 2.6 A Note to Wheelchair Assistants When assistance to the wheelchair user...occupant. The second assistant should be positioned at the front of the wheelchair lifting upward on the sidewalk and turn the wheelchair so that the rear wheels are pointing up and over the curb. 2.7.2 Method 2 - Turn...
Owners Manual
Page 15
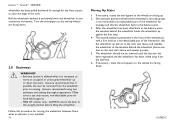
... edge of the wheelchair for leverage and tilts the wheelchair back to the balance point. 3. ALWAYS return the back to use only secure, non-detachable parts for hand-held supports. - 9000 XT recliner only - One assistant (positioned behind the wheelchair backs the wheelchair up . 2...., rotate the anti-tippers so the wheels are facing down . 2.8 Stairways WARNING! - Invacare recommends using two assistants and making thorough preparations. Turn the anti-tippers so the anti-tip wheels are facing down . 1567855-C After the wheelchair has been tilted back to the balance...
... edge of the wheelchair for leverage and tilts the wheelchair back to the balance point. 3. ALWAYS return the back to use only secure, non-detachable parts for hand-held supports. - 9000 XT recliner only - One assistant (positioned behind the wheelchair backs the wheelchair up . 2...., rotate the anti-tippers so the wheels are facing down . 2.8 Stairways WARNING! - Invacare recommends using two assistants and making thorough preparations. Turn the anti-tippers so the anti-tip wheels are facing down . 1567855-C After the wheelchair has been tilted back to the balance...

Owners Manual
Page 17
Shift body weight into seat with the front casters parallel to which you . Invacare ® Veranda™ 3000/4000 Position the wheelchair as close as possible along side the seat to it. Remove the armrest, if installed. During independent transfer, little or no seat platform will be beneath you are transferring, with transfer. Engage wheel locks. Use a transfer board if at all possible. 16 1567855-C
Shift body weight into seat with the front casters parallel to which you . Invacare ® Veranda™ 3000/4000 Position the wheelchair as close as possible along side the seat to it. Remove the armrest, if installed. During independent transfer, little or no seat platform will be beneath you are transferring, with transfer. Engage wheel locks. Use a transfer board if at all possible. 16 1567855-C

Owners Manual
Page 21
... loose or worn parts and enhance the smooth operation of your personal body structure and preference. Clean upholstery with mild soap and water. Replace if necessary. q Ensure wheel bearings are free of your wheelchair to a stop . q Inspect front casters for proper tension by spinning caster. q Inspect rear wheels for a thorough inspection and servicing. q Check headtube locknuts...
... loose or worn parts and enhance the smooth operation of your personal body structure and preference. Clean upholstery with mild soap and water. Replace if necessary. q Ensure wheel bearings are free of your wheelchair to a stop . q Inspect front casters for proper tension by spinning caster. q Inspect rear wheels for a thorough inspection and servicing. q Check headtube locknuts...
Owners Manual
Page 24
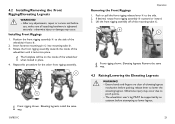
...repair or service and before pushing release lever to lower the elevating legrest. The footplate will be supported by an assistant before attempting to the side of the wheelchair when locked in place. 4. Repeat this procedure for the other front rigging assembly. If desired, rotate front rigging assembly B outward or inward. 3. The wheelchair user...assembly towards the inside of the wheelchair frame B. 2. Elevating legrests install the same way. 1567855-C Operation Removing the Front Riggings 1. Otherwise injury may occur. Insert footrest mounting pin C into place. ...
...repair or service and before pushing release lever to lower the elevating legrest. The footplate will be supported by an assistant before attempting to the side of the wheelchair when locked in place. 4. Repeat this procedure for the other front rigging assembly. If desired, rotate front rigging assembly B outward or inward. 3. The wheelchair user...assembly towards the inside of the wheelchair frame B. 2. Elevating legrests install the same way. 1567855-C Operation Removing the Front Riggings 1. Otherwise injury may occur. Insert footrest mounting pin C into place. ...
Owners Manual
Page 26
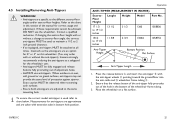
...-TIPPER (MEASUREMENT IN INCHES) Seat-toFloor Height Lenght Height Model Part No. 17 1/2 to 19 1/2 inches 13 1/2 3 1/2 1360 1058836 151/2 to 2 inch ground clearance. - ALWAYS use the wheelchair. Ensure both anti-tippers are specific to the different seat-to-floor angles and/or seat-to -floor height with extension tube in the bottom of the manual for 0° or...
...-TIPPER (MEASUREMENT IN INCHES) Seat-toFloor Height Lenght Height Model Part No. 17 1/2 to 19 1/2 inches 13 1/2 3 1/2 1360 1058836 151/2 to 2 inch ground clearance. - ALWAYS use the wheelchair. Ensure both anti-tippers are specific to the different seat-to-floor angles and/or seat-to -floor height with extension tube in the bottom of the manual for 0° or...
Owners Manual
Page 30
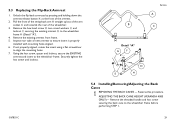
... wheelchair frame H (Detail "A"). 4. Reverse this procedure. 5.3 Replacing the Flip-Back Armrest 1. Remove the existing armrest from frame. 5. Using the hex screw, spacer and locknut, secure the EXISTING armrest and insert to the wheelchair frame before performing STEP 1. 1567855-C 29 Remove the threaded handle and hex screw securing the back cane to the wheelchair frame. Service A B C Detail "A" G F D E H 5.4 Installing...
... wheelchair frame H (Detail "A"). 4. Reverse this procedure. 5.3 Replacing the Flip-Back Armrest 1. Remove the existing armrest from frame. 5. Using the hex screw, spacer and locknut, secure the EXISTING armrest and insert to the wheelchair frame before performing STEP 1. 1567855-C 29 Remove the threaded handle and hex screw securing the back cane to the wheelchair frame. Service A B C Detail "A" G F D E H 5.4 Installing...
Owners Manual
Page 32
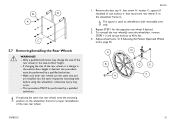
... a qualified technician. - D C B A G E F 1567855-C 31 To reinstall the rear wheel(s) onto the wheelchair, reverse STEPS 1-2 and torque locknut to -floor height. - If replacing the same size rear wheel, note the mounting position on wheelchairs with removable arms only. 2. Service 1. Repeat STEP 1 for proper reinstallation of the rear wheel or the seat-to 40 ft.-lbs. 4. Only a qualified technician may...
... a qualified technician. - D C B A G E F 1567855-C 31 To reinstall the rear wheel(s) onto the wheelchair, reverse STEPS 1-2 and torque locknut to -floor height. - If replacing the same size rear wheel, note the mounting position on wheelchairs with removable arms only. 2. Service 1. Repeat STEP 1 for proper reinstallation of the rear wheel or the seat-to 40 ft.-lbs. 4. Only a qualified technician may...
Owners Manual
Page 36
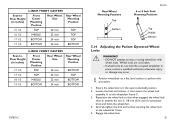
...inch TOP 17 1/2 BOTTOM 24 inch TOP 17 1/2 BOTTOM 20 inch BOTTOM 8-INCH FRONT CASTERS Seat-toFloor Height (in inches) Front Caster Mounting Position Rear Wheel Rear Wheel Size Mounting Position 17 1/2 TOP 20 inch BOTTOM 17 1/2 TOP 24 inch TOP 18 1/2 ...ions Top Bottom Service 6 o r 8 Inch For k Mount ing Posit ions Top Middle Bottom 5.14 Adjusting the Patient Operated Wheel Locks WARNING! - Position wheelchair on a flat, level surface to stop a moving wheelchair with wheel locks. DO NOT attempt to perform this procedure. 1. Wheel locks are not brakes. - Securely ...
...inch TOP 17 1/2 BOTTOM 24 inch TOP 17 1/2 BOTTOM 20 inch BOTTOM 8-INCH FRONT CASTERS Seat-toFloor Height (in inches) Front Caster Mounting Position Rear Wheel Rear Wheel Size Mounting Position 17 1/2 TOP 20 inch BOTTOM 17 1/2 TOP 24 inch TOP 18 1/2 ...ions Top Bottom Service 6 o r 8 Inch For k Mount ing Posit ions Top Middle Bottom 5.14 Adjusting the Patient Operated Wheel Locks WARNING! - Position wheelchair on a flat, level surface to stop a moving wheelchair with wheel locks. DO NOT attempt to perform this procedure. 1. Wheel locks are not brakes. - Securely ...
Owners Manual
Page 39
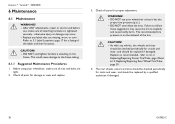
... are tight. 2. Refer to explode and cause bodily harm. WARNING! - Invacare ® Veranda™ 3000/4000 6 Maintenance 6.1 Maintenance WARNING! - After ANY adjustments, repair or service and before use your wheelchair, make sure all nuts and bolts are missing, worn, or torn. Replace any vehicle, the wheels and tires should be checked periodically for damage or wear and...
... are tight. 2. Refer to explode and cause bodily harm. WARNING! - Invacare ® Veranda™ 3000/4000 6 Maintenance 6.1 Maintenance WARNING! - After ANY adjustments, repair or service and before use your wheelchair, make sure all nuts and bolts are missing, worn, or torn. Replace any vehicle, the wheels and tires should be checked periodically for damage or wear and...
Owners Manual
Page 44
... replacement part installation or repair of this warranty. This warranty gives you specific legal rights and you may also have other person or entity and is serialized, indicate the serial number. For warranty service, please contact the dealer from Invacare or...model number, date of purchase, indicate nature of the defect and, if the product is not transferable or assignable to be repaired or replaced, at the bottom of any subsequent purchaser or owner. Do not return products to Invacare at the address at Invacare's option. Invacare warrants the upholstered materials (seat...
... replacement part installation or repair of this warranty. This warranty gives you specific legal rights and you may also have other person or entity and is serialized, indicate the serial number. For warranty service, please contact the dealer from Invacare or...model number, date of purchase, indicate nature of the defect and, if the product is not transferable or assignable to be repaired or replaced, at the bottom of any subsequent purchaser or owner. Do not return products to Invacare at the address at Invacare's option. Invacare warrants the upholstered materials (seat...


