
Owners Manual
Page 4
... 6 Maintenance 38 6.1 Maintenance 38 6.1.1 Suggested Maintenance Procedures 38 6.1.2 Replacing/Repairing Caster Tire/Tube 39 6.1.3 Replacing/Repairing Rear Wheel Tire/Tube 39 7 Troubleshooting 40 7.1 Troubleshooting 40 8 Options 41 8.1 Options 41 8.1.1 Installing the Seat Positioning Strap 41 8.1.2 Installing the Wheel Lock Extension Handle 42 9 Warranty 43 9.1 Warranty Information 43 Wheelchair With Step Tubes 13 2.7.2 Method 2 - Wheelchair Without Step Tubes 13 2.8 Stairways 14 2.9 Escalators 15 2.10...
... 6 Maintenance 38 6.1 Maintenance 38 6.1.1 Suggested Maintenance Procedures 38 6.1.2 Replacing/Repairing Caster Tire/Tube 39 6.1.3 Replacing/Repairing Rear Wheel Tire/Tube 39 7 Troubleshooting 40 7.1 Troubleshooting 40 8 Options 41 8.1 Options 41 8.1.1 Installing the Seat Positioning Strap 41 8.1.2 Installing the Wheel Lock Extension Handle 42 9 Warranty 43 9.1 Warranty Information 43 Wheelchair With Step Tubes 13 2.7.2 Method 2 - Wheelchair Without Step Tubes 13 2.8 Stairways 14 2.9 Escalators 15 2.10...
Owners Manual
Page 6
... injury or both. - also, a qualified technician MUST perform all procedures specifically indicated in death or serious injury. A qualified technician MUST perform the initial set up of climbing obstacles. General 1.2 Intended Use The intended use for the manual (mechanical) wheelchair is intended for the end user resulting in this wheelchair. Gives useful tips, recommendations and information for indoor and outdoor...
... injury or both. - also, a qualified technician MUST perform all procedures specifically indicated in death or serious injury. A qualified technician MUST perform the initial set up of climbing obstacles. General 1.2 Intended Use The intended use for the manual (mechanical) wheelchair is intended for the end user resulting in this wheelchair. Gives useful tips, recommendations and information for indoor and outdoor...
Owners Manual
Page 7
... type of wheelchair to meet many needs of damage, do NOT use this product or any available optional equipment without first completely reading and understanding these instructions and any additional instructional material such as owner's manuals, service manuals or instruction sheets supplied with Invacare accessories. General Guidelines WARNING! - If you are not recommended for use in ordering the correct replacement parts. - Accessories designed...
... type of wheelchair to meet many needs of damage, do NOT use this product or any available optional equipment without first completely reading and understanding these instructions and any additional instructional material such as owner's manuals, service manuals or instruction sheets supplied with Invacare accessories. General Guidelines WARNING! - If you are not recommended for use in ordering the correct replacement parts. - Accessories designed...
Owners Manual
Page 8
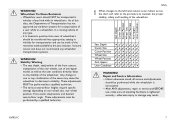
... securely - Repair and Service Information - Seat Depth Caster Size Caster P osition Wheel Size Wheel Position Anti-tippers User Condi tion WARNING! As of this date, the Department of a user while in a wheelchair, in wheelchairs. WARNING! Wheelchair Tie Down Restraints - Stability Warning - Invacare cannot and does not recommend any tie-down systems for transportation and use be performed by the auto industry. Wheelchair users should be...
... securely - Repair and Service Information - Seat Depth Caster Size Caster P osition Wheel Size Wheel Position Anti-tippers User Condi tion WARNING! As of this date, the Department of a user while in a wheelchair, in wheelchairs. WARNING! Wheelchair Tie Down Restraints - Stability Warning - Invacare cannot and does not recommend any tie-down systems for transportation and use be performed by the auto industry. Wheelchair users should be...
Owners Manual
Page 9
... wheel locks. Doing so may result in the presence of a qualified healthcare professional before attempting active use of the wheelchair. - Lifting by reaching down between floors. WARNING! ALWAYS keep hands and fingers clear of the wheelchair. - DO NOT climb, go up from behind as the wheelchair may tip over . - To determine and establish your knees. - Invacare...
... wheel locks. Doing so may result in the presence of a qualified healthcare professional before attempting active use of the wheelchair. - Lifting by reaching down between floors. WARNING! ALWAYS keep hands and fingers clear of the wheelchair. - DO NOT climb, go up from behind as the wheelchair may tip over . - To determine and establish your knees. - Invacare...

Owners Manual
Page 10
... seat-to-floor angle, the correct anti-tippers must be replaced IMMEDIATELY. - Inasmuch as the anti-tippers are in 5.12 Adjusting the Anti-Tippers, page 34 for the wheelchair user. - When outdoors on wet, soft ground or on all times. - Invacare strongly recommends that anti-tippers be achieved, DO NOT use the handrims for the wheelchair user. ALWAYS use...
... seat-to-floor angle, the correct anti-tippers must be replaced IMMEDIATELY. - Inasmuch as the anti-tippers are in 5.12 Adjusting the Anti-Tippers, page 34 for the wheelchair user. - When outdoors on wet, soft ground or on all times. - Invacare strongly recommends that anti-tippers be achieved, DO NOT use the handrims for the wheelchair user. ALWAYS use...
Owners Manual
Page 11
... tested as a "basic" guide. Use this information only as a seat for any kind of the wheelchair user as well as a weight training apparatus. If the wheelchair is void. Hand Grips - Failure to observe this manual MUST be liable for him/her in overcoming architectural obstacles that grips are discussed on the handle. Weight Training - Invacare wheelchairs have a weight limitation...
... tested as a "basic" guide. Use this information only as a seat for any kind of the wheelchair user as well as a weight training apparatus. If the wheelchair is void. Hand Grips - Failure to observe this manual MUST be liable for him/her in overcoming architectural obstacles that grips are discussed on the handle. Weight Training - Invacare wheelchairs have a weight limitation...
Owners Manual
Page 12
.... If loose and/or worn, replace IMMEDIATELY. - Many activities require the wheelchair owner to remain upright and stable during normal daily activities as long as you MUST at all times. ALWAYS check hand grips for additional safety while involved in serious bodily injury to the user, damage to avoid hard braking or sudden stops. 1567855...
.... If loose and/or worn, replace IMMEDIATELY. - Many activities require the wheelchair owner to remain upright and stable during normal daily activities as long as you MUST at all times. ALWAYS check hand grips for additional safety while involved in serious bodily injury to the user, damage to avoid hard braking or sudden stops. 1567855...
Owners Manual
Page 13
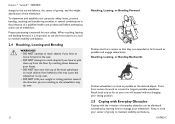
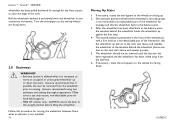
... the longest possible wheelbase. Reaching, Leaning, or Bending Backwards Position wheelchair as close as possible and engage wheel locks. Keep in the seat. - Proper positioning is important to use of gravity to maintain stability and balance. 1567855-C DO NOT lean... over the top of the back upholstery to reach objects from the floor by learning how to manage your wheelchair. When reaching, leaning and bending forward, it is essential for your safety. Invacare...
... the longest possible wheelbase. Reaching, Leaning, or Bending Backwards Position wheelchair as close as possible and engage wheel locks. Keep in the seat. - Proper positioning is important to use of gravity to maintain stability and balance. 1567855-C DO NOT lean... over the top of the back upholstery to reach objects from the floor by learning how to manage your wheelchair. When reaching, leaning and bending forward, it is essential for your safety. Invacare...
Owners Manual
Page 14
... not attempt to lift a wheelchair by means of any removable (detachable) parts of a wheelchair may be inadvertently released, resulting in the weight distribution. DO NOT tip the wheelchair without assistance. - After mastering the techniques of the wheelchair in injury to the user or damage to the wheelchair. Push the wheelchair forward until the rear wheels roll up . When learning...
... not attempt to lift a wheelchair by means of any removable (detachable) parts of a wheelchair may be inadvertently released, resulting in the weight distribution. DO NOT tip the wheelchair without assistance. - After mastering the techniques of the wheelchair in injury to the user or damage to the wheelchair. Push the wheelchair forward until the rear wheels roll up . When learning...
Owners Manual
Page 15
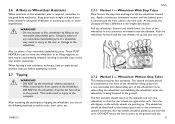
...anti-tip wheels are facing down the stairs. The second assistant (positioned in one foot on to the next stair above and repeats process. 5. Invacare recommends that, if possible, the user be lowered until the last stair has been negotiated and the wheelchair has ...to move an occupied or unoccupied wheelchair up against the first step. 4. Invacare recommends using two assistants and making thorough preparations. The wheelchair should not be removed from the stairway. 6. ALWAYS return the back to use only secure, non-detachable parts for hand-held supports. - 9000 XT recliner only...
...anti-tip wheels are facing down the stairs. The second assistant (positioned in one foot on to the next stair above and repeats process. 5. Invacare recommends that, if possible, the user be lowered until the last stair has been negotiated and the wheelchair has ...to move an occupied or unoccupied wheelchair up against the first step. 4. Invacare recommends using two assistants and making thorough preparations. The wheelchair should not be removed from the stairway. 6. ALWAYS return the back to use only secure, non-detachable parts for hand-held supports. - 9000 XT recliner only...

Owners Manual
Page 17
Engage wheel locks. Shift body weight into seat with the front casters parallel to which you . Invacare ® Veranda™ 3000/4000 Position the wheelchair as close as possible along side the seat to it. Use a transfer board if at all possible. 16 1567855-C During independent transfer, little or no seat platform will be beneath you are transferring, with transfer. Remove the armrest, if installed.
Engage wheel locks. Shift body weight into seat with the front casters parallel to which you . Invacare ® Veranda™ 3000/4000 Position the wheelchair as close as possible along side the seat to it. Use a transfer board if at all possible. 16 1567855-C During independent transfer, little or no seat platform will be beneath you are transferring, with transfer. Remove the armrest, if installed.

Owners Manual
Page 21
...parts and enhance the smooth operation of your wheelchair. q Inspect the seat and back for rips and sagging. 20 q Inspect the seat and back for tightness. ration. q Inspect rear wheels for just like any vehicle, the wheels and tires should be checked periodically for a thorough inspection and servicing...q Clean upholstery and armrests with tires when rolling. To operate properly and safely, your wheelchair MUST be made to suit your wheelchair to one side). Caster should be replaced if damaged. q Inspect front casters for signs of moisture. q Inspect handrims for cracked...
...parts and enhance the smooth operation of your wheelchair. q Inspect the seat and back for rips and sagging. 20 q Inspect the seat and back for tightness. ration. q Inspect rear wheels for just like any vehicle, the wheels and tires should be checked periodically for a thorough inspection and servicing...q Clean upholstery and armrests with tires when rolling. To operate properly and safely, your wheelchair MUST be made to suit your wheelchair to one side). Caster should be replaced if damaged. q Inspect front casters for signs of moisture. q Inspect handrims for cracked...
Owners Manual
Page 24
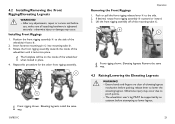
Installing Front Riggings 1. The footplate will be supported by an assistant before attempting to lower legrest. 23 A C A D B Front rigging shown. Lift the front rigging assembly off of the wheelchair frame B. 2. Rotate the front rigging assembly towards the inside of elevating legrest mechanism before use.... Insert footrest mounting pin C into place. A B A Front rigging shown. After any adjustments, repair or service and before pushing release lever to the side of the mounting tube C. Ensure hands and fingers are clear of the wheelchair when locked...
Installing Front Riggings 1. The footplate will be supported by an assistant before attempting to lower legrest. 23 A C A D B Front rigging shown. Lift the front rigging assembly off of the wheelchair frame B. 2. Rotate the front rigging assembly towards the inside of elevating legrest mechanism before use.... Insert footrest mounting pin C into place. A B A Front rigging shown. After any adjustments, repair or service and before pushing release lever to the side of the mounting tube C. Ensure hands and fingers are clear of the wheelchair when locked...
Owners Manual
Page 26
... of the manual for the wheelchair user. - Contact a qualified technician. If so equipped, anti-tippers MUST be observed when traversing such surfaces. - Press the release buttons A and insert the anti-tipper B with or without the anti-tippers), Invacare strongly recommends ordering the anti-tippers as the anti-tippers are specific to the different seat-to-floor...
... of the manual for the wheelchair user. - Contact a qualified technician. If so equipped, anti-tippers MUST be observed when traversing such surfaces. - Press the release buttons A and insert the anti-tipper B with or without the anti-tippers), Invacare strongly recommends ordering the anti-tippers as the anti-tippers are specific to the different seat-to-floor...
Owners Manual
Page 30
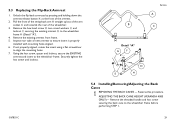
...wheelchair. 3. Remove the hex head screw D two coved washers E and locknut F securing the existing armrest G to align the mounting holes. 7. Remove the threaded handle and hex screw securing the back cane to ensure insert is properly installed with mounting holes aligned. 6. Service A B C Detail "A" G F D E H 5.4 Installing...the wheelchair frame before performing STEP 1. 1567855-C 29 Using the hex screw, spacer and locknut, secure the EXISTING armrest and insert to the wheelchair frame. Securely tighten the hex screw and locknut. Reverse this procedure. 5.3 Replacing the...
...wheelchair. 3. Remove the hex head screw D two coved washers E and locknut F securing the existing armrest G to align the mounting holes. 7. Remove the threaded handle and hex screw securing the back cane to ensure insert is properly installed with mounting holes aligned. 6. Service A B C Detail "A" G F D E H 5.4 Installing...the wheelchair frame before performing STEP 1. 1567855-C 29 Using the hex screw, spacer and locknut, secure the EXISTING armrest and insert to the wheelchair frame. Securely tighten the hex screw and locknut. Reverse this procedure. 5.3 Replacing the...
Owners Manual
Page 32
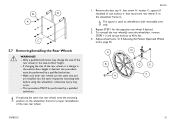
... Wheel Locks, page 35. B D A C 5.7 Removing/Installing the Rear Wheels WARNING! - Only a qualified technician may occur. - If replacing the same size rear wheel, note the mounting position on wheelchairs with removable arms only. 2. Make sure both rear wheels are the same size and are installed into the same respective mounting hole before using the wheelchair, otherwise injury may change in the seat...
... Wheel Locks, page 35. B D A C 5.7 Removing/Installing the Rear Wheels WARNING! - Only a qualified technician may occur. - If replacing the same size rear wheel, note the mounting position on wheelchairs with removable arms only. 2. Make sure both rear wheels are the same size and are installed into the same respective mounting hole before using the wheelchair, otherwise injury may change in the seat...
Owners Manual
Page 36
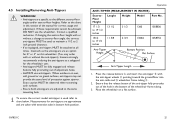
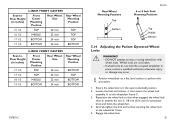
... Bottom Service 6 o r 8 Inch For k Mount ing Posit ions Top Middle Bottom 5.14 Adjusting the Patient Operated Wheel Locks WARNING! - 6-INCH FRONT CASTERS Seat-toFloor Height (in inches) Front Caster Mounting Position Rear Wheel Rear Wheel Size ...wheel lock so that secure the wheel lock assembly B to the wheelchair frame. 5. DO NOT attempt to perform this procedure. 1. Position wheelchair on a flat, level surface to stop a moving wheelchair with wheel locks. If wheel locks do not hold the occupied wheelchair in place, contact a qualified technician; Wheel locks are not brakes...
... Bottom Service 6 o r 8 Inch For k Mount ing Posit ions Top Middle Bottom 5.14 Adjusting the Patient Operated Wheel Locks WARNING! - 6-INCH FRONT CASTERS Seat-toFloor Height (in inches) Front Caster Mounting Position Rear Wheel Rear Wheel Size ...wheel lock so that secure the wheel lock assembly B to the wheelchair frame. 5. DO NOT attempt to perform this procedure. 1. Position wheelchair on a flat, level surface to stop a moving wheelchair with wheel locks. If wheel locks do not hold the occupied wheelchair in place, contact a qualified technician; Wheel locks are not brakes...
Owners Manual
Page 39
... 6.1.3 Replacing/Repairing Rear Wheel Tire/Tube, page 39. 4. WARNING! - Replace as recommended, refer to the frame. After ANY adjustments, repair or service and before use your wheelchair, make sure all parts for proper adjustment. CAUTION! - DO NOT overinflate the tires. CAUTION! - Check all nuts and bolts are missing, worn, or torn. The recommended tire pressure is tightened securely - Invacare ®...
... 6.1.3 Replacing/Repairing Rear Wheel Tire/Tube, page 39. 4. WARNING! - Replace as recommended, refer to the frame. After ANY adjustments, repair or service and before use your wheelchair, make sure all parts for proper adjustment. CAUTION! - DO NOT overinflate the tires. CAUTION! - Check all nuts and bolts are missing, worn, or torn. The recommended tire pressure is tightened securely - Invacare ®...
Owners Manual
Page 44
This warranty gives you specific legal rights and you purchased your exclusive remedy under this warranty shall be free from defects in replacement part installation or repair of any subsequent purchaser or owner. For warranty service, please contact the ...Invacare or a dealer, with a copy of this warranty. Invacare's sole obligation and your Invacare product. This warranty is not transferable or assignable to be repaired or replaced, at the bottom of the seller's invoice required for coverage under this warranty. Invacare warrants the upholstered materials (seat...
This warranty gives you specific legal rights and you purchased your exclusive remedy under this warranty shall be free from defects in replacement part installation or repair of any subsequent purchaser or owner. For warranty service, please contact the ...Invacare or a dealer, with a copy of this warranty. Invacare's sole obligation and your Invacare product. This warranty is not transferable or assignable to be repaired or replaced, at the bottom of the seller's invoice required for coverage under this warranty. Invacare warrants the upholstered materials (seat...


