
User Guide
Page 17
... Certification Markings 46 Intel® Entry Server Chassis SC5275-E User Guide xvii Replacing the Front System Fan in Board 25 Figure 15. Removing the Front Panel Board 34 Figure 21. Installing the Hard Drive Bay Cage 22 Figure 14. Installing the Access Cover 27 Figure 17. Table 6. Removing EMI Shields 16 Figure 9. Slide Rails...17 Figure 10...
... Certification Markings 46 Intel® Entry Server Chassis SC5275-E User Guide xvii Replacing the Front System Fan in Board 25 Figure 15. Removing the Front Panel Board 34 Figure 21. Installing the Hard Drive Bay Cage 22 Figure 14. Installing the Access Cover 27 Figure 17. Table 6. Removing EMI Shields 16 Figure 9. Slide Rails...17 Figure 10...

User Guide
Page 19
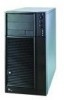
...Two 5.25-inch wide bays that includes two pair of 5.25inch external drive rails, four different types of mounting screws, and two brackets for up to six 3.5-inch hard disk drives. unused expansion slots must have a slot cover Covers installed over the ...1 Chassis Description 1 Chassis Description Kit Contents The chassis subassembly kit includes this product guide and a box that are externally accessible, designed to hold up to five 1-inch high, SCSI hot-swap hard drives or four SATA drives. Hex head 6-32 x 6mm [.256] Figure 1. Intel® Entry Server Chassis SC5275-E ...
...Two 5.25-inch wide bays that includes two pair of 5.25inch external drive rails, four different types of mounting screws, and two brackets for up to six 3.5-inch hard disk drives. unused expansion slots must have a slot cover Covers installed over the ...1 Chassis Description 1 Chassis Description Kit Contents The chassis subassembly kit includes this product guide and a box that are externally accessible, designed to hold up to five 1-inch high, SCSI hot-swap hard drives or four SATA drives. Hex head 6-32 x 6mm [.256] Figure 1. Intel® Entry Server Chassis SC5275-E ...

User Guide
Page 35
... the appropriate size and length, attach two slide rails to the drive manufacturer's instructions. 6. B Figure 9. Set any jumpers or switches on an antistatic surface. 4. Slide Rails TP00081 Intel® Entry Server Chassis SC5275-E User Guide 17 Remove the drive from the drive. Note that the left and right rails mirror each other. The rails must be installed with the metal flange with...
... the appropriate size and length, attach two slide rails to the drive manufacturer's instructions. 6. B Figure 9. Set any jumpers or switches on an antistatic surface. 4. Slide Rails TP00081 Intel® Entry Server Chassis SC5275-E User Guide 17 Remove the drive from the drive. Note that the left and right rails mirror each other. The rails must be installed with the metal flange with...

User Guide
Page 36
Position the drive so the slide rails engage in only one way. The connectors are flush with the chassis. 8. Push the drive into the bay until the slide rails are keyed and can be inserted in the chassis bay guide rails. Use two screws for each slide rail to the drive. TP00065 Figure 10. 2 Setting Up the Chassis 7. Connect the data and power cables to attach the device at the front of the chassis. 9. Installing a Removable Media Device Intel® Entry Server Chassis SC5275-E User Guide 18
Position the drive so the slide rails engage in only one way. The connectors are flush with the chassis. 8. Push the drive into the bay until the slide rails are keyed and can be inserted in the chassis bay guide rails. Use two screws for each slide rail to the drive. TP00065 Figure 10. 2 Setting Up the Chassis 7. Connect the data and power cables to attach the device at the front of the chassis. 9. Installing a Removable Media Device Intel® Entry Server Chassis SC5275-E User Guide 18

User Guide
Page 39
... the open side of cage) Figure 12. Line up when installing drives. Use four screws (screw A), attach the drive to a Cage Intel® Entry Server Chassis SC5275-E User Guide 21 B. Screw tabs. Slide the drive into the back of the drive cage along the rails in until the drive connectors are flush with the rear of the cage with the component...
... the open side of cage) Figure 12. Line up when installing drives. Use four screws (screw A), attach the drive to a Cage Intel® Entry Server Chassis SC5275-E User Guide 21 B. Screw tabs. Slide the drive into the back of the drive cage along the rails in until the drive connectors are flush with the rear of the cage with the component...