

Product Guide
Page 18
...(CIR) support • Low pin count (LPC) interface • Intelligent power management, including a programmable wake up event interface • PCI power management support Expandability Intel Desktop Board DX58SO provides the following RAID (Redundant Array of Independent Drives) levels: • RAID 0 - data striping and data mirroring • RAID 5 - data mirroring •... • Two PCI Express 1.1 x1 ports • One PCI bus connector BIOS The BIOS provides the Power-On Self-Test (POST), the BIOS Setup program, and the PCI/PCI Express and IDE auto-configuration utilities.
...(CIR) support • Low pin count (LPC) interface • Intelligent power management, including a programmable wake up event interface • PCI power management support Expandability Intel Desktop Board DX58SO provides the following RAID (Redundant Array of Independent Drives) levels: • RAID 0 - data striping and data mirroring • RAID 5 - data mirroring •... • Two PCI Express 1.1 x1 ports • One PCI bus connector BIOS The BIOS provides the Power-On Self-Test (POST), the BIOS Setup program, and the PCI/PCI Express and IDE auto-configuration utilities.

Product Guide
Page 25
... how to Appendix A for instructions on the Desktop Board. The speaker provides audible error code (beep code) information during the Power-On Self-Test (POST). Go to page 57 for a description of -day clock and 100-year calendar. Desktop Board Features Onboard VR and CPU LEDs The Desktop Board contains the following two LEDs (see Figure 6) that...
... how to Appendix A for instructions on the Desktop Board. The speaker provides audible error code (beep code) information during the Power-On Self-Test (POST). Go to page 57 for a description of -day clock and 100-year calendar. Desktop Board Features Onboard VR and CPU LEDs The Desktop Board contains the following two LEDs (see Figure 6) that...
Product Guide
Page 33
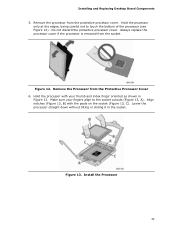
... the socket cutouts (Figure 13, A). Lower the processor straight down without tilting or sliding it in Figure 13. Installing and Replacing Desktop Board Components 5. Remove the processor from the socket. Do not discard the protective processor cover. Always replace the processor cover if the processor...thumb and index finger oriented as shown in the socket. Remove the Processor from the Protective Processor Cover 6. Hold the processor with the posts on the socket (Figure 13, C). Install the Processor 33 Figure 12. Align notches (Figure 13, B) with your fingers align ...
... the socket cutouts (Figure 13, A). Lower the processor straight down without tilting or sliding it in Figure 13. Installing and Replacing Desktop Board Components 5. Remove the processor from the socket. Do not discard the protective processor cover. Always replace the processor cover if the processor...thumb and index finger oriented as shown in the socket. Remove the Processor from the Protective Processor Cover 6. Hold the processor with the posts on the socket (Figure 13, C). Install the Processor 33 Figure 12. Align notches (Figure 13, B) with your fingers align ...

Product Guide
Page 56
... cord from the AC power source. 11. Setup displays the Maintenance menu. 8. Configure (2-3) Recovery (None) After the Power-On Self-Test (POST) runs, the BIOS displays the Maintenance Menu. Replace the cover, plug in "Before You Begin" on pins 2-3 as shown below. 6. Turn...(wall outlet or power adapter). 3. Select Yes and press . Remove the computer cover. 56 Use the arrow keys to boot. 7. Intel Desktop Board DX58SO Product Guide Table 14. Find the configuration jumper block (see Figure 31). 5. The computer starts the Setup program. Press to the computer...
... cord from the AC power source. 11. Setup displays the Maintenance menu. 8. Configure (2-3) Recovery (None) After the Power-On Self-Test (POST) runs, the BIOS displays the Maintenance Menu. Replace the cover, plug in "Before You Begin" on pins 2-3 as shown below. 6. Turn...(wall outlet or power adapter). 3. Select Yes and press . Remove the computer cover. 56 Use the arrow keys to boot. 7. Intel Desktop Board DX58SO Product Guide Table 14. Find the configuration jumper block (see Figure 31). 5. The computer starts the Setup program. Press to the computer...

Product Guide
Page 63
... BIOS Update utility or the Iflash Memory Update utility, and how to recover the BIOS if an update fails. Go to the DX58SO page, click "[view] Latest BIOS updates," and select the Express BIOS Update utility file. 3. You can also save this file to a ...Test (POST) memory test begins and before the operating system boot begins. Follow the instructions provided in the Windows environment. 3 Updating the BIOS The BIOS Setup program can be rebooted at the last Express BIOS Update window. 5. Navigate to the Intel World Wide Web site: http://support.intel.com/support/motherboards/desktop/ 2....
... BIOS Update utility or the Iflash Memory Update utility, and how to recover the BIOS if an update fails. Go to the DX58SO page, click "[view] Latest BIOS updates," and select the Express BIOS Update utility file. 3. You can also save this file to a ...Test (POST) memory test begins and before the operating system boot begins. Follow the instructions provided in the Windows environment. 3 Updating the BIOS The BIOS Setup program can be rebooted at the last Express BIOS Update window. 5. Navigate to the Intel World Wide Web site: http://support.intel.com/support/motherboards/desktop/ 2....
Product Guide
Page 66
... the F10 option during POST to boot to a bootable USB flash drive or other bootable USB media. 2. however, if an interruption occurs, the BIOS could be required. Intel Desktop Board DX58SO Product Guide CAUTION Do not interrupt the process or the system may not function properly. 1. Due to : http://support.intel.com/support/motherboards/desktop/sb/CS-022312...
... the F10 option during POST to boot to a bootable USB flash drive or other bootable USB media. 2. however, if an interruption occurs, the BIOS could be required. Intel Desktop Board DX58SO Product Guide CAUTION Do not interrupt the process or the system may not function properly. 1. Due to : http://support.intel.com/support/motherboards/desktop/sb/CS-022312...
Product Guide
Page 67
...boot, you will only appear if three or four SATA drives are available), RAID 5 and RAID 10 (these options will see the following Intel Matrix Storage Manager option ROM status message on the remaining portion of the volume (if you enter less than two drives available) and press...Matrix Storage Technology NOTE Intel Matrix Storage Technology requires Microsoft Windows Vista or Microsoft Windows XP operating system and SATA hard drives. Creating Your RAID Set 1. ensure that RAID is selected. 4. Assemble your settings by pressing after the Power-On-Self-Test (POST) memory tests begin. ...
...boot, you will only appear if three or four SATA drives are available), RAID 5 and RAID 10 (these options will see the following Intel Matrix Storage Manager option ROM status message on the remaining portion of the volume (if you enter less than two drives available) and press...Matrix Storage Technology NOTE Intel Matrix Storage Technology requires Microsoft Windows Vista or Microsoft Windows XP operating system and SATA hard drives. Creating Your RAID Set 1. ensure that RAID is selected. 4. Assemble your settings by pressing after the Power-On-Self-Test (POST) memory tests begin. ...
Product Guide
Page 69
... Windows installation and install all necessary drivers. 69 Press once you can then create a second RAID array on the screen: Press to the Desktop Board's two back panel eSATA connectors. 2. Select the strip size, if necessary, and press . 5. When prompted, insert the diskette that RAID... is selected. 4. Then save your settings by pressing the key after the Power-On-Self-Test (POST) memory tests begin. 3. Press and enter the RAID Configuration Utility. 2. Configuring for RAID Configuring for information on supported USB floppy disk ...
... Windows installation and install all necessary drivers. 69 Press once you can then create a second RAID array on the screen: Press to the Desktop Board's two back panel eSATA connectors. 2. Select the strip size, if necessary, and press . 5. When prompted, insert the diskette that RAID... is selected. 4. Then save your settings by pressing the key after the Power-On-Self-Test (POST) memory tests begin. 3. Press and enter the RAID Configuration Utility. 2. Configuring for RAID Configuring for information on supported USB floppy disk ...

Product Guide
Page 71
... the monitor BIOS Beep Codes The BIOS also issues a beep code (one long tone followed by two short tones) during the POST, the BIOS displays an error message describing the problem. The firmware has detected that a CMOS battery failure occurred. SERIAL PRESENCE DETECT... 16 gives an explanation of memory installed in Channel B. Maximum memory performance is required for reliable operation. A Error Messages and Indicators Intel Desktop Board DX58SO reports POST errors in two ways: • By sounding a beep code • By displaying an error message on reboot) BIOS Error Messages...
... the monitor BIOS Beep Codes The BIOS also issues a beep code (one long tone followed by two short tones) during the POST, the BIOS displays an error message describing the problem. The firmware has detected that a CMOS battery failure occurred. SERIAL PRESENCE DETECT... 16 gives an explanation of memory installed in Channel B. Maximum memory performance is required for reliable operation. A Error Messages and Indicators Intel Desktop Board DX58SO reports POST errors in two ways: • By sounding a beep code • By displaying an error message on reboot) BIOS Error Messages...


