
Product Specification
Page 102
... • No (default) • Yes • Off • On (default) Description Specifies if manual configuration is available for use during lab testing. Yes lets the operating system configure Plug and Play devices not required to boot the system. Intel Desktop Board D845PEBT2 Technical Product Specification Table 69. PCI Configuration Submenu (continued) Feature PCI Slot5 IRQ...
... • No (default) • Yes • Off • On (default) Description Specifies if manual configuration is available for use during lab testing. Yes lets the operating system configure Plug and Play devices not required to boot the system. Intel Desktop Board D845PEBT2 Technical Product Specification Table 69. PCI Configuration Submenu (continued) Feature PCI Slot5 IRQ...
Product Specification
Page 112
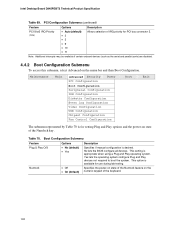
...fans will turn off the system, unplug the power cord from the system. After saving the BIOS settings and turning off . Intel Desktop Board D845PEBT2 Technical Product Specification Table 78. User Defined. 4.4.10 Fan Control Configuration Submenu To access this menu, select Advanced on . 112... Enabled (default) • Slow (default) • Off Description Enables or disables fan control. Note: These options will continue to Manual - Selects the number of time required before reapplying power and turning the system back on the menu bar and then Fan Control Configuration....
...fans will turn off the system, unplug the power cord from the system. After saving the BIOS settings and turning off . Intel Desktop Board D845PEBT2 Technical Product Specification Table 78. User Defined. 4.4.10 Fan Control Configuration Submenu To access this menu, select Advanced on . 112... Enabled (default) • Slow (default) • Off Description Enables or disables fan control. Note: These options will continue to Manual - Selects the number of time required before reapplying power and turning the system back on the menu bar and then Fan Control Configuration....
Product Guide
Page 4
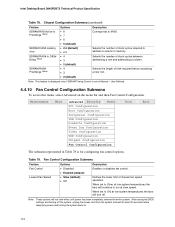
Intel Desktop Boards D845PESV Product Guide 2 Installing and Replacing Desktop Board Components Before You Begin ...23 Installing the I/O Shield ...24 Installing and Removing the Desktop Board 25 Installing and Removing a Processor 26 Installing a Processor 26 Installing the Processor Fan Heat ...39 The RAID Configuration Utility 40 Creating a Striped Set (RAID 0 41 Automatic Configuration 41 Manual Configuration 41 Creating a Mirrored Set (RAID 1 42 Automatic Configuration 42 Manual Configuration 43 Deleting the RAID Set 44 Rebuilding the Mirrored Set 44 Resolving Conflicts ...44 ...
Intel Desktop Boards D845PESV Product Guide 2 Installing and Replacing Desktop Board Components Before You Begin ...23 Installing the I/O Shield ...24 Installing and Removing the Desktop Board 25 Installing and Removing a Processor 26 Installing a Processor 26 Installing the Processor Fan Heat ...39 The RAID Configuration Utility 40 Creating a Striped Set (RAID 0 41 Automatic Configuration 41 Manual Configuration 41 Creating a Mirrored Set (RAID 1 42 Automatic Configuration 42 Manual Configuration 43 Deleting the RAID Set 44 Rebuilding the Mirrored Set 44 Resolving Conflicts ...44 ...
Product Guide
Page 18
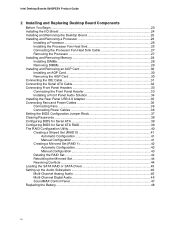
... can override the auto-configuration options by following restrictions: • The supervisor password gives unrestricted access to Setup. 18 You can be updated by specifying manual configuration in the BIOS Setup program. Intel Desktop Board D845PEBT2 Product Guide Accelerated Graphics Port (AGP) ✏ NOTE Desktop Board D845PEBT2 is stored in the Firmware Hub.
... can override the auto-configuration options by following restrictions: • The supervisor password gives unrestricted access to Setup. 18 You can be updated by specifying manual configuration in the BIOS Setup program. Intel Desktop Board D845PEBT2 Product Guide Accelerated Graphics Port (AGP) ✏ NOTE Desktop Board D845PEBT2 is stored in the Firmware Hub.
Product Guide
Page 25
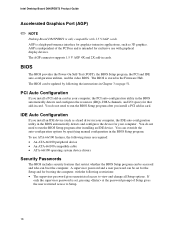
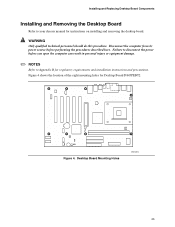
... manual for instructions on installing and removing the desktop board. Desktop Board Mounting Holes OM14812 25 Figure 4. Installing and Replacing Desktop Board Components Installing and Removing the Desktop Board Refer to Appendix B for regulatory requirements and installation instructions and precautions. WARNING Only qualified technical personnel should do this procedure. Figure 4 shows the location of the eight mounting holes for Desktop Board D845PEBT2...
... manual for instructions on installing and removing the desktop board. Desktop Board Mounting Holes OM14812 25 Figure 4. Installing and Replacing Desktop Board Components Installing and Removing the Desktop Board Refer to Appendix B for regulatory requirements and installation instructions and precautions. WARNING Only qualified technical personnel should do this procedure. Figure 4 shows the location of the eight mounting holes for Desktop Board D845PEBT2...

Product Guide
Page 26
... how to install the processor to the desktop board are given below. mPGA478B mPGA478B mPGA478B A Figure 5. Installing a Processor OM12078 Installing the Processor Fan Heat Sink Desktop Board D845PEBT2 has an integrated processor fan heat sink retention mechanism (RM). Intel Desktop Board D845PEBT2 Product Guide Installing and Removing a Processor ... (A) is aligned with the corner where the lever is attached to the boxed processor manual or the Intel World Wide Web site at: http://support.intel.com/support/processors/pentium4/intnotes478.htm 26 the standby power LED should not be lit ...
... how to install the processor to the desktop board are given below. mPGA478B mPGA478B mPGA478B A Figure 5. Installing a Processor OM12078 Installing the Processor Fan Heat Sink Desktop Board D845PEBT2 has an integrated processor fan heat sink retention mechanism (RM). Intel Desktop Board D845PEBT2 Product Guide Installing and Removing a Processor ... (A) is aligned with the corner where the lever is attached to the boxed processor manual or the Intel World Wide Web site at: http://support.intel.com/support/processors/pentium4/intnotes478.htm 26 the standby power LED should not be lit ...
Product Guide
Page 27
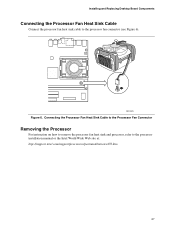
Connecting the Processor Fan Heat Sink Cable to the Processor Fan Connector Removing the Processor For instruction on how to remove the processor fan heat sink and processor, refer to the processor fan connector (see Figure 6). OM14813 Figure 6. Installing and Replacing Desktop Board Components Connecting the Processor Fan Heat Sink Cable Connect the processor fan heat sink cable to the processor installation manual or the Intel World Wide Web site at: http://support.intel.com/support/processors/pentium4/intnotes478.htm 27
Connecting the Processor Fan Heat Sink Cable to the Processor Fan Connector Removing the Processor For instruction on how to remove the processor fan heat sink and processor, refer to the processor fan connector (see Figure 6). OM14813 Figure 6. Installing and Replacing Desktop Board Components Connecting the Processor Fan Heat Sink Cable Connect the processor fan heat sink cable to the processor installation manual or the Intel World Wide Web site at: http://support.intel.com/support/processors/pentium4/intnotes478.htm 27
Product Guide
Page 41
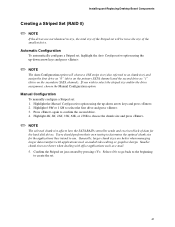
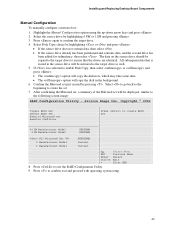
... drive and press . 3. Smaller chunk sizes are better when managing larger data transfers with office applications such as e-mail. 5. Highlight the Manual Configuration option using the up -down arrow keys and press . ✏ NOTE The Auto Configuration option will be twice the size of data...press . ✏ NOTE The selected chunk size affects how the SATA RAID controller sends and receives block of the smallest drive. Installing and Replacing Desktop Board Components Creating a Striped Set (RAID 0) ✏ NOTE If the drives are not identical in size, the total size of the Striped set...
... drive and press . 3. Smaller chunk sizes are better when managing larger data transfers with office applications such as e-mail. 5. Highlight the Manual Configuration option using the up -down arrow keys and press . ✏ NOTE The Auto Configuration option will be twice the size of data...press . ✏ NOTE The selected chunk size affects how the SATA RAID controller sends and receives block of the smallest drive. Installing and Replacing Desktop Board Components Creating a Striped Set (RAID 0) ✏ NOTE If the drives are not identical in size, the total size of the Striped set...
Product Guide
Page 42
... Set (RAID 1) Automatic Configuration To automatically configure a mirrored set Resolve Conflicts Press to select the drive assignments for the source and target drives, choose the Manual Configuration option. 42 Intel Desktop Board D845PEBT2 Product Guide 6.
... Set (RAID 1) Automatic Configuration To automatically configure a mirrored set Resolve Conflicts Press to select the drive assignments for the source and target drives, choose the Manual Configuration option. 42 Intel Desktop Board D845PEBT2 Product Guide 6.
Product Guide
Page 43
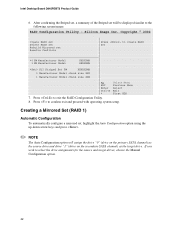
...169; 2002 Create RAID set Delete RAID set Rebuild Mirrored set Resolve Conflicts Press to create RAID set : 1. Installing and Replacing Desktop Board Components Manual Configuration To manually configure a mirrored set *0 PM Manufacturer Model 1 SM Manufacturer Model XXXXXMB XXXXXMB *Set0 SiI Mirrored Set PM 0 Manufacturer Model 1... - After confirming the Mirrored set, a summary of the Mirrored set will copy the disk in the background. 6. Highlight the Manual Configuration option using the up-down arrow keys and press . 2. The data on the source drive should be copied to the ...
...169; 2002 Create RAID set Delete RAID set Rebuild Mirrored set Resolve Conflicts Press to create RAID set : 1. Installing and Replacing Desktop Board Components Manual Configuration To manually configure a mirrored set *0 PM Manufacturer Model 1 SM Manufacturer Model XXXXXMB XXXXXMB *Set0 SiI Mirrored Set PM 0 Manufacturer Model 1... - After confirming the Mirrored set, a summary of the Mirrored set will copy the disk in the background. 6. Highlight the Manual Configuration option using the up-down arrow keys and press . 2. The data on the source drive should be copied to the ...
Product Guide
Page 60
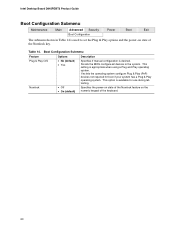
...is desired. Yes lets the operating system configure Plug & Play (PnP) devices not required for use during lab testing. Intel Desktop Board D845PEBT2 Product Guide Boot Configuration Submenu Maintenance Main Advanced Security Power Boot Exit Boot Configuration The submenu shown in the system. Boot Configuration... Plug & Play O/S Numlock Options • No (default) • Yes • Off • On (default) Description Specifies if manual configuration is used to set the Plug & Play options and the power-on the numeric keypad of the Numlock key. This setting is available...
...is desired. Yes lets the operating system configure Plug & Play (PnP) devices not required for use during lab testing. Intel Desktop Board D845PEBT2 Product Guide Boot Configuration Submenu Maintenance Main Advanced Security Power Boot Exit Boot Configuration The submenu shown in the system. Boot Configuration... Plug & Play O/S Numlock Options • No (default) • Yes • Off • On (default) Description Specifies if manual configuration is used to set the Plug & Play options and the power-on the numeric keypad of the Numlock key. This setting is available...
Product Guide
Page 68
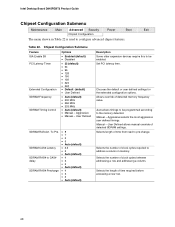
.... 68 Auto allows timings to be enabled. Selects the length of detected memory frequency value. Set PCI latency time. Manual - Selects the number of time from read to configure advanced chipset features. Intel Desktop Board D845PEBT2 Product Guide Chipset Configuration Submenu Maintenance Main Advanced Security Power Boot Exit Chipset Configuration The menu shown in memory...
.... 68 Auto allows timings to be enabled. Selects the length of detected memory frequency value. Set PCI latency time. Manual - Selects the number of time from read to configure advanced chipset features. Intel Desktop Board D845PEBT2 Product Guide Chipset Configuration Submenu Maintenance Main Advanced Security Power Boot Exit Chipset Configuration The menu shown in memory...


