
Quick Setup Guide (English)
Page 1
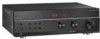
... receiver. Loosen cap, insert speaker wire into the side, then tighten cap. Video 3 Input Connect a game console or video camera here. Press PRESET buttons to select the radio band, FM, FM-MONO, or AM. Power Press to the front of a high-quality Insignia product... Selector Turn the knob to choose an AM or FM radio station. Your 5.1-channel surround sound receiver is designed for more information. Quick Setup Guide I NS-R5101HD 5.1 Receiver Congratulations on your receiver or put it in the battery compartment, then replace the cover. 2 Connect speakers Position speakers...
... receiver. Loosen cap, insert speaker wire into the side, then tighten cap. Video 3 Input Connect a game console or video camera here. Press PRESET buttons to select the radio band, FM, FM-MONO, or AM. Power Press to the front of a high-quality Insignia product... Selector Turn the knob to choose an AM or FM radio station. Your 5.1-channel surround sound receiver is designed for more information. Quick Setup Guide I NS-R5101HD 5.1 Receiver Congratulations on your receiver or put it in the battery compartment, then replace the cover. 2 Connect speakers Position speakers...

Quick Setup Guide (English)
Page 2
...OUT jacks on the VCR. 4 Connect an audio cable to the AUDIO OUT GAME/AUX2 L/R jacks on the back of your receiver. Antenna for FM radio Receiver Receiver for a TV to these jacks, using a Composite cable (not included). Plug the other component using an HDMI cable (not ...subwoofer to a device that requires a composite video output connection, like a recording device. AUDIO OUT Connect to this jack. IR IN Connect an IR receiver to this SUBWOOFER PRE OUT jack. COAXIAL IN1 Connect a coaxial digital audio device to this jack, using a Component cable (not included). TV IN...
...OUT jacks on the VCR. 4 Connect an audio cable to the AUDIO OUT GAME/AUX2 L/R jacks on the back of your receiver. Antenna for FM radio Receiver Receiver for a TV to these jacks, using a Composite cable (not included). Plug the other component using an HDMI cable (not ...subwoofer to a device that requires a composite video output connection, like a recording device. AUDIO OUT Connect to this jack. IR IN Connect an IR receiver to this SUBWOOFER PRE OUT jack. COAXIAL IN1 Connect a coaxial digital audio device to this jack, using a Component cable (not included). TV IN...

Quick Setup Guide (English)
Page 3
... front AV jacks To connect a device to the front AV jacks: 1 Connect a standard (composite) video cable to the AUX 1 VIDEO jack on the front of your receiver and ...to the AUDIO OUT jacks on the front of video jacks that you cannot select HDMI as for the device to a digital audio jack on the back of your receiver...cable to the COMPONENT VIDEO IN 2 (CABLE/SAT) jacks on the back of your receiver and to a standard video device. 2 Connect an audio cable to make an audio connection...
... front AV jacks To connect a device to the front AV jacks: 1 Connect a standard (composite) video cable to the AUX 1 VIDEO jack on the front of your receiver and ...to the AUDIO OUT jacks on the front of video jacks that you cannot select HDMI as for the device to a digital audio jack on the back of your receiver...cable to the COMPONENT VIDEO IN 2 (CABLE/SAT) jacks on the back of your receiver and to a standard video device. 2 Connect an audio cable to make an audio connection...

Quick Setup Guide (English)
Page 4
...3. See "Setting the listening environment (ROOM EQ)" in your remote control to complete the auto speaker setup procedure. Adjust speaker settings with this receiver, do not use a microphone other than the one supplied with Auto Setup 1. Distributed by Best Buy Purchasing, LLC 7601 Penn Avenue South, ... in your User Guide for more information. Connect the supplied microphone to the SETUP MIC jack on the front of your receiver to turn on the receiver. 5 Complete setup • Press the input buttons on your remote control or rotate the INPUT SELECTOR knob on your User...
...3. See "Setting the listening environment (ROOM EQ)" in your remote control to complete the auto speaker setup procedure. Adjust speaker settings with this receiver, do not use a microphone other than the one supplied with Auto Setup 1. Distributed by Best Buy Purchasing, LLC 7601 Penn Avenue South, ... in your User Guide for more information. Connect the supplied microphone to the SETUP MIC jack on the front of your receiver to turn on the receiver. 5 Complete setup • Press the input buttons on your remote control or rotate the INPUT SELECTOR knob on your User...

User Manual (English)
Page 2
...player or DVD player 8 Connecting a TV 9 Connecting a device to the front AV jacks 10 Connecting a CD player 10 Connecting digital audio 10 Connecting headphones 11 Connecting speakers 11 Connecting an IR receiver 13 Adjusting the speakers 13 Selecting speaker type 13 Selecting the crossover frequency 14 Adjusting...output levels 14 Selecting the speaker distance 15 Setting the listening environment (ROOM EQ 16 Understanding the basics 17 Turning your receiver on or off 17 Selecting the input source 17 Adjusting the volume 17 Adjusting the bass and treble 18 Viewing status ...
...player or DVD player 8 Connecting a TV 9 Connecting a device to the front AV jacks 10 Connecting a CD player 10 Connecting digital audio 10 Connecting headphones 11 Connecting speakers 11 Connecting an IR receiver 13 Adjusting the speakers 13 Selecting speaker type 13 Selecting the crossover frequency 14 Adjusting...output levels 14 Selecting the speaker distance 15 Setting the listening environment (ROOM EQ 16 Understanding the basics 17 Turning your receiver on or off 17 Selecting the input source 17 Adjusting the volume 17 Adjusting the bass and treble 18 Viewing status ...

User Manual (English)
Page 3
Contents Manually tuning to a radio station 22 Presetting radio stations 22 Tuning to a preset station 22 Recording 22 Setting the sleep timer 23 Adjusting the display brightness 23 Troubleshooting 23 Specifications 24 Legal notices 24 One-year limited warranty 25 www.insigniaproducts.com iii
Contents Manually tuning to a radio station 22 Presetting radio stations 22 Tuning to a preset station 22 Recording 22 Setting the sleep timer 23 Adjusting the display brightness 23 Troubleshooting 23 Specifications 24 Legal notices 24 One-year limited warranty 25 www.insigniaproducts.com iii

User Manual (English)
Page 5
A grounding type plug has two blades and a third grounding prong. CAUTION RISK OF ELECTRIC SHOCK DO NOT OPEN TO REDUCE THE RISK OF ELECTRIC SHOCK, DO NOT CAUTION: REMOVE COVER (OR BACK). Caution regarding installation: For heat dispersal, do not expose this appliance to rain or moisture. Cautions • Leave a space around the unit for sufficient ventilation. • Avoid installation in extremely hot or cold locations, or in an area that may be connected to the grounding system of uninsulated "dangerous voltage" within the product's enclosure that is required when the ...
A grounding type plug has two blades and a third grounding prong. CAUTION RISK OF ELECTRIC SHOCK DO NOT OPEN TO REDUCE THE RISK OF ELECTRIC SHOCK, DO NOT CAUTION: REMOVE COVER (OR BACK). Caution regarding installation: For heat dispersal, do not expose this appliance to rain or moisture. Cautions • Leave a space around the unit for sufficient ventilation. • Avoid installation in extremely hot or cold locations, or in an area that may be connected to the grounding system of uninsulated "dangerous voltage" within the product's enclosure that is required when the ...
User Manual (English)
Page 6
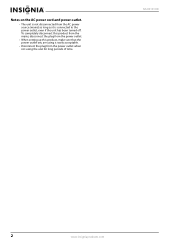
To completely disconnect this product from the mains, disconnect the plug from the power outlet. • When setting up this product, make sure that the power outlet you are using the unit for long periods of time. NS-R5101HD 2 www.insigniaproducts.com Notes on the AC power cord and power outlet. • The unit is not disconnected from the power outlet when not using is easily acceptable. • Disconnect the plug from the AC power source (mains) as long as it is connected to the power outlet, even if the unit has been turned off.
To completely disconnect this product from the mains, disconnect the plug from the power outlet. • When setting up this product, make sure that the power outlet you are using the unit for long periods of time. NS-R5101HD 2 www.insigniaproducts.com Notes on the AC power cord and power outlet. • The unit is not disconnected from the power outlet when not using is easily acceptable. • Disconnect the plug from the AC power source (mains) as long as it is connected to the power outlet, even if the unit has been turned off.

User Manual (English)
Page 7
...; User Guide Front # Item Description 9 POWER ON/OFF Press to turn connected speakers on page 16. To stop the flow of a high-quality Insignia product. Rotate to the next or previous preset station. Each time you rotate the knob slightly, you feel a click and, the sound mode changes ...to GAME/AX2 to CBL/SAT (cable/satellite) to DVD to turn your receiver on or off . Your NS-R5101HD represents the state of the art in 5.1 surround sound receiver design and is turned on, press to put your receiver in standby mode, electricity still flows into this jack to AM. Lights when...
...; User Guide Front # Item Description 9 POWER ON/OFF Press to turn connected speakers on page 16. To stop the flow of a high-quality Insignia product. Rotate to the next or previous preset station. Each time you rotate the knob slightly, you feel a click and, the sound mode changes ...to GAME/AX2 to CBL/SAT (cable/satellite) to DVD to turn your receiver on or off . Your NS-R5101HD represents the state of the art in 5.1 surround sound receiver design and is turned on, press to put your receiver in standby mode, electricity still flows into this jack to AM. Lights when...

User Manual (English)
Page 8
... 13 COAXIAL IN1 Connect a coaxial digital audio device to this jack. Connect the audio for a TV to this jack. Connect an IR receiver to this jack. NS-R5101HD 5.1 Surround Sound Receiver Back # Item Description HDMI IN DVD 1 HDMI IN CABLE/SAT HDMI IN GAME/AUX2 2 IR IN AUDIO OUT L/R 3 AUDIO IN...For more information, see "Connecting a CD player" on page 11. 12 HDMI OUT Connect a TV to hear its sound through your receiver is helpful when your receiver. VIDEO IN GAME AUX2 9 VIDEO DVD IN Connect a Blu-ray Disc player or DVD player to this jack. COMPONENT VIDEO 20 IN1...
... 13 COAXIAL IN1 Connect a coaxial digital audio device to this jack. Connect the audio for a TV to this jack. Connect an IR receiver to this jack. NS-R5101HD 5.1 Surround Sound Receiver Back # Item Description HDMI IN DVD 1 HDMI IN CABLE/SAT HDMI IN GAME/AUX2 2 IR IN AUDIO OUT L/R 3 AUDIO IN...For more information, see "Connecting a CD player" on page 11. 12 HDMI OUT Connect a TV to hear its sound through your receiver is helpful when your receiver. VIDEO IN GAME AUX2 9 VIDEO DVD IN Connect a Blu-ray Disc player or DVD player to this jack. COMPONENT VIDEO 20 IN1...

User Manual (English)
Page 9
... / PRESET 18 RETURN 19 MUTE Press to adjust the brightness of time. Description When in standby mode. The sleep timer will automatically turn off your receiver in standby mode, press to a previous menu. In menu mode, press to increase or decrease the bass. 2 Insert two AAA batteries into the battery ... station. Press to open the on page 21. Do not use the remote control for the surround mode, volume, or input source. 5.1 Surround Sound Receiver Remote control # Item Description 11 LED indicator Lights when you press a button. 12 STANDBY 13 D.INPUTS Press to put your...
... / PRESET 18 RETURN 19 MUTE Press to adjust the brightness of time. Description When in standby mode. The sleep timer will automatically turn off your receiver in standby mode, press to a previous menu. In menu mode, press to increase or decrease the bass. 2 Insert two AAA batteries into the battery ... station. Press to open the on page 21. Do not use the remote control for the surround mode, volume, or input source. 5.1 Surround Sound Receiver Remote control # Item Description 11 LED indicator Lights when you press a button. 12 STANDBY 13 D.INPUTS Press to put your...

User Manual (English)
Page 10
NS-R5101HD 5.1 Surround Sound Receiver Aiming the remote control To aim the remote control: • Aim the remote control at the remote sensor on the front of your receiver. Indoor FM antenna 23 ft. (7 m) Note Make sure that there are no obstructions between the remote control and the remote ...control sensor on the front of your receiver is within 30°. Poor or incorrect connections can connect an outdoor FM antenna. The operating distance is unplugged from the power outlet ...
NS-R5101HD 5.1 Surround Sound Receiver Aiming the remote control To aim the remote control: • Aim the remote control at the remote sensor on the front of your receiver. Indoor FM antenna 23 ft. (7 m) Note Make sure that there are no obstructions between the remote control and the remote ...control sensor on the front of your receiver is within 30°. Poor or incorrect connections can connect an outdoor FM antenna. The operating distance is unplugged from the power outlet ...
User Manual (English)
Page 11
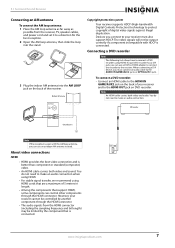
...AM LOOP jack on DVD recorder. Devices you can control other components through the HDMI connector. • The audio signals from the receiver, TV, speaker cables, and power cord and set it to make an audio connection. DVD recorder AM loop antenna Grounding wire ...and audio. The video signals will not be controlled by another component through the HDMI connector. Outdoor AM antenna Copyright protection system Your receiver supports HDCP (High-bandwidth Digital Contents Protection) technology to make an audio connection when using HDMI. • For stable signal transfer...
...AM LOOP jack on DVD recorder. Devices you can control other components through the HDMI connector. • The audio signals from the receiver, TV, speaker cables, and power cord and set it to make an audio connection. DVD recorder AM loop antenna Grounding wire ...and audio. The video signals will not be controlled by another component through the HDMI connector. Outdoor AM antenna Copyright protection system Your receiver supports HDCP (High-bandwidth Digital Contents Protection) technology to make an audio connection when using HDMI. • For stable signal transfer...

User Manual (English)
Page 12
VCR NS-R5101HD 5.1 Surround Sound Receiver To connect a Blu-ray Disc player or DVD player using component video: 1 Connect a component video cable to the COMPONENT VIDEO IN 1 (DVD) jacks on the back of your receiver and to the COMPONENT VIDEO OUT jacks on your receiver and to the AUDIO OUT jacks on the ...digital audio" on the player. To connect a VCR: 1 Connect standard video cable to the VIDEO IN GAME/AUX2 jack on the back of your receiver and to the AUDIO IN jacks on the player. Connecting a VCR Note When recording video program sources through GAME/AUX 2 OUT jack, you must...
VCR NS-R5101HD 5.1 Surround Sound Receiver To connect a Blu-ray Disc player or DVD player using component video: 1 Connect a component video cable to the COMPONENT VIDEO IN 1 (DVD) jacks on the back of your receiver and to the COMPONENT VIDEO OUT jacks on your receiver and to the AUDIO OUT jacks on the ...digital audio" on the player. To connect a VCR: 1 Connect standard video cable to the VIDEO IN GAME/AUX2 jack on the back of your receiver and to the AUDIO IN jacks on the player. Connecting a VCR Note When recording video program sources through GAME/AUX 2 OUT jack, you must...
User Manual (English)
Page 13
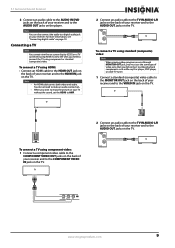
...TV tuner. 1 Connect a standard (composite) video cable to the MONITOR OUT jack on the back of your receiver and to the VIDEO IN jack on the TV. You do not need to connect the TV using component or ...sound, set the HDMI to AMP. For more information, see "Connecting digital audio" on your receiver. TV To connect a TV using component video: 1 Connect a component video cable to the COMPONENT VIDEO OUT ...TV connected using HDMI: • Connect an HDMI cable to the HDMI OUT jack on the back of your receiver and to the HDMI IN jack on the TV. Note • An HDMI cable carries both video and audio....
...TV tuner. 1 Connect a standard (composite) video cable to the MONITOR OUT jack on the back of your receiver and to the VIDEO IN jack on the TV. You do not need to connect the TV using component or ...sound, set the HDMI to AMP. For more information, see "Connecting digital audio" on your receiver. TV To connect a TV using component video: 1 Connect a component video cable to the COMPONENT VIDEO OUT ...TV connected using HDMI: • Connect an HDMI cable to the HDMI OUT jack on the back of your receiver and to the HDMI IN jack on the TV. Note • An HDMI cable carries both video and audio....

User Manual (English)
Page 14
...AUX) or OPTICAL IN 1 (CABLE/SAT) jack on the back of your receiver and to the OPTICAL OUT jack on the front of your receiver. Note When you do not want to keep them covered with optical digital audio AV device 2 Connect an audio cable to the AUX 1 L/R jacks on the digital... audio" on page 10. Do not connect both coaxial and optical digital audio jacks, connect one or the other. NS-R5101HD 5.1 Surround Sound Receiver Connecting a device to the front AV jacks The front AV jacks make it easy to connect a device like a camcorder or video game console that has both jacks to your ...
...AUX) or OPTICAL IN 1 (CABLE/SAT) jack on the back of your receiver and to the OPTICAL OUT jack on the front of your receiver. Note When you do not want to keep them covered with optical digital audio AV device 2 Connect an audio cable to the AUX 1 L/R jacks on the digital... audio" on page 10. Do not connect both coaxial and optical digital audio jacks, connect one or the other. NS-R5101HD 5.1 Surround Sound Receiver Connecting a device to the front AV jacks The front AV jacks make it easy to connect a device like a camcorder or video game console that has both jacks to your ...

User Manual (English)
Page 15
Never touch the speaker jacks when the power cord is incorrect, the sound will be heard from the speakers, and if the polarity of your receiver to the channel (left Center 2 Press SPEAKER on your environment and speaker layout. (For more information see "Placing the speakers" on the front .... Do not let the bare speaker wires touch each other or any metal part on the front of the speaker connection is connect to your receiver. After installing the speakers, first adjust the speaker settings according to a power outlet. Front right Front left and right) and the polarity (+ and ...
Never touch the speaker jacks when the power cord is incorrect, the sound will be heard from the speakers, and if the polarity of your receiver to the channel (left Center 2 Press SPEAKER on your environment and speaker layout. (For more information see "Placing the speakers" on the front .... Do not let the bare speaker wires touch each other or any metal part on the front of the speaker connection is connect to your receiver. After installing the speakers, first adjust the speaker settings according to a power outlet. Front right Front left and right) and the polarity (+ and ...

User Manual (English)
Page 16
... aimed at a slightly higher position (0 to 8.0 inches or 0 to the surround back speakers into the SUBWOOFER PRE OUT jack on the size of your receiver. NS-R5101HD 5.1 Surround Sound Receiver 3 Insert the bare part of the listener or slightly behind the listener. When using a single surround back speaker, place it clockwise. Surround left and...
... aimed at a slightly higher position (0 to 8.0 inches or 0 to the surround back speakers into the SUBWOOFER PRE OUT jack on the size of your receiver. NS-R5101HD 5.1 Surround Sound Receiver 3 Insert the bare part of the listener or slightly behind the listener. When using a single surround back speaker, place it clockwise. Surround left and...

User Manual (English)
Page 17
...when connecting speakers that can use only magnetically shielded front left and right and center speakers to avoid interference with the IR receiver. This effectively prevents the surround back channel signals from reflecting off the TV or screen at a slightly downward facing angle. ...SPEAKER DISTANCE 3 Press TUNE or TUNE to select the speaker type. SPEAKER SETTING FRONT CENTER SURR SURR. Depending on connecting the IR receiver, see the operating instructions that cannot fully reproduce sounds below crossover frequency. • SMALL-Select this is connected). • NO-...
...when connecting speakers that can use only magnetically shielded front left and right and center speakers to avoid interference with the IR receiver. This effectively prevents the surround back channel signals from reflecting off the TV or screen at a slightly downward facing angle. ...SPEAKER DISTANCE 3 Press TUNE or TUNE to select the speaker type. SPEAKER SETTING FRONT CENTER SURR SURR. Depending on connecting the IR receiver, see the operating instructions that cannot fully reproduce sounds below crossover frequency. • SMALL-Select this is connected). • NO-...

User Manual (English)
Page 18
.... You can select 50Hz, 80Hz, 100Hz, 150Hz, or 200Hz. 5 Press RETURN to return to the main menu or press SETUP to close the menu. NS-R5101HD 5.1 Surround Sound Receiver • PLUS-Select this when you want the subwoofer to output bass sound continously or you want deeper bass (the bass frequencies that came...
.... You can select 50Hz, 80Hz, 100Hz, 150Hz, or 200Hz. 5 Press RETURN to return to the main menu or press SETUP to close the menu. NS-R5101HD 5.1 Surround Sound Receiver • PLUS-Select this when you want the subwoofer to output bass sound continously or you want deeper bass (the bass frequencies that came...