

Firmware Installation Guide (English)
Page 2
...this screen do not select a language please move to "Choose your TV back on the side of the TV. 8. When you experience any custom settings that you will be blue; Note: It is complete and you erase/delete the update file from the TV. 9. The first time the bar ...OFF OR UNPLUG DURING THE UPDATE Note: During the software update, a progress bar will fill two times. this upgrade, call Insignia Customer Support at (877) 467‐4289 for TV set up . See image of the update; Power your menu Language" will then begin automatically; The software update will appear. Once...
...this screen do not select a language please move to "Choose your TV back on the side of the TV. 8. When you experience any custom settings that you will be blue; Note: It is complete and you erase/delete the update file from the TV. 9. The first time the bar ...OFF OR UNPLUG DURING THE UPDATE Note: During the software update, a progress bar will fill two times. this upgrade, call Insignia Customer Support at (877) 467‐4289 for TV set up . See image of the update; Power your menu Language" will then begin automatically; The software update will appear. Once...
User Manual (English)
Page 3
... the audio mode 24 Selecting the sound mode or audio language 25 Adjusting audio settings 25 Playing audio only 25 Changing channel settings 25 Automatically scanning for channels 25 Hiding channels 26 Setting up a favorite channel list 26 Labeling a channel 27 Viewing the digital TV ...33 Selecting the closed captioning mode 33 Customizing the DTV closed captioning style 34 Adjusting time settings 35 Manually setting the date and time 35 Setting the sleep timer 35 Adjusting menu settings 36 Selecting the menu language 36 Adjusting the menu transparency 36 Labeling a video input ...
... the audio mode 24 Selecting the sound mode or audio language 25 Adjusting audio settings 25 Playing audio only 25 Changing channel settings 25 Automatically scanning for channels 25 Hiding channels 26 Setting up a favorite channel list 26 Labeling a channel 27 Viewing the digital TV ...33 Selecting the closed captioning mode 33 Customizing the DTV closed captioning style 34 Adjusting time settings 35 Manually setting the date and time 35 Setting the sleep timer 35 Adjusting menu settings 36 Selecting the menu language 36 Adjusting the menu transparency 36 Labeling a video input ...
User Manual (English)
Page 11
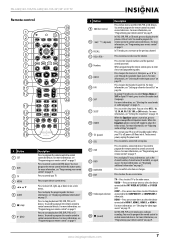
..., such as the video source. To disconnect power, unplug the power cord. Press to turn your TV. Press one or more information, see "Setting up , or down in on-screen menus. You need to program the remote control to control connected devices. For more information, see "Programming your... your remote control" on page 9. NS-L42Q120-10A/NS-L46Q120-10A 42"/46" LCD TV Remote control 19 1 20 2 21 3 22 4 23 5 24 6 TV VIDEO COMP HDMI 25 7 26 8 27 9 28 10 29 11 30 12 31 32 13 14 33 15 34 16 35 17 36 18 37 # Button 1 SET 2 DVD 3 TV 4 MENU 5 6 ...
..., such as the video source. To disconnect power, unplug the power cord. Press to turn your TV. Press one or more information, see "Setting up , or down in on-screen menus. You need to program the remote control to control connected devices. For more information, see "Programming your... your remote control" on page 9. NS-L42Q120-10A/NS-L46Q120-10A 42"/46" LCD TV Remote control 19 1 20 2 21 3 22 4 23 5 24 6 TV VIDEO COMP HDMI 25 7 26 8 27 9 28 10 29 11 30 12 31 32 13 14 33 15 34 16 35 17 36 18 37 # Button 1 SET 2 DVD 3 TV 4 MENU 5 6 ...
User Manual (English)
Page 12
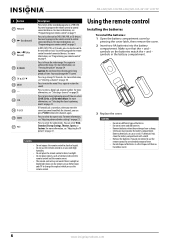
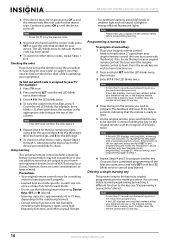
...objects, such as hazardous waste. 8 www.insigniaproducts.com Press to select the video modes. For more information, see "Selecting a channel" on page 9. NS-L42Q120-10A/NS-L46Q120-10A 42"/46" LCD TV # Button 27 PVR/LIST 28 (fast forward) 29 / forward) (skip 30 /FREEZE 31 CH /CH 32 MUTE 33... cause a rash. For more information, see "Selecting the closed captioning on page 20. For more information, see "Adjusting advanced video settings" on page 33. You need to program the remote control to control connected devices. You need to program the remote control to control...
...objects, such as hazardous waste. 8 www.insigniaproducts.com Press to select the video modes. For more information, see "Selecting a channel" on page 9. NS-L42Q120-10A/NS-L46Q120-10A 42"/46" LCD TV # Button 27 PVR/LIST 28 (fast forward) 29 / forward) (skip 30 /FREEZE 31 CH /CH 32 MUTE 33... cause a rash. For more information, see "Selecting the closed captioning on page 20. For more information, see "Adjusting advanced video settings" on page 33. You need to program the remote control to control connected devices. You need to program the remote control to control...
User Manual (English)
Page 13
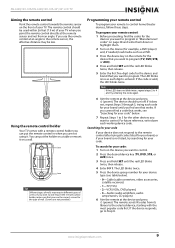
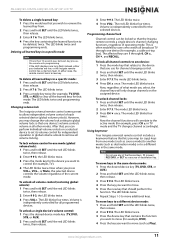
NS-L42Q120-10A/NS-L46Q120-10A 42"/46" LCD TV Aiming the remote control Point the remote control towards the remote sensor on the front of screws. ... 6 Aim the remote at the remote sensor and not from its library to program (TV, DVD, STB, or AUX). 4 Press and hold SET until the red LED blinks twice, then release. 5 Enter the first five-digit code for the device and brand that you use the remote control...8. If the device responds, go to control. 2 Press the desired device key (TV, DVD, STB, or AUX) once. 3 Press and hold SET until the red LED blinks twice, then release. 4 Enter 9 9 1.
NS-L42Q120-10A/NS-L46Q120-10A 42"/46" LCD TV Aiming the remote control Point the remote control towards the remote sensor on the front of screws. ... 6 Aim the remote at the remote sensor and not from its library to program (TV, DVD, STB, or AUX). 4 Press and hold SET until the red LED blinks twice, then release. 5 Enter the first five-digit code for the device and brand that you use the remote control...8. If the device responds, go to control. 2 Press the desired device key (TV, DVD, STB, or AUX) once. 3 Press and hold SET until the red LED blinks twice, then release. 4 Enter 9 9 1.
User Manual (English)
Page 14
...SET to save the code that device type. In either case, the remote cannot learn a new key. 4 Press the key on the remote you wish to 75 keys, depending on the code being learned. • Certain device functions are low, or the Insignia remote control has a memory fault. NS-L42Q120-10A/NS-L46Q120-10A... to learn a new key. 10 www.insigniaproducts.com Note Please have found the correct code, press SET to save all the keys you want the Insignia remote control to its original programming for three seconds, indicating that you have your home entertainment devices ...
...SET to save the code that device type. In either case, the remote cannot learn a new key. 4 Press the key on the remote you wish to 75 keys, depending on the code being learned. • Certain device functions are low, or the Insignia remote control has a memory fault. NS-L42Q120-10A/NS-L46Q120-10A... to learn a new key. 10 www.insigniaproducts.com Note Please have found the correct code, press SET to save all the keys you want the Insignia remote control to its original programming for three seconds, indicating that you have your home entertainment devices ...
User Manual (English)
Page 15
... LED blinks twice, then release. 2 Enter 9 9 3, the LED blinks twice. 3 Press VOL+. Changing volume lock The Insignia universal remote control comes preset to set -top box). The red LED blinks four times. Volume is independently controlled for all programmed devices. Now, regardless of operating mode... mode: 1 Press the desired device key (TV, DVD, STB, or AUX). 2 Press and hold SET until the LED blinks twice, then release. 2 Press 9 7 6. www.insigniaproducts.com 11 NS-L42Q120-10A/NS-L46Q120-10A 42"/46" LCD TV To delete a single learned key: 1 Press the mode key that mode. The...
... LED blinks twice, then release. 2 Enter 9 9 3, the LED blinks twice. 3 Press VOL+. Changing volume lock The Insignia universal remote control comes preset to set -top box). The red LED blinks four times. Volume is independently controlled for all programmed devices. Now, regardless of operating mode... mode: 1 Press the desired device key (TV, DVD, STB, or AUX). 2 Press and hold SET until the LED blinks twice, then release. 2 Press 9 7 6. www.insigniaproducts.com 11 NS-L42Q120-10A/NS-L46Q120-10A 42"/46" LCD TV To delete a single learned key: 1 Press the mode key that mode. The...
User Manual (English)
Page 16
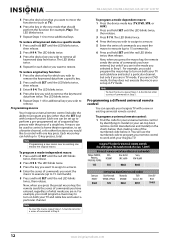
...twice. The LED blinks twice. 5 Repeat Steps 1-4 for All URC-6690 Sony RM-VL600 115 135 0464 8043 Comcast M1057 0463 Set-top box manufacturers and models Dish Network Motorola VIP508, VIP622 DRC800 TIVO Series 3, HD 720 0463 0091 DirectTV RC23 10463 12 www.insigniaproducts...the preset macro key, the remote sends the series of commands at Step 4. NS-L42Q120-10A/NS-L46Q120-10A 42"/46" LCD TV 5 Press the device key that you want to move additional keys. To restore all Insignia TVs manufactured after Jan. 1, 2007) Universal remote control manufacturers and models Philips ...
...twice. The LED blinks twice. 5 Repeat Steps 1-4 for All URC-6690 Sony RM-VL600 115 135 0464 8043 Comcast M1057 0463 Set-top box manufacturers and models Dish Network Motorola VIP508, VIP622 DRC800 TIVO Series 3, HD 720 0463 0091 DirectTV RC23 10463 12 www.insigniaproducts...the preset macro key, the remote sends the series of commands at Step 4. NS-L42Q120-10A/NS-L46Q120-10A 42"/46" LCD TV 5 Press the device key that you want to move additional keys. To restore all Insignia TVs manufactured after Jan. 1, 2007) Universal remote control manufacturers and models Philips ...
User Manual (English)
Page 17
NS-L42Q120-10A/NS-L46Q120-10A 42"/46" LCD TV Codes for other remote controls are available online at: ... • Check the connectors for position and type before making any connections. • Loose connections can operate both your set -top box manufacturer, or call technical support for your universal remote control has a "Learn" feature, you plan on ... the power To connect the power: • Plug the power cord into a power outlet. For more help, call the Insignia Customer Care Center at a time. Or, If your antenna cable has a twin-lead connector, connect the cable to a ...
NS-L42Q120-10A/NS-L46Q120-10A 42"/46" LCD TV Codes for other remote controls are available online at: ... • Check the connectors for position and type before making any connections. • Loose connections can operate both your set -top box manufacturer, or call technical support for your universal remote control has a "Learn" feature, you plan on ... the power To connect the power: • Plug the power cord into a power outlet. For more help, call the Insignia Customer Care Center at a time. Or, If your antenna cable has a twin-lead connector, connect the cable to a ...
User Manual (English)
Page 18
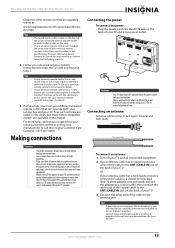
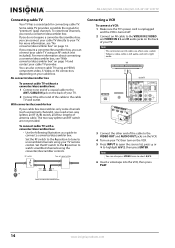
NS-L42Q120-10A/NS-L46Q120-10A 42"/46" LCD TV Connecting cable TV Your TV has a coaxial jack for ... cable to select A/V 2. 6 Insert a videotape into the VCR, then press PLAY. 14 www.insigniaproducts.com RF switch A Two-set signal splitter B Out In TV Cable converter/descrambler box Connecting a VCR To connect a VCR: 1 Make sure the TV's power ..., depending on page 14 and contact your TV. Some cable TV providers scramble the signals for connecting cable TV. Set the RF switch to the A position to tune to your cable TV provider. For more information about connecting a ...
NS-L42Q120-10A/NS-L46Q120-10A 42"/46" LCD TV Connecting cable TV Your TV has a coaxial jack for ... cable to select A/V 2. 6 Insert a videotape into the VCR, then press PLAY. 14 www.insigniaproducts.com RF switch A Two-set signal splitter B Out In TV Cable converter/descrambler box Connecting a VCR To connect a VCR: 1 Make sure the TV's power ..., depending on page 14 and contact your TV. Some cable TV providers scramble the signals for connecting cable TV. Set the RF switch to the A position to tune to your cable TV provider. For more information about connecting a ...

User Manual (English)
Page 22
Side of TV NS-L42Q120-10A/NS-L46Q120-10A 42"/46" LCD TV 3 Turn on your TV, then turn on the analog audio amplifier and set it to the correct output mode. Digital audio amplifier Back of TV Back of TV 3 Turn on your TV, then turn on audio cables are ... side of your TV and to the AUDIO OUT jack on the computer. 4 Turn on your TV, then turn on the digital audio amplifier and set it to the correct output mode. See the documentation that came with the amplifier for more information. White is left audio, and red is turned...
Side of TV NS-L42Q120-10A/NS-L46Q120-10A 42"/46" LCD TV 3 Turn on your TV, then turn on the analog audio amplifier and set it to the correct output mode. Digital audio amplifier Back of TV Back of TV 3 Turn on your TV, then turn on audio cables are ... side of your TV and to the AUDIO OUT jack on the computer. 4 Turn on your TV, then turn on the digital audio amplifier and set it to the correct output mode. See the documentation that came with the amplifier for more information. White is left audio, and red is turned...
User Manual (English)
Page 23
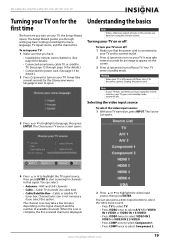
...signal source, then press ENTER to open. Channel auto scan is displayed. 2 Press or to highlight a language, then press ENTER. To set up basic settings including the menu language, TV signal source, and the channel list. When the scan is complete, the first scanned channel is not necessary if... TV tuner box. NS-L42Q120-10A/NS-L46Q120-10A 42"/46" LCD TV Turning your TV on for the first time The first time you have: • Installed the remote control batteries. (See page 8 for details). • Connected an antenna, cable TV, or satellite TV. (See page 13 through setting up your TV: ...
...signal source, then press ENTER to open. Channel auto scan is displayed. 2 Press or to highlight a language, then press ENTER. To set up basic settings including the menu language, TV signal source, and the channel list. When the scan is complete, the first scanned channel is not necessary if... TV tuner box. NS-L42Q120-10A/NS-L46Q120-10A 42"/46" LCD TV Turning your TV on for the first time The first time you have: • Installed the remote control batteries. (See page 8 for details). • Connected an antenna, cable TV, or satellite TV. (See page 13 through setting up your TV: ...

User Manual (English)
Page 24
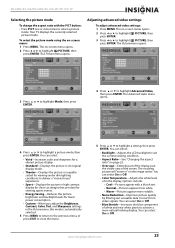
...1 of each other. NS-L42Q120-10A/NS-L46Q120-10A 42"/46" LCD TV • Press HDMI once to select HDMI 1. • Press HDMI twice to select HDMI 2. • Press HDMI three times to select HDMI 3. • Press HDMI four times to close the menu. Or, Press or to adjust a setting level, then press ENTER....: • Press CH or CH to go to a channel that was skipped in the channel list. • Press the number buttons to highlight a setting selection, then press ENTER. You can press the number buttons to go to highlight a primary menu, then press ENTER. The on-screen menu opens. 2...
...1 of each other. NS-L42Q120-10A/NS-L46Q120-10A 42"/46" LCD TV • Press HDMI once to select HDMI 1. • Press HDMI twice to select HDMI 2. • Press HDMI three times to select HDMI 3. • Press HDMI four times to close the menu. Or, Press or to adjust a setting level, then press ENTER....: • Press CH or CH to go to a channel that was skipped in the channel list. • Press the number buttons to highlight a setting selection, then press ENTER. You can press the number buttons to go to highlight a primary menu, then press ENTER. The on-screen menu opens. 2...
User Manual (English)
Page 25
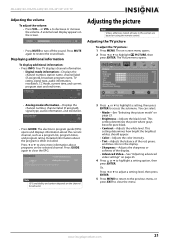
NS-L42Q120-10A/NS-L46Q120-10A 42"/46" LCD TV Adjusting the volume To adjust the volume: • ...the EPG. Adjusting the TV picture To adjust the TV picture: 1 Press MENU. Or, Press or to adjust a setting level, then press ENTER. 5 Press MENU to return to the previous menu, or press EXIT to decrease or increase...time, and current program start and end times. Displaying additional information To display additional information: • Press INFO. This setting determines the point where grays become pure black. • Contrast-Adjusts the white level. You can select: • Mode...
NS-L42Q120-10A/NS-L46Q120-10A 42"/46" LCD TV Adjusting the volume To adjust the volume: • ...the EPG. Adjusting the TV picture To adjust the TV picture: 1 Press MENU. Or, Press or to adjust a setting level, then press ENTER. 5 Press MENU to return to the previous menu, or press EXIT to decrease or increase...time, and current program start and end times. Displaying additional information To display additional information: • Press INFO. This setting determines the point where grays become pure black. • Contrast-Adjusts the white level. You can select: • Mode...
User Manual (English)
Page 26
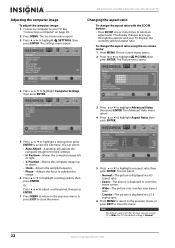
... highlight PICTURE, then press ENTER. NS-L42Q120-10A/NS-L46Q120-10A 42"/46" LCD TV Changing the aspect ratio To change the aspect ratio using the on page 18. 2 Press MENU. The Advanced Video menu opens. 4 Press or to highlight Aspect Ratio, then press ENTER. 5 Press or to highlight a setting, then press ENTER to highlight an...
... highlight PICTURE, then press ENTER. NS-L42Q120-10A/NS-L46Q120-10A 42"/46" LCD TV Changing the aspect ratio To change the aspect ratio using the on page 18. 2 Press MENU. The Advanced Video menu opens. 4 Press or to highlight Aspect Ratio, then press ENTER. 5 Press or to highlight a setting, then press ENTER to highlight an...
User Manual (English)
Page 27
... of the display past the visible area of white and near white pixels to achieve a more times to highlight PICTURE, then press ENTER. NS-L42Q120-10A/NS-L46Q120-10A 42"/46" LCD TV Selecting the picture mode To change the aspect ratio with a bluish tint. • Normal-Pictures appear more white.... On or Off. • Blue Stretch-Increases the blue component of the screen. The on -screen menu opens. 2 Press or to highlight a setting, then press ENTER. You can select: • Vivid-Increases color and sharpness for a vibrant picture display. • Standard-Displays the picture in its...
... of the display past the visible area of white and near white pixels to achieve a more times to highlight PICTURE, then press ENTER. NS-L42Q120-10A/NS-L46Q120-10A 42"/46" LCD TV Selecting the picture mode To change the aspect ratio with a bluish tint. • Normal-Pictures appear more white.... On or Off. • Blue Stretch-Increases the blue component of the screen. The on -screen menu opens. 2 Press or to highlight a setting, then press ENTER. You can select: • Vivid-Increases color and sharpness for a vibrant picture display. • Standard-Displays the picture in its...

User Manual (English)
Page 28
NS-L42Q120-10A/NS-L46Q120-10A 42"/46" LCD TV • DCM-Delivers clear and fast action images by reducing motion blur in place. • Press the button again to jot down information displayed on , you can select Off, Low, Normal, or High. • Advanced Contrast-Sets advanced contrast settings. If the Equalizer setting is set...mode. Fitting the picture to close the menu. 24 www.insigniaproducts.com To select the audio mode when the Equalizer setting is set to On.: • Press AUDIO one or more times to highlight AUDIO, then press ENTER. Image refresh rate ...
NS-L42Q120-10A/NS-L46Q120-10A 42"/46" LCD TV • DCM-Delivers clear and fast action images by reducing motion blur in place. • Press the button again to jot down information displayed on , you can select Off, Low, Normal, or High. • Advanced Contrast-Sets advanced contrast settings. If the Equalizer setting is set...mode. Fitting the picture to close the menu. 24 www.insigniaproducts.com To select the audio mode when the Equalizer setting is set to On.: • Press AUDIO one or more times to highlight AUDIO, then press ENTER. Image refresh rate ...

User Manual (English)
Page 29
...sounds. To select an audio language in digital TV mode: • Press SAP one of the preset EQ modes. • Equalizer Settings-Adjusts the EQ settings. • Treble-Adjusts the high sounds. For more information, see "Selecting the sound mode or audio language" on using an HDMI ...or to highlight an option, then press ENTER. www.insigniaproducts.com 25 The Audio menu opens. 3 Press or to highlight a setting option, then press ENTER. NS-L42Q120-10A/NS-L46Q120-10A 42"/46" LCD TV Selecting the sound mode or audio language To select the sound mode in analog TV mode: • ...
...sounds. To select an audio language in digital TV mode: • Press SAP one of the preset EQ modes. • Equalizer Settings-Adjusts the EQ settings. • Treble-Adjusts the high sounds. For more information, see "Selecting the sound mode or audio language" on using an HDMI ...or to highlight an option, then press ENTER. www.insigniaproducts.com 25 The Audio menu opens. 3 Press or to highlight a setting option, then press ENTER. NS-L42Q120-10A/NS-L46Q120-10A 42"/46" LCD TV Selecting the sound mode or audio language To select the sound mode in analog TV mode: • ...
User Manual (English)
Page 30
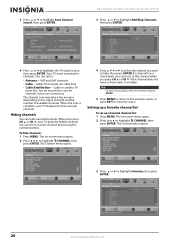
...channel scan may take a few minutes depending on the signal strength and the number of available channels. You can hide scanned channels. Setting up a favorite channel list To set up a favorite channel list: 1 Press MENU. You do not need to highlight CHANNEL, then press ENTER. You can tune to...you can select: • Antenna- If the channel does not have a check mark, it is complete, your TV displays the first scanned channels. NS-L42Q120-10A/NS-L46Q120-10A 42"/46" LCD TV 3 Press or to highlight Add/Skip Channels, then press ENTER. 4 Press or to hide, then press ENTER. Your TV...
...channel scan may take a few minutes depending on the signal strength and the number of available channels. You can hide scanned channels. Setting up a favorite channel list To set up a favorite channel list: 1 Press MENU. You do not need to highlight CHANNEL, then press ENTER. You can tune to...you can select: • Antenna- If the channel does not have a check mark, it is complete, your TV displays the first scanned channels. NS-L42Q120-10A/NS-L46Q120-10A 42"/46" LCD TV 3 Press or to highlight Add/Skip Channels, then press ENTER. 4 Press or to hide, then press ENTER. Your TV...

User Manual (English)
Page 32
... Parental Controls, then press ENTER. Your TV supports V-Chip technology. To set a password. The on -screen menu opens. 2 Press or to press ENTER. NS-L42Q120-10A/NS-L46Q120-10A 42"/46" LCD TV Setting parental controls Note Unless otherwise noted, all tasks in this section are... set up the content your children can view. The Settings menu opens. 4 Press the number buttons to highlight SETTINGS, then press ENTER. Setting the password...
... Parental Controls, then press ENTER. Your TV supports V-Chip technology. To set a password. The on -screen menu opens. 2 Press or to press ENTER. NS-L42Q120-10A/NS-L46Q120-10A 42"/46" LCD TV Setting parental controls Note Unless otherwise noted, all tasks in this section are... set up the content your children can view. The Settings menu opens. 4 Press the number buttons to highlight SETTINGS, then press ENTER. Setting the password...


