IC Realtime ICIP-D2001-IR-D-2.8 Support and Manuals
Get Help and Manuals for this IC Realtime item

View All Support Options Below
Free IC Realtime ICIP-D2001-IR-D-2.8 manuals!
Problems with IC Realtime ICIP-D2001-IR-D-2.8?
Ask a Question
Free IC Realtime ICIP-D2001-IR-D-2.8 manuals!
Problems with IC Realtime ICIP-D2001-IR-D-2.8?
Ask a Question
Popular IC Realtime ICIP-D2001-IR-D-2.8 Manual Pages
Product Manual - Page 2

...installation...is for any problems caused by improper handling or installation. Please do not... safeguard and warnings carefully before installing wiring, which is not the... caused by unauthorized modification or attempted repair.
2.Environment
Please don't aim...installation.
3. This user's manual is correct before operating the device. Please transport, use this user's manual...
Product Manual - Page 3
...surface.
The manual will be grounded to outward. Please contact the customer service for the...update; Dome cover is an optical device, please don't touch or wipe cover surface directly during installation and use oil-free cotton cloth or paper soaked with once dirt is any problem...manual due to the reasons such as the real environment is necessary to clean the device. the upgraded...
Product Manual - Page 4
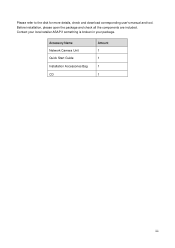
Contact your local retailer ASAP if something is broken in your package. Before installation, please open the package and check all the components are included. Accessory Name Network Camera Unit Quick Start Guide Installation Accessories Bag CD
Amount 1 1 1 1
iii
Please refer to the disk for more details, check and download corresponding user's manual and tool.
Product Manual - Page 6
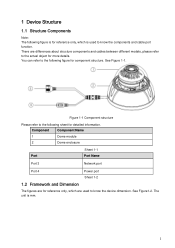
... dimension. See Figure 1-1.
1 Device Structure
1.1 Structure Components
Note: The following figure is for reference only, which are differences about structure components and cables between different models, please refer to the actual object for more details. Figure 1-1 Component structure
Please refer to the following figure for component structure.
Product Manual - Page 7
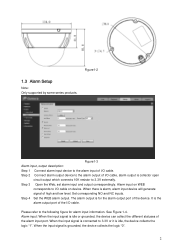
... WEB alarm output. Step 3 Open the Web, set alarm input and output correspondingly. Please refer to the following figure for the...alarm output is collector open
circuit output which connects 10K resistor to I /O cable. Figure1-2
1.3 Alarm Setup
Note: Only supported by some series products. Set corresponding NO and NC inputs. Step 2 Connect alarm output device to 3.3V or it is alarm, ...
Product Manual - Page 9
... three bolts firmly.
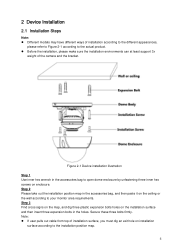
2 Device Installation
2.1 Installation Steps
Note: Different models may have different ways of installation according to the different appearances,
please refer to Figure 2-1 according to the actual product. Before the installation, please make sure the installation environments can at least support 3x
weight of installation surface, you must dig an...
Product Manual - Page 10
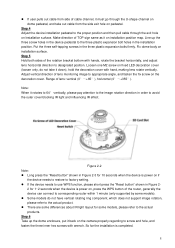
...Installation surface. Loosen one M2 screw on fixed LED decoration cover (loosen only, do not have vertical rotating ring component, which does not support image rotation, please refer to the actual product. There are some differences about IR light layout for some models, please refer to corresponding router within 1 minute (only supported by some models... to factory setting. ...
Product Manual - Page 11
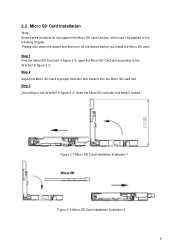
...down the power and then turn off the device before you install the Micro SD card. open the Micro SD Card slot ...Figure 2-3 Micro SD Card installation illustration 1
Figure 2-4 Micro SD Card installation illustration 2
6 2.2 Micro SD Card Installation
Note: Some series products do not support the Micro SD card function, which can't be applied to proper direction and install it locked. Step 2 ...
Product Manual - Page 12
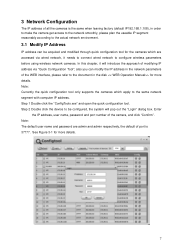
...the same network segment with computer IP address. Note: Currently the quick configuration tool only supports the cameras which are admin and admin respectively, the default of port is the same... Configuration
The IP address of all the cameras is 37777. Note: The default user name and password are accessed via "Quick Configuration Tool"; In this chapter, it will pop out the "Login"...
Product Manual - Page 13

... details.
8 Figure 3-2
3.2 Login WEB Interface
Note: Different devices may have different WEB interfaces, the figures below , please input your user name and password (Default user
name is admin and password is admin respectively), click "login". Step 2 The login interface is shown below are just for reference, please refer to finish modification. Figure...
Product Manual - Page 14
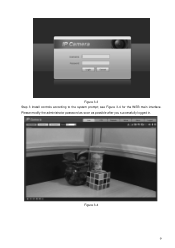
Figure 3-4
9 Figure 3-3 Step 3 Install controls according to the system prompt;
Please modify the administrator password as soon as possible after you successfully logged in. see Figure 3-4 for the WEB main interface.
Product Manual - Page 15

... trademarks and registered trademarks mentioned are the properties of their respective
owners. If there is for more information.
10 Note: This quick start guide is any uncertainty or controversy, please refer to the final explanation of us. Please visit our website or contact your local...
Product Datasheet - Page 2
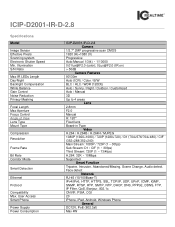
...ICIP-D2001-IR-D-2.8
Specifications
Model
Image Sensor Effective Pixels Scanning system Electronic Shutter Speed Min. User Access Smart Phone
Power Supply Power Consumption
ICIP-D2001-IR-D-2.8 Camera
1/2.7" 2MP progressive scan CMOS 1920 (H)×1080 (V) Progressive Auto/Manual...720P (1 ~ 13/4fps) H.264: 32K ~ 10Mbps Supported
Smart Function Tripwire, Intrusion, Abandoned/Missing, Scene Change, ...
Product Datasheet - Page 3
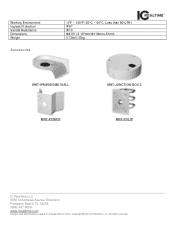
... © 2015 IC Realtime, LLC. Less than 90% RH IP67 IK10 Φ4.33"×3.19"mm/Φ110mm×81mm 0.73lb/0.33kg
MNT-IPMINIDOME-WALL
MNT-JUNCTION BOX 2
MNT-PCNRIP
MNT-POLIP
IC Realtime LLC 3050 N Andrews Avenue Extension Pompano Beach, FL 33064 (866) 997-9009 www.icrealtime.com
Designs and specifications subject to change...
IC Realtime ICIP-D2001-IR-D-2.8 Reviews
We have not received any reviews for IC Realtime yet.