Product Manual
Page 2
Table of Contents 1 Network Config...1 1.1 Network Connection ...1 1.2 Log in ...1 2 Live ...7 2.1 Encode Setup ...7 2.2 System Menu...8 2.3 Video Window Function Option 8 2.4 Video Window Setup ...9 2.4.1 Image Adjustment...9 2.4.2 Original Size ...10 2.4.3 Full Screen ...10 2.4.4 Width and Height Ratio 11 2.4.5 Fluency Adjustment 11 2.4.6 Focus zoom...11 3 PTZ Control...13 3.1 Scan ...14 3.2 Preset...14 3.3 Tour ...15 3.4 Pattern ...16 3.5 Assistant ...16 3.6 Light Wiper ...16 4 Playback ...18 4.1 Playback ...18 4.1.1 Function of Play...18 4.1.2 Playback File ...19 4.1.3 Playback Cut ......
Table of Contents 1 Network Config...1 1.1 Network Connection ...1 1.2 Log in ...1 2 Live ...7 2.1 Encode Setup ...7 2.2 System Menu...8 2.3 Video Window Function Option 8 2.4 Video Window Setup ...9 2.4.1 Image Adjustment...9 2.4.2 Original Size ...10 2.4.3 Full Screen ...10 2.4.4 Width and Height Ratio 11 2.4.5 Fluency Adjustment 11 2.4.6 Focus zoom...11 3 PTZ Control...13 3.1 Scan ...14 3.2 Preset...14 3.3 Tour ...15 3.4 Pattern ...16 3.5 Assistant ...16 3.6 Light Wiper ...16 4 Playback ...18 4.1 Playback ...18 4.1.1 Function of Play...18 4.1.2 Playback File ...19 4.1.3 Playback Cut ......

Product Manual
Page 5
For example, if your camera IP is 192.168.1.108, then please input http:// 192.168.1.108 in the address bar. Please refer to Quick Configuration Tool manual. 1.2 Log in Open IE and input network camera address in IE address bar. 1 Network Config 1.1 Network Connection Network camera and PC connection mainly has two ways, see Figure 1- 1 and Figure 1- 2. See Figure 1- 3. 1 Figure 1- 1 Figure 1- 2 Before you access network camera via the Internet, you need to search IP of the network camera. User can use quick config tool to have its IP address.
For example, if your camera IP is 192.168.1.108, then please input http:// 192.168.1.108 in the address bar. Please refer to Quick Configuration Tool manual. 1.2 Log in Open IE and input network camera address in IE address bar. 1 Network Config 1.1 Network Connection Network camera and PC connection mainly has two ways, see Figure 1- 1 and Figure 1- 2. See Figure 1- 3. 1 Figure 1- 1 Figure 1- 2 Before you access network camera via the Internet, you need to search IP of the network camera. User can use quick config tool to have its IP address.

Product Manual
Page 14
... bit stream. 2.4.3 Full Screen 10 Reset Restore brightness, contrastness sRaturation and hue to systemedefault setup. 2.4.2 Original Size Click this button to adjust monitor video hue. See Figure 2- 6 for detailed information. Click it to adjust monitor video contrastness. It is to display/hide image control interface. It is to open picture setup interface. Note: All the operations here apply to WEB end only. Please go to adjust monitor video saturation...
... bit stream. 2.4.3 Full Screen 10 Reset Restore brightness, contrastness sRaturation and hue to systemedefault setup. 2.4.2 Original Size Click this button to adjust monitor video hue. See Figure 2- 6 for detailed information. Click it to adjust monitor video contrastness. It is to display/hide image control interface. It is to open picture setup interface. Note: All the operations here apply to WEB end only. Please go to adjust monitor video saturation...

Product Manual
Page 17
... length control PTZ, zoom, focus and iris. See Figure 3- 1. Speed It controls rotation speed. Figure 3- 1 13 Before PTZ operation, please make sure you can view direction keys, speed, zoom, focus, iris, preset, tour, pan, scan, pattern, aux close, and PTZ setup button. 3 PTZ Control Please note only some series product support PTZ function. Here you have properly set PTZ protocol. (Please refer to Quick Position quickly positioning. The longer the step length, the higher the speed. Use mouse to draw a box in monitoring video, PTZ...
... length control PTZ, zoom, focus and iris. See Figure 3- 1. Speed It controls rotation speed. Figure 3- 1 13 Before PTZ operation, please make sure you can view direction keys, speed, zoom, focus, iris, preset, tour, pan, scan, pattern, aux close, and PTZ setup button. 3 PTZ Control Please note only some series product support PTZ function. Here you have properly set PTZ protocol. (Please refer to Quick Position quickly positioning. The longer the step length, the higher the speed. Use mouse to draw a box in monitoring video, PTZ...
Product Manual
Page 32
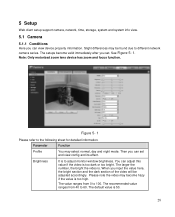
... the video is to adjust monitor window brightness. Please note the video may select normal, day and night mode. Note: Only motorized zoom lens device has zoom and focus function. When you can adjust this value if the video is 50. 28 It is . The setups become hazy if the value is too high. 5 Setup Web client setup support camera, network, time, storage, system and system info view. 5.1 Camera 5.1.1 Conditions Here you set and view config...
... the video is to adjust monitor window brightness. Please note the video may select normal, day and night mode. Note: Only motorized zoom lens device has zoom and focus function. When you can adjust this value if the video is 50. 28 It is . The setups become hazy if the value is too high. 5 Setup Web client setup support camera, network, time, storage, system and system info view. 5.1 Camera 5.1.1 Conditions Here you set and view config...
Product Manual
Page 34
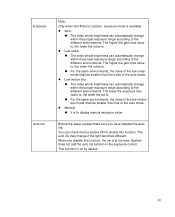
... the noise of the auto mode. Manual It is . Low noise: The video whole brightness can automatically change within the proper exposure range according to display manual exposure value. This function is at the max. System does not add the auto iris function in the exposure control. You can automatically change if the light becomes different. The higher...
... the noise of the auto mode. Manual It is . Low noise: The video whole brightness can automatically change within the proper exposure range according to display manual exposure value. This function is at the max. System does not add the auto iris function in the exposure control. You can automatically change if the light becomes different. The higher...

Product Manual
Page 35
...; Outdoor: White balance threshold sets to control day/night mode. The value reneges from config file. It is to make sure the vide color is proper. Sunny: The threshold of the white balance is in the sunny mode. Night: The threshold of the video. It adjusts delay value of color and black/white switch. Default is auto mode. Color: Device outputs the color video. Auto: Device auto select to output the color...
...; Outdoor: White balance threshold sets to control day/night mode. The value reneges from config file. It is to make sure the vide color is proper. Sunny: The threshold of the white balance is in the sunny mode. Night: The threshold of the video. It adjusts delay value of color and black/white switch. Default is auto mode. Color: Device outputs the color video. Auto: Device auto select to output the color...

Product Manual
Page 36
BLC Mode BLC is used for multi-frame (at the same time. The value ranges from 0 to disable the BLC function. Default value is to 100. So that you can view these two sections clearly at least 2) image processing. The default value is 50 when HLC is on the video window, you enabled HLC function, the device can lower the high...
BLC Mode BLC is used for multi-frame (at the same time. The value ranges from 0 to disable the BLC function. Default value is to 100. So that you can view these two sections clearly at least 2) image processing. The default value is 50 when HLC is on the video window, you enabled HLC function, the device can lower the high...
Product Manual
Page 48
... operation, please make sure the network camera and the PC in the same LAN. Set the network camera and the PC in the same LAN. Step 3: Go to the steps listed below. Now you can see there are output information such as "Reply from 192.168.0.125 ..." Enable ARP/Ping set the device IP address if you can access now. 5.2.2 Connection 5.2.2.1 Connection The connection...
... operation, please make sure the network camera and the PC in the same LAN. Set the network camera and the PC in the same LAN. Step 3: Go to the steps listed below. Now you can see there are output information such as "Reply from 192.168.0.125 ..." Enable ARP/Ping set the device IP address if you can access now. 5.2.2 Connection 5.2.2.1 Connection The connection...
Product Manual
Page 49
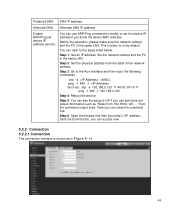
.... User cannot modify them. Avoid using default port value of other ports. 45 Default connection amount is 443. You can input the actual port number if necessary. The default value is MJPEG, the max resolution only supports 2040*2040. Follow standard RTP protocol and when encode mode is 37778. HTTPs Check HTTPs enable, login as https://ip:port. The value ranges from 1 connection to CIF and turn off audio...
.... User cannot modify them. Avoid using default port value of other ports. 45 Default connection amount is 443. You can input the actual port number if necessary. The default value is MJPEG, the max resolution only supports 2040*2040. Follow standard RTP protocol and when encode mode is 37778. HTTPs Check HTTPs enable, login as https://ip:port. The value ranges from 1 connection to CIF and turn off audio...

Product Manual
Page 54
... here to the interval you must disable UPnP function. The send interval ranges from 0 to the following sheet for the email server. When the alarm, motion detection or the abnormity event activates the email, system sends out the email according to enable this function. Port Anonymity User Name Password Sender Authentication (Encryption mode) Title (Subject) Attachment Mail receiver Interval Health mail enable Email test Default value is 25.
... here to the interval you must disable UPnP function. The send interval ranges from 0 to the following sheet for the email server. When the alarm, motion detection or the abnormity event activates the email, system sends out the email according to enable this function. Port Anonymity User Name Password Sender Authentication (Encryption mode) Title (Subject) Attachment Mail receiver Interval Health mail enable Email test Default value is 25.
Product Manual
Page 55
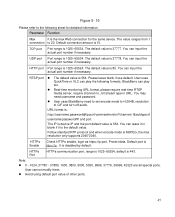
... is enabled in Figure 5- 27 and Figure 5- 28. In the Windows OS, From Start->Control Panel->Add or remove programs. Click the "Add/Remove Windows Components" and then select the "Network Services" from the Web. Please click OK to activate the new setup. 51 Click the Details button and then check the "Internet Gateway Device Discovery and Control client" and "UPnP User Interface". You need to...
... is enabled in Figure 5- 27 and Figure 5- 28. In the Windows OS, From Start->Control Panel->Add or remove programs. Click the "Add/Remove Windows Components" and then select the "Network Services" from the Web. Please click OK to activate the new setup. 51 Click the Details button and then check the "Internet Gateway Device Discovery and Control client" and "UPnP User Interface". You need to...

Product Manual
Page 56
... change. Read-only access to send Trap message. The destination address of the device. Port which send Trap message, default is a UDP port not a TCP port. Server calibrate corresponding username, password and encryption method too access device and v1/v2 are unavailable. It is 162, range 1~65535. 52 Note: Only number, letter, _, and - Figure 5- 27 Please refer to 65535. Parameter Function SNMP Version...
... change. Read-only access to send Trap message. The destination address of the device. Port which send Trap message, default is a UDP port not a TCP port. Server calibrate corresponding username, password and encryption method too access device and v1/v2 are unavailable. It is 162, range 1~65535. 52 Note: Only number, letter, _, and - Figure 5- 27 Please refer to 65535. Parameter Function SNMP Version...
Product Manual
Page 58
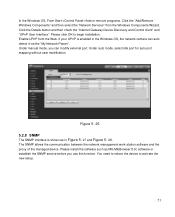
... note the safari browse support this function. Click the "Display All Bookmarks: and open the Bonjour, system can view the server name when the network camera is detected by the Bonjour. Multicast is a transmission mode of the outer. The source host can set the protocol as in the LAN. Note: Open preview, streaming media protocol, select multicast, and monitor via multicast format...
... note the safari browse support this function. Click the "Display All Bookmarks: and open the Bonjour, system can view the server name when the network camera is detected by the Bonjour. Multicast is a transmission mode of the outer. The source host can set the protocol as in the LAN. Note: Open preview, streaming media protocol, select multicast, and monitor via multicast format...

Product Manual
Page 66
... from 10s to 300s. If you enabled this function, System can backup motion detection snapshot file. Check it and the system will auto record. You need to select alarm output port so that system can send out email to 300s. You shall set snapshot period in record control interface. See Figure 5- 40. User can delay the alarm output for specified time after alarm ended. Such as go to...
... from 10s to 300s. If you enabled this function, System can backup motion detection snapshot file. Check it and the system will auto record. You need to select alarm output port so that system can send out email to 300s. You shall set snapshot period in record control interface. See Figure 5- 40. User can delay the alarm output for specified time after alarm ended. Such as go to...

Product Manual
Page 83
... lower rights setup than the admin. Modify password It is to modify the user password. Figure 5- 65 Modify user It is to modify the user property, belonging group, password and rights. See Figure 5- . Hidden user "default" is to add a name to group and set some channel view without login. Here you can only have administrator right. See Figure 5- . Please note, the password ranges from 0-digit to...
... lower rights setup than the admin. Modify password It is to modify the user password. Figure 5- 65 Modify user It is to modify the user property, belonging group, password and rights. See Figure 5- . Hidden user "default" is to add a name to group and set some channel view without login. Here you can only have administrator right. See Figure 5- . Please note, the password ranges from 0-digit to...
Product Manual
Page 86
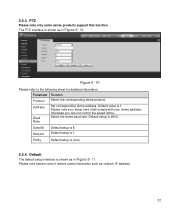
... note system cannot restore some series products support this function. The PTZ interface is shown as in Figure 5- 70. 5.5.3 PTZ Please note only some information such as network IP address. 82 Data Bit Stop bit Parity Default setup is 9600. Parameter Function Protocol Select the corresponding dome protocol. Default setup is 8. Please note your setup here shall comply with your dome address; otherwise you can not control the speed dome.
... note system cannot restore some series products support this function. The PTZ interface is shown as in Figure 5- 70. 5.5.3 PTZ Please note only some information such as network IP address. 82 Data Bit Stop bit Parity Default setup is 9600. Parameter Function Protocol Select the corresponding dome protocol. Default setup is 8. Please note your setup here shall comply with your dome address; otherwise you can not control the speed dome.
Product Manual
Page 89
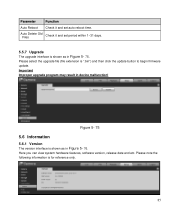
... ".bin") and then click the update button to begin firmware update. Figure 5- 75 5.6 Information 5.6.1 Version The version interface is shown as in Figure 5- 76. Important Improper upgrade program may result in Figure 5- 75. Parameter Function Auto Reboot Check it and set auto reboot time. Here you can view system hardware features, software version, release date and etc. Please select the upgrade file (file extension is for...
... ".bin") and then click the update button to begin firmware update. Figure 5- 75 5.6 Information 5.6.1 Version The version interface is shown as in Figure 5- 76. Important Improper upgrade program may result in Figure 5- 75. Parameter Function Auto Reboot Check it and set auto reboot time. Here you can view system hardware features, software version, release date and etc. Please select the upgrade file (file extension is for...
Product Manual
Page 92
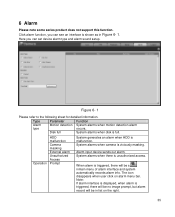
... some series product does not support this function. System alarms when camera is triggered, there will be s inmain menu of alarm interface and system automatically records alarm info. When alarm is viciously masking. Note: If alarm interface is displayed, when alarm is unauthorized access. System alarms when there is triggered, there will be no image prompt, but alarm record will be in Figure 6- 1. The icon disappears when user...
... some series product does not support this function. System alarms when camera is triggered, there will be s inmain menu of alarm interface and system automatically records alarm info. When alarm is viciously masking. Note: If alarm interface is displayed, when alarm is unauthorized access. System alarms when there is triggered, there will be no image prompt, but alarm record will be in Figure 6- 1. The icon disappears when user...
Product Datasheet
Page 2
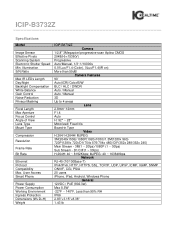
D1/CIF(1 ~ 30fps) H.264H: 40 ~ 8192Kbps; User Access Smart Phone Power Supply Power Consumption Working Environment Ingress Protection Dimensions (W×D×H) Weight ICIP-B3732Z Camera 1/2.8" 3Megapixel progressive scan Aptina CMOS 2048(H)×1536(V) Progressive Auto/Manual, 1/3~1/10000s 0.01Lux/F1.4 (Color), 0Lux/F1.4(IR on) More than 95% RH IP66 2.83"×3.15"×8.38" 1.43 lb MJPEG: 40 ~ 16384Kbps Network RJ-45 (10/100Base-T) IPv4...
D1/CIF(1 ~ 30fps) H.264H: 40 ~ 8192Kbps; User Access Smart Phone Power Supply Power Consumption Working Environment Ingress Protection Dimensions (W×D×H) Weight ICIP-B3732Z Camera 1/2.8" 3Megapixel progressive scan Aptina CMOS 2048(H)×1536(V) Progressive Auto/Manual, 1/3~1/10000s 0.01Lux/F1.4 (Color), 0Lux/F1.4(IR on) More than 95% RH IP66 2.83"×3.15"×8.38" 1.43 lb MJPEG: 40 ~ 16384Kbps Network RJ-45 (10/100Base-T) IPv4...


