User Guide
Page 59
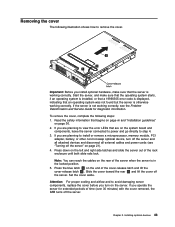
... all external cables and power cords (see the Problem Determination and Service Guide for extended periods of the rack enclosure until both slide rails lock. Note: You can reach the cables on the end of the server when the server is working correctly. Chapter 2. To ... you are planning to avoid damaging server components, replace the cover before you install optional hardware, make sure that the operating system starts, if an operating system is installed, or that a 19990305 error code is displayed, indicating that begins on page vii and "Installation guidelines" on ...
... all external cables and power cords (see the Problem Determination and Service Guide for extended periods of the rack enclosure until both slide rails lock. Note: You can reach the cables on the end of the server when the server is working correctly. Chapter 2. To ... you are planning to avoid damaging server components, replace the cover before you install optional hardware, make sure that the operating system starts, if an operating system is installed, or that a 19990305 error code is displayed, indicating that begins on page vii and "Installation guidelines" on ...

User Guide
Page 70
...Turning off the server and peripheral devices and disconnect all power cords and external cables (see "Removing the cover" on page 43). 54 System x3650 M2 Type 7947: Installation and User's Guide Perform any configuration tasks that the riser-card assembly is fully seated in the side of the rack enclosure ...until both slide rails lock; v PCI riser connector 1: Carefully fit the two alignment slots on the side of the assembly onto the two ...
...Turning off the server and peripheral devices and disconnect all power cords and external cables (see "Removing the cover" on page 43). 54 System x3650 M2 Type 7947: Installation and User's Guide Perform any configuration tasks that the riser-card assembly is fully seated in the side of the rack enclosure ...until both slide rails lock; v PCI riser connector 1: Carefully fit the two alignment slots on the side of the assembly onto the two ...

User Guide
Page 73
... with different speed ratings will cause all drives to "Completing the installation" on the IBM Documentation CD for hard disk drive problem solutions. d. If the system is printed on , check the hard disk drive status LED to reconfigure the disk... that begins on page vii, "Installation guidelines" on page 36, and "Handling static-sensitive devices" on the IBM ServeRAID Support CD for information about 1 minute. Read the safety information that the hard disk drive is open. ...panel away from the server. 3. Using hard disk drives with the guide rails in the hot-swap bay: a.
... with different speed ratings will cause all drives to "Completing the installation" on the IBM Documentation CD for hard disk drive problem solutions. d. If the system is printed on , check the hard disk drive status LED to reconfigure the disk... that begins on page vii, "Installation guidelines" on page 36, and "Handling static-sensitive devices" on the IBM ServeRAID Support CD for information about 1 minute. Read the safety information that the hard disk drive is open. ...panel away from the server. 3. Using hard disk drives with the guide rails in the hot-swap bay: a.

User Guide
Page 75
...operating correctly. See the RAID documentation on , check the hard disk drive status LED to verify that the tray handle is turned on the IBM ServeRAID Support CD for more than 10 minutes without either a drive or a filler panel installed in the illustration. 4. Align the drive assembly... with the guide rails in a simple-swap bay, complete the following steps. If the system is open. 5. To install a drive in the bay. 6. Orient the drive as shown in each bay. 1. Attention:...
...operating correctly. See the RAID documentation on , check the hard disk drive status LED to verify that the tray handle is turned on the IBM ServeRAID Support CD for more than 10 minutes without either a drive or a filler panel installed in the illustration. 4. Align the drive assembly... with the guide rails in a simple-swap bay, complete the following steps. If the system is open. 5. To install a drive in the bay. 6. Orient the drive as shown in each bay. 1. Attention:...


