Reference Manual
Page 1
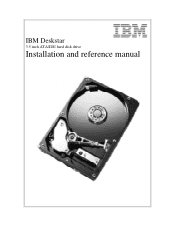
IBM Deskstar 3.5 inch ATA/IDE hard disk drive Installation and reference manual
IBM Deskstar 3.5 inch ATA/IDE hard disk drive Installation and reference manual
Reference Manual
Page 2
...• Applications used (if relevant) In North America Web www.ibm.com/harddrive Voice 888.IBM.5214 or 507.286.5825 Fax 507.253.DRIVE e-mail drive@us.ibm.com In the United Kingdom Voice 44.0870.010.2866 e-mail drive@uk.ibm.com In Singapore Voice 65.1800.840.9292 or 65.841.2900....07032.153050 e-mail drive@de.ibm.com ii Technical support Troubleshooting and Frequently Asked Questions (FAQ) sections are provided in the Appendix of this manual, call technical support. If the answer to aid you in the installation of device, which device is not found in this manual to your IBM Deskstar.
...• Applications used (if relevant) In North America Web www.ibm.com/harddrive Voice 888.IBM.5214 or 507.286.5825 Fax 507.253.DRIVE e-mail drive@us.ibm.com In the United Kingdom Voice 44.0870.010.2866 e-mail drive@uk.ibm.com In Singapore Voice 65.1800.840.9292 or 65.841.2900....07032.153050 e-mail drive@de.ibm.com ii Technical support Troubleshooting and Frequently Asked Questions (FAQ) sections are provided in the Appendix of this manual, call technical support. If the answer to aid you in the installation of device, which device is not found in this manual to your IBM Deskstar.

Reference Manual
Page 3
... objective and is provided for a particular purpose. actual results may make available such IBM products, programming, or services in your country. Note to restricted rights - IBM Deskstar 3.5 inch ATA/IDE hard disk drive Easy installation manual International Business Machines Corporation provides this publication "as explicitly stated in the Warranty section of this Manual, the product...
... objective and is provided for a particular purpose. actual results may make available such IBM products, programming, or services in your country. Note to restricted rights - IBM Deskstar 3.5 inch ATA/IDE hard disk drive Easy installation manual International Business Machines Corporation provides this publication "as explicitly stated in the Warranty section of this Manual, the product...
Reference Manual
Page 5
... star hard disk drive. Ultra ATA/100 performance requires the following components: • A 40-pin, 80-conductor ATA/IDE cable • A controller card or motherboard chipset with Ultra ATA/100 or higher capability • An Ultra ATA/100-compatible BIOS The IBM Deskstar drives listed above also support the following model numbers: • IC35L020AVER07 (20 GB) • IC35L040AVER07 (40 GB...
... star hard disk drive. Ultra ATA/100 performance requires the following components: • A 40-pin, 80-conductor ATA/IDE cable • A controller card or motherboard chipset with Ultra ATA/100 or higher capability • An Ultra ATA/100-compatible BIOS The IBM Deskstar drives listed above also support the following model numbers: • IC35L020AVER07 (20 GB) • IC35L040AVER07 (40 GB...
Reference Manual
Page 6
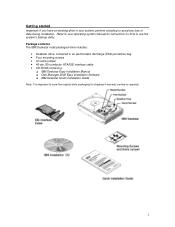
... • Four mounting screws • An extra jumper • 40-pin, 80-conductor ATA/IDE interface cable • CD-ROM containing: ! Refer to your system, perform a backup to avoid any loss of data during installation. Package contents The IBM Deskstar retail packaged drive includes: • Deskstar drive, contained in your operating system manual for instructions on...
... • Four mounting screws • An extra jumper • 40-pin, 80-conductor ATA/IDE interface cable • CD-ROM containing: ! Refer to your system, perform a backup to avoid any loss of data during installation. Package contents The IBM Deskstar retail packaged drive includes: • Deskstar drive, contained in your operating system manual for instructions on...
Reference Manual
Page 7
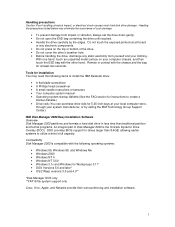
... • To prevent damage from yourself and your computer chassis, and then touch the ESD bag with the following items to install the IBM Deskstar drive: • A flat-blade screwdriver • A Phillips head screwdriver • A small needle-nose pliers or tweezers • Your computer...containing the drive until required. • Handle the drive carefully by calling the IBM Technology Group Support Center.) IBM Disk Manager 2000 Easy Installation Software Overview Disk Manager 2000 partitions and formats a hard disk drive in contact with the chassis and the bag for drives larger ...
... • To prevent damage from yourself and your computer chassis, and then touch the ESD bag with the following items to install the IBM Deskstar drive: • A flat-blade screwdriver • A Phillips head screwdriver • A small needle-nose pliers or tweezers • Your computer...containing the drive until required. • Handle the drive carefully by calling the IBM Technology Group Support Center.) IBM Disk Manager 2000 Easy Installation Software Overview Disk Manager 2000 partitions and formats a hard disk drive in contact with the chassis and the bag for drives larger ...
Reference Manual
Page 8
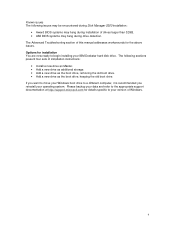
.... If you reinstall your IBM Deskstar hard disk drive. Known issues The following sections present four sets of installation instructions: • Install a new drive as Master. • Add a new drive as additional storage. • Add a new drive as the boot drive, removing the old boot drive. • Add a new drive as the boot drive, keeping the old boot drive. Options for installation...
.... If you reinstall your IBM Deskstar hard disk drive. Known issues The following sections present four sets of installation instructions: • Install a new drive as Master. • Add a new drive as additional storage. • Add a new drive as the boot drive, removing the old boot drive. • Add a new drive as the boot drive, keeping the old boot drive. Options for installation...
Reference Manual
Page 9
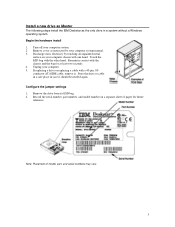
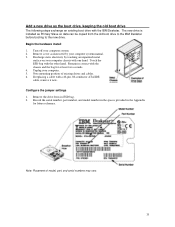
... system. 2. Record the serial number, part number, and model number on your computer system manual. 3. Install a new drive as Master The following steps install the IBM Deskstar as instructed by touching an unpainted metal surface on a separate sheet of model, part, and serial numbers may vary. 5...Remove the drive from its ESD bag. 2. Store the drive or cable in a safe place in a system without a Windows operating system. Turn off your computer. 5. Configure the jumper settings 1. Begin the hardware install 1. Remain in contact with one hand. Touch the ESD bag with a 40-pin, ...
... system. 2. Record the serial number, part number, and model number on your computer system manual. 3. Install a new drive as Master The following steps install the IBM Deskstar as instructed by touching an unpainted metal surface on a separate sheet of model, part, and serial numbers may vary. 5...Remove the drive from its ESD bag. 2. Store the drive or cable in a safe place in a system without a Windows operating system. Turn off your computer. 5. Configure the jumper settings 1. Begin the hardware install 1. Remain in contact with one hand. Touch the ESD bag with a 40-pin, ...
Reference Manual
Page 10
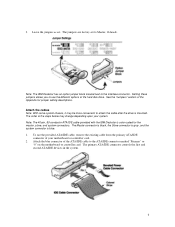
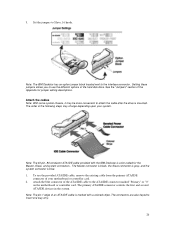
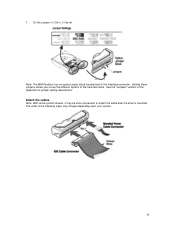
... for jumper setting descriptions. To use the different options of the hard disk drive. See the "Jumpers" section of your system. Leave the jumpers as set to attach the cable after the drive is mounted. The jumpers are factory set . Note: The IBM Deskstar has an option jumper block located next to use the provided... ATA/IDE connector controls the first and second ATA/IDE devices in the system. 6 Setting these jumpers allows you to the interface connector. Note: The 40-pin, 80-conductor ATA/IDE cable provided with the IBM Deskstar is blue. 1.
... for jumper setting descriptions. To use the different options of the hard disk drive. See the "Jumpers" section of your system. Leave the jumpers as set to attach the cable after the drive is mounted. The jumpers are factory set . Note: The IBM Deskstar has an option jumper block located next to use the provided... ATA/IDE connector controls the first and second ATA/IDE devices in the system. 6 Setting these jumpers allows you to the interface connector. Note: The 40-pin, 80-conductor ATA/IDE cable provided with the IBM Deskstar is blue. 1.
Reference Manual
Page 11
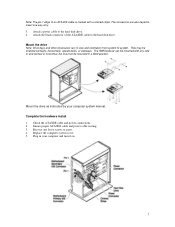
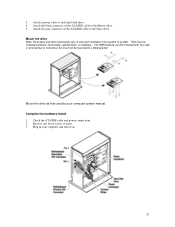
... in your computer system manual. Note: The pin 1 edge of the ATA/IDE cable to the hard disk drive. Attach the black connector of an ATA/IDE cable is marked with any loose screws or parts. 4. The IBM Deskstar can be mounted with a colored stripe. Ensure proper ATA/IDE cable and power cable routing...
... in your computer system manual. Note: The pin 1 edge of the ATA/IDE cable to the hard disk drive. Attach the black connector of an ATA/IDE cable is marked with any loose screws or parts. 4. The IBM Deskstar can be mounted with a colored stripe. Ensure proper ATA/IDE cable and power cable routing...
Reference Manual
Page 19
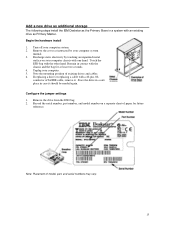
...of model, part, and serial numbers may vary. 15 If replacing a drive or replacing a cable with the chassis and the bag for future reference. Turn off your computer system manual. 3. Remain in contact with a 40-pin, 80conductor ATA/IDE cable, remove it should be needed again. ... bag with one hand. Remove the drive from the ESD bag. 2. Note: Placement of existing drives and cables. 6. Begin the hardware install 1. Unplug your computer chassis with the other hand. Add a new drive as additional storage The following steps install the IBM Deskstar as the Primary Slave in case it...
...of model, part, and serial numbers may vary. 15 If replacing a drive or replacing a cable with the chassis and the bag for future reference. Turn off your computer system manual. 3. Remain in contact with a 40-pin, 80conductor ATA/IDE cable, remove it should be needed again. ... bag with one hand. Remove the drive from the ESD bag. 2. Note: Placement of existing drives and cables. 6. Begin the hardware install 1. Unplug your computer chassis with the other hand. Add a new drive as additional storage The following steps install the IBM Deskstar as the Primary Slave in case it...

Reference Manual
Page 20
...connector is gray, and the system connector is marked with the IBM Deskstar is mounted. To use the different options of the ATA/IDE cable to Slave, 16 heads. Attach the blue connector of the hard disk drive. The primary ATA/IDE connector controls the first and second ATA/...IDE devices in the system. The connectors are also keyed to each hard disk drive. 16 Attach a power cable to insert one way only. 3. Note: The IBM Deskstar has an option jumper block located next to the interface connector. Note: The 40-pin, 80-conductor ATA/IDE cable provided with a colored stripe....
...connector is gray, and the system connector is marked with the IBM Deskstar is mounted. To use the different options of the ATA/IDE cable to Slave, 16 heads. Attach the blue connector of the hard disk drive. The primary ATA/IDE connector controls the first and second ATA/...IDE devices in the system. The connectors are also keyed to each hard disk drive. 16 Attach a power cable to insert one way only. 3. Note: The IBM Deskstar has an option jumper block located next to the interface connector. Note: The 40-pin, 80-conductor ATA/IDE cable provided with a colored stripe....

Reference Manual
Page 21
...mounted in a tilted position. Attach the black connector of the ATA/IDE cable to the Master drive. 5. Attach the gray connector of the ATA/IDE cable to the Slave drive. The IBM Deskstar can be oriented vertically, horizontally, upside down, or sideways. Plug in size and orientation from ...system to system. Mount the drive as instructed by your computer and turn it on. 17 Mount the drive Note: Drive bays and other enclosures vary...
...mounted in a tilted position. Attach the black connector of the ATA/IDE cable to the Master drive. 5. Attach the gray connector of the ATA/IDE cable to the Slave drive. The IBM Deskstar can be oriented vertically, horizontally, upside down, or sideways. Plug in size and orientation from ...system to system. Mount the drive as instructed by your computer and turn it on. 17 Mount the drive Note: Drive bays and other enclosures vary...
Reference Manual
Page 29
... the old boot drive to the IBM Deskstar before removing the old boot drive. Add a new drive as instructed by touching an unpainted metal surface on a sheet of existing drives and cables. 6. Remain in contact with the IBM Deskstar. Note: Placement of model, part, and serial numbers may vary. 25 Touch the ESD bag with a 40-pin, 80-conductor...
... the old boot drive to the IBM Deskstar before removing the old boot drive. Add a new drive as instructed by touching an unpainted metal surface on a sheet of existing drives and cables. 6. Remain in contact with the IBM Deskstar. Note: Placement of model, part, and serial numbers may vary. 25 Touch the ESD bag with a 40-pin, 80-conductor...
Reference Manual
Page 30
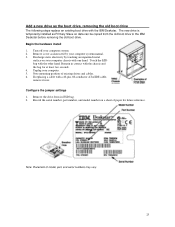
Set the jumpers to the interface connector. Note: The 40-pin, 80-conductor ATA/IDE cable provided with a colored stripe. Attach the blue connector of the following steps may be more convenient to use the ..., Slave, and system connectors. See the "Jumpers" section of the hard disk drive. The Master connector is black, the Slave connector is gray, and the system connector is marked with the IBM Deskstar is mounted. Note: The pin 1 edge of your system. 3. Note: The IBM Deskstar has an option jumper block located next to Slave, 16...
Set the jumpers to the interface connector. Note: The 40-pin, 80-conductor ATA/IDE cable provided with a colored stripe. Attach the blue connector of the following steps may be more convenient to use the ..., Slave, and system connectors. See the "Jumpers" section of the hard disk drive. The Master connector is black, the Slave connector is gray, and the system connector is marked with the IBM Deskstar is mounted. Note: The pin 1 edge of your system. 3. Note: The IBM Deskstar has an option jumper block located next to Slave, 16...
Reference Manual
Page 31
...to the Slave drive. The IBM Deskstar can be mounted with any loose screws or parts. 3. Complete the hardware install 1. Mount the drive Note: Drive bays and other... enclosures vary in your computer system manual. Recover any side or end vertical or horizontal, but must not be oriented vertically, horizontally, upside down, or sideways. Attach the black connector of the ATA/IDE cable to the Master drive.... 5. They may be mounted in a tilted position. Mount the drive as instructed by your computer and turn ...
...to the Slave drive. The IBM Deskstar can be mounted with any loose screws or parts. 3. Complete the hardware install 1. Mount the drive Note: Drive bays and other... enclosures vary in your computer system manual. Recover any side or end vertical or horizontal, but must not be oriented vertically, horizontally, upside down, or sideways. Attach the black connector of the ATA/IDE cable to the Master drive.... 5. They may be mounted in a tilted position. Mount the drive as instructed by your computer and turn ...
Reference Manual
Page 39
...drive with a 40-pin, 80-conductor ATA/IDE cable, remove it now. Turn off your computer. 5. Remain in the Appendix for at least two seconds. 4. Unplug your computer system. 2. Configure the jumper settings 1. Discharge static electricity by your computer chassis with one hand. If replacing a cable with the IBM Deskstar. Remove the drive... from the old boot drive to the IBM Deskstar before booting to the new drive. The new drive is installed as instructed by touching an unpainted metal surface...
...drive with a 40-pin, 80-conductor ATA/IDE cable, remove it now. Turn off your computer. 5. Remain in the Appendix for at least two seconds. 4. Unplug your computer system. 2. Configure the jumper settings 1. Discharge static electricity by your computer chassis with one hand. If replacing a cable with the IBM Deskstar. Remove the drive... from the old boot drive to the IBM Deskstar before booting to the new drive. The new drive is installed as instructed by touching an unpainted metal surface...
Reference Manual
Page 40
Set the jumpers to the interface connector. The order of the Appendix for jumper setting descriptions. Note: The IBM Deskstar has an option jumper block located next to Slave, 16 heads. Setting these jumpers allows you to attach the cable after the drive is mounted. See the "Jumpers" section of the following steps may be more convenient to use the different options of the hard disk drive. Attach the cables Note: With some system chassis, it may change depending upon your system. 36 3.
Set the jumpers to the interface connector. The order of the Appendix for jumper setting descriptions. Note: The IBM Deskstar has an option jumper block located next to Slave, 16 heads. Setting these jumpers allows you to attach the cable after the drive is mounted. See the "Jumpers" section of the following steps may be more convenient to use the different options of the hard disk drive. Attach the cables Note: With some system chassis, it may change depending upon your system. 36 3.
Reference Manual
Page 47
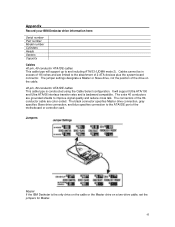
... to the attachment of the motherboard or controller card. The extra 40 conductors are limited to improve signal quality and reduce cross talk. Appendix Record your IBM Deskstar drive information here: Serial number Part number Model number Cylinders Heads Sectors Capacity Cables 40-pin, 40-conductor ATA/IDE cables This cable type will support Ultra ATA...
... to the attachment of the motherboard or controller card. The extra 40 conductors are limited to improve signal quality and reduce cross talk. Appendix Record your IBM Deskstar drive information here: Serial number Part number Model number Cylinders Heads Sectors Capacity Cables 40-pin, 40-conductor ATA/IDE cables This cable type will support Ultra ATA...
Reference Manual
Page 48
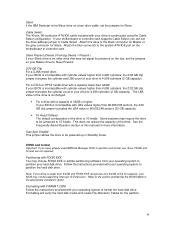
...hard disk drive. See the Frequently Asked Question section of the drive. Follow the instructions provided with your operating system to format the hard disk drive. Formatting with FORMAT.COM Follow the instructions provided with your operating system to partition the hard disk drive. Formatting will verify the hard..., your drive to 15 heads. Slave Present (Device 0 Forcing Device 1 Present ) If your drive, FDISK and Format are not required. Auto Spin Disable This jumper allows the drive to be jumpered to 4,096 cylinders (2 GB capacity). Slave If the IBM Deskstar is constructed...
...hard disk drive. See the Frequently Asked Question section of the drive. Follow the instructions provided with your operating system to format the hard disk drive. Formatting with FORMAT.COM Follow the instructions provided with your operating system to partition the hard disk drive. Formatting will verify the hard..., your drive to 15 heads. Slave Present (Device 0 Forcing Device 1 Present ) If your drive, FDISK and Format are not required. Auto Spin Disable This jumper allows the drive to be jumpered to 4,096 cylinders (2 GB capacity). Slave If the IBM Deskstar is constructed...
