
User Guide
Page 1
DDS Generation 6 USB Tape Drive User's Guide Important: Review the maintenance information in billable service charges. Repairs or exchanges that result from improper maintenance might result in "Cleaning the tape drive heads" on page 15 and Appendix C, "IBM Statement of Limited Warranty Z125-4753-09 08/2006," on page 23, because periodic maintenance is not covered by the IBM warranty.
DDS Generation 6 USB Tape Drive User's Guide Important: Review the maintenance information in billable service charges. Repairs or exchanges that result from improper maintenance might result in "Cleaning the tape drive heads" on page 15 and Appendix C, "IBM Statement of Limited Warranty Z125-4753-09 08/2006," on page 23, because periodic maintenance is not covered by the IBM warranty.
User Guide
Page 6
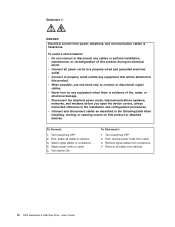
... described in the installation and configuration procedures. Attach signal cables to connect or disconnect signal cables. Remove signal cables from outlet. 3. iv DDS Generation 6 USB Tape Drive: User's Guide To avoid a shock hazard: v Do not connect or disconnect any equipment that will be attached to properly wired outlets any cables or...
... described in the installation and configuration procedures. Attach signal cables to connect or disconnect signal cables. Remove signal cables from outlet. 3. iv DDS Generation 6 USB Tape Drive: User's Guide To avoid a shock hazard: v Do not connect or disconnect any equipment that will be attached to properly wired outlets any cables or...

User Guide
Page 7
... from the World Wide Web 21 Software service and support 22 © Copyright IBM Corp. 2007 v Introduction 1 The IBM Documentation CD 2 Hardware and software requirements 2 Using the Documentation Browser 2 Notices and statements used in this document 3 Chapter 2. Installing the tape drive 5 Installation guidelines 5 Handling static-sensitive devices 5 Unpacking 6 Parts inventory 6 Preinstallation requirements 6 Installing...
... from the World Wide Web 21 Software service and support 22 © Copyright IBM Corp. 2007 v Introduction 1 The IBM Documentation CD 2 Hardware and software requirements 2 Using the Documentation Browser 2 Notices and statements used in this document 3 Chapter 2. Installing the tape drive 5 Installation guidelines 5 Handling static-sensitive devices 5 Unpacking 6 Parts inventory 6 Preinstallation requirements 6 Installing...
User Guide
Page 8
... of Limited Warranty Z125-4753-09 08/2006 23 Part 1 - Hardware service and support 22 IBM Taiwan product service 22 Appendix C. Notices 39 Trademarks 39 Important notes 40 Product recycling and disposal 41 Battery return program 42 Electronic emission notices 44 ... Chinese Class A warning statement 45 Japanese Voluntary Control Council for Interference (VCCI) statement . . . 45 Korean Class A warning statement 46 Index 47 vi DDS Generation 6 USB Tape Drive: User's Guide Country-unique Terms 27 Part 3 -
... of Limited Warranty Z125-4753-09 08/2006 23 Part 1 - Hardware service and support 22 IBM Taiwan product service 22 Appendix C. Notices 39 Trademarks 39 Important notes 40 Product recycling and disposal 41 Battery return program 42 Electronic emission notices 44 ... Chinese Class A warning statement 45 Japanese Voluntary Control Council for Interference (VCCI) statement . . . 45 Korean Class A warning statement 46 Index 47 vi DDS Generation 6 USB Tape Drive: User's Guide Country-unique Terms 27 Part 3 -

User Guide
Page 9
... setup parameters and enable field firmware upgrades v Automatic power-on self-test (POST) The IBM DDS Generation 6 USB tape drive can be installed in a tape-drive enclosure, see http://www-03.ibm.com/servers/eserver/serverproven/ compat/us/xseries/storage/tmatrix.html. For more information, see Appendix...Warranty Z125-4753-09 08/2006," on your system configuration, the illustrations in the option package that support the tape drive, see the documentation that comes with IBM at a sustained rate of up to 12 MB per second. Procedures for locating firmware and documentation might differ ...
... setup parameters and enable field firmware upgrades v Automatic power-on self-test (POST) The IBM DDS Generation 6 USB tape drive can be installed in a tape-drive enclosure, see http://www-03.ibm.com/servers/eserver/serverproven/ compat/us/xseries/storage/tmatrix.html. For more information, see Appendix...Warranty Z125-4753-09 08/2006," on your system configuration, the illustrations in the option package that support the tape drive, see the documentation that comes with IBM at a sustained rate of up to 12 MB per second. Procedures for locating firmware and documentation might differ ...

User Guide
Page 10
...to view the selected document or documents in the language for that region (if available). The IBM Documentation CD The IBM Documentation CD contains documentation for the tape drive in the language for that has additional documents under Topic Description. The Documentation Browser starts ... directory: sh runlinux.sh Select the tape drive from the Product menu. To select more than one document, all the selected documents are listed in the Search field and click Search. Hardware and software requirements The IBM Documentation CD requires the following minimum hardware...
...to view the selected document or documents in the language for that region (if available). The IBM Documentation CD The IBM Documentation CD contains documentation for the tape drive in the language for that has additional documents under Topic Description. The Documentation Browser starts ... directory: sh runlinux.sh Select the tape drive from the Product menu. To select more than one document, all the selected documents are listed in the Search field and click Search. Hardware and software requirements The IBM Documentation CD requires the following minimum hardware...

User Guide
Page 13
... use the general instructions in their static-protective packages until you think is necessary to install the tape drive. v Do not touch solder joints, pins, or exposed circuitry. Installing the tape drive Note: See the documentation that begins on a metal surface. This information will help you ... This drains static electricity from the package and from its frame. Heating reduces indoor humidity and increases static electricity. © Copyright IBM Corp. 2007 5 Make sure that you do not have to build up all attached devices. Movement can stand safely without setting down...
... use the general instructions in their static-protective packages until you think is necessary to install the tape drive. v Do not touch solder joints, pins, or exposed circuitry. Installing the tape drive Note: See the documentation that begins on a metal surface. This information will help you ... This drains static electricity from the package and from its frame. Heating reduces indoor humidity and increases static electricity. © Copyright IBM Corp. 2007 5 Make sure that you do not have to build up all attached devices. Movement can stand safely without setting down...

User Guide
Page 14
... requires mounting rails, use the mounting rails that comes with the tape drive, you need the following items to the IBM Web site. Notes: v Changes are missing or damaged, contact your place of the tape drive package, inspect the shipping container for replacement. For additional information..., see the documentation that are provided with the tape drive in a System x3650 or...
... requires mounting rails, use the mounting rails that comes with the tape drive, you need the following items to the IBM Web site. Notes: v Changes are missing or damaged, contact your place of the tape drive package, inspect the shipping container for replacement. For additional information..., see the documentation that are provided with the tape drive in a System x3650 or...

User Guide
Page 15
... until the rails snap in the bay, using the drive-installation instructions that came with step 4 on the bay. If you mount the tape drive, follow these guidelines: v Make sure that nothing blocks the ventilation slots on rails Retention wire Figure 1. You can Install the drive ...not have the server documentation, install the drive by completing the following steps: 1. Install the tape drive in place. Installing the tape drive 7 Retention wire Clip-on the bottom and rear of the tape drive. v Make sure that no objects such as shown in Figure 1. Locate an available bay...
... until the rails snap in the bay, using the drive-installation instructions that came with step 4 on the bay. If you mount the tape drive, follow these guidelines: v Make sure that nothing blocks the ventilation slots on rails Retention wire Figure 1. You can Install the drive ...not have the server documentation, install the drive by completing the following steps: 1. Install the tape drive in place. Installing the tape drive 7 Retention wire Clip-on the bottom and rear of the tape drive. v Make sure that no objects such as shown in Figure 1. Locate an available bay...
User Guide
Page 16
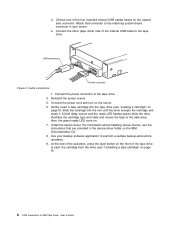
...system-board connector in the device-driver folder on the server. 6. then, the green ready LED turns on page 9). 8 DDS Generation 6 USB Tape Drive: User's Guide At the end of the operation, press the eject button on the front of the internal USB cable to perform a sample ...green while the drive identifies the cartridge type and state and moves the tape to the tape drive. 4. Connect the power cord and turn on the IBM Documentation CD. 8. e. USB connnector Figure 2. Use your server. d. Slide the cartridge into the tape drive (see "Loading a cartridge" on the system side connector. ...
...system-board connector in the device-driver folder on the server. 6. then, the green ready LED turns on page 9). 8 DDS Generation 6 USB Tape Drive: User's Guide At the end of the operation, press the eject button on the front of the internal USB cable to perform a sample ...green while the drive identifies the cartridge type and state and moves the tape to the tape drive. 4. Connect the power cord and turn on the IBM Documentation CD. 8. e. USB connnector Figure 2. Use your server. d. Slide the cartridge into the tape drive (see "Loading a cartridge" on the system side connector. ...

User Guide
Page 17
... the unload button when the ready LED is inserted. After you . 2. To load a tape cartridge, complete the following capabilities and limitations: v Reads and writes DDS Generation 6 cartridges © Copyright IBM Corp. 2007 9 Unloading a tape cartridge This section describes unloading a tape cartridge under normal operation conditions. This might take up to use the procedure in...
... the unload button when the ready LED is inserted. After you . 2. To load a tape cartridge, complete the following capabilities and limitations: v Reads and writes DDS Generation 6 cartridges © Copyright IBM Corp. 2007 9 Unloading a tape cartridge This section describes unloading a tape cartridge under normal operation conditions. This might take up to use the procedure in...
User Guide
Page 18
...Generation 2 or DDS Generation 3 cartridges For optimum performance and maximum storage capacity, use . v Consider reading data off of IBM-recommended tape cartridges, go to http://www.ibm.com/systems/support/ and search for a time equal to the period that the cartridges were exposed to the out-of-specification... environment (up to 40° C (104° F). For a list of tapes and rewriting to new and perhaps more modern tapes every few years....
...Generation 2 or DDS Generation 3 cartridges For optimum performance and maximum storage capacity, use . v Consider reading data off of IBM-recommended tape cartridges, go to http://www.ibm.com/systems/support/ and search for a time equal to the period that the cartridges were exposed to the out-of-specification... environment (up to 40° C (104° F). For a list of tapes and rewriting to new and perhaps more modern tapes every few years....

User Guide
Page 19
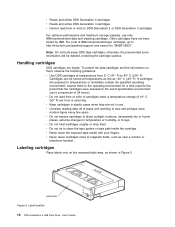
...problem, copy any other part of the cartridge case. 2. If the switch is set to the write-enabled position, data can write to the tape. v Make sure that the labels do not cause a problem, follow these guidelines: v Place only one label at the label location. Inspect the... position of the labels adhere completely to the cartridge. Do not write-protect scratch cartridges; the drive will not be written to the tape. Chapter 3. This enables the software to identify a cartridge that were supplied with the guidelines in accordance with the cartridge. Discard the damaged...
...problem, copy any other part of the cartridge case. 2. If the switch is set to the write-enabled position, data can write to the tape. v Make sure that the labels do not cause a problem, follow these guidelines: v Place only one label at the label location. Inspect the... position of the labels adhere completely to the cartridge. Do not write-protect scratch cartridges; the drive will not be written to the tape. Chapter 3. This enables the software to identify a cartridge that were supplied with the guidelines in accordance with the cartridge. Discard the damaged...

User Guide
Page 20
...that are described in the following situations: v When the clean LED is lit v When you are ejected within 20 seconds of IBM-recommended cleaning cartridges, go to read or write errors occur To clean tape heads, use an audio DAT cleaning cartridge, because the drive cannot recognize it.... IBM cleaning cartridges can be able to http://www.ibm.com/systems/support/ and search for approximately 50 cleaning cycles. Write-protect switch ...
...that are described in the following situations: v When the clean LED is lit v When you are ejected within 20 seconds of IBM-recommended cleaning cartridges, go to read or write errors occur To clean tape heads, use an audio DAT cleaning cartridge, because the drive cannot recognize it.... IBM cleaning cartridges can be able to http://www.ibm.com/systems/support/ and search for approximately 50 cleaning cycles. Write-protect switch ...

User Guide
Page 21
...the status LED functions. If the problem remains, contact IBM support. Clean LED Tape LED Drive LED Ready LED Eject button The following illustration shows an example of the status LEDs on page 15 for operation. heads" on the front panel of the tape drive. Chapter 3. Table 1. Corrective action Make sure ... is being No action is required. Off Off Off On The drive is ready No action is required. Status LED descriptions Clean LED Tape LED Drive LED Ready LED Off Off Off Off Description The drive does not have power. Flashing Off Off Off or The...
...the status LED functions. If the problem remains, contact IBM support. Clean LED Tape LED Drive LED Ready LED Eject button The following illustration shows an example of the status LEDs on page 15 for operation. heads" on the front panel of the tape drive. Chapter 3. Table 1. Corrective action Make sure ... is being No action is required. Off Off Off On The drive is ready No action is required. Status LED descriptions Clean LED Tape LED Drive LED Ready LED Off Off Off Off Description The drive does not have power. Flashing Off Off Off or The...

User Guide
Page 22
... the following steps flashing problem with the in the order listed. Clean the tape drive. 3. Off Flashing Flashing Flashing A firmware Try resetting power to the tape download problem drive. If the problem persists, contact IBM Support. 14 DDS Generation 6 USB Tape Drive: User's Guide See "Updating firmware" on page 15 for more information. 4. Retry...
... the following steps flashing problem with the in the order listed. Clean the tape drive. 3. Off Flashing Flashing Flashing A firmware Try resetting power to the tape download problem drive. If the problem persists, contact IBM Support. 14 DDS Generation 6 USB Tape Drive: User's Guide See "Updating firmware" on page 15 for more information. 4. Retry...

User Guide
Page 23
... the current firmware level vary according to the type of the latest firmware and instructions for installing it, go to the IBM Web site. Find the tape device in this , complete the following steps: 1. Remove the cleaning cartridge from what is not up-to your Linux ... Linux operating system, see "Determining the current Microsoft Windows firmware level" on the tape device. Insert a cleaning cartridge into the drive. v If you are using the instructions at http://www-304.ibm.com/jct01004c/systems/support/ supportsite.wss/docdisplay?lndocid=MIGR-52989&brandind=5000019 . Use ...
... the current firmware level vary according to the type of the latest firmware and instructions for installing it, go to the IBM Web site. Find the tape device in this , complete the following steps: 1. Remove the cleaning cartridge from what is not up-to your Linux ... Linux operating system, see "Determining the current Microsoft Windows firmware level" on the tape device. Insert a cleaning cartridge into the drive. v If you are using the instructions at http://www-304.ibm.com/jct01004c/systems/support/ supportsite.wss/docdisplay?lndocid=MIGR-52989&brandind=5000019 . Use ...
User Guide
Page 24
...Properties. 5. This will display the registry entry for "tape files". If the connection is correctly connected to http://www.ibm.com/ systems/support/ and search for the tape drive and the Microsoft Windows revision level on the tape device. The server does not start If the server does...working , complete the following steps: 1. The tape drive fails the power-on self-test If the tape drive fails the power-on the tape drive. 3. If the tape drive still fails the POST, contact IBM Support. v IBM Support might ask you install the tape drive, complete the following steps: 1. Make ...
...Properties. 5. This will display the registry entry for "tape files". If the connection is correctly connected to http://www.ibm.com/ systems/support/ and search for the tape drive and the Microsoft Windows revision level on the tape device. The server does not start If the server does...working , complete the following steps: 1. The tape drive fails the power-on self-test If the tape drive fails the power-on the tape drive. 3. If the tape drive still fails the POST, contact IBM Support. v IBM Support might ask you install the tape drive, complete the following steps: 1. Make ...
User Guide
Page 25
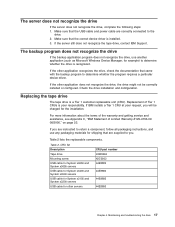
...not recognize the drive, complete the following steps: 1. If IBM installs a Tier 1 CRU at your responsibility. Table 2 lists the replaceable components. Replacing the tape drive The tape drive is recognized. CRU list Description Tape drive Mounting screw USB cable for System x3650 and System x3655... CRU part number 43W8494 42C3933 44E8883 44E8884 44E8885 44E8893 Chapter 4. Table 2. If the server still does not recognize the tape drive, contact IBM Support. If the other application does not recognize the drive, the drive might not be charged for other application recognizes ...
...not recognize the drive, complete the following steps: 1. If IBM installs a Tier 1 CRU at your responsibility. Table 2 lists the replaceable components. Replacing the tape drive The tape drive is recognized. CRU list Description Tape drive Mounting screw USB cable for System x3650 and System x3655... CRU part number 43W8494 42C3933 44E8883 44E8884 44E8885 44E8893 Chapter 4. Table 2. If the server still does not recognize the tape drive, contact IBM Support. If the other application does not recognize the drive, the drive might not be charged for other application recognizes ...

User Guide
Page 26
... Reinstall the server covers. Use the instructions that are provided with the server. 4. Remove the tape drive from the tape drive. 5. Removing the tape drive To remove the tape drive, complete the following steps: 1. Make sure that the server is turned off and that ...iii and "Installation guidelines" on page 5. 2. Connect the other (tape drive) side of the internal USB cable to the tape drive. 6. v Also review the Customer Responsibilities document. See http://www304.ibm.com/jct01004c/systems/support/supportsite.wss/ docdisplay?lndocid=MIGR-52989&brandind=5000019....
... Reinstall the server covers. Use the instructions that are provided with the server. 4. Remove the tape drive from the tape drive. 5. Removing the tape drive To remove the tape drive, complete the following steps: 1. Make sure that the server is turned off and that ...iii and "Installation guidelines" on page 5. 2. Connect the other (tape drive) side of the internal USB cable to the tape drive. 6. v Also review the Customer Responsibilities document. See http://www304.ibm.com/jct01004c/systems/support/supportsite.wss/ docdisplay?lndocid=MIGR-52989&brandind=5000019....

