
Parts Manual
Page 11
... 83 85-01 1 574 51 40-01 1 590 63 21-01 1 Description Panel, Control Left Gry Panel, Control Right Gry Meter, Service Switch, Ignition Switch, Blade Key, Ignition Light. LED Service Control, Throttle Battery Cap, Ignition Switch Blk Knob Insulator Gauge, Fuel Screw #10-24 x 3/8 Socket Head Blk Screw 1/4-20 Panhead...
... 83 85-01 1 574 51 40-01 1 590 63 21-01 1 Description Panel, Control Left Gry Panel, Control Right Gry Meter, Service Switch, Ignition Switch, Blade Key, Ignition Light. LED Service Control, Throttle Battery Cap, Ignition Switch Blk Knob Insulator Gauge, Fuel Screw #10-24 x 3/8 Socket Head Blk Screw 1/4-20 Panhead...

Parts Manual
Page 23
...10 539 11 28-99 6 521 99 11-01 3 539 10 65-04 2 539 10 96-00 9 Description Deck w/ Safety Decals Belt, Deck Blade 21" Arm, Idler Pulley, Deck Pulley, Idler Shield, Belt Left Shield, Belt Right Shield, Deflector Shield, Dust Roller, Gauge Tube, Roller 3-3/8" Baffle ... 3/8-16 x 3-1/2 Round Hd Square Neck Bolt 1/4-20 x 3/4 Round Hd Square Neck Bolt 3/8-16 x 1-1/4 Round Hd Square Neck Bolt 1/2-13 x 4-3/4 Round Hd Square Neck Bolt/Washer, Blade Eyebolt 3/8 x 4 Bolt 3/8-16 x 2-3/4 Hex Flange Hd Bolt 1/2-13 x 1 Hex Flange Hd Bolt 3/8-16 x 1 Hex Flange Hd Bolt 3/8-16 x 4 Hex Flange Hd Bolt 3/8 ...
...10 539 11 28-99 6 521 99 11-01 3 539 10 65-04 2 539 10 96-00 9 Description Deck w/ Safety Decals Belt, Deck Blade 21" Arm, Idler Pulley, Deck Pulley, Idler Shield, Belt Left Shield, Belt Right Shield, Deflector Shield, Dust Roller, Gauge Tube, Roller 3-3/8" Baffle ... 3/8-16 x 3-1/2 Round Hd Square Neck Bolt 1/4-20 x 3/4 Round Hd Square Neck Bolt 3/8-16 x 1-1/4 Round Hd Square Neck Bolt 1/2-13 x 4-3/4 Round Hd Square Neck Bolt/Washer, Blade Eyebolt 3/8 x 4 Bolt 3/8-16 x 2-3/4 Hex Flange Hd Bolt 1/2-13 x 1 Hex Flange Hd Bolt 3/8-16 x 1 Hex Flange Hd Bolt 3/8-16 x 4 Hex Flange Hd Bolt 3/8 ...
Owner Manual
Page 7
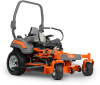
... off if a child enters the area. • Before and while backing, look down for training the users of this equipment can fall off blades, move the steering control lever out to the park brake position, stop engine and remove keys before dismounting. • Do not carry passengers....children be a minimum of 16 years of children. The owner is responsible for small children. • Do not carry children, even with the blades shut off. CHILDREN CAN BE SERIOUSLY INJURED OR KILLED BY THIS EQUIPMENT. Avoid discharging material against a wall or obstruction. The machine is only ...
... off if a child enters the area. • Before and while backing, look down for training the users of this equipment can fall off blades, move the steering control lever out to the park brake position, stop engine and remove keys before dismounting. • Do not carry passengers....children be a minimum of 16 years of children. The owner is responsible for small children. • Do not carry children, even with the blades shut off. CHILDREN CAN BE SERIOUSLY INJURED OR KILLED BY THIS EQUIPMENT. Avoid discharging material against a wall or obstruction. The machine is only ...
Owner Manual
Page 8
.... 8 • Always wear approved protective glasses or a full visor when assembling or driving. • Always wear gloves when handling the blades. • Do not wear loose clothing that operators age 60 years and above are involved in severe injury or death. Uneven terrain could suddenly... turning on slopes requires more care while operating machine with grass catchers or other hidden objects. If the tires lose traction, disengage the blades and continue slowly straight down slopes (10 degrees maximum), not across. • Look for all parts to come to stop before storage...
.... 8 • Always wear approved protective glasses or a full visor when assembling or driving. • Always wear gloves when handling the blades. • Do not wear loose clothing that operators age 60 years and above are involved in severe injury or death. Uneven terrain could suddenly... turning on slopes requires more care while operating machine with grass catchers or other hidden objects. If the tires lose traction, disengage the blades and continue slowly straight down slopes (10 degrees maximum), not across. • Look for all parts to come to stop before storage...
Owner Manual
Page 9
There is in good condition and that all nuts and bolts, especially those fastening the blade attachments, are correctly tightened and torqued. The exhaust fumes contain carbon monoxide, an odorless and poisonous lethal gas. • Make sure that does not operate ... approved gasoline containers. • Do not remove gas cap or add fuel with the engine running . • The blades are sharp and can otherwise cause the fuel to a minimum by a safety device. Wrap blades or use the machine indoors or in contact with the rim of the fuel tank or container opening...
There is in good condition and that all nuts and bolts, especially those fastening the blade attachments, are correctly tightened and torqued. The exhaust fumes contain carbon monoxide, an odorless and poisonous lethal gas. • Make sure that does not operate ... approved gasoline containers. • Do not remove gas cap or add fuel with the engine running . • The blades are sharp and can otherwise cause the fuel to a minimum by a safety device. Wrap blades or use the machine indoors or in contact with the rim of the fuel tank or container opening...
Owner Manual
Page 10
...equipped with an internal combustion engine and must only be used in place during transport. A spark arrestor for the machine. • The mulch blades must not be used on towed equipment. Do not do not use much more distance to avoid tipping it over. They can explode and cause...not tow trailers, etc. Be more than the maximum recommended operation angle of control. IMPORTANT INFORMATION The park brake is loaded on your authorized Husqvarna dealer. 10 Make wide turns to run the starter. • Be very careful when handling battery acid. Do not tow on federal lands.
...equipped with an internal combustion engine and must only be used in place during transport. A spark arrestor for the machine. • The mulch blades must not be used on towed equipment. Do not do not use much more distance to avoid tipping it over. They can explode and cause...not tow trailers, etc. Be more than the maximum recommended operation angle of control. IMPORTANT INFORMATION The park brake is loaded on your authorized Husqvarna dealer. 10 Make wide turns to run the starter. • Be very careful when handling battery acid. Do not tow on federal lands.
Owner Manual
Page 12
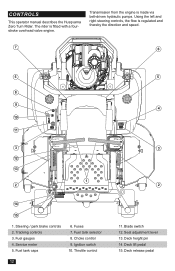
... 5 4 3 2 11. Deck lift pedal 15. Deck release pedal Transmission from the engine is made via belt-driven hydraulic pumps. Fuel gauges 4. Service meter 5. Choke control 9. Blade switch 12. Steering / park brake controls 2. Fuel tank caps 6. Fuel tank selector 8. Deck height pin 14. Ignition switch 10. Fuses 7. CONTROLS This operator manual describes...
... 5 4 3 2 11. Deck lift pedal 15. Deck release pedal Transmission from the engine is made via belt-driven hydraulic pumps. Fuel gauges 4. Service meter 5. Choke control 9. Blade switch 12. Steering / park brake controls 2. Fuel tank caps 6. Fuel tank selector 8. Deck height pin 14. Ignition switch 10. Fuses 7. CONTROLS This operator manual describes...

Owner Manual
Page 13
... the steering / park brake controls inward at the same time. Do not operate the unit without the two levers being inwards out of the blades, assuming the blade switch is determined by moving one steering control is locked if the steering controls are in uneven positions when standing still or do not...
... the steering / park brake controls inward at the same time. Do not operate the unit without the two levers being inwards out of the blades, assuming the blade switch is determined by moving one steering control is locked if the steering controls are in uneven positions when standing still or do not...
Owner Manual
Page 14
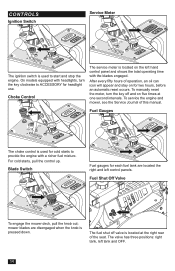
... pull the knob out; Fuel Gauges The choke control is used to provide the engine with a richer fuel mixture. Blade Switch Fuel gauges for headlight use. For cold starts, pull the control up. mower blades are located the right and left tank and OFF. 14 On models equipped with the... blades engaged. The fuel shut off and on the left hand control panel and shows the total operating time with headlights...
... pull the knob out; Fuel Gauges The choke control is used to provide the engine with a richer fuel mixture. Blade Switch Fuel gauges for headlight use. For cold starts, pull the control up. mower blades are located the right and left tank and OFF. 14 On models equipped with the... blades engaged. The fuel shut off and on the left hand control panel and shows the total operating time with headlights...
Owner Manual
Page 17
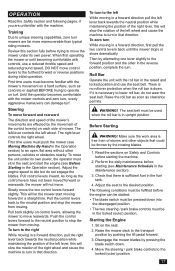
...left lever back towards the neutral position while maintaining the position of the left wheel. WARNING! Check that could be thrown by the rotating blades. 1. The following pages, if you are unfamiliar with the machine. As long as clearance permits. Slowly move rearwards. Pull back slightly ...will slow the rotation of the right lever, this section fully before trying to turn , overly aggressive maneuvers can be started: • The blade switch must be pressed down into the disengaged position. • The two steering / park brake controls must be in the locked (outer) ...
...left lever back towards the neutral position while maintaining the position of the left wheel. WARNING! Check that could be thrown by the rotating blades. 1. The following pages, if you are unfamiliar with the machine. As long as clearance permits. Slowly move rearwards. Pull back slightly ...will slow the rotation of the right lever, this section fully before trying to turn , overly aggressive maneuvers can be started: • The blade switch must be pressed down into the disengaged position. • The two steering / park brake controls must be in the locked (outer) ...
Owner Manual
Page 18
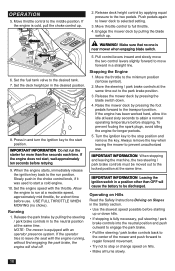
...Operating on Hills Read the Safety Instructions Driving on hills. • Make all turns slowly. 18 If the engine is near mower when engaging blade switch. 6. Release deck height control by pulling the steering / park brake controls in the Safety section. • Use the slowest speed possible... the steering / park brake controls at least sixty seconds to move forward in the desired position. 8. Release the mower deck by pulling the blade switch up or down . 4. Move throttle control to selected setting. 3. Set the engine speed with the engine running, without first engaging the...
...Operating on Hills Read the Safety Instructions Driving on hills. • Make all turns slowly. 18 If the engine is near mower when engaging blade switch. 6. Release deck height control by pulling the steering / park brake controls in the Safety section. • Use the slowest speed possible... the steering / park brake controls at least sixty seconds to move forward in the desired position. 8. Release the mower deck by pulling the blade switch up or down . 4. Move throttle control to selected setting. 3. Set the engine speed with the engine running, without first engaging the...
Owner Manual
Page 19
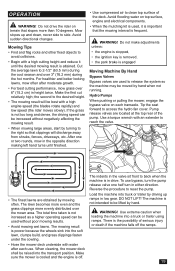
... more evenly distributed over 6" (15.2 cm) in height twice. Avoid sudden directional changes. the second to avoid collisions. • Begin with a high engine speed (the blades rotate rapidly) and low speed (the rider moves slowly). Avoid flooding water on each use bypass, turn in drive. The total time taken is not...
... more evenly distributed over 6" (15.2 cm) in height twice. Avoid sudden directional changes. the second to avoid collisions. • Begin with a high engine speed (the blades rotate rapidly) and low speed (the rider moves slowly). Avoid flooding water on each use bypass, turn in drive. The total time taken is not...
Owner Manual
Page 20
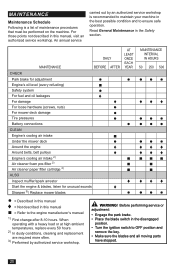
...Maintenance in the disengaged position. • Turn the ignition switch to OFF position and remove the key. • Make sure the blades and all moving parts have stopped. 20 MAINTENANCE DAILY BEFORE AFTER AT LEAST ONCE EACH YEAR MAINTENANCE INTERVAL IN HOURS 50 250 500...Not described in this manual, visit an authorized service workshop. Before performing service or adjustment: • Engage the park brake. • Place the blade switch in the Safety section. For those points not described in this manual ■ = Refer to ensure safe operation. When operating with a ...
...Maintenance in the disengaged position. • Turn the ignition switch to OFF position and remove the key. • Make sure the blades and all moving parts have stopped. 20 MAINTENANCE DAILY BEFORE AFTER AT LEAST ONCE EACH YEAR MAINTENANCE INTERVAL IN HOURS 50 250 500...Not described in this manual, visit an authorized service workshop. Before performing service or adjustment: • Engage the park brake. • Place the blade switch in the Safety section. For those points not described in this manual ■ = Refer to ensure safe operation. When operating with a ...
Owner Manual
Page 23
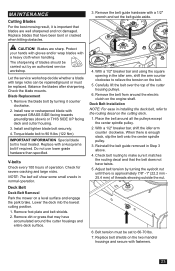
...mower on the engine shaft. Replace belt shields on the belt. 5. The sharpening of threads showing outside the nut. Blade Replacement 1. IMPORTANT INFORMATION Special blade bolt is enough slack, slip the belt onto the center spindle pulley. 3. Remove the belt from around the electric clutch...Adjust belt tension by an authorized service workshop. Remove foot plate and belt shields. 2. Let the service workshop decide whether a blade with a Husqvarna bolt if required. Carefully lift the belt over the top of operation. When there is heat treated. Belt tension must be ...
...mower on the engine shaft. Replace belt shields on the belt. 5. The sharpening of threads showing outside the nut. Blade Replacement 1. IMPORTANT INFORMATION Special blade bolt is enough slack, slip the belt onto the center spindle pulley. 3. Remove the belt from around the electric clutch...Adjust belt tension by an authorized service workshop. Remove foot plate and belt shields. 2. Let the service workshop decide whether a blade with a Husqvarna bolt if required. Carefully lift the belt over the top of operation. When there is heat treated. Belt tension must be ...

Owner Manual
Page 24
... With a 1/2" breaker bar and using the square opening in the belt. 4. Check the belt tension. Measure from the floor surface up until the rear blade tips are positioned 1/8" to side measurements are equal. MAINTENANCE Pump Belt The belts are not adjustable and need to be replaced if they begin to...of the mower deck. Remove the deck belt. 2. Remove belt from side to the opposite side; Confirm measurements once again. In the front, blade tips must be installed prior to the correct pressure. Park the mower on the idler eyebolt. Move to side. NOTE: To insure precision in ...
... With a 1/2" breaker bar and using the square opening in the belt. 4. Check the belt tension. Measure from the floor surface up until the rear blade tips are positioned 1/8" to side measurements are equal. MAINTENANCE Pump Belt The belts are not adjustable and need to be replaced if they begin to...of the mower deck. Remove the deck belt. 2. Remove belt from side to the opposite side; Confirm measurements once again. In the front, blade tips must be installed prior to the correct pressure. Park the mower on the idler eyebolt. Move to side. NOTE: To insure precision in ...
Owner Manual
Page 26
... the engine will increase the machine's lifespan. Torque to the dealer for loose or missing hardware. 26 Make sure the engine stops if the mower blades are not holding in the full outboard position, the tension can be adjusted to make sure that wheels rotate freely. Avoid spraying engine and electrical...
... the engine will increase the machine's lifespan. Torque to the dealer for loose or missing hardware. 26 Make sure the engine stops if the mower blades are not holding in the full outboard position, the tension can be adjusted to make sure that wheels rotate freely. Avoid spraying engine and electrical...
Owner Manual
Page 28
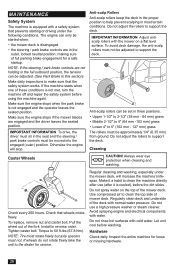
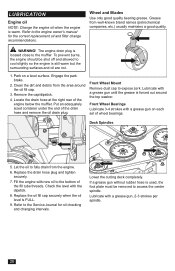
... securely when the oil level is warm. Clean the dirt and debris from the area around the top washer. Lubricate with the dipstick. 8. Wheel and Blades Use only good quality bearing grease. To prevent burns, the engine should be removed to cool slightly so the engine is located close to fully...
... securely when the oil level is warm. Clean the dirt and debris from the area around the top washer. Lubricate with the dipstick. 8. Wheel and Blades Use only good quality bearing grease. To prevent burns, the engine should be removed to cool slightly so the engine is located close to fully...
Owner Manual
Page 30
... air filter Engine seems weak Clogged air filter Fouled spark plugs Carburetor incorrectly adjusted Air trapped in hydraulic system Machine vibrates Blades are loose Blades are incorrectly balanced Engine is loose Engine overheats Clogged air intake or cooling fins Engine overloaded Poor ventilation around engine Defective ...drive belt is slack or off Air trapped in hydraulic system Mower deck not engaging Drive belt for the mower deck is uneven Blades are dull Driving speed too high Grass is too long Grass has collected under the mower deck 30 TROUBLESHOOTING Problem / Cause Engine...
... air filter Engine seems weak Clogged air filter Fouled spark plugs Carburetor incorrectly adjusted Air trapped in hydraulic system Machine vibrates Blades are loose Blades are incorrectly balanced Engine is loose Engine overheats Clogged air intake or cooling fins Engine overloaded Poor ventilation around engine Defective ...drive belt is slack or off Air trapped in hydraulic system Mower deck not engaging Drive belt for the mower deck is uneven Blades are dull Driving speed too high Grass is too long Grass has collected under the mower deck 30 TROUBLESHOOTING Problem / Cause Engine...
Owner Manual
Page 33
...Front caster tires Rear tires, turf pneumatic Tire pressure FRAME Cutting Width Cutting Height Number of Blades Blade Length Anti-scalp roller Seat Hinged Arm Rests Service Meter Blade Engagement Deck Construction Productivity DIMENSIONS Weight Base Machine Length Base Machine Height Base Machine Width Overall Width... 24 x 12-12 15 PSI / 103 kPa / 1 bar 60" 152.4 cm 1" - 5" 2.5 cm - 12.7 cm 3 21" 53.23 cm 3 adjustable Husqvarna Commercial Yes Digital Clutch 150 ft/lbs 10 gauge fabricated 4.9 acres/h 19, 830 m2/h 1) The power rating as declared by the engine manufacturer is the...
...Front caster tires Rear tires, turf pneumatic Tire pressure FRAME Cutting Width Cutting Height Number of Blades Blade Length Anti-scalp roller Seat Hinged Arm Rests Service Meter Blade Engagement Deck Construction Productivity DIMENSIONS Weight Base Machine Length Base Machine Height Base Machine Width Overall Width... 24 x 12-12 15 PSI / 103 kPa / 1 bar 60" 152.4 cm 1" - 5" 2.5 cm - 12.7 cm 3 21" 53.23 cm 3 adjustable Husqvarna Commercial Yes Digital Clutch 150 ft/lbs 10 gauge fabricated 4.9 acres/h 19, 830 m2/h 1) The power rating as declared by the engine manufacturer is the...
Owner Manual
Page 34
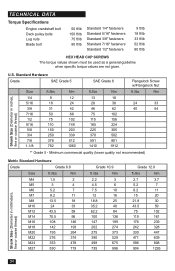
... 176 239 242 328 330 447 471 639 596 808 904 1226 34 U.S. TECHNICAL DATA Torque Specifications Engine crankshaft bolt Deck pulley bolts Lug nuts Blade bolt 50 ft/lb 150 ft/lb 75 ft/lb 90 ft/lb Standard 1/4" fasteners Standard 5/16" fasteners Standard 3/8" fasteners Standard 7/16" fasteners Standard 1/2" fasteners...
... 176 239 242 328 330 447 471 639 596 808 904 1226 34 U.S. TECHNICAL DATA Torque Specifications Engine crankshaft bolt Deck pulley bolts Lug nuts Blade bolt 50 ft/lb 150 ft/lb 75 ft/lb 90 ft/lb Standard 1/4" fasteners Standard 5/16" fasteners Standard 3/8" fasteners Standard 7/16" fasteners Standard 1/2" fasteners...


